litespeed
 News Reporter
England - North West, United Kingdom
Joined: October 15, 2009
KitMaker: 1,976 posts
AeroScale: 1,789 posts
Posted: Monday, October 05, 2015 - 12:26 AM UTC
Joel_W
Associate Editor New York, United States
Joined: December 04, 2010
KitMaker: 11,666 posts
AeroScale: 7,410 posts
Posted: Monday, October 05, 2015 - 07:15 PM UTC
Tim,
Glad you're back to the bench after a summer off. I'll be following your build blog to it's conclusion with one of your superb builds. Either paint scheme should prove to be quite striking.
As usual, your meticulous attention to details has spotted and removed all those injector pin marks.
Looking forward to your next update.
Joel
On my Workbench:
Monogram 1/24 scale 427 Shelby Cobra
Just Completed:
Beemax 1/24 scale BMW M3 E30 1992 Evolution II
litespeed
News Reporter England - North West, United Kingdom
Joined: October 15, 2009
KitMaker: 1,976 posts
AeroScale: 1,789 posts
Posted: Tuesday, October 06, 2015 - 12:56 AM UTC
Thanks Joel always good to have you along on a kit build blog.

California, United States
Joined: May 07, 2009
KitMaker: 189 posts
AeroScale: 73 posts
Posted: Tuesday, October 06, 2015 - 03:03 AM UTC
Can't wait to see more! One of my favorite passed over aircraft.
litespeed
News Reporter England - North West, United Kingdom
Joined: October 15, 2009
KitMaker: 1,976 posts
AeroScale: 1,789 posts
Posted: Wednesday, October 07, 2015 - 12:28 AM UTC
Quoted Text
Can't wait to see more! One of my favorite passed over aircraft.
Great to have you along Alan. I must admit the type has really grown on me. I have really enjoyed looking at the film footage of the XL on Youtube.
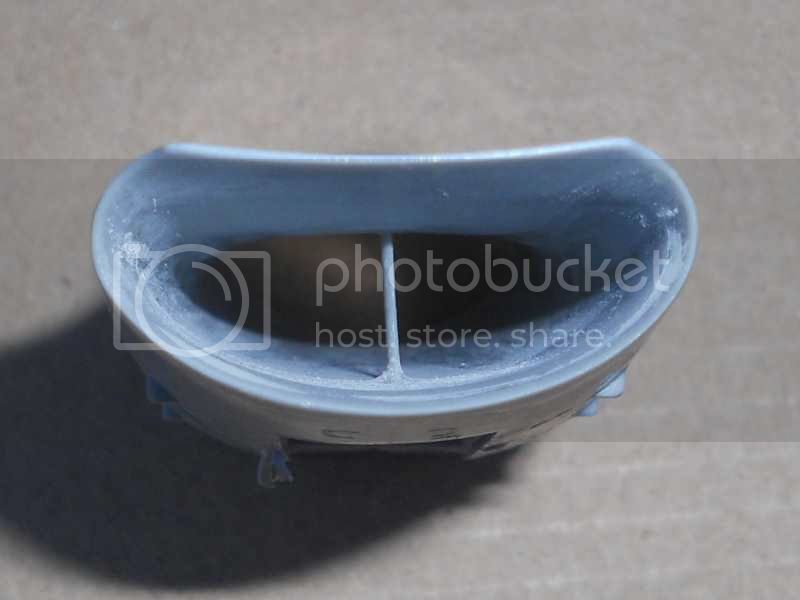
I glued the completed forward section of the air intake trunk to the outer fairings and to the intake lip. As mentioned above I did not have to alter any of the parts for a reasonable fit. But the joins needed some attention with filler and sanding especially between the intake duct and lip. I am pretty happy with the results.
I will sand the join inside the duct with some fine wet and dry before painting. I used super glue as a filler with a little bit of talc sprinkled on top.

To be continued

Joel_W
Associate Editor New York, United States
Joined: December 04, 2010
KitMaker: 11,666 posts
AeroScale: 7,410 posts
Posted: Wednesday, October 07, 2015 - 12:49 AM UTC
Tim,
Nice work on that intake. It really looks quite good.
Joel
On my Workbench:
Monogram 1/24 scale 427 Shelby Cobra
Just Completed:
Beemax 1/24 scale BMW M3 E30 1992 Evolution II
litespeed
News Reporter England - North West, United Kingdom
Joined: October 15, 2009
KitMaker: 1,976 posts
AeroScale: 1,789 posts
Posted: Wednesday, October 07, 2015 - 01:35 AM UTC
I think once the abrasive marks are removed and the strut shape is refined a little, the intake will look fine Joel. I'm just working on the second part of the duct leading up to the compressor fan.
tim
Joel_W
Associate Editor New York, United States
Joined: December 04, 2010
KitMaker: 11,666 posts
AeroScale: 7,410 posts
Posted: Wednesday, October 07, 2015 - 11:03 PM UTC
Quoted Text
I think once the abrasive marks are removed and the strut shape is refined a little, the intake will look fine Joel. I'm just working on the second part of the duct leading up to the compressor fan.
tim
Tim,
Just about every jet I've built to date, the intakes always seem to have some of the nastiest seams found in that kit. It's almost like the kit manufactures think that no one will ever look down into them.
The work you've done so far sure looks like the finished assembly will have corrected that major issue.
Joel
On my Workbench:
Monogram 1/24 scale 427 Shelby Cobra
Just Completed:
Beemax 1/24 scale BMW M3 E30 1992 Evolution II
litespeed
News Reporter England - North West, United Kingdom
Joined: October 15, 2009
KitMaker: 1,976 posts
AeroScale: 1,789 posts
Posted: Friday, October 09, 2015 - 01:35 AM UTC
Quoted Text
Tim,
Just about every jet I've built to date, the intakes always seem to have some of the nastiest seams found in that kit. It's almost like the kit manufactures think that no one will ever look down into them.
Joel
You are spot on in your assessment of most jet kits Joel
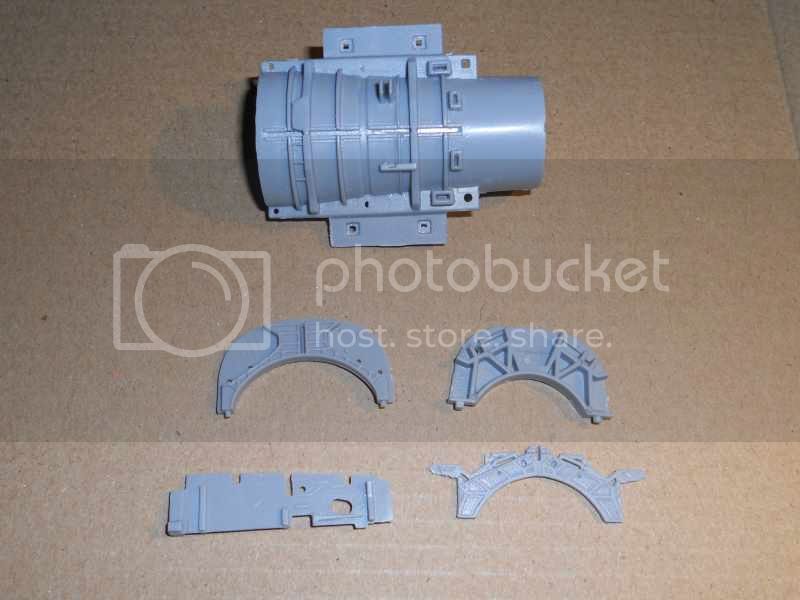
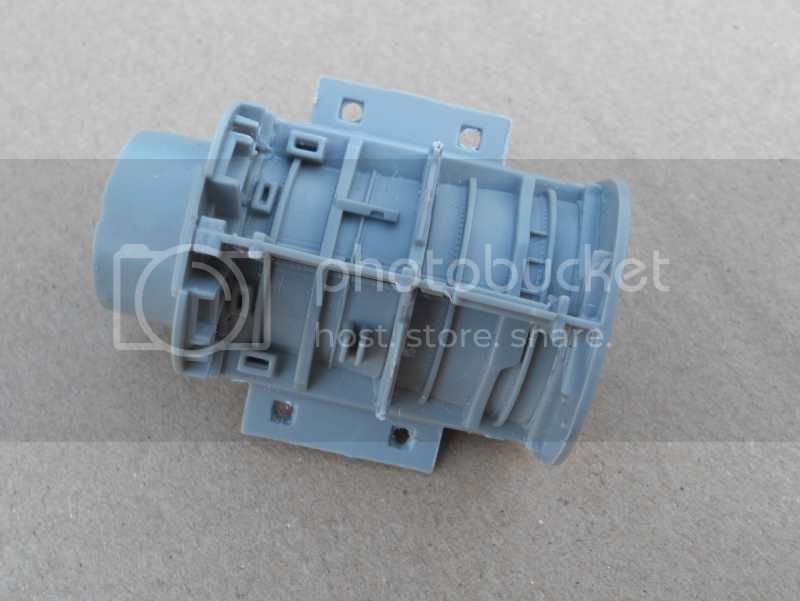
The main undercarriage bay has a fair few parts to build up the detail. At this point I have built up the main walls. I will add further detail from the kit later.The observant amongst you will notice that the door actuators have been removed in the image of the assembled gear bay. In my haste to put the bay together I failed to realise that I cannot fit the assembled bay into the fuselage with the actuators on. A case of me trying to be smart and not following the instructions

They will be re attached later in the build.
To be continued
litespeed
News Reporter England - North West, United Kingdom
Joined: October 15, 2009
KitMaker: 1,976 posts
AeroScale: 1,789 posts
Posted: Friday, October 09, 2015 - 10:48 PM UTC
Hi all
Here is a short documentary from Youtube on the F-16XL.
Enjoy
litespeed
News Reporter England - North West, United Kingdom
Joined: October 15, 2009
KitMaker: 1,976 posts
AeroScale: 1,789 posts
Posted: Sunday, October 11, 2015 - 12:02 AM UTC
Hi all
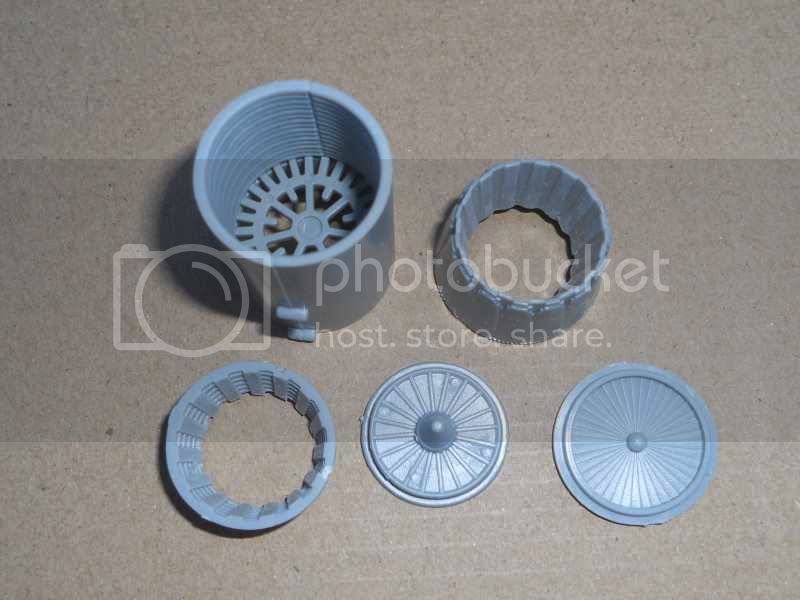
The jet pipe was cleaned up a bit, although I have left the recessed ejector marks in the forward smoother part of the pipe as they wont be seen behind the re heat matrix. For this build I have been using Revells sprue snips for the first time and I have been very impressed. Normally I separate the parts from the sprue using a Stanley knife. A friend suggested using the snips so I bought a pair. It has really reduced the amount of damage to the plastic surface compared to using a knife. I primed the parts and applied Halfords rattle can aluminium over all the parts. I will weather the parts towards the end of the build to break up the rather monotonous looking colour. The assembled jet pipe and nozzle needs to be put in place before the fuselage halves are joined.
To be continued
Joel_W
Associate Editor New York, United States
Joined: December 04, 2010
KitMaker: 11,666 posts
AeroScale: 7,410 posts
Posted: Sunday, October 11, 2015 - 01:04 AM UTC
Tim,
Thanks for the link to that You Tube Vid. It was quite informative for someone like me whose not really an aviation enthusiast, but rather a hard core plastic scale modeler.
The start of the exhaust can looks good with that base Aluminum coat.
Joel
On my Workbench:
Monogram 1/24 scale 427 Shelby Cobra
Just Completed:
Beemax 1/24 scale BMW M3 E30 1992 Evolution II
litespeed
News Reporter England - North West, United Kingdom
Joined: October 15, 2009
KitMaker: 1,976 posts
AeroScale: 1,789 posts
Posted: Sunday, October 11, 2015 - 02:24 AM UTC
Quoted Text
It was quite informative for someone like me whose not really an aviation enthusiast, but rather a hard core plastic scale modeler.
Joel
That's interesting Joel. I'm a hard core aviation enthusiast that dabbles with plastic aircraft kits

tim
litespeed
News Reporter England - North West, United Kingdom
Joined: October 15, 2009
KitMaker: 1,976 posts
AeroScale: 1,789 posts
Posted: Sunday, October 11, 2015 - 02:42 AM UTC
Here is the late Marta Bohn-Meyer explaining the efforts to optimize and maintain the supersonic laminar flow on the F-16XL. She was the project manager for the programme. Although the laminar wing does not feature in the kit its none the less a fascinating interview and a good insight into the work to improve wing efficiency using the F-16XL.
Enjoy
Joel_W
Associate Editor New York, United States
Joined: December 04, 2010
KitMaker: 11,666 posts
AeroScale: 7,410 posts
Posted: Monday, October 12, 2015 - 01:21 AM UTC
Tim.
Thanks for yet another link.
If anything I'm a hard core road racing enthusiast from the early 60s thru the 80s, yet I don't model race cars. Go figure.

Joel
On my Workbench:
Monogram 1/24 scale 427 Shelby Cobra
Just Completed:
Beemax 1/24 scale BMW M3 E30 1992 Evolution II
litespeed
News Reporter England - North West, United Kingdom
Joined: October 15, 2009
KitMaker: 1,976 posts
AeroScale: 1,789 posts
Posted: Tuesday, October 13, 2015 - 04:01 AM UTC
Quoted Text
If anything I'm a hard core road racing enthusiast from the early 60s thru the 80s, yet I don't model race cars. Go figure.
Joel
Maybe Joel we know deep down we could not do justice to the things we are most interested in with a model.
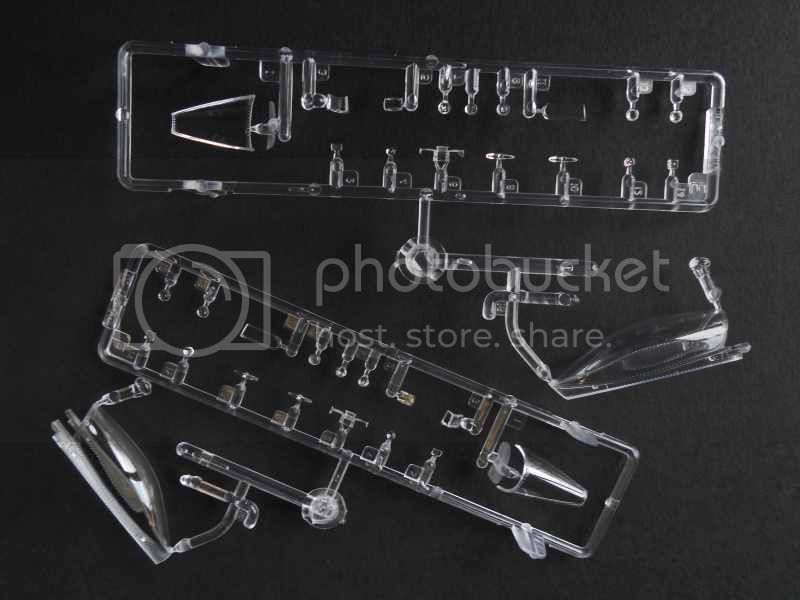
Anyone that has read my review of this kit will know that I was very disappointed with the damage to the canopies. Well good news, Skunkmodel Works has sent me a couple of replacement sprues! They look really good. Well done Skunkmodel Works customers service
To be continued
litespeed
News Reporter England - North West, United Kingdom
Joined: October 15, 2009
KitMaker: 1,976 posts
AeroScale: 1,789 posts
Posted: Wednesday, October 14, 2015 - 03:27 AM UTC
Hi all.
The two part radome has some damage to both probes, probably a blessing in disguise as they are oversized anyway. After gluing the two halves I added a fair bit of lead cut up from an off cut from a roof repair. A filled the cavity two thirds of the way. I should have measured the weight but I forgot.
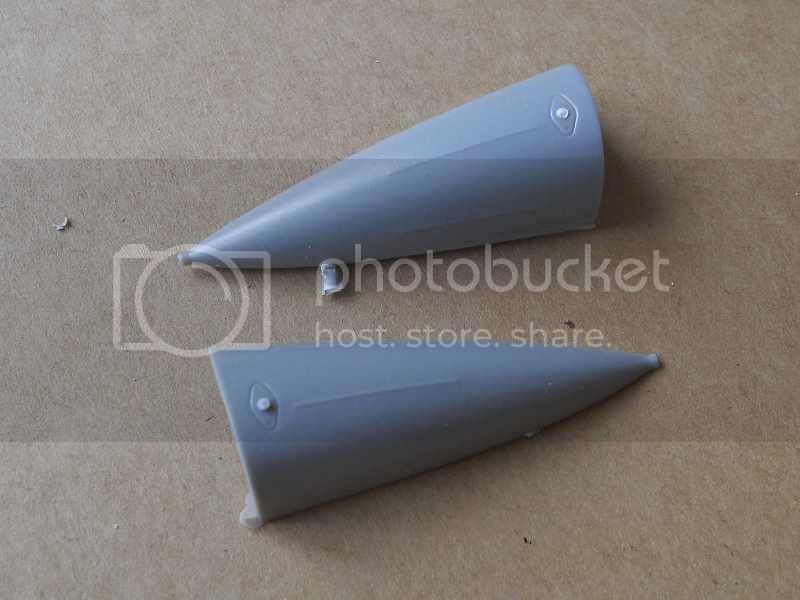
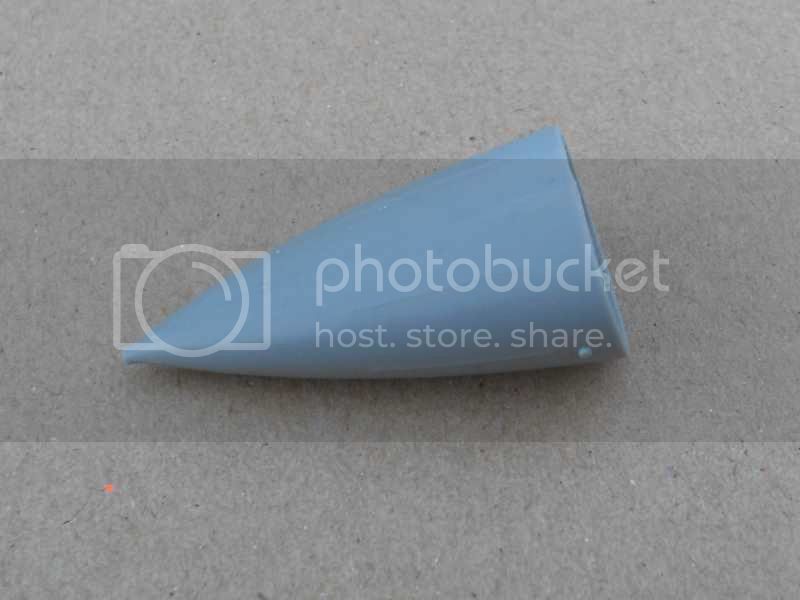
To be continued
Joel_W
Associate Editor New York, United States
Joined: December 04, 2010
KitMaker: 11,666 posts
AeroScale: 7,410 posts
Posted: Thursday, October 15, 2015 - 12:05 AM UTC
Tim,
You hit the nail right on the head with your reasoning of why I never really stuck with learning how to build race cars of my chosen era. Specifically, creating a perfect mile deep gloss paint job is nothing like painting military models, and I was just never satisfied with my efforts, so I went back to what I always enjoyed as a small boy in the 60's, Aircraft modeling.
Although, I've reached the stage in my modeling, where I really want to take a break once or twice a year, and try a few Ebbro race cars from my chosen era. I actually think it would help my military modeling just by breaking the cycle of how I build aircraft.
I've posted whether or not I could post pictures of my completed model in the ready for inspection, so that I could share it with all of you. Honestly, the vast majority of us never visits the other Kit Netmaker Network sites to view other media. And sharing with my friends here on Aeroscale is honestly more important to me then posting in a forum of what is basically strangers.
As far as adding lead to the nose cone, it's always been a major issue for me. I've guessed several times and didn't add enough, or went over board and added way too much. My last tricycle gear build, Academy's P-38, I taped the aircraft together, then kept on adding lead to various places till it rock forward over a dowel approximating the balancing point. How do you go about it if the instructions don't state the correct amount of lead?
Joel
On my Workbench:
Monogram 1/24 scale 427 Shelby Cobra
Just Completed:
Beemax 1/24 scale BMW M3 E30 1992 Evolution II
litespeed
News Reporter England - North West, United Kingdom
Joined: October 15, 2009
KitMaker: 1,976 posts
AeroScale: 1,789 posts
Posted: Thursday, October 15, 2015 - 03:15 AM UTC
Its always a mystery to me Joel why companies do not generally provide information about how much ballast to put in a nose. I always leave the fixing of the nose until the bulk of the airframe is in place. Then I use the location point of the main U/C oleos as the models centre of gravity. By adding weights gradually to the nose I just wait for the nose to become heavy enough so the model wont tip back onto its tail. Then I just hope the plastic U/C legs will hold the additional weight.
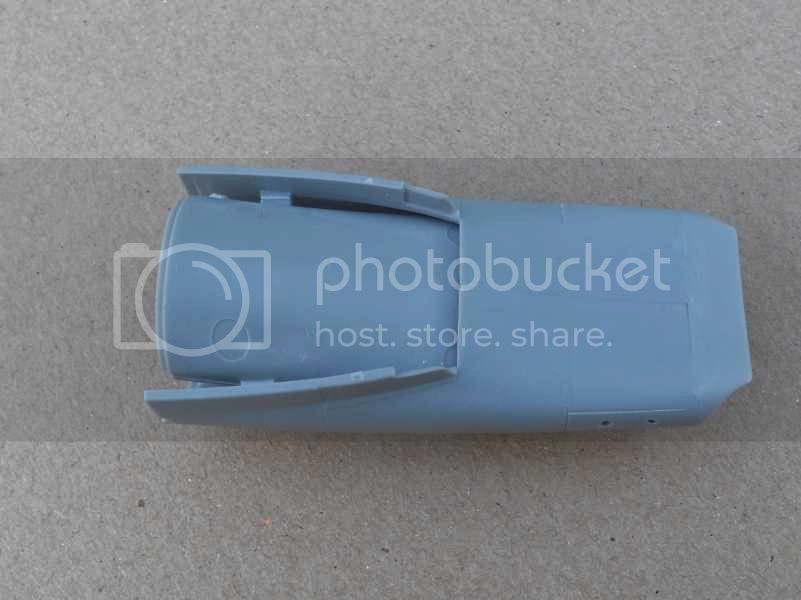
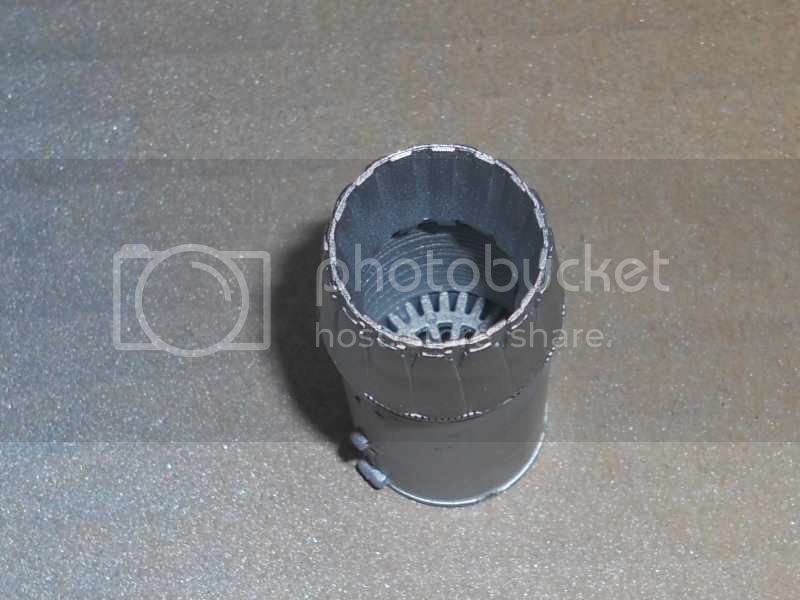
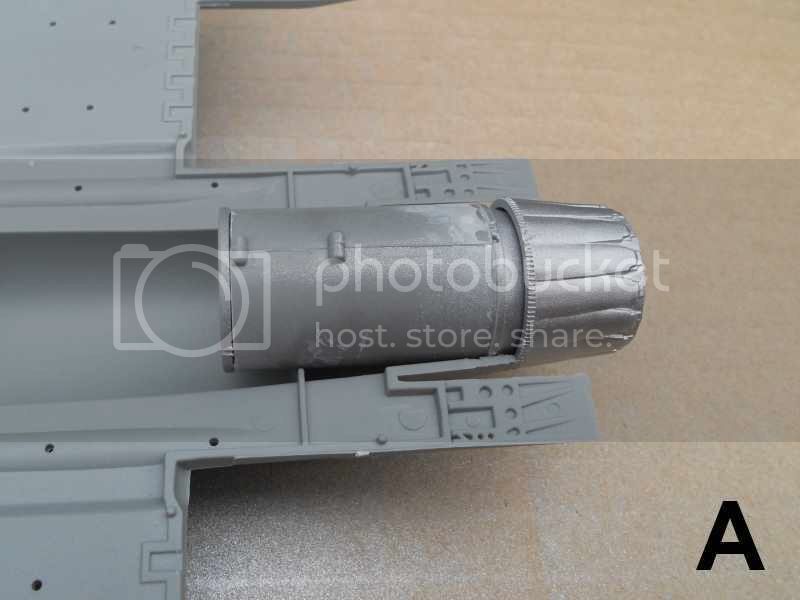
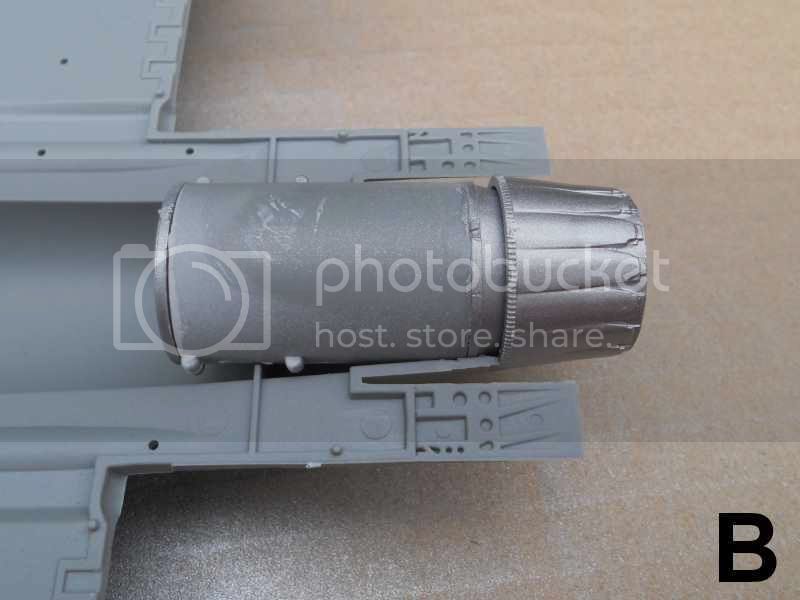
I test fitted the completed jet pipe and nozzle. I struggled to close up the fuselage halves with the pipe fitted per instructions [image A]. I found turning the pipe 90° [image B] results in a much better fit of the fuselage halves around the jet pipe.
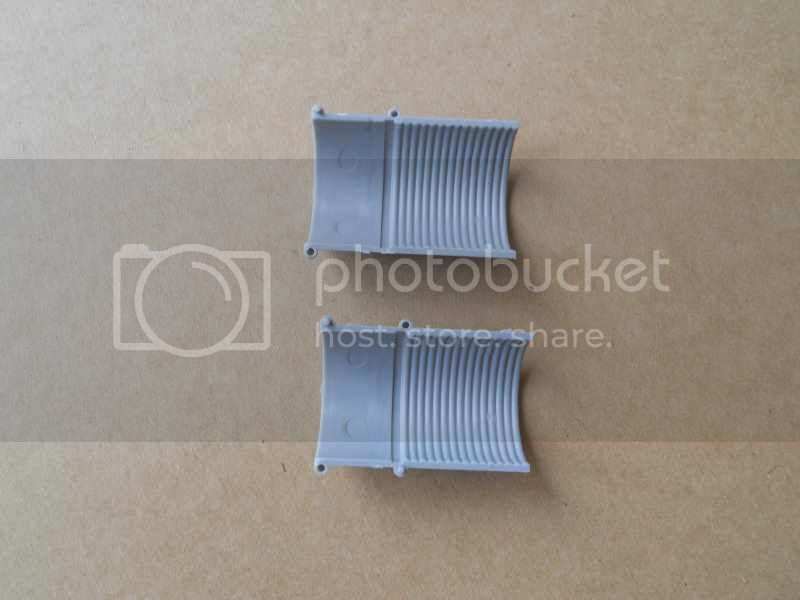
You can see clearly in the photos the moulded detail inside the airbrakes. You can display the airbrakes open if you wish, but it involves cutting of the airbrake flaps and relocating them in the open position.
To be continued
Joel_W
Associate Editor New York, United States
Joined: December 04, 2010
KitMaker: 11,666 posts
AeroScale: 7,410 posts
Posted: Thursday, October 15, 2015 - 09:57 PM UTC
Tim,
I think that only one or two kits ever had the recommended needed weight listed on their instructions. Nothing worse then not getting it right, and one still has a tail sitter, or like you said so much added weight that front gear eventually broke.
Looking at the box top painting, it seams to me that opening the dive brakes would really change the overall lines of the aircraft. If it was my build I'd leave them closed. That's the main reason why I closed the big air brake on the back of my F-15C, it just looks horrible with it opened.
Joel
On my Workbench:
Monogram 1/24 scale 427 Shelby Cobra
Just Completed:
Beemax 1/24 scale BMW M3 E30 1992 Evolution II
litespeed
News Reporter England - North West, United Kingdom
Joined: October 15, 2009
KitMaker: 1,976 posts
AeroScale: 1,789 posts
Posted: Friday, October 16, 2015 - 01:05 AM UTC
I really don't want to spoil the pleasing lines of my F-16XL Joel. So it's no to open air brakes, canopies and anything hanging from the wings. I have noticed that the F-16XL's flown by NASA had the Sidewinders [live or dummies?] attached to the wing tips. But there are plenty of images showing the wing tip rails devoid of Sidewinders. So I think I will model this ship sans weapons.
tim
Joel_W
Associate Editor New York, United States
Joined: December 04, 2010
KitMaker: 11,666 posts
AeroScale: 7,410 posts
Posted: Saturday, October 17, 2015 - 02:45 AM UTC
Quoted Text
I really don't want to spoil the pleasing lines of my F-16XL Joel. So it's no to open air brakes, canopies and anything hanging from the wings. I have noticed that the F-16XL's flown by NASA had the Sidewinders [live or dummies?] attached to the wing tips. But there are plenty of images showing the wing tip rails devoid of Sidewinders. So I think I will model this ship sans weapons.
tim
Tim,
I really like your approach. I just might close the canopy on my next jet build for that very reason. Of course the canopy needs to be a near perfect fit.
Joel
On my Workbench:
Monogram 1/24 scale 427 Shelby Cobra
Just Completed:
Beemax 1/24 scale BMW M3 E30 1992 Evolution II
litespeed
News Reporter England - North West, United Kingdom
Joined: October 15, 2009
KitMaker: 1,976 posts
AeroScale: 1,789 posts
Posted: Monday, October 19, 2015 - 02:51 AM UTC
Quoted Text
I just might close the canopy on my next jet build for that very reason. Of course the canopy needs to be a near perfect fit.
Joel
Yes Joel the fit is very important when displaying the canopy closed. Display the canopy open when the fit is dubious is always a good ace in the hole. Unfortunately my built kits need to be as cat proof as possible. They do like examining the kits I build even though they are not allowed into my man cave. An open canopy is always the first thing that goes west when they do occasionally get in

Thanks for looking in Joel
tim
Joel_W
Associate Editor New York, United States
Joined: December 04, 2010
KitMaker: 11,666 posts
AeroScale: 7,410 posts
Posted: Monday, October 19, 2015 - 10:31 PM UTC
Tim,
We have one cat, and his name is Evil. Do I have to tell you anything else about him

I try to keep him out of the model/computer room, but he just seats outside the door and cries till my loving wife lets him in to torment me. He steals parts from open boxes, and loves steel wire, and plastic rod. What's more his loose hair is becoming an issue with the change of season.
Joel
On my Workbench:
Monogram 1/24 scale 427 Shelby Cobra
Just Completed:
Beemax 1/24 scale BMW M3 E30 1992 Evolution II
litespeed
News Reporter England - North West, United Kingdom
Joined: October 15, 2009
KitMaker: 1,976 posts
AeroScale: 1,789 posts
Posted: Friday, October 23, 2015 - 01:12 AM UTC