_GOTOBOTTOM
Air Campaigns
Want to start or join a group build? This is where to start.
56th FG P-47 Operation - Aussiereg
AussieReg
Staff MemberAssociate Editor
AUTOMODELER
#007
_VISITCOMMUNITY
Victoria, Australia
Joined: June 09, 2009
KitMaker: 8,156 posts
AeroScale: 3,756 posts
Posted: Thursday, December 31, 2015 - 08:03 PM UTC
Hi Folks. Here we go with my build log for what will hopefully be a real feast of P-47 builds during 2016.

For my planned diorama, I have my kits sorted:


and I will be putting together a diorama based loosely on this image from the new book


As always, any and all comments, suggestions, criticisms are welcome and gratefully received.

Cheers, D
AussieReg
Staff MemberAssociate Editor
AUTOMODELER
#007
_VISITCOMMUNITY
Victoria, Australia
Joined: June 09, 2009
KitMaker: 8,156 posts
AeroScale: 3,756 posts
Posted: Sunday, January 03, 2016 - 03:18 AM UTC
No build progress to report, just gathering references and materials and considering my diorama layout.

I won't be doing any in-depth kit reviews on the vehicles as these kits are already in the Kitmaker Review library:

Airfield Fuel Truck In Box Review

Airfield Fuel Truck Built Review

Follow Me Jeep

Strangely, I can't seem to find an in-box review of the Tamiya 1/48 P-47 Razorback on the Kitmaker network, but that might just be my lack of computer skills on display!

I did find an interesting image while hunting for some reference pics of the Jeep, I believe that this is a gathering of squadron leaders from various groups:


Cheers, D
AussieReg
Staff MemberAssociate Editor
AUTOMODELER
#007
_VISITCOMMUNITY
Victoria, Australia
Joined: June 09, 2009
KitMaker: 8,156 posts
AeroScale: 3,756 posts
Posted: Thursday, January 07, 2016 - 08:54 AM UTC
Oh what a tangled web we weave !!!

On further investigation the fuel truck in the image I posted earlier is an F2A Tanker trailer most likely the same as this one . . .

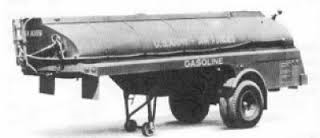
Now, this is typically pulled by an Autocar truck and there doesn't seem to be a kit readily available in 1/48 for me to truly replicate this scenario.
But wait, there's more!
In my search I came across this image (apologies for the small size, it pixelates badly if blown up).

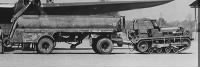
Don't you just LOVE the Cletrac!
Seriously, do I go out and buy a 1/48 B-24 just to get a Cletrac (Hmmmm, Nige, any comment?) and then try to scratch-build the F2A? Much as I would just love to do this, methinks it is beyond my reach right now.

So, back to poring over my favourite reference websites, http://www.littlefriends.co.uk/index.php and http://www.56thfightergroup.co.uk/ to set my mind at ease, and I find this image


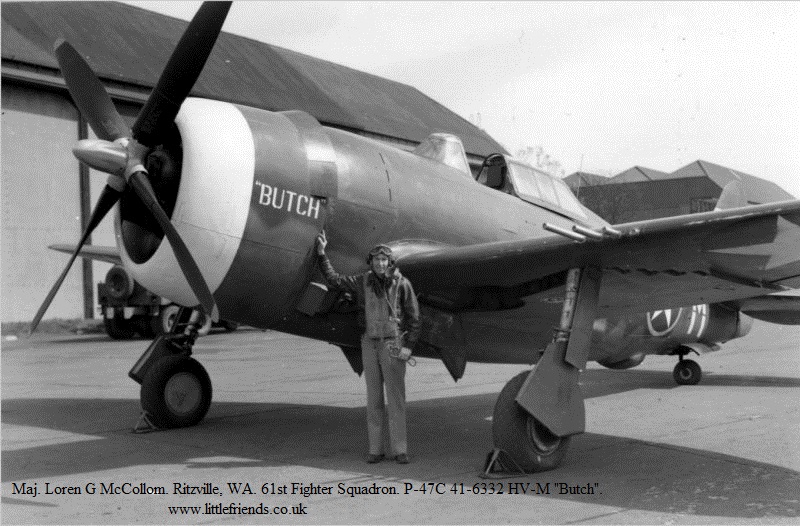
Now this gives me a couple of things. Firstly, in the background is the rear-end of the 6x6 fuel truck, sweet!
Secondly, the wheel base and tailwheel of the P-47 gives me an accurate dimension of the individual concrete pads on the hardstand.

Apologies for the rambling, I'm just having a quiet day at work and turned to the Google machine in my coffee break.

Cheers, D
AussieReg
Staff MemberAssociate Editor
AUTOMODELER
#007
_VISITCOMMUNITY
Victoria, Australia
Joined: June 09, 2009
KitMaker: 8,156 posts
AeroScale: 3,756 posts
Posted: Sunday, January 24, 2016 - 07:24 PM UTC
And so we begin! I had a couple of hours at the bench tonight and made a start on the Jeep and Fuel Truck sub assemblies.


Hopefully tomorrow the Razorback will hit the bench.

Cheers, D

AussieReg
Staff MemberAssociate Editor
AUTOMODELER
#007
_VISITCOMMUNITY
Victoria, Australia
Joined: June 09, 2009
KitMaker: 8,156 posts
AeroScale: 3,756 posts
Posted: Tuesday, January 26, 2016 - 02:11 AM UTC


Lining up as many sub assemblies as possible so that when I get the airbrush fired up I can make he most of the limited time I have at the moment.

Cheers, D
AussieReg
Staff MemberAssociate Editor
AUTOMODELER
#007
_VISITCOMMUNITY
Victoria, Australia
Joined: June 09, 2009
KitMaker: 8,156 posts
AeroScale: 3,756 posts
Posted: Tuesday, February 02, 2016 - 11:36 AM UTC
Time for a little bit of surgery. This is the cowl flap arrangement that I need to achieve for the P-47C I am modelling (photo courtesy of Nigel's book):

Here is the kit open cowl dry fitted:
Here is the kit closed cowl dry fitted:
I used the razor saw to cut the bottom two cowl flaps off both parts and squared the closed cowl flaps up. Here is how it looks dry fitted together:
With some fine filler and re scribing I think I can make it look right.

Cheers, D
GazzaS
#424
_VISITCOMMUNITY
Queensland, Australia
Joined: April 23, 2015
KitMaker: 4,648 posts
AeroScale: 1,938 posts
Posted: Tuesday, February 02, 2016 - 12:21 PM UTC
Nice to see you building something, Damian.
Not accusing you of not building before... Anyway...is there much wirk to change a D into a C? I was checking that stuff out on my last jug and got lost in all of the block numbers.

Gonna follow your build,

Cheers,

Gary
AussieReg
Staff MemberAssociate Editor
AUTOMODELER
#007
_VISITCOMMUNITY
Victoria, Australia
Joined: June 09, 2009
KitMaker: 8,156 posts
AeroScale: 3,756 posts
Posted: Wednesday, February 03, 2016 - 06:09 AM UTC

Quoted Text

Nice to see you building something, Damian.
Not accusing you of not building before... Anyway...is there much wirk to change a D into a C?


It is great to finally get some bench time again, limited though it is! Thanks for checking in Gazza.

From what I can gather the two major corrections are the cowl flaps and the belly. Extra cowl flaps were added for engine cooling airflow from the D-1 onwards. The belly on the C didn't contain a fuel tank and was basically flat from the rear of the cowl back to the rear of the wing. I think this was changed from the D-15 onwards. The image below (from the Kagero book) shows both of these changes quite clearly.

There are resin conversion sets available for the cowl flaps and belly tank, or you can fill the bottom of the fuselage with CA or putty and go to town grinding and sanding and rescribing. Alternatively, you can be a lazy git like me and feign ignorance and leave the belly alone, just pretend like you didn't know!
There were plenty of other internal mods, as well as armour plating and bulletproof glass, but these aren't really relevant in this scale.
I am planning to get the Lone Star Resin Flat Keel and Ferry Tank sets for my next Razorback build and do it properly, but not on this one.

Cheers, D
GazzaS
#424
_VISITCOMMUNITY
Queensland, Australia
Joined: April 23, 2015
KitMaker: 4,648 posts
AeroScale: 1,938 posts
Posted: Wednesday, February 03, 2016 - 11:01 AM UTC
Hey D,
Thanks for the reply. and the info. I think I may have to play ignorant, too. I have enough rescribing recently with the Dornier and upcoming with the B-29.
I just got my jug in the mail, today. It's the same one you are building now. Lots of underwing hardware available, fer sure.
...now I have to find another NMF Jug to model.

Gary

AussieReg
Staff MemberAssociate Editor
AUTOMODELER
#007
_VISITCOMMUNITY
Victoria, Australia
Joined: June 09, 2009
KitMaker: 8,156 posts
AeroScale: 3,756 posts
Posted: Sunday, February 21, 2016 - 03:51 PM UTC
Update time folks. I have worked my way through the instructions and put together all of the sub-assemblies, time to hit the paint shop.

All acrylics thinned with at least 50% of the branded thinner, shot through my trusty old Paasche-H at about 15psi. I tend to lay on several nice light coats and build up the intensity of colour to where I am happy.
Gunze H-58 with a drop of black for the interior green, Tamiya XF-4 for the ZC and Tamiya X-18 Semi-Gloss Black which I will flatten down later with the clear coat.

Detail painting coming next in the office, then major assembly time.

Cheers, D
lampie
#029
_VISITCOMMUNITY
England - East Midlands, United Kingdom
Joined: December 23, 2005
KitMaker: 6,249 posts
AeroScale: 3,270 posts
Posted: Monday, February 22, 2016 - 04:34 AM UTC
Looking good
I wouldn't worry too much about the flat/bulged keel issue.
Bulged keels were fitted to P-47C's and early D's at Halesworth starting at the end of August 43. This enabled them to use the latest 75g belly tank and later the 108.

It was actually civilian contractors who arrived unexpectedly to commence work on the modification!

So you can easily get away with modelling a 56th P-47C by just changing the cowl flaps. ( Unless of course its one that was lost prior to the bulged keels being fitted)

I hear that Lonestar are releasing a new version of the flat keel which consists of whole fuselage parts to replace the kit ones. Obviously hacking up a Tamiya razorback didn't appeal to many people.

Oh yeah, while I remember,, inside of the cowlings was andonised metal, not the yellow zinc cromate
AussieReg
Staff MemberAssociate Editor
AUTOMODELER
#007
_VISITCOMMUNITY
Victoria, Australia
Joined: June 09, 2009
KitMaker: 8,156 posts
AeroScale: 3,756 posts
Posted: Monday, February 22, 2016 - 04:47 AM UTC

Quoted Text

Oh yeah, while I remember,, inside of the cowlings was andonised metal, not the yellow zinc cromate


Ummmm, oops! Are you talking the whole cowl or just the underside of the flaps?

Never mind, easy fix either way.

Thanks for checking in mate, appreciate it.

Cheers, D
lampie
#029
_VISITCOMMUNITY
England - East Midlands, United Kingdom
Joined: December 23, 2005
KitMaker: 6,249 posts
AeroScale: 3,270 posts
Posted: Monday, February 22, 2016 - 05:28 AM UTC
Whole cowling fella
AussieReg
Staff MemberAssociate Editor
AUTOMODELER
#007
_VISITCOMMUNITY
Victoria, Australia
Joined: June 09, 2009
KitMaker: 8,156 posts
AeroScale: 3,756 posts
Posted: Monday, February 22, 2016 - 06:58 AM UTC
Thanks Nige. Next time I'm having a beer with Mr Tamiya I will let him know that his ZC/NG cowl interior paint callouts are incorrect.

Cheers, D
Totalize
_VISITCOMMUNITY
Ontario, Canada
Joined: February 04, 2009
KitMaker: 743 posts
AeroScale: 151 posts
Posted: Monday, February 22, 2016 - 04:14 PM UTC
Nice work thus far Damian,

She's really coming along. Good on ya for taking on the challenge of modifying the Tamiya cowling to a P-47C.
AussieReg
Staff MemberAssociate Editor
AUTOMODELER
#007
_VISITCOMMUNITY
Victoria, Australia
Joined: June 09, 2009
KitMaker: 8,156 posts
AeroScale: 3,756 posts
Posted: Friday, February 26, 2016 - 04:51 PM UTC
Thanks for checking in Dave!

Some detail painting and a light dry-brush with Flat Aluminium. Still need to give it a wash with some flat black to tone things down a bit. Waiting on some aftermarket belts to be delivered, hopefully in the next day or two, then we can button up the fuselage!


Cheers, D
spaarndammer
_VISITCOMMUNITY
Noord-Holland, Netherlands
Joined: January 28, 2007
KitMaker: 1,945 posts
AeroScale: 388 posts
Posted: Friday, February 26, 2016 - 09:20 PM UTC
Great work on your P-47 Damian. Already quite a bit of work done on yours.


Jelger
AussieReg
Staff MemberAssociate Editor
AUTOMODELER
#007
_VISITCOMMUNITY
Victoria, Australia
Joined: June 09, 2009
KitMaker: 8,156 posts
AeroScale: 3,756 posts
Posted: Saturday, February 27, 2016 - 03:49 AM UTC
Thanks Jelger, I appreciate you checking in. I just love the engineering on this Tamiya kit, it is great for a change to work through a build without any great consideration of test-fitting and modification.

I gave the office a wash with highly thinned Tamiya Flat Black enamel, at least 10:1 thinner to paint. It flows beautifully into the corners and cracks and crevices and really makes the detail pop. I also got the wings assembled and gave the wheel wells a wash. I took these sub assemblies outside to photograph as the light inside is a bit dull.


Cheers, D
GazzaS
#424
_VISITCOMMUNITY
Queensland, Australia
Joined: April 23, 2015
KitMaker: 4,648 posts
AeroScale: 1,938 posts
Posted: Saturday, February 27, 2016 - 04:31 AM UTC
Nice looking work, Damian. That wash put a nice tone on everything.
AussieReg
Staff MemberAssociate Editor
AUTOMODELER
#007
_VISITCOMMUNITY
Victoria, Australia
Joined: June 09, 2009
KitMaker: 8,156 posts
AeroScale: 3,756 posts
Posted: Wednesday, March 02, 2016 - 06:49 PM UTC
Thanks Gazza! It seems like such a small thing to do but it makes such a big difference.

I've made some more progress on the build. I repainted the inside of the cowl and flaps black, and then hit a few parts with Alclad Airframe Aluminium. Gear legs, prop hub, engine and cowls are all done. Engine is assembled and fitted onto the cowl.


Cowl flaps are on, some filling, sanding and re-scribing to follow.


Cheers, D
AussieReg
Staff MemberAssociate Editor
AUTOMODELER
#007
_VISITCOMMUNITY
Victoria, Australia
Joined: June 09, 2009
KitMaker: 8,156 posts
AeroScale: 3,756 posts
Posted: Wednesday, March 09, 2016 - 04:22 PM UTC
Office done, time to get the fuselage together. Eduard PE belts used. I fudged around with the HGW set for a while but in this scale I just found it too fiddly. I can see the value in them though, will certainly get some for my 1/24 builds.


Cheers, D
AussieReg
Staff MemberAssociate Editor
AUTOMODELER
#007
_VISITCOMMUNITY
Victoria, Australia
Joined: June 09, 2009
KitMaker: 8,156 posts
AeroScale: 3,756 posts
Posted: Friday, March 18, 2016 - 05:04 PM UTC
This is what it's all about folks. A quiet Saturday night, a magnum of 1995 Hanwood Cab Sav, and a Thunderbolt in the bench!


Office installed, fuselage buttoned up and seams cleaned up, wings on.


I used a toothpick to dab on some Mr Surfacer 1200 along the redundant panel lines on the cowling conversion, this will cure overnight and get a clean-up tomorrow before the cowl assembly gets fitted to the fuselage.


Cheers, D
GazzaS
#424
_VISITCOMMUNITY
Queensland, Australia
Joined: April 23, 2015
KitMaker: 4,648 posts
AeroScale: 1,938 posts
Posted: Saturday, March 19, 2016 - 09:26 AM UTC
Nice to see the wings on, Damian. You have such a nice, clean work area. Now I'm thirsty...


Gaz
AussieReg
Staff MemberAssociate Editor
AUTOMODELER
#007
_VISITCOMMUNITY
Victoria, Australia
Joined: June 09, 2009
KitMaker: 8,156 posts
AeroScale: 3,756 posts
Posted: Tuesday, March 22, 2016 - 06:15 PM UTC
While I'm waiting for a bit of putty to dry on the belly of the Jug, I thought I would see how well the Jeep driver, controller and pilot were getting along . . . . . .


Hmmmm, there seems to be some dissent. Why can't we all just get along?

Cheers, D
AussieReg
Staff MemberAssociate Editor
AUTOMODELER
#007
_VISITCOMMUNITY
Victoria, Australia
Joined: June 09, 2009
KitMaker: 8,156 posts
AeroScale: 3,756 posts
Posted: Wednesday, March 23, 2016 - 04:58 PM UTC
Bits and pieces night tonight folks. Glued the nose on, touched up some paintwork, dipped the clear parts in future, CA'd a few parts, had a couple of beers, sanded the centreline mounting points, all counts as progress! I might sneak off now and do some work on my '67 GTO build over on Automodeler.


Cheers, D
 _GOTOTOP