

Here's a compiled listing of topic discussions related to working on those pesky canopies:
Modelcitizen 62
You're on the right track with Scotch tape for 1/72 scale -- the frame detail will show in the same way that decals can silver over high points on a model, and that gives you a positive visual cue for trimming away the excess tape.
As for tape residue, the best ways to control that are to leave the canopy masked for the shortest possible time -- maybe a couple of days tops. Excess adhesive can be removed with a q-tip or rolled-up corner of a paper towel dipped in Windex.
Once you get some experience with that and if you don't want to go to the expense of precut canopy masks, another masking medium that may give you fewer headaches for 1/72 scale canopies is Parafilm M -- check the recent thread in aircraft forums on canopies on how to use the stuff.
slodder
Go Liquid Mask!
I use it All the time for AC canopies. I apply a generous coating over the entire surface. I let it dry over night. The next day the stuff is dry and see through. I take a brand new #11 blade and carefully cut along the edges. I peal away the liquid mask away from the areas to be painted. You can go back and touch up areas if necessary with a fine brush too.
mld
Several companies make self-adhesive masks for specific aircraft, but I have not used them in the past.
I know it is more expensive than tape, but bare metal foil works very well fro me, even on the barely there frames on Italeri 1/72 helo canopies. It's quite thin, ,thinner than tape and burnishes down quite tightly so if there is any line there it will be visable.
Their website, Baremetal foil.com, has a how to use tutorial that even though it is for cars, is very helpful.
As for removing residue, I've had luck using a piece of the same tape to dab at the area, been able to 'roll' it off with a finger, and when all else fails have used the Orange Clean citrus adhesive remover (from the cleaning section of the dollar store, Kmart or Walmart in the US). Plus side to it is that Orange Clean will not damage acrylic painted framing like rubbing alcohol or lighter fliud does.
modelcitizen62
I almost forgot an old family recipe for masking fluid . . .
Take a 35 mm film can and fill about 3/4ths full with PVA/white glue. Add two drops of dishwashing liquid, about five drops of rubbing alcohol and one or two drops of red, green or blue food coloring. Stir gently until well mixed.
The detergent and alcohol reduce the surface tension of the glue, making it easier to brush on and cover a surface. The food coloring of course makes it easier to see where the fluid is going, and the mix pretty much ensures that the coloring will not stain anything. I've used this mix before with good results, and it has the virtue of being very inexpensive.
The seal from a film can lid also makes sure that one batch will last a long time -- my first batch lasted well over a year with no ill effects.
Tin_Can
One of the problems with canopies is that they can become scratched so as soon as I open a kit, the canopy sprue goes into a separate bag for safe keeping.
Took me a while to get masking the canopy for painting the framework down pat. I've eventually settled on using the blue 3m painters tape. How I proceed depends on how pronounced the framework is. Some canopies have a good edge on the frames while others have a shallow edge. For the shallow edge, cut strips of tape the width of the framework and lay these down over the existing framework to increase the thickness to give a good edge to run the xacto blade against. After you have a good edge laydown tape over the rest of the canopy to cover the areas that will remain clear. Now take a sharp (you'll be best just to put a new blade on) #11 blade and trace around the framework. After all the framework has been cut along you can begin to peel off the tape covering the framework. If the framework edge is still hard to see before cutting, try burnishing the tape down snug against the frame edge with a toothpick. After the tape has been removed from the framework, burnish down the edges of the tape on the 'clear' areas to make sure no paint leads under the tape.
Its important to make sure the canopy gets all the same paint work as the rest of the plane so it doesn't look any different. Some people ensure this by temporarily attaching the canopy in place using blue tac (there's an article on this somewhere that I'll try to find). I prefer just to leave the canopy off and airbrush it right after airbrusing the rest of the plane with whatever coat I'm on.
I've also started to spray the first coat of the framework the same color as the cockpit interior color. For example, in the corsair I just finished, the interior color is the chromate green so I sprayed the first coat of the canopy frame the same chromate green and then continued painting the framework with respect to the exterior paint coats. This way it gives the illusion of the interior of the framework being painted green when you look through the canopy from inside to out. Probably not real major but I think its a nice little touch.
modelcitizen62
I also like to attach fixed canopy sections -- windscreens, rear windows, cabin windows -- during construction so I can blend their framing properly into the aircraft structure.
I use Ambroid Pro-Weld applied with a sharp O brush to attach fixed canopy sections that need a little persuasion, or even if they don't need it. Smaller brushes may be sharper, but they don't hold as much cement as an O brush
Sanding clear parts may seem like heresy, but I keep a few ladies' tri-stick nail buffers on hand to buff out light scratches and scuffs. I've also been know to do really dumb stuff too, like sanding out scratches starting with 2,000 grit wet-and-dry sandpaper and working up to 10,000 grit paper, Blue Magic liquid metal polish and a Future dip to make damaged clear parts a little clearer
Outlining less distinct framing with tape strips is a solid procedure. If you don't feel like filling in the outlines with tape, though, brush on two or three coats of white glue to fill in the outlines and act as a liquid masking material. SuperScale and other companies offer masking fluids, but two or three coats of white glue act just as well against enamles, acrylics and lacquers. The tape stripes are needed, though, to ensure a sharp mask line.
But if you're real lucky and have kit glazing with good, distinct framing, Parafilm M can work some neato torpedo magic. Testors used to package the stuff -- a laboratory product for sealing beakers and test tubes -- but lab supply and scientific supply houses also sell it a lot cheaper. The stuff stretches into a self-adhesive film that you can press and rub onto clear parts. You then take a FRESH X-acto blade and trim lightly but firmly along the frame lines. Take care to make sure that cuts meet at frame corners. Use the blade tip or tweezers to lift the Parafilm on the frames, and gently lift off the excess.
If the film lifts off the area to remain clear, don't panic. Press it back gently, recut the frame line, and remove the excess. You can mask the interior sections with tape, blobs of poster hanging putty or wet facial tissue.
After you finish removing the film from the frames, press on the remaining masks to ensure they are tight, and spray your canopy interior colors, external colors, and decaling and final clear coats.
After ALL the painting and clear coating is done, lightly run an X-acto along the mask edges to ensure the masks lift cleanly away. Parafilm again removes easily (even more so with the paint buildup stiffening it) by lifting corners with a knife or toothpick tip and gently pulling away the mask.
Any paint bleedthrough along the edges can be removed by scraping off with a toothpick cut to a chisel point. If you're feeling real brave, soak the tip in paint thinner first but shake off the excess and be careful where that scraper goes.
modlrmike
Masking Canopies:
I also use Parafilm. Before I paint, I give the canopy a good soap and water clean and dry. I then dip the piece in Future; this prevents the Parafilm from sticking too tightly to the canopy if it reacts with the paint. I use a sharp, NEW, scalpel blade and cut out the framing. Paint the inside colour, and then the outside colour. Remove the Parafilm. If you are going to paint the model with the canopy attached. Give it another dip in Future, and then mask it with tape.
Tin_Can
Masking Canopies:
I use blue 3M painters tape. It's low tac and won't leave residue when pulled off. Very effective against bleed under as well.
I'll usually cut thin strips to outline the glass to cover up and then fill it up with bigger pieces until only the frames remain.
Merlin
Masking Canopies:
I outline the frames with thin strips of masking tape (less than 1mm) and fill in larger areas with more tape or liquid latex - much cheaper than specialised masking fluids.
I normally use Tamiya masking tape, because it's so flexible. Some people have had problems with it leaving a residue, but I must have been lucky, because it hasn't happened to me (yet! ).
byptepilot
I swear by 3M Magic Scotch tape for most of my masking needs, and that includes canopy frame masking too. This is a semi-transparent tape, not the regular creamish Scotch opaque tape. I've used it for a variety of purposes, ranging from nose art, fuselage/wing camo masking to masking of canopy frames.
chip250
I hand paint them with a very small brush. I get a drop on the brush (make sure the paint is thinned, not gunky). and then run it very carefull along the raised lines. It should run along the lines, and fill the space between them.
If I get some on the canopy I just take some thinner to it quickly before it dries. That will probably fog it up if your using enamels, so then I put some model wax on it. And that seems to work.
I sometimes (Starting to do this now) cut a piece of scotch tape in two. Position one straight-side along the frame line, and the other straight-side piece along the other line. Press firmly and then paint. Pull off then, and see if any bled through, and then go back with thinner and take off the window.
garybeebe
Try a wooden tooth pick to scrape or rub off paint spots. It works good and wont scratch or mar the clear plastic.
Holdfast
As for painting the perfect canopy, I think we are all hoping for that, one day Masking is really the only way to go. I use Parafilm-M but it requires a little practice, 3M tape works well, it's fairly low tack and is frosted, so you can tell when it is adhering. Tamiya tape is also very good, and is what I would suggest you try. Lay the tape on a piece of glass, or similar hard surface, use a steel rule and cut a thin strip, about 2mm wide. Cut this strip into short lengths, (shorter than the side of one pane in the canopy) Lay this piece along one side of one pane, with one corner in the corner of the pane. Do this 4 times, working around the pane. Fill in the centre with a small rectangle, that overlaps the first 4 pieces. For the more curved front part, a thinner piece of tape will follow the curve better. You can do this with tape other than Tamiya if you like.
A quicker way would be to lay a piece of masking tape over the whole canopy and cut out each individual pane with a new scalpel blade. This is what I do, with the P-M, then remove the tape from over the frames and paint. But before doing this on your kit canopy I would recomend that you practice on a spare first.
Part-Timer
Removing Scratches:
Yes, there are a few. One way that works is to polish the scratched area with rubbing compound (available from auto supply stores - get the finest grain they have) or toothpaste; after the scratch is polished out, dip the canopy in Future to get it all the way clear.
Bus
Mal Mayfields Article
Merlin
I got a really nasty scratch on the rear canopy of my Sea Hornet. I used MicroMesh Polishing Cloths to sand it away. After this, I dipped the canopy in Klear (Future) - like in Mal's article - the result is as good as new.
Start Here (for Beginners)
This forum is for younger modelers or people just starting out in the hobby.
This forum is for younger modelers or people just starting out in the hobby.
Hosted by Jim Starkweather
Canopy Tips

Tin_Can

Joined: January 26, 2002
KitMaker: 1,560 posts
AeroScale: 750 posts
Posted: Monday, February 16, 2004 - 06:15 AM UTC


md72

#439
Joined: November 05, 2005
KitMaker: 4,950 posts
AeroScale: 3,192 posts

Posted: Thursday, March 29, 2012 - 05:25 PM UTC
Good suggestions.
I have a new question. I've got the windscreen masked and glued in place, but I want to finish the plane with the canopy open. Is there a way to 'tack' the canopy in place so that it gets painted when the rest of the plane gest sone and can mask off the cockpit? After painting, I can remove it and glue it into it's final location.
I have a new question. I've got the windscreen masked and glued in place, but I want to finish the plane with the canopy open. Is there a way to 'tack' the canopy in place so that it gets painted when the rest of the plane gest sone and can mask off the cockpit? After painting, I can remove it and glue it into it's final location.


lampie

#029

Joined: December 23, 2005
KitMaker: 6,249 posts
AeroScale: 3,270 posts

Posted: Thursday, March 29, 2012 - 05:35 PM UTC
If you attach a thin piece of Tamiya tape to the front part of the canopy and jutting out a bit, (on the inside with the sticky side up), then place the canopy in the closed position, with a small piece of bluetac holding the rear part down in place, this will let you spray the aircraft with the canopy in situ.
The tape will stop any paint entering the cockpit at the front/rear join.
Hope this helps,
Nige

The tape will stop any paint entering the cockpit at the front/rear join.
Hope this helps,
Nige

md72
#439
Joined: November 05, 2005
KitMaker: 4,950 posts
AeroScale: 3,192 posts
Posted: Thursday, March 29, 2012 - 05:58 PM UTC
WOW, that was fast. I'll try it tomorrow. Thanks

PubZombie

Joined: June 28, 2011
KitMaker: 31 posts
AeroScale: 11 posts
Posted: Thursday, May 03, 2012 - 11:49 AM UTC
Hi all,
Great tips here but what is the best glue to use??
I have tried CA on a cheap revell kit to get some practice on - and its leaves a cloudy stain on the clear canopy. Traditional plastic cement is also visible.
Cheers
Great tips here but what is the best glue to use??
I have tried CA on a cheap revell kit to get some practice on - and its leaves a cloudy stain on the clear canopy. Traditional plastic cement is also visible.
Cheers

Jessie_C


Joined: September 03, 2009
KitMaker: 6,965 posts
AeroScale: 6,247 posts

Posted: Thursday, May 03, 2012 - 11:53 AM UTC
Microscale Crystal Klear, Clearfix, white glue or even clear varnish are good adhesives for clear parts. Testors makes a "Clear parts Cement" which is just a variety of white glue sold at a ridiculous markup. If you're going to use superglue, coat the canopy with Future (Kleer) to prevent the fogging, and make sure there's some air circulating around the model to blow the glue fumes away before they can settle onto the plastic.

cinzano
Joined: January 13, 2009
KitMaker: 419 posts
AeroScale: 378 posts
Posted: Thursday, May 03, 2012 - 01:45 PM UTC
Historically I've relied on a variety of "white" glues to attach canopies. For my last half dozen or so projects I've switched to 5 minute epoxy applied with a wooden toothpick. The epoxy bond is much better. It also has gap filling qualities. Excess can be wiped clean (at least until it sets) and it takes paint well. One other thing I do is always dip clear parts in Future before painting and gluing.
Cheers,
Fred
Cheers,
Fred
PubZombie
Joined: June 28, 2011
KitMaker: 31 posts
AeroScale: 11 posts
Posted: Thursday, May 03, 2012 - 08:24 PM UTC
thank you guys - I have some white carpenters glue in the shed to test out.
Thanx for your time
Pz
Thanx for your time
Pz

warreni

Joined: August 14, 2007
KitMaker: 5,926 posts
AeroScale: 2,201 posts
Posted: Tuesday, January 14, 2014 - 09:50 AM UTC
I have a question about vacformed canopies..
What is the best, safest method of cutting them out of the rest of the vac form material?
I just received a resin CMK 1/72 CA-6 Wackett and don't want to stuff up the large canopy..
Cheers
Warren
What is the best, safest method of cutting them out of the rest of the vac form material?
I just received a resin CMK 1/72 CA-6 Wackett and don't want to stuff up the large canopy..
Cheers
Warren
Jessie_C
Joined: September 03, 2009
KitMaker: 6,965 posts
AeroScale: 6,247 posts
Posted: Tuesday, January 14, 2014 - 12:01 PM UTC
I post this so much I ought to make a "How To" out of it:
Doing a vac canopy calls for a bit of care and patience, but not nearly as much as you fear
The first trick is to deal with cutting them out of their backing. You need a black sharpie marker and a brand new razor knife. (I can't stress how important it is to use a new blade. If it's at all even the slightest bit dull, you risk ruining the canopy). You'll also benefit from a pair of cuticle scissors for cutting away most of the scrap.
First, mark around the edges of the canopy with your marker.
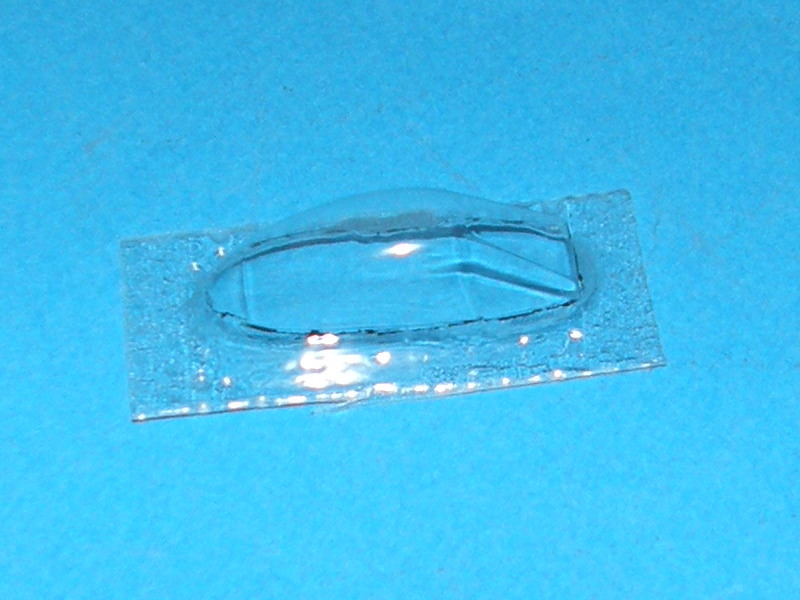
Run the tip of your blade along the marked line with just enough pressure so it scores the plastic, but doesn't cut through. Take this step slowly and carefully. Two or three shallow passes are better than one heavy one. Cut in stages instead of making one complete circuit around the canopy.
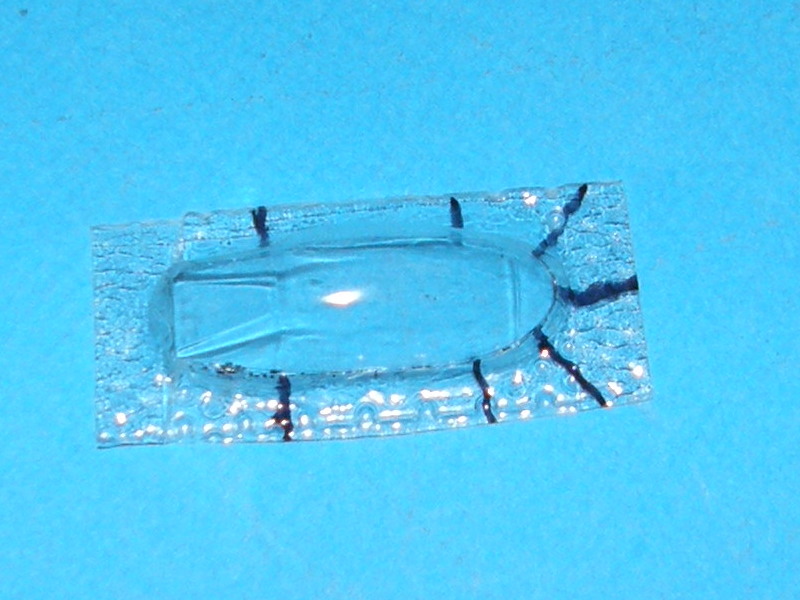
Then cut the scrap backing plastic with the cuticle scissors until the cuts go just to the edge of the canopy but not into the frame. Be very careful with this step. In the case of this Venom canopy, I've used the Sharpie marker to illustrate where the cuts should go. In highly curved areas make the cuts closer together.
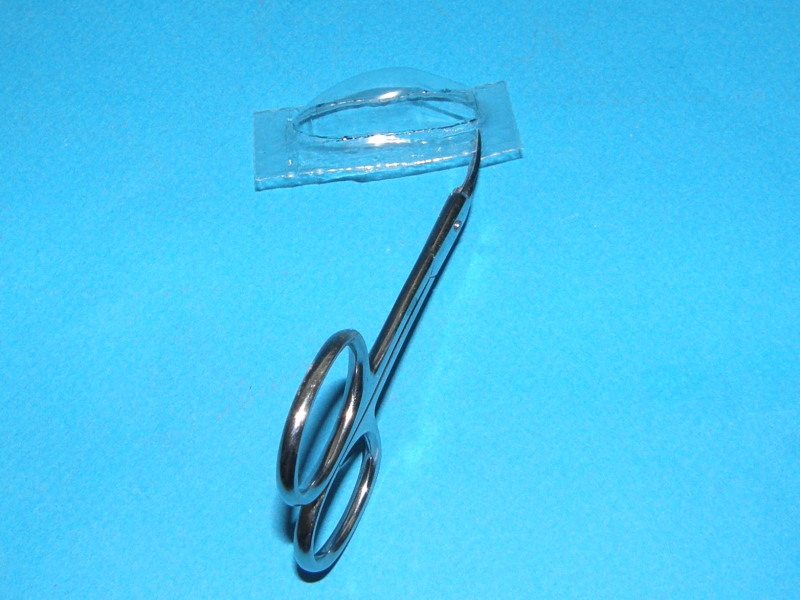
The scored line along the canopy base makes the plastic weaker there. Now take one of the cut segments and carefully bend it down and towards the centre of the canopy. You'll have to bend it back and forth a few times before it snaps off but eventually you'll get this:
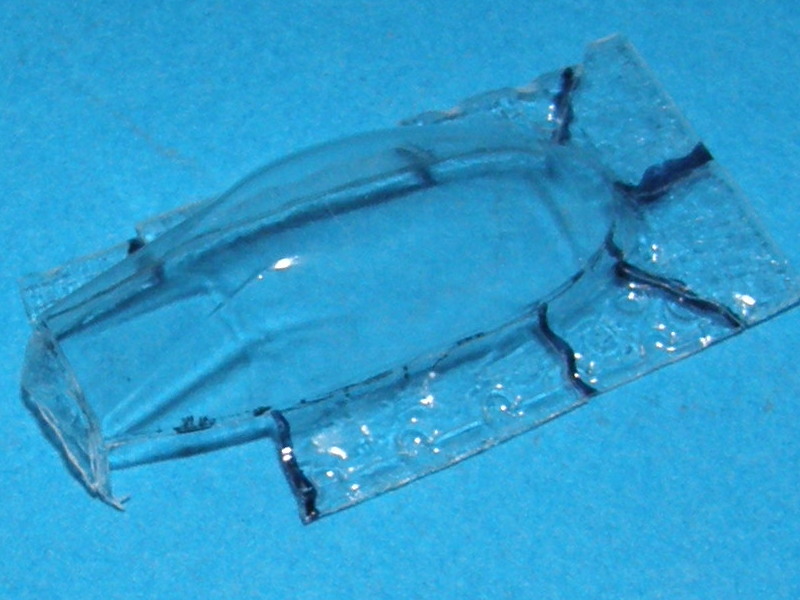
Repeat this step until you've snapped off all of the waste plastic from your canopy. Avoid the temptation to rush! Now your canopy is free of its base, but the edges are quite rough. You'll need to carefully sand the edges of the canopy using a sanding stick until it's all smoothed off.
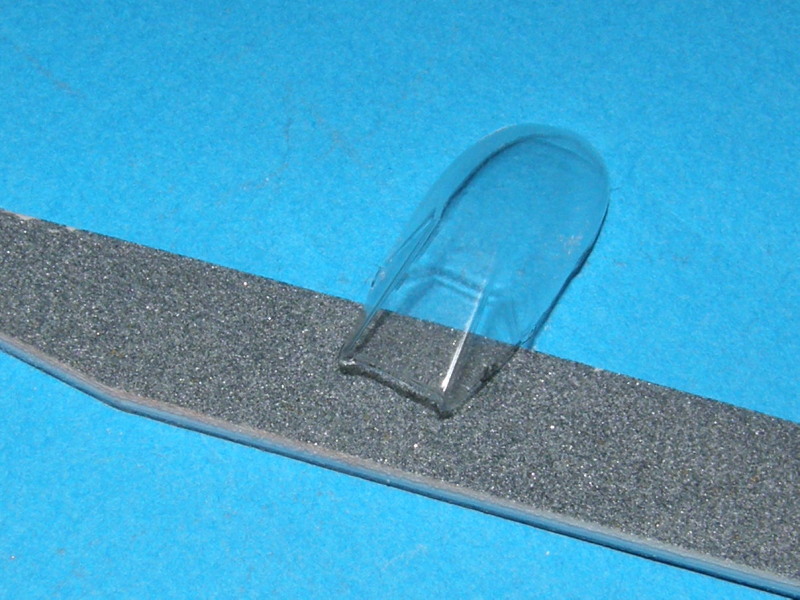
The sanding stick may be used along the edges in order to properly shape the canopy to fit the model. Work slowly and carefully. Remember that it's easier to remove material than add it. If you must add material, add it to the fuselage rather than to the canopy. A nice trick here is to roll a rope of epoxy putty around the cockpit opening and squish the canopy into it while it's soft (Use a little water to make sure the putty won't stick to the canopy). Sculpt the putty to shape then remove the canopy. Once the putty hardens you can paint it, then glue the canopy into place.
Now you have your canopy ready to glue (you may wish to repeat the score and bend steps to open it if it was moulded shut and you want to display it open). Since vac canopies are not made from styrene, regular model cement will not affect it. Glues of choice are epoxy, superglue (non-fogging is best) Krystal Kleer or white glue (PVA. White glue is very good for filling small gaps without damaging the canopy or the model. Apply a blob, then smooth it into place with a wet fingertip). Once the canopy is glued in place, it will be fairly robust, but you should obviously avoid crushing it.
To mask, you can use thin strips of masking tape to outline the canopy panes and then fill in with other small pieces of tape. If Eduard or other manufacturers make pre-cut masks they may be used. Another way is to place a piece of masking tape on the canopy, trace the outline of the glazing on the tape with a pencil, remove it and cut to shape before placing the freshly-cut mask back on the canopy.
I would put a vac canopy on at the same time I'd do an injection one. Usually the windscreen goes on before painting so the frames get the same paint as the fuselage. If I'm displaying the canopy open, I'll mask and paint it at the same time I do the fuselage but I'll install it last after decalling and weathering.
Doing a vac canopy calls for a bit of care and patience, but not nearly as much as you fear
The first trick is to deal with cutting them out of their backing. You need a black sharpie marker and a brand new razor knife. (I can't stress how important it is to use a new blade. If it's at all even the slightest bit dull, you risk ruining the canopy). You'll also benefit from a pair of cuticle scissors for cutting away most of the scrap.
First, mark around the edges of the canopy with your marker.
Run the tip of your blade along the marked line with just enough pressure so it scores the plastic, but doesn't cut through. Take this step slowly and carefully. Two or three shallow passes are better than one heavy one. Cut in stages instead of making one complete circuit around the canopy.
Then cut the scrap backing plastic with the cuticle scissors until the cuts go just to the edge of the canopy but not into the frame. Be very careful with this step. In the case of this Venom canopy, I've used the Sharpie marker to illustrate where the cuts should go. In highly curved areas make the cuts closer together.
The scored line along the canopy base makes the plastic weaker there. Now take one of the cut segments and carefully bend it down and towards the centre of the canopy. You'll have to bend it back and forth a few times before it snaps off but eventually you'll get this:
Repeat this step until you've snapped off all of the waste plastic from your canopy. Avoid the temptation to rush! Now your canopy is free of its base, but the edges are quite rough. You'll need to carefully sand the edges of the canopy using a sanding stick until it's all smoothed off.
The sanding stick may be used along the edges in order to properly shape the canopy to fit the model. Work slowly and carefully. Remember that it's easier to remove material than add it. If you must add material, add it to the fuselage rather than to the canopy. A nice trick here is to roll a rope of epoxy putty around the cockpit opening and squish the canopy into it while it's soft (Use a little water to make sure the putty won't stick to the canopy). Sculpt the putty to shape then remove the canopy. Once the putty hardens you can paint it, then glue the canopy into place.
Now you have your canopy ready to glue (you may wish to repeat the score and bend steps to open it if it was moulded shut and you want to display it open). Since vac canopies are not made from styrene, regular model cement will not affect it. Glues of choice are epoxy, superglue (non-fogging is best) Krystal Kleer or white glue (PVA. White glue is very good for filling small gaps without damaging the canopy or the model. Apply a blob, then smooth it into place with a wet fingertip). Once the canopy is glued in place, it will be fairly robust, but you should obviously avoid crushing it.
To mask, you can use thin strips of masking tape to outline the canopy panes and then fill in with other small pieces of tape. If Eduard or other manufacturers make pre-cut masks they may be used. Another way is to place a piece of masking tape on the canopy, trace the outline of the glazing on the tape with a pencil, remove it and cut to shape before placing the freshly-cut mask back on the canopy.
I would put a vac canopy on at the same time I'd do an injection one. Usually the windscreen goes on before painting so the frames get the same paint as the fuselage. If I'm displaying the canopy open, I'll mask and paint it at the same time I do the fuselage but I'll install it last after decalling and weathering.

tinbanger
Joined: February 04, 2008
KitMaker: 2,507 posts
AeroScale: 1,814 posts

Posted: Tuesday, January 14, 2014 - 01:23 PM UTC
I have used Silly putty to fill the canopy and use a brand new #11 blade to cut out the frame.

warreni
Joined: August 14, 2007
KitMaker: 5,926 posts
AeroScale: 2,201 posts
Posted: Tuesday, January 14, 2014 - 09:19 PM UTC
Thanks Richard and Jessica.
I want to see some more methods before I go for it.
Cheers
Warren
I want to see some more methods before I go for it.
Cheers
Warren
Shanghaied

Joined: June 30, 2011
KitMaker: 189 posts
AeroScale: 82 posts

Posted: Wednesday, January 15, 2014 - 12:01 AM UTC
I use now a non fogging superglue (Loctite 403) now. works fine for me. For temporary fixing you can use white glue or blue tac.
Very important is to make a test cut with a knife or scissors. Normally I cut carefully with a small scissor, but I had recently a canopy where the scissors caused long crack, so I had to cut far away from the frame with a knife and then sanded the rest.
Its really no rocket science and I feel the vac canopies scratches less then the injection molded.
Greetings from Shanghai
Red4
Joined: April 01, 2002
KitMaker: 4,287 posts
AeroScale: 1,164 posts

Posted: Wednesday, February 12, 2014 - 09:46 AM UTC
The very first thing I do when I start an aircraft is to cut down the clear parts sprues to fit into my jar of Future. It's an old wide mouth salsa jar that I have Future in. I dip the entire sprue in, wick the excess off using a paper towel and then place the whole thing in a covered container to dry/cure. Since it takes a week or sometimes lots longer, it gives them plenty of time to harden up.
I mask using thinly cut strips of Tamiya tape along the framing edges, then fill the glazing with larger strips/pieces. In cases were the corners are rounded I'll find a punch that is the same size as the curve and punch discs of tape to match these corners, install them, then run the thin strips as I normally would.
I attach all the opening portions of canopies to my planes prior to painting with plain old Elmer white glue. I can easily pop off the opening portion after painting and it doesn't harm the paint. For attaching the windscreen, I will run a thin bead of Future along the mating surfaces on the plane itsef and let it set for just a minute or so then place the windscreen where it goes and again let it set for a minute or so. I will then apply more Future to the seam using a paint brush and let capillary action run it around the seam. It dries clear and is more than strong enough to hold things in place. If there happens to be gaps or seams, I fill these with Krystal Kleer and dress the area with a damp Q-tip. It takes paint well and is a lot easier than trying to use CA and sanding or putties.
"Q"

SuperSandaas

Joined: October 23, 2012
KitMaker: 189 posts
AeroScale: 142 posts
Posted: Saturday, March 08, 2014 - 06:55 AM UTC
My trick for brush painting canopies in scale 1:72 and 1:144 is as follows:
I use acrylic paints, usually Agama brand, and I use 0-brush with a good point. I always work with the canopy on the sprue, as that gives a lot better control of the part, and as often I move the canopy along the brush as the other way around. I work in stages, because when the paint has just started curing (2-4 minutes) I use the flat tip of a wooden toothpick to "nudge" away any paint that missed the frame, and clean up the lines. The wood will not scratch the plastic, so you can fix any tiny mistakes you made.
(If you have a girlfriend who fixes her nail cuticles it's more or less the same thing in a smaller scale.)
The method works for me,I've used it since I was a kid, and the result is more than adequate for a standard model (i.e. not full blown competition standard.)


PrickleHead
Joined: December 31, 2013
KitMaker: 338 posts
AeroScale: 190 posts

Posted: Thursday, September 25, 2014 - 01:01 PM UTC
Good tips. Canopies have been the bane of my return to modelling.


mrockhill
Joined: June 17, 2009
KitMaker: 566 posts
AeroScale: 507 posts

Posted: Tuesday, August 18, 2015 - 07:12 AM UTC
Ive been using bare metail foil lately, my other go to is pre cut masks. Definitely be sure to dip the canopy in future but also be sure to give it plenty of cure time too. Recently I was too quick to mask after the future and it was pretty frustrating to remove. Because I used future all that was required to repair the canopy finish was to simply brush a thin coat of future onto just the transparent portions and all will be well.
When I apply bare metal foil (BMF) I use a smooth rounded toothpick to burnish the foil into the detail of the canopy framed. Be prepared to see how strangely uneven some canopies actually are. Dont worry its normal. BMF shows every little flaw and scratch beneath it. I then use a fresh No11 xacto to lightly cut out the canopy frames, which are removed with sharpened tooth picks and tweezers. I go back over the edges with the smooth tooth pick to be sure they are still sealed
After painting I remove the BMF with toothpicks shaped into chisels. Bare metal foil usually leaves a residue if left on for any length of time, as in just a few days. This residue is easily removed with a cotton swab moistened with WD40 (a US brand, not sure where else its available) which is acrylic safe in my experience, but not enamel so be careful and be sure the cotton swab is moist and not wet.
BMF doesn't take being masked over too well, if your subjects' scheme requires it. Ive had it work but it often will pull the bmf. Some can be just be burnished back into place but I use masking fluid for any necessary repairs. Small pieces of BMF tend not too stick well.
I also recommend sanding and painting the edges of your canopies. I think it helps hide the unscale thickness of injection molded canopies, especially in smaller scales where this quickly becomes obvious. The smooth edges reflect the light in the canopy and sometimes it can be noticed when viewing a model from an off angle or even can be noticed when examining the cockpit from the opposite side. By giving it a light roughing up, I use finer grits that just make the edges look foggy. Besure to completely remove and smooth over sprue nubs they can leave brighter spots in the edge. If there is any damage or cracks around the edges, which can also draw attention, try wicking some liquid cement into them. I recommend tamiya extra thin or similar consistency or you risk catastrophe. Cement and clear styrene requires extra care. I paint the edges either black or a darkened interior color
I've used a couple different glues on canopies so far with no clear favorite. White glue works great, just be sure to clean up any that squishes out and not just smear it down the fuselage. Its obviously easier to remove when still fresh but not so obvious is if you find a lone bit of it that might mar your paint job later on. If you go to pick it out dry it may just drag away some of your canopy seam with it.
I also like using future for this task too. Takes longer to set up and not terribly strong. So as long as the canopy isnt a structural piece of the model I cant see it being a problem. It's also easy to repair if it were to come loose down the road.
Tamiya extra thin also works, to a lesser extent if canopy edges are painted. But if carefully applied and used sparingly works just fine. Be careful of any interior structure or other object that may cause the glue to be wicked onto the sides of the canopy. Practice on spare parts and kits and dont use if you feel at all unsure.
If your going to build alot of aircraft buy some micro mark sanding pads. My set had 3600, 4000, 6000, 8000 and 12000. I also have various bits of crocus cloth and other super fine sandpaper bits. With these and some Future you can easily repair scratched or glue marked canopies not to mention the seams found on some more complex canopy moldings. I start with 1000 grit paper. Sand for a little longer than you think is enough before moving to the next finer grit.
 |

WEB HOSTING BY


Copyright ©2021 AeroScale and Kitmaker Network, a subsidiary of Silver Star Enterprises
All Rights Reserved. Please read our Conditions of Use and Privacy Policy.
All Rights Reserved. Please read our Conditions of Use and Privacy Policy.