_GOTOBOTTOM
Air Campaigns
Want to start or join a group build? This is where to start.
OFFICIAL: Canvas Falcons IV: 1917-18 Campaign
MichaelSatin
Staff MemberCampaigns Administrator
AEROSCALE
_VISITCOMMUNITY
Colorado, United States
Joined: January 19, 2008
KitMaker: 3,909 posts
AeroScale: 2,904 posts
Posted: Saturday, November 11, 2017 - 08:34 PM UTC
Welcome to the Canvas Falcons IV: 1917-18 Campaign!

The campaign will run from November 12, 2017 through November 11, 2018.

If you haven't signed up yet, or want to see the rules, go here.

One of the aims of the campaign is to promote WWI building. While I have removed the requirement to post your in-progress work in a blog on the Early Aviation forum with a link in this thread, such a blog is still encouraged if you feel so inclined. Please post your finished build photos in your blog and in the campaign gallery.

The period 1917-18 is when the air war reached its climax, so I'm looking forward to some great builds of aircraft of World War I to commemorate the centennial of the final year of the Great War!

Michael
pylwagl
_VISITCOMMUNITY
United Kingdom
Joined: January 04, 2015
KitMaker: 32 posts
AeroScale: 29 posts
Posted: Saturday, November 11, 2017 - 10:58 PM UTC
I'm in! Not sure what with yet ...
PasiAhopelto
_VISITCOMMUNITY
Uusimaa, Finland
Joined: October 01, 2016
KitMaker: 514 posts
AeroScale: 239 posts
Posted: Friday, November 17, 2017 - 04:40 PM UTC
And I'm also with another Wingnut Wings model (Pfalz D.XII from 1918):


I'll post more info once I decide which of the options I'm building. But what I've understood this was a fighter for those who weren't lucky enough to get their hands on Fokker D.VII. The Pfalz D.XII had better dive performance, but was harder to fly and lacked also in other areas. But I find it attractive, and this will also be my first plane with Lozenge camouflage.
pylwagl
_VISITCOMMUNITY
United Kingdom
Joined: January 04, 2015
KitMaker: 32 posts
AeroScale: 29 posts
Posted: Saturday, November 18, 2017 - 03:58 PM UTC
I'll probably do this, it looks very nice in the box, although its a bit of a rigging-fest.


wont be starting it until after Xmas mind
cheers
stu
ludwig113
_VISITCOMMUNITY
England - South East, United Kingdom
Joined: February 05, 2008
KitMaker: 1,381 posts
AeroScale: 1,110 posts
Posted: Saturday, November 18, 2017 - 08:37 PM UTC
here my next one, my 4th udet aircraft.

paul
TMoon
#152
_VISITCOMMUNITY
Texas, United States
Joined: December 07, 2002
KitMaker: 487 posts
AeroScale: 19 posts
Posted: Monday, December 11, 2017 - 10:37 PM UTC
Here is my start up photo.


Tom
Bigrip74
_VISITCOMMUNITY
Texas, United States
Joined: February 22, 2008
KitMaker: 5,026 posts
AeroScale: 2,811 posts
Posted: Saturday, December 23, 2017 - 04:19 AM UTC
I am in with a Sopwith Snipe, the Albatross has been my experiment to see if I could master some of the techniques that you guys have shown

Bob
Cbacon84
_VISITCOMMUNITY
California, United States
Joined: October 10, 2012
KitMaker: 204 posts
AeroScale: 52 posts
Posted: Saturday, January 06, 2018 - 01:19 AM UTC
going to try this again, hopefully will be able to finish the Pfalz IIIa this time. Here is where i left of from the last campaign

MichaelSatin
Staff MemberCampaigns Administrator
AEROSCALE
_VISITCOMMUNITY
Colorado, United States
Joined: January 19, 2008
KitMaker: 3,909 posts
AeroScale: 2,904 posts
Posted: Sunday, January 07, 2018 - 12:15 AM UTC
Looks like some very nice builds being planned!

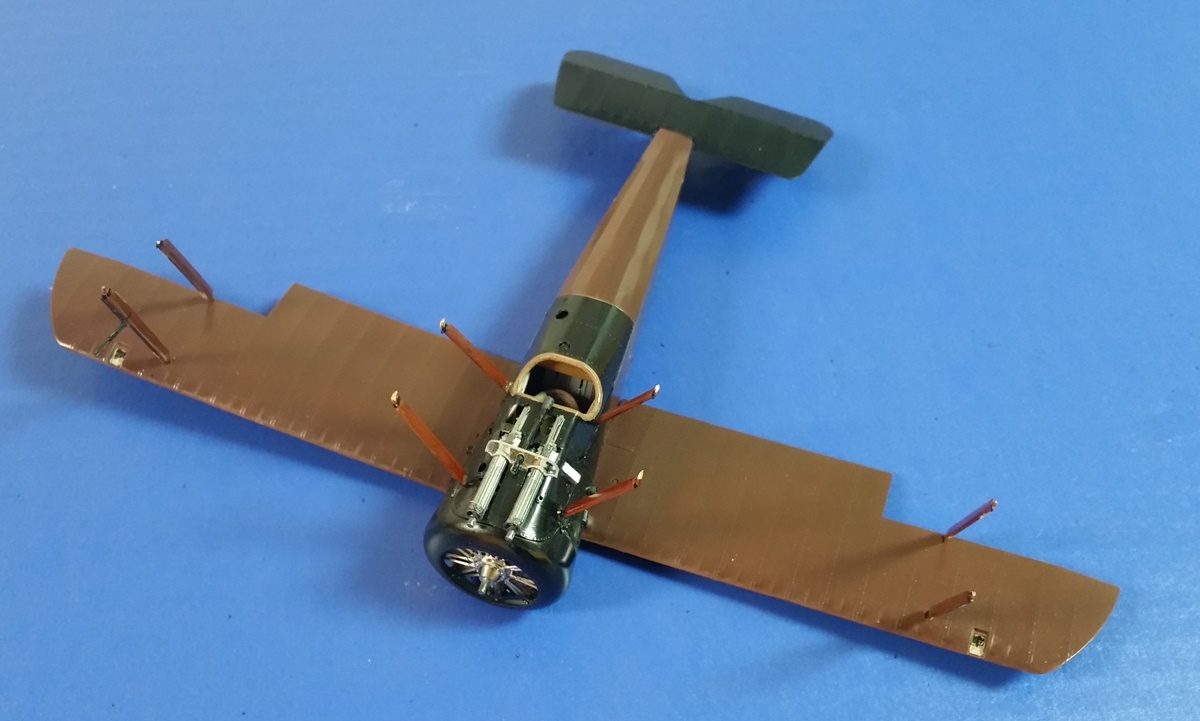
I'm trying to resurrect my WNW Camel build from CFIII. Those who were there might remember that for some, still unknown, reason, the linen colored paint on the bottom was just wiping off, and getting all over the top. I have now repainted (apparently successfully) and am just about ready for a glosscoat for decals:


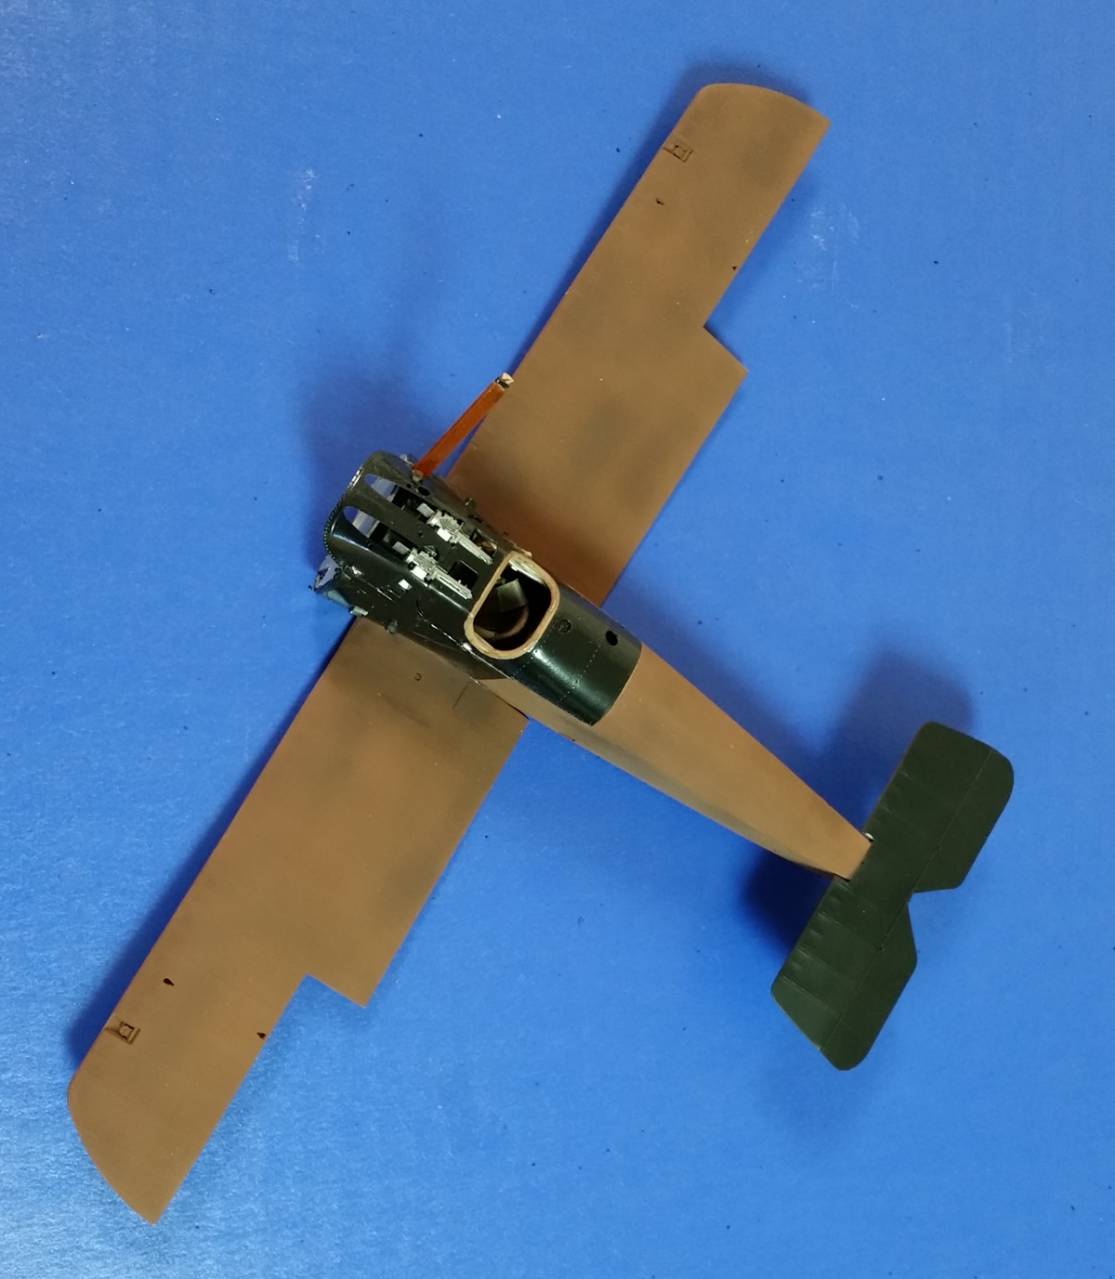
Those who are paying even moderate attention will notice a new problem: the cabines. These are the most fragile struts I've seen yet from WNW and I've managed to knock off three of the them (and the forth isn't too secure). I'd like to run my plan for fixing them by you all to see what you think.

I would like to pin the struts, but the attachment points are so small I don't see how I can realistically do that. So my plan is to build out the top wing, insert the cabines into their locator holes (probably without glue), and then set the wing in place using the interplane struts (again, probably without glue.) Then I can use small amounts of epoxy to reattach the cabines to their proper locations on the fuselage. All this is possible, of course, due to WNW's excellent strut locator design.

So, my first question is, does this make sense to you all? If not, better ideas are certainly appreciated.

My second question: if the above does make sense, when should I do it? Even using epoxy, I'm none too sure about how strong this will all be. Should I wait to do this until basically the last minute (decals on but rigging not all finished up), or try it sooner and hope it all holds together when I remove the top wing (and then I don't knock them off again)?

Any comments and/or suggestions are surely welcome!!

Michael
PasiAhopelto
_VISITCOMMUNITY
Uusimaa, Finland
Joined: October 01, 2016
KitMaker: 514 posts
AeroScale: 239 posts
Posted: Saturday, January 13, 2018 - 11:08 PM UTC
I checked Camel ("Le Rhône" version) and having cabanes molded in as part of frame looks bit odd solution because they will on the way when painting and are likely to be bent. I'd probably leave them last after painting and decals and would not try to remove the top wing.

Meanwhile, I've proceeded with Pfalz's cockpit:


Seat belts attachment at rear is wrong. They should be attached to the small black things on outside frames and not on the back plate. But for that to work I should've probably removed the short strap forming the H before glueing the belts to seat. Anyway, this part shouldn't be visible on completed model.
MichaelSatin
Staff MemberCampaigns Administrator
AEROSCALE
_VISITCOMMUNITY
Colorado, United States
Joined: January 19, 2008
KitMaker: 3,909 posts
AeroScale: 2,904 posts
Posted: Sunday, January 14, 2018 - 02:41 AM UTC
Looking good, Pasi, and thanks for the advice! I've pretty much decided to do the repair before I add the decals. I'll have to handle the model a lot while working on the struts and will probably use rubber bands or tape to keep the top wing as steady as possible, all of which could damage decals. I have already applied the gloss coat, however. We shall see...

Michael
MichaelSatin
Staff MemberCampaigns Administrator
AEROSCALE
_VISITCOMMUNITY
Colorado, United States
Joined: January 19, 2008
KitMaker: 3,909 posts
AeroScale: 2,904 posts
Posted: Tuesday, January 16, 2018 - 07:52 PM UTC
And there is hope!


After I installed the top wing with the interplane struts and had taped it all up, I slipped the broken cabines into place and epoxied them. Everything seemed to set up well and in a fit of exuberance I (carefully) removed the top wing. Voila! While I will have to be very careful with the rest of the build, especially reinstalling the top wing, the cabines seem to be pretty stable. And it was a whole lot easier finishing the guns, Aldis sight, windscreen, etc. with the top wing out of the way.

This one may actually get done! Though I'm honestly a bit nervous about rigging (especially the center section cross wires with the acorn). This will be my first try using EZ-Line flat RAF wires, any suggestions about the best way to ensure no twisting?

My thought on color is to use a small brush and try painting them with AeroMaster metalizer steel. I figure it's very thin paint and should leach down the thread. Once again, we'll see...

Michael
PasiAhopelto
_VISITCOMMUNITY
Uusimaa, Finland
Joined: October 01, 2016
KitMaker: 514 posts
AeroScale: 239 posts
Posted: Wednesday, January 17, 2018 - 12:59 AM UTC
I'm rigging Snipe in Anzac campaign with EZ-line, and I think I have avoided twisting the lines this time. Trick was to hold the line with locking tweezers at both ends and work with it until the lines are straight. Places where lines cross and touch each other are difficult, because they tend to twist each other 90 degrees (and will become non-aerodynamic wires).
pylwagl
_VISITCOMMUNITY
United Kingdom
Joined: January 04, 2015
KitMaker: 32 posts
AeroScale: 29 posts
Posted: Friday, February 02, 2018 - 03:25 AM UTC
So, off we go. started painting myriad bits & pieces in the cockpit. Now need to make a lever thing that pinged off into space while I was painting too. Got prop and floor done.


cheers
Stu
WIggus
_VISITCOMMUNITY
Pennsylvania, United States
Joined: July 07, 2017
KitMaker: 78 posts
AeroScale: 74 posts
Posted: Tuesday, February 06, 2018 - 07:34 PM UTC
Stu: That prop looks AMAZING. I hope I can get near that quality some day.

I am just about finished with an Eduard 1/72 Fokker DR.1.
I'll get photos up later, but here is a teaser.

ludwig113
_VISITCOMMUNITY
England - South East, United Kingdom
Joined: February 05, 2008
KitMaker: 1,381 posts
AeroScale: 1,110 posts
Posted: Thursday, February 08, 2018 - 09:18 PM UTC
bit of an update on my Udet SSW D.111
WIggus
_VISITCOMMUNITY
Pennsylvania, United States
Joined: July 07, 2017
KitMaker: 78 posts
AeroScale: 74 posts
Posted: Thursday, February 08, 2018 - 09:37 PM UTC
I'm looking forward to your SSW build Ludwig, since i have that one in my stash. :-)
ludwig113
_VISITCOMMUNITY
England - South East, United Kingdom
Joined: February 05, 2008
KitMaker: 1,381 posts
AeroScale: 1,110 posts
Posted: Friday, February 09, 2018 - 06:40 PM UTC

Quoted Text

I'm looking forward to your SSW build Ludwig, since i have that one in my stash. :-)


so far everything has gone together really well. i'm trying a new way(to me) of building.assembling the whole cockpit then painting it, rather than doing parts as i go along.

paul
AussieReg
Staff MemberAssociate Editor
AUTOMODELER
#007
_VISITCOMMUNITY
Victoria, Australia
Joined: June 09, 2009
KitMaker: 8,156 posts
AeroScale: 3,756 posts
Posted: Friday, February 09, 2018 - 06:50 PM UTC
This is going to be a great thread to follow and learn from, some really good work going on already and a very nice variety of subject matter.

For those who haven't seen it yet, I have a Sopwith Camel Clerget Project on the go with a build log thread HERE.

I started about a week before this Campaign kicked off so it doesn't quite fit the timeline requirements, but please check in and comment with any critique or advice.

Cheers, D
MichaelSatin
Staff MemberCampaigns Administrator
AEROSCALE
_VISITCOMMUNITY
Colorado, United States
Joined: January 19, 2008
KitMaker: 3,909 posts
AeroScale: 2,904 posts
Posted: Friday, February 09, 2018 - 07:17 PM UTC

Quoted Text

I started about a week before this Campaign kicked off so it doesn't quite fit the timeline requirements, but please check in and comment with any critique or advice.

Cheers, D


D,

This campaign allows works-in-progress and build threads are encouraged, so feel free to join in, we'd love to have you!

Michael
pylwagl
_VISITCOMMUNITY
United Kingdom
Joined: January 04, 2015
KitMaker: 32 posts
AeroScale: 29 posts
Posted: Tuesday, February 13, 2018 - 09:39 PM UTC
Thanks for the compliment Wiggus, but the graining effect is really not too tricky. It's just Humbrol 94, a layer of Tamiya clear, then burnt umber oil paint wiped over the surface with a soft brush, best thing is it can be easily wiped off and re-done if need be. Bravo to you for the 1/72 Dr1 - far too small for me i'm afraid! The streaky red finish looks great btw.

So, still plugging away at the interior bits - there always seems so many with biplanes. I now have a heap of mostly ready bits and fuselage halves are pretty well done.


Having contemplated long and hard a convenient method of rigging, I then went and got some Bob's buckles. They are scary tiny but are much easier to thread together than I imagined (yeah, I could regret saying that later). There is a completed one in the photo. I think they will look great, not least since there is so much rigging on the F2B.


cheers
Stu
AussieReg
Staff MemberAssociate Editor
AUTOMODELER
#007
_VISITCOMMUNITY
Victoria, Australia
Joined: June 09, 2009
KitMaker: 8,156 posts
AeroScale: 3,756 posts
Posted: Wednesday, February 14, 2018 - 01:57 AM UTC

Quoted Text

D,

This campaign allows works-in-progress and build threads are encouraged, so feel free to join in, we'd love to have you!

Michael


Thanks Michael, enlisted now as number 10 on the roster!

Cheers, D
pylwagl
_VISITCOMMUNITY
United Kingdom
Joined: January 04, 2015
KitMaker: 32 posts
AeroScale: 29 posts
Posted: Friday, February 16, 2018 - 11:13 PM UTC
So, have now managed to get the interior done and the fuselage halves together. It was a test of patience, with every assembly needing test fitting, adjusting and fiddling, but got there in the end. Fuselage seams will need some work (could be me or could be slightly warped moulding) but hey!


cheers
Stu
phantom_phanatic309
#372
_VISITCOMMUNITY
United Kingdom
Joined: March 10, 2010
KitMaker: 2,568 posts
AeroScale: 1,619 posts
Posted: Saturday, February 17, 2018 - 04:44 PM UTC
I'll enter. Hopefully I can finish this one.
Got a few kits to choose from and still have the half finished WNW Rumpler I entered in last years. It would be good to finally finish that one.
AussieReg
Staff MemberAssociate Editor
AUTOMODELER
#007
_VISITCOMMUNITY
Victoria, Australia
Joined: June 09, 2009
KitMaker: 8,156 posts
AeroScale: 3,756 posts
Posted: Sunday, February 18, 2018 - 06:50 PM UTC
Small update on my Clerget build , black base coat on ready for NMF. Check the build log thread for details.


Cheers, D
 _GOTOTOP