_GOTOBOTTOM
Modern (1975-today): USA
Modern aircraft of the United States.
Mentor
Joey
_VISITCOMMUNITY
Jerusalem, Israel
Joined: October 15, 2003
KitMaker: 90 posts
AeroScale: 0 posts
Posted: Friday, March 19, 2004 - 01:52 AM UTC
Hi
I have the Fairchild Republic A-10A Thunderbolt from Tamiya, and I about to begin building it. I was wondering if anybody would like to be my "mentor" or guide when I build this model. It's my first model in a while and it's the first model I'm really going to do weathering and all that stuff. So if anybody wants to help your more then welcome, I have a camera so I'll try to post pictures.

Thanks for the help.
Holdfast
Staff MemberPresident
IPMS-UK KITMAKER BRANCH
#056
_VISITCOMMUNITY
England - South West, United Kingdom
Joined: September 30, 2002
KitMaker: 8,581 posts
AeroScale: 4,913 posts
Posted: Friday, March 19, 2004 - 08:53 AM UTC
:-) Hi Joey,
I'm game, The ideal thing would be for us to have a group build, although I have this kit I just don't think I can fit in anymore builds at this time. I also build WW II, but I'm more than willing to help you through this.
First thing is to plan the build;
1. What marking option do you want to do?
2. Do you have an airbrush, or are you brush painting?
3. Are you going to add weight to rthe nose, or use the clear prop?
4. What ordnance are you going to use?
5. Are you going to have the bording ladder deployed?
Study the instructions, there is quite alot that can be done while the initial painting is being done, gluing halves together etc. I'm assuming you use liquid cement, if not I recommend that you do.
Mal
Joey
_VISITCOMMUNITY
Jerusalem, Israel
Joined: October 15, 2003
KitMaker: 90 posts
AeroScale: 0 posts
Posted: Saturday, March 20, 2004 - 12:19 AM UTC
Hi
Thanks Holdfast, I can't wait to get busy. I'll answer all of your questions later on during the day (Got to do some homework first).
Thanks again for the help.
Holdfast
Staff MemberPresident
IPMS-UK KITMAKER BRANCH
#056
_VISITCOMMUNITY
England - South West, United Kingdom
Joined: September 30, 2002
KitMaker: 8,581 posts
AeroScale: 4,913 posts
Posted: Saturday, March 20, 2004 - 03:54 AM UTC
:-) OK Joey, homework does come first. Errrr.........What's homework
I can see you getting me to build this, eeek :-)
Mal
Joey
_VISITCOMMUNITY
Jerusalem, Israel
Joined: October 15, 2003
KitMaker: 90 posts
AeroScale: 0 posts
Posted: Sunday, March 21, 2004 - 11:13 PM UTC
Hi Mal
How are you?
1. I want to do marking option A in the instructions.
2. I'm going to brush paint.
3. I was going to add a weight. what's a clear prop?
4. I was planning on using all the ordnance (By ordnance you mean the bombs and missiles that come with the modle, right? ).
5. I'm not going to have the bording ladder deployed.

Awaiting your instruction.
Yonaton :-)
antoniazzip
_VISITCOMMUNITY
Aragua, Venezuela
Joined: November 13, 2002
KitMaker: 158 posts
AeroScale: 0 posts
Posted: Monday, March 22, 2004 - 05:40 AM UTC
Hi friend, I place in you disposition to be your guide, I know to want to begin a model one and not to know how, all we happen over there a you see, I already see that they are helping you, I only want that you know that you can count on me, I give you a suggestion, the sheme (Camo) of paint of the A-10, If it's Europe I, you needed the use of the airbrush with this tool you achieved their finish, there are online many guides to be identified with their use.
Well,... friend if you want more than my humble help you make it to me to know and I write you... my e-mail is here.

ABCs of Airbrushing

Articles FSM

All best.
Leal Antoniazzi Pedro.
[email protected]
Holdfast
Staff MemberPresident
IPMS-UK KITMAKER BRANCH
#056
_VISITCOMMUNITY
England - South West, United Kingdom
Joined: September 30, 2002
KitMaker: 8,581 posts
AeroScale: 4,913 posts
Posted: Monday, March 22, 2004 - 09:13 AM UTC
antoniazzip, is correct about the European 1 scheme, but I don't think the Tamiya kit represents an aircraft that would have worn that scheme, as it's an early production version, I believe. Anyway It would be best to keep it simple, so scheme “A” is the one to go for :-)

OK, Brush painting is not my usual method, but that's cool, just requires a bit of lateral thinking on my part. Planning to airbrush paint is possibly different to hand painting, so I will have to give it a little thought. Won’t stop anything though.

Right so adding weight is your first consideration. The instructions state 25-30 grams and show it divided between the fuselage, behind the cockpit and in the nose wheel leg piece. The first thing you will need to do is find the required weight, lead shot, fishing weights, nuts and bolts, bits of metal, plastacine almost anything that will give you the weight. I would suggest something like fishing weights, I use fine lead shot. When you have the weight you then have to figure out how to install it. The instructions show to nice cylinders of weight, which could be simply superglued into position. Most anything else will require compartments to be built. Don't worry, find your weight first, then we will sort that out. The clear prop I referred to is part F6, on the clear sprue. For a more authentic looking A-10 the weight is the better option :-)

Yep ordnance is the bombs and missles, no problem, I thought that would be your answer.

Fine we can forget about the bording ladder.

You didn’t say, do you use liquid cement?

I build in sub assemblies and glue halves together while waiting for paint to dry etc. I have clear plastic cups to keep small items in, like the wheels, (I'll take a pic or 2 of my work area so you can see what I mean) Larger sub assemblies go in the kit box.

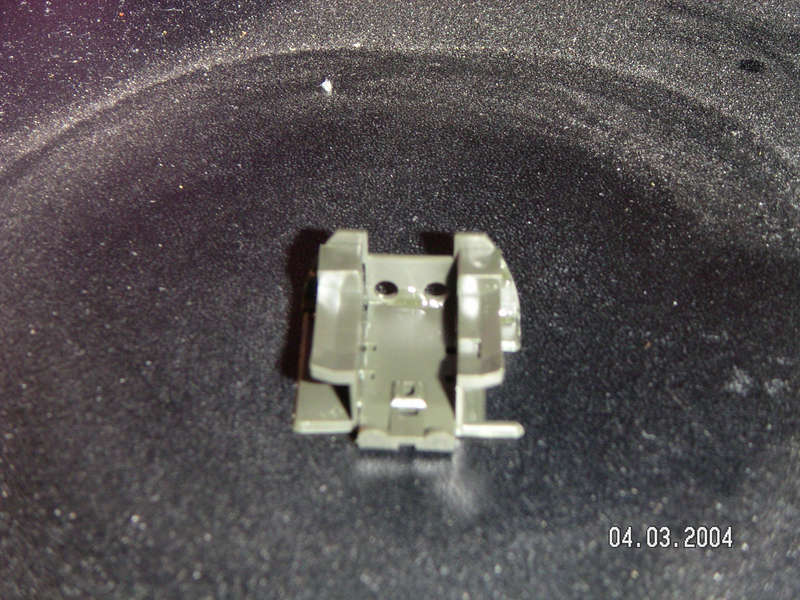
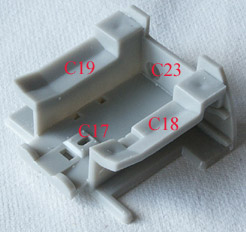
First thing is to study the make up of the cockpit and the nose wheel bay. Then cut the parts from the sprue and, before applying any glue, test fit the parts. Do this until you are happy that they will, a, fit and b, you understand how they go together. With liquid cement you can then position the parts and touch a brush, lightly, loaded with cement to the seam and capillary action will draw it along. Make sure that, while the parts dry, they are kept in the correct position. Parts A13, C32 and C33 can be glued together, as can C17, C18, C19 and C23. When they are dry the cockpit can be painted light grey and the nose wheel bay white. Don't forget to paint the areas in the fuselage halves as well.
Note. Because I air brush, I would prepare all items of the same colour, i.e. the undercarriage parts and spray them at the same time. As you are hand painting this is not so much of a concern. One thing to note how ever is that to paint white, by hand you will require several coats. Don’t try and cover in one go.

In between coats and while waiting for the paint to dry you can glue all the “halves” together. Things like the wheels, tailplane, tails, etc. What you must do is to cut the items off the sprue, clean up the sprue gate, that’s left on the parts and test fit everything before committing glue. You could be doing the engines as well, but it might be best just to get the cockpit and nose wheel bay sorted first.

If anything I have said doesn’t make sense, do ask before cutting. One other thing to check before removing anything off the sprues is that they are not handed (if they have the same number they are, generally the same, if they look the same but have a different number they are, probably handed. Then you will need to know basically which side or position they belong to, even when off the sprue)

I think that’s enough to be going on with, drop me a PM and I will send you my email address
Mal
Joey
_VISITCOMMUNITY
Jerusalem, Israel
Joined: October 15, 2003
KitMaker: 90 posts
AeroScale: 0 posts
Posted: Monday, March 22, 2004 - 10:52 AM UTC
Hi
I'll take all the help I can get, so thanks antoniazzip.
I use Testors cement for plastic modles, I also have Tamiya extra thin cement.
Thanks for all the help.
Yonaton :-)
antoniazzip
_VISITCOMMUNITY
Aragua, Venezuela
Joined: November 13, 2002
KitMaker: 158 posts
AeroScale: 0 posts
Posted: Tuesday, March 23, 2004 - 02:46 AM UTC
Ok friend I use liquied cement Humbrol for my it's works well, with relationship to the weight that you should use I recommend you to use the munisiones or pellets of the cartridges for the weapons and to hit them with cyano, I also use the pieces that are used to balance the tires they give good result you don't forget to hit them with cyano, with relationship to the painting of the parts and sections of the pattern recommend you to work in each one of them for separate, clear this, following the instructions.

Anyway you can call me. :-)

Cheers.
Leal Antoniazzi Pedro.
[email protected]
Joey
_VISITCOMMUNITY
Jerusalem, Israel
Joined: October 15, 2003
KitMaker: 90 posts
AeroScale: 0 posts
Posted: Tuesday, March 23, 2004 - 04:19 AM UTC
OK.
Thanks. :-)
Holdfast
Staff MemberPresident
IPMS-UK KITMAKER BRANCH
#056
_VISITCOMMUNITY
England - South West, United Kingdom
Joined: September 30, 2002
KitMaker: 8,581 posts
AeroScale: 4,913 posts
Posted: Wednesday, March 31, 2004 - 07:33 AM UTC
Just bringing this back to the front :-)
Mal
antoniazzip
_VISITCOMMUNITY
Aragua, Venezuela
Joined: November 13, 2002
KitMaker: 158 posts
AeroScale: 0 posts
Posted: Wednesday, March 31, 2004 - 12:50 PM UTC
I also guys...I waiting.

Cheers.
Leal Antoniazzi Pedro.
[email protected] :-) :-) :-) :-) :-)
Joey
_VISITCOMMUNITY
Jerusalem, Israel
Joined: October 15, 2003
KitMaker: 90 posts
AeroScale: 0 posts
Posted: Thursday, April 01, 2004 - 02:19 AM UTC
Hi guys
So I should do steps: 1,2,4,11,12 and the wheels?
Should I do any painting besides what you told me (the cockpit and the nose wheel bay)?
Thanks for the help.
Yonaton :-)
Holdfast
Staff MemberPresident
IPMS-UK KITMAKER BRANCH
#056
_VISITCOMMUNITY
England - South West, United Kingdom
Joined: September 30, 2002
KitMaker: 8,581 posts
AeroScale: 4,913 posts
Posted: Thursday, April 01, 2004 - 09:36 AM UTC
:-) oooer, I knew this would get difficult :-)
I think we might have to take this a step at a time, to start with anyway. What you want to acieve is the cockpit in the fuselage, the wheel wells, wings and engines, glued together and attached to the fuselage, with any parts that you can't reach after that, already painted. It is best not to have any "dangly bits" (wheels, ordnance, pylons etc) attached before the main painting.
This might seam strange, but basically use the instructions for how and where the parts go, but not for the order in which to assemble. This depends on how you build. An airbrush painter will, in general, approach it differently to a hand painter. If you want to weather the model as well, this needs to be taken into account.
As I don't know what standard you are at it's difficult for me to gauge the best way for you to proceed. Lets try at the basics and take it from there.
1. Assemble parts C17, C18, C19 and C23 as per stage two. Do nothing else, trim the parts, test fit and glue together using liquid cement. Don't glue anything until you are sure where and how it fits When you have done this post a pic, if you can. Any problems get back to me. Don't worry things will speed up, remember I can't see what you are doing, you must tell me.
Best of luck.
Mal
Joey
_VISITCOMMUNITY
Jerusalem, Israel
Joined: October 15, 2003
KitMaker: 90 posts
AeroScale: 0 posts
Posted: Thursday, April 01, 2004 - 12:45 PM UTC
Hi Mal
I really appreciate you taking the time out to go step by step with me :-)
Don't worry I have time, no rush :-)
Thanks
Yonaton
TreadHead
_VISITCOMMUNITY
Colorado, United States
Joined: January 12, 2002
KitMaker: 5,000 posts
AeroScale: 370 posts
Posted: Thursday, April 01, 2004 - 01:22 PM UTC
Howdy Joey,

I wish you the very best of luck with your build. And I have to say for the record, you are a very fortunate individual to have our good member Holdfast as your 'Mentor'. He is a very talented 'wingy thingy' builder, and a good lad!
I only wish I had his council now and again! #:-)

Good on ya Holdfast!

Tread.
Joey
_VISITCOMMUNITY
Jerusalem, Israel
Joined: October 15, 2003
KitMaker: 90 posts
AeroScale: 0 posts
Posted: Saturday, April 03, 2004 - 02:19 AM UTC
Hi Mal
I Assembled parts C17, C18, C19.
I have a couple of pics in my gallery but I don't know how to post
Awaiting your instructions :-)
Yonaton
DaveCox
_VISITCOMMUNITY
England - South East, United Kingdom
Joined: January 11, 2003
KitMaker: 4,307 posts
AeroScale: 272 posts
Posted: Saturday, April 03, 2004 - 03:09 AM UTC
Here you go Joey, this was the best of the three pics


Joey
_VISITCOMMUNITY
Jerusalem, Israel
Joined: October 15, 2003
KitMaker: 90 posts
AeroScale: 0 posts
Posted: Saturday, April 03, 2004 - 03:18 AM UTC
Thanks for the help
Holdfast
Staff MemberPresident
IPMS-UK KITMAKER BRANCH
#056
_VISITCOMMUNITY
England - South West, United Kingdom
Joined: September 30, 2002
KitMaker: 8,581 posts
AeroScale: 4,913 posts
Posted: Saturday, April 03, 2004 - 06:40 AM UTC
Hi Yonaton,
Cockpit looks fine, but did you use liquid or tube cement? I'm guessing tube cement as I can see a little blob at the rear. This is an important point as Liquid cement really helps. I have decided that to help you through this build I really need to be building the model as well. I have constructed the cockpit tub, plus I have started on the next phase. I will post some pics later, at the moment I am downloading pics into my online build of the Tamiya Spitfire Mk I, Have you seen it? Tamiya Spitfire

I will try and give you the low-down on placing pics in your threads.
1. You have got the first part done, by downloading pics to your gallery.
2. When you want to insert a pic select the [ img] tag, on the far right of the code tags under the box where you type your replies;
[img ] http://put.url.here/image.file [ /img] and you will get this.
3. Hold down the shift key and click on "GALLERY" (in the side bar at left) this will open the site gallery, as a separate window.
4. Select "My Gallery" (top left, just below the picture). This will open your gallery space.
5. Find the picture you want to insert and click on it (this will open it)
6. When it is open Right click on it. (This will open a drop down menu)
7. Click on properties at the bottom. (This will open a dialogue box)
8. Next to "address (URL)" you will see the URL of you picture. Use your curser to highlight it. ( Make sure you highlight the whole address) then copy it, I use CTL+C
9. Minimise the Gallery window and of course you will be back at the typing box.
10. Highlight this part, http://put.url.here/image.file (between the 2 img tags) Make sure that you don't highlight any part of the img tag (doing so will ruin the code)
11. Paste the URL (copied previously, from you pic) into the highlighted area)
Bingo, if done correctly your picture will appear like so:

I'll be back.
Mal
Joey
_VISITCOMMUNITY
Jerusalem, Israel
Joined: October 15, 2003
KitMaker: 90 posts
AeroScale: 0 posts
Posted: Saturday, April 03, 2004 - 07:12 AM UTC
Hi Mal
I used tube cement. Should I use Liquid cement for the entire model?
Thanks for the guide to posting :-)
When you have time I'm ready for the next phase
Thanks again.
Yonaton
antoniazzip
_VISITCOMMUNITY
Aragua, Venezuela
Joined: November 13, 2002
KitMaker: 158 posts
AeroScale: 0 posts
Posted: Saturday, April 03, 2004 - 07:43 AM UTC
Hi pal, Yes the liquid cement is the best, don't worry you would try whit them always.
I hope to see anything pictures of you models in progres. :-) :-) :-)

Thanks...
Leal Antoniazzi Pedro.
[email protected]
Holdfast
Staff MemberPresident
IPMS-UK KITMAKER BRANCH
#056
_VISITCOMMUNITY
England - South West, United Kingdom
Joined: September 30, 2002
KitMaker: 8,581 posts
AeroScale: 4,913 posts
Posted: Sunday, April 04, 2004 - 07:57 AM UTC
Aw shucks, thanks Tread
Hi Yonaton,
Don't worry about the tube cement on the tub, but it would be far better and easier to use liquid cement. Yes use it for the entire model, I never use tube cement.
I'll give you a link to my "Workbench" Gallery, there are some more pics with some explanations A-10
Here's my cockpit tub:

There is no difference between yours and mine, apart from the fact that mine has been put together with liquid cement, and my pic is a little neater.
If you have liquid cement, and are confident in it's use, assemble the ejection seat, parts C20,21,22 and 25. If you don't have liquid cement then I would suggest that you do no more until you do. If you have but are'nt sure about it's use, follow the link to my gallery. I haven't included a detailed explanation, so if you are still unsure do ask.
In the mean time, if we are waiting on liquid cement, Have a look at the undercarriage parts. Study them, so you understand how they go together. Also think how best to paint them. I use an airbrush, so I will clean them up and fix them to some suitable impliment to enable me to paint them. Even when hand brushing you need to hold the parts, so this needs some consideration. The instructions call for aluminium, for the gear legs, I think it might be white. In either case there are problems to overcome, when hand brushing, but I have the answers
Waiting on the liquid cement
Mal
Joey
_VISITCOMMUNITY
Jerusalem, Israel
Joined: October 15, 2003
KitMaker: 90 posts
AeroScale: 0 posts
Posted: Monday, April 05, 2004 - 12:19 AM UTC
Hi Mal
What liquid cement would you recommend I buy?
I have Tamiya extra thin cement, can I use that for liquid cement?
I'm not going to build anything until I'm sure that the Tamiya extra thin cement is considered liquid cement.
Thanks for all the help.
Yonaton
Holdfast
Staff MemberPresident
IPMS-UK KITMAKER BRANCH
#056
_VISITCOMMUNITY
England - South West, United Kingdom
Joined: September 30, 2002
KitMaker: 8,581 posts
AeroScale: 4,913 posts
Posted: Monday, April 05, 2004 - 06:57 AM UTC
Hi Yonaton,
That sounds like the stuff, although I haven't heard of the Tamiya one. You can test it, take a couple of pieces of sprue and hold them side by side. Dip a brush into the cement and touch it to where the sprues meet. The cement should flow, a little way, down the join. Polystyrene cement, tube or liquid, works by actually melting the plastic, when it dries you have what is, in effect, a welded joint. That's why I stay clear of tube cement, it will destroy your kit. Liquid cement is far more controlable. Another thing, if the Tamiya cement comes with a brush in the lid, throw it away and use a normal paint brush. I use a cheap number one brush, specificaly for cement. I also have a smaller brush, for small delicate parts. Another thing about liquid cement is that it drys very quickly, so you have to make sure you have enough in the join. I still leave major joints overnight to cure.
Assuming that you have got liquid cement there, and it sounds like you have. Assemble the ejection seat, cut the parts from the sprue, clean them up, by removing the tab from the sprue gate and any flash and/or molding seams. Test fit the parts, when you are happy that all the parts fit together as they should, glue them together. The technique when using liquid cement is different from the tube stuff. Hold the parts together, then apply the glue with your brush. It wont be possible to hold all the parts at the same time so build it up bits at a time. I hope that's clear, if not just ask.
You can also remove the fuselage halves, from their sprue, hold them together (don't glue them) and test fit the cockpit tub, Just to start getting the feeling of how this will fit.
Do you have any etched seat belts?
Have you taken a look at the A-10 pics in my Workbench gallery/
Mal
 _GOTOTOP