This looks very good. I like to build 1/72 but the result is so smallish. Watching this build I can see mee picking up this model for my stash and use it as a mojo raiser. The result looks very good!
Gr TC
World War II
Discuss WWII and the era directly before and after the war from 1935-1949.
Discuss WWII and the era directly before and after the war from 1935-1949.
Hosted by Rowan Baylis
UWAGA! 1/72 PZL P.11c from Arma Hobby
Twentecable

Joined: September 13, 2003
KitMaker: 339 posts
AeroScale: 244 posts

Posted: Saturday, October 06, 2018 - 06:38 PM UTC
Joel_W

Joined: December 04, 2010
KitMaker: 11,666 posts
AeroScale: 7,410 posts

Posted: Sunday, October 07, 2018 - 01:02 AM UTC
Magnus,
The Black wash in those prominent recessed lines really do standout, which is a concern to me. That's why I was so glad to read that in real life it's much less. It's easy to understand how the lighting for photography can create that effect of strong highlights, as well as strong shadows.
Joel
The Black wash in those prominent recessed lines really do standout, which is a concern to me. That's why I was so glad to read that in real life it's much less. It's easy to understand how the lighting for photography can create that effect of strong highlights, as well as strong shadows.
Joel
Antilles

Joined: March 22, 2015
KitMaker: 671 posts
AeroScale: 614 posts

Posted: Monday, October 08, 2018 - 03:44 AM UTC
Hi Magnus,
Your PZL comes along very nice. It looks like You were building a 1/48 kit.
Oliver
Your PZL comes along very nice. It looks like You were building a 1/48 kit.
Oliver


magnusf

Joined: May 02, 2006
KitMaker: 1,953 posts
AeroScale: 1,902 posts

Posted: Tuesday, October 09, 2018 - 08:18 AM UTC
Lars! Pick one up, it's a sweet kit and the engineering is first rate, just check out the struts below!
Joel! It is difficult to photograph a model so that it looks the same way in the photos as it is seen in reality, to start with the camera gets a lot "closer" in some way. The wash is a brownish shade that is a favourite of mine for enhancing detail.
Oliver! I still don't do 48!
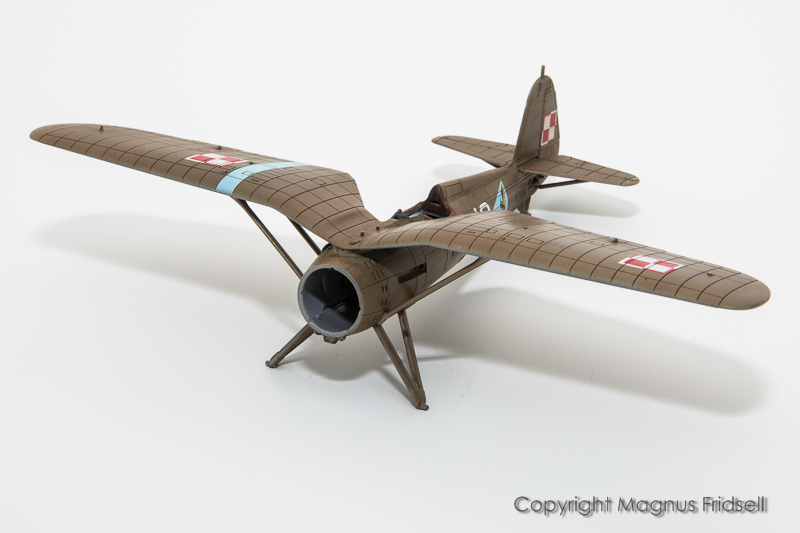
Struts finally in place.
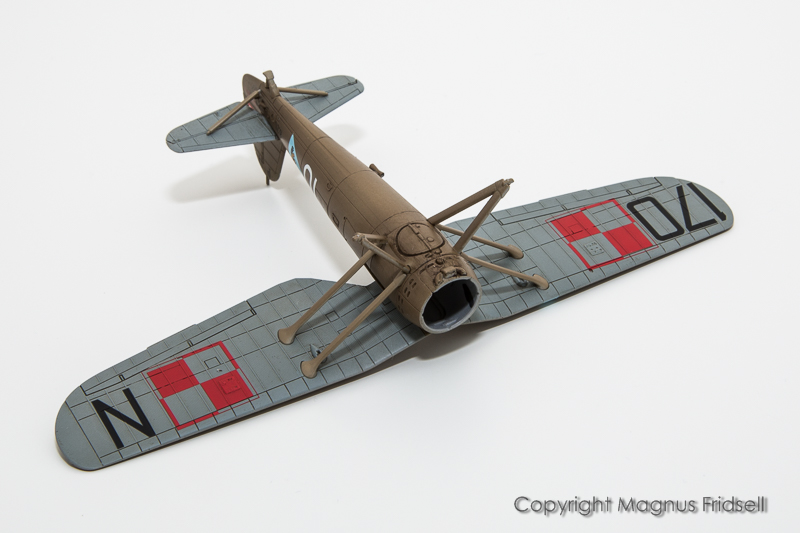
Engineering is fantastic, they just fell in place, I have secured them with white glue since they aren't structural in any way. Note that they are all slightly different, take care not to mix them up in the process!
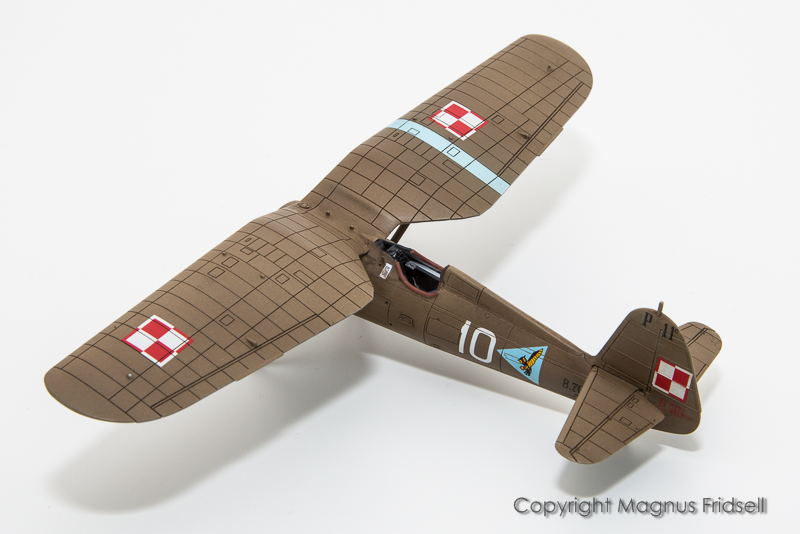
Detail painting around cockpit, leather coaming and pilot neck rest painted.
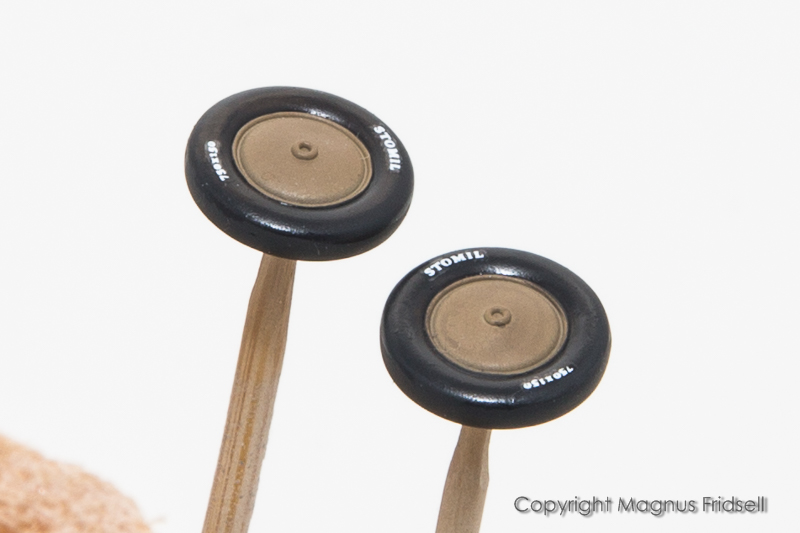
And one final nice touch: tire labels! Thanks Wojtek!

Magnus
Joel! It is difficult to photograph a model so that it looks the same way in the photos as it is seen in reality, to start with the camera gets a lot "closer" in some way. The wash is a brownish shade that is a favourite of mine for enhancing detail.
Oliver! I still don't do 48!


Struts finally in place.

Engineering is fantastic, they just fell in place, I have secured them with white glue since they aren't structural in any way. Note that they are all slightly different, take care not to mix them up in the process!

Detail painting around cockpit, leather coaming and pilot neck rest painted.

And one final nice touch: tire labels! Thanks Wojtek!

Magnus
Joel_W

Joined: December 04, 2010
KitMaker: 11,666 posts
AeroScale: 7,410 posts

Posted: Wednesday, October 10, 2018 - 02:12 AM UTC
Magnus,
Love the lettering decals on the wheels. Not an easy thing to accomplish in 1/72 scale.
for model photography, I've gone to a 3 light setup: two at about 45 degrees to the model and one overhead, softer light to help with the shadow issues. Never use a on camera flash. Other then grab shots during construction, I use a tripod, stop down as much as I can to increase the already to narrow depth of field, so my exposures run close to 1/2 second or more. For a lens I generally use a 105mm macro lens or my 18-70 zoomed out to almost 70mm (sometimes needing a 12mm extension tube). That gets me further away from the subject, and generally softens the overall image.
Joel

goodn8

Joined: October 12, 2008
KitMaker: 709 posts
AeroScale: 651 posts

Posted: Thursday, October 11, 2018 - 06:27 AM UTC
This really turns out pretty nice, Magnus!
Decals, detailing and paint job looking spot on so far. Though I'm not much impressed by any polish engeneering and constructions I love the "Pulawski-Wings".
Th mas
mas
Decals, detailing and paint job looking spot on so far. Though I'm not much impressed by any polish engeneering and constructions I love the "Pulawski-Wings".
Th
 mas
mas
magnusf

Joined: May 02, 2006
KitMaker: 1,953 posts
AeroScale: 1,902 posts

Posted: Saturday, October 13, 2018 - 05:29 AM UTC
Joel! Since I hadn't glosscoated the wheels I had almost decided to cheat on the wheel decals, I'm glad I didn't  ! And it wasn't that complicated to brush a thin layer of Andrea acrylic clear on the tire wall, it dried in about three minutes and then it was decal time... I have to stop being lazy!
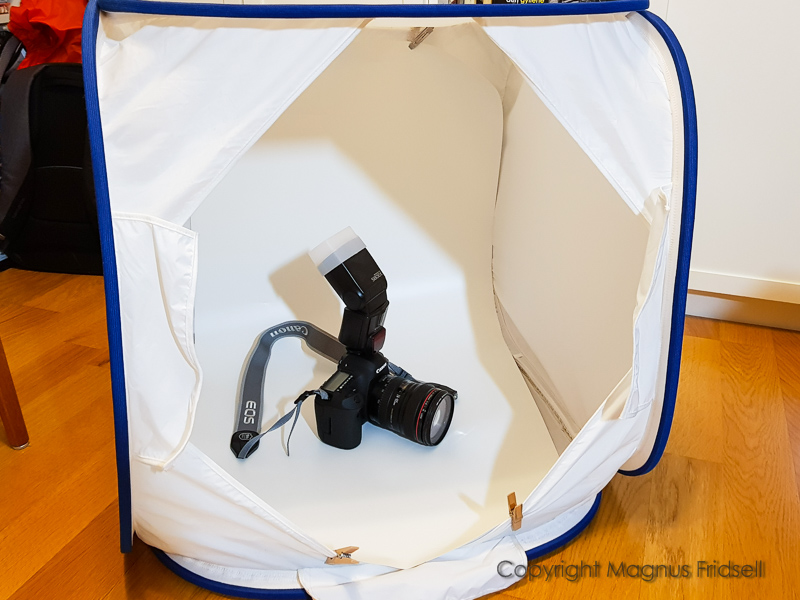
I might have shown this before but my photo setup can be seen below, I'm using a photo tent (three years in a row voted "most hated thing in the house" by my wife since I leave it unfolded wherever I forget it: kitchen table, living room table, once even on our bed ) with a curved background held up by clothes pins in both ends, and a flash with a diffuser that I aim upwards/backwards to get a good light spread.
My EOS5D Mk III camera has three preset positions on the program wheel, one of these is programmed to f/20, 1/50 s, ISO 100, flash compensation +2 (for the diffuser and the fact that the flash is aimed away from the target) and white balance for flashlight. Lens is an ordinary 24-105 "holiday zoom" with stabiliser, I don't use any fixed focal length but full model photos are usually taken somewhere in the middle of the focal range while backing off a bit, still ensuring that the flash will hit the inside of the tent though.
I've used setups with lamps before but that's a bit more work to set up since I have no room for a permanent photo studio so this turned out to be the golden compromise. And if you ask Ulrika, that tent is usually ready for action within seconds since it is standing unfolded somewhere in the house anyway !
!
Thomas! The PZL gull wings certainly are cool, the Iskra isn't bad either! Check out the PZL-130 Orlik, I would love one for myself. And don't forget the gliders, I've flown both the Jantar, the Junior and the Puchacz !
!
Some small-size meditation the other night...
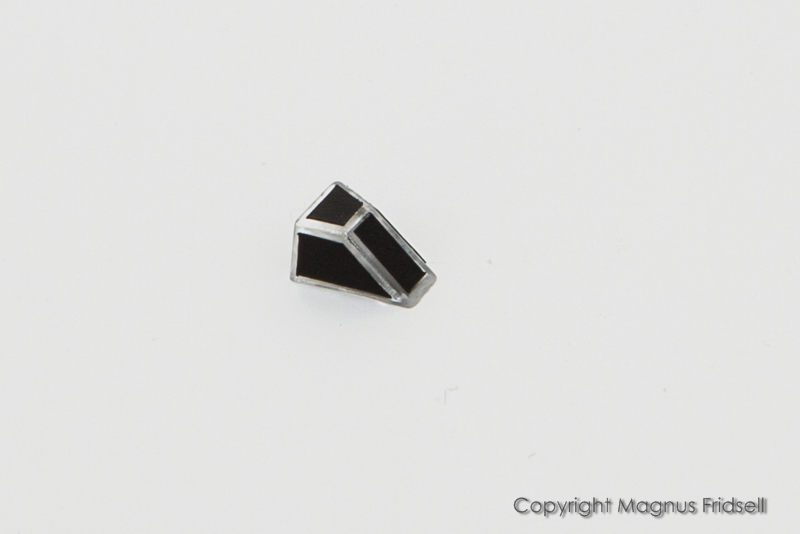
Wind screen masked, masks provided in the kit (thanks!)!
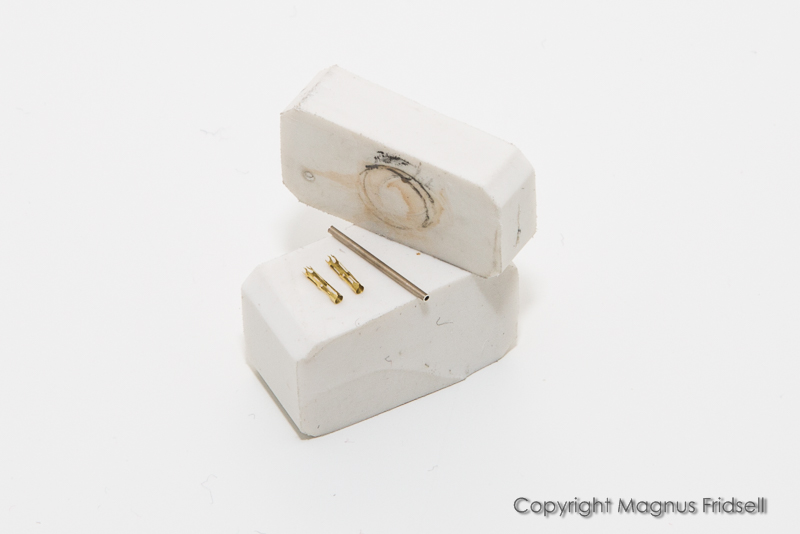
Machine guns, rolled from photo etch. I was a bit worried over this but it turned out simple, I used a suitable Albion tube and a piece of eraser to roll it against another eraser and suddenly I had a beautifully formed piece of metal!

Magnus
 ! And it wasn't that complicated to brush a thin layer of Andrea acrylic clear on the tire wall, it dried in about three minutes and then it was decal time... I have to stop being lazy!
I might have shown this before but my photo setup can be seen below, I'm using a photo tent (three years in a row voted "most hated thing in the house" by my wife since I leave it unfolded wherever I forget it: kitchen table, living room table, once even on our bed
 ) with a curved background held up by clothes pins in both ends, and a flash with a diffuser that I aim upwards/backwards to get a good light spread.
My EOS5D Mk III camera has three preset positions on the program wheel, one of these is programmed to f/20, 1/50 s, ISO 100, flash compensation +2 (for the diffuser and the fact that the flash is aimed away from the target) and white balance for flashlight. Lens is an ordinary 24-105 "holiday zoom" with stabiliser, I don't use any fixed focal length but full model photos are usually taken somewhere in the middle of the focal range while backing off a bit, still ensuring that the flash will hit the inside of the tent though.
I've used setups with lamps before but that's a bit more work to set up since I have no room for a permanent photo studio so this turned out to be the golden compromise. And if you ask Ulrika, that tent is usually ready for action within seconds since it is standing unfolded somewhere in the house anyway
 !
!
Thomas! The PZL gull wings certainly are cool, the Iskra isn't bad either! Check out the PZL-130 Orlik, I would love one for myself. And don't forget the gliders, I've flown both the Jantar, the Junior and the Puchacz
 !
!Some small-size meditation the other night...

Wind screen masked, masks provided in the kit (thanks!)!

Machine guns, rolled from photo etch. I was a bit worried over this but it turned out simple, I used a suitable Albion tube and a piece of eraser to roll it against another eraser and suddenly I had a beautifully formed piece of metal!

Magnus
Joel_W

Joined: December 04, 2010
KitMaker: 11,666 posts
AeroScale: 7,410 posts

Posted: Saturday, October 13, 2018 - 06:43 AM UTC
Quoted Text
Joel! Since I hadn't glosscoated the wheels I had almost decided to cheat on the wheel decals, I'm glad I didn't! And it wasn't that complicated to brush a thin layer of Andrea acrylic clear on the tire wall, it dried in about three minutes and then it was decal time... I have to stop being lazy!
I might have shown this before but my photo setup can be seen below, I'm using a photo tent (three years in a row voted "most hated thing in the house" by my wife since I leave it unfolded wherever I forget it: kitchen table, living room table, once even on our bed) with a curved background held up by clothes pins in both ends, and a flash with a diffuser that I aim upwards/backwards to get a good light spread.
My EOS5D Mk III camera has three preset positions on the program wheel, one of these is programmed to f/20, 1/50 s, ISO 100, flash compensation +2 (for the diffuser and the fact that the flash is aimed away from the target) and white balance for flashlight. Lens is an ordinary 24-105 "holiday zoom" with stabiliser, I don't use any fixed focal length but full model photos are usually taken somewhere in the middle of the focal range while backing off a bit, still ensuring that the flash will hit the inside of the tent though.
I've used setups with lamps before but that's a bit more work to set up since I have no room for a permanent photo studio so this turned out to be the golden compromise. And if you ask Ulrika, that tent is usually ready for action within seconds since it is standing unfolded somewhere in the house anyway!

Thomas! The PZL gull wings certainly are cool, the Iskra isn't bad either! Check out the PZL-130 Orlik, I would love one for myself. And don't forget the gliders, I've flown both the Jantar, the Junior and the Puchacz!
Some small-size meditation the other night...
Wind screen masked, masks provided in the kit (thanks!)!
Machine guns, rolled from photo etch. I was a bit worried over this but it turned out simple, I used a suitable Albion tube and a piece of eraser to roll it against another eraser and suddenly I had a beautifully formed piece of metal!

Magnus
Magnus,
I'm super impressed with how your rolled those barrels. the one time I tried it, I completely ruined all of them.
Nice photo setup. A single bounce flash works great in an enclosed space like that. My 3 light setup is my work bench cleaned off, my desklamp for overhead and back fill, and two side tensor lamps (one of which I use for modeling as well). I just started using Micro fiber towels that I tape to the wall and let it drape over the side of the table. I'm still looking for a min of 24 inches x 24 inches in a nice blue. So far I haven't come close. I shoot with Canon's competitor: D7100 Nikon and either a 18-70mm lens or my 105mm macro lens.
Joel

magnusf

Joined: May 02, 2006
KitMaker: 1,953 posts
AeroScale: 1,902 posts

Posted: Saturday, October 13, 2018 - 05:40 PM UTC
Joel! A box of plastic erasers is probably the cheapest most useful thing I have ever bought for my hobby  ! Cut it into jigs, sanding blocks of whatever shape you desire, supports, paint stands and now an anvil for rolling PE! And if you ever make a spelling mistake, you can even use them for what they were intended for from the beginning
  !
!
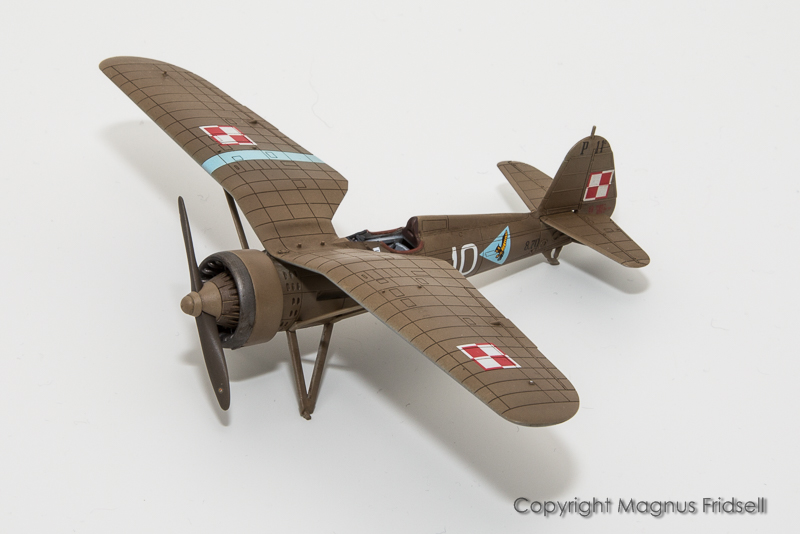
Almost there, should be finished within next week I hope!

Magnus
 ! Cut it into jigs, sanding blocks of whatever shape you desire, supports, paint stands and now an anvil for rolling PE! And if you ever make a spelling mistake, you can even use them for what they were intended for from the beginning
  !
!
Almost there, should be finished within next week I hope!

Magnus
Joel_W

Joined: December 04, 2010
KitMaker: 11,666 posts
AeroScale: 7,410 posts

Posted: Sunday, October 14, 2018 - 02:40 AM UTC
Quoted Text
Joel! A box of plastic erasers is probably the cheapest most useful thing I have ever bought for my hobby! Cut it into jigs, sanding blocks of whatever shape you desire, supports, paint stands and now an anvil for rolling PE! And if you ever make a spelling mistake, you can even use them for what they were intended for from the beginning
!
Almost there, should be finished within next week I hope!

Magnus
Magnus,
Going to get a few today.
Joel
phumbles

Joined: June 14, 2013
KitMaker: 82 posts
AeroScale: 81 posts
Posted: Tuesday, October 16, 2018 - 09:23 PM UTC
Hi Magnus,I am curious about what thinner you used for the Hataka paints as I have a couple of Polish aircraft to do. Thanks Phil

magnusf

Joined: May 02, 2006
KitMaker: 1,953 posts
AeroScale: 1,902 posts

Posted: Tuesday, October 16, 2018 - 09:55 PM UTC
Joel! If you find some new uses for the erasers, please share them  !
!
Phil! I used Hataka's dedicated thinner for their "orange line" paints, I think that both Gunze's ("Flattening thinner") and Tamiya's ("Yellow cap") laquer thinners will work fine. And you'll only need it for thinning since airbrush cleaning can be done with alcohol, both safer and cheaper.

Magnus
 !
!Phil! I used Hataka's dedicated thinner for their "orange line" paints, I think that both Gunze's ("Flattening thinner") and Tamiya's ("Yellow cap") laquer thinners will work fine. And you'll only need it for thinning since airbrush cleaning can be done with alcohol, both safer and cheaper.

Magnus

magnusf

Joined: May 02, 2006
KitMaker: 1,953 posts
AeroScale: 1,902 posts

Posted: Sunday, October 21, 2018 - 08:33 AM UTC
Almost there take II  ! There are always those little bits and pieces to fix that have been missed earlier in the build, the most obvious being some rigging on the landing gear and some extra hardware that goes with the antenna wires.
Rear view mirror size XL added...

Magnus
 ! There are always those little bits and pieces to fix that have been missed earlier in the build, the most obvious being some rigging on the landing gear and some extra hardware that goes with the antenna wires.

Rear view mirror size XL added...

Magnus
Szmann

Joined: September 02, 2014
KitMaker: 1,977 posts
AeroScale: 295 posts

Posted: Tuesday, October 23, 2018 - 03:03 AM UTC
Hi, Magnus! I just caught up with your build! Pure splendor and stunning craftsmanship! I should have read it earlier, because I just failed to roll a perforated metallic sleeve on a barrel in 1/35th in my last build! (Argh! - two erasers!  ). And thank you for introducing me to Arma Hobby. Looks much better than I would ever guess.
Cheers!
Gabriel
 ). And thank you for introducing me to Arma Hobby. Looks much better than I would ever guess.
Cheers!
Gabriel


BlackWidow

Joined: August 09, 2009
KitMaker: 1,732 posts
AeroScale: 1,336 posts

Posted: Tuesday, October 23, 2018 - 06:19 AM UTC
Very lovely little build, Magnus! Top notch! From the last photo you can see how the decals were sucked in the panel lines. And I won't imagine now, this is 1/72 .... 
Torsten

Torsten


magnusf

Joined: May 02, 2006
KitMaker: 1,953 posts
AeroScale: 1,902 posts

Posted: Tuesday, October 23, 2018 - 07:19 AM UTC
Gabriel! Thanks  ! I hope you get another chance to roll some photo etch so you can try out the erasers!
Torsten! Being used to small-scale helps ! The decals were quite a lot of work, there were MANY applications of setting solution before getting them to settle. Thanks!
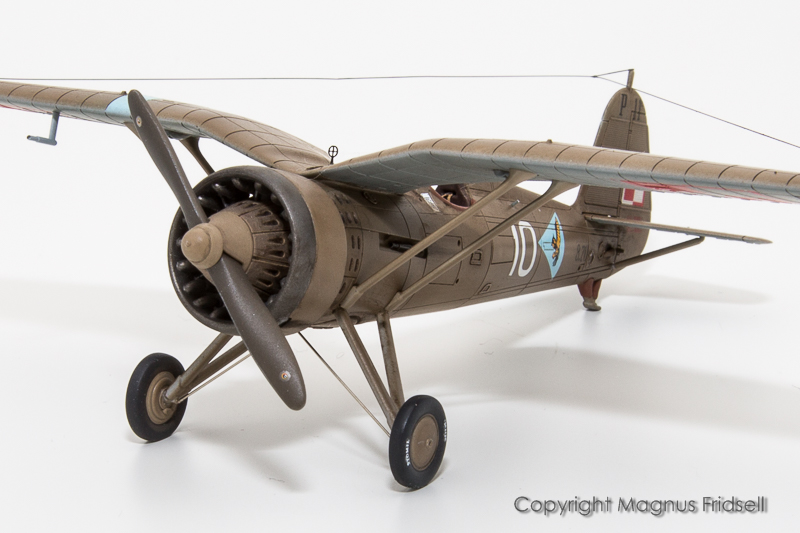
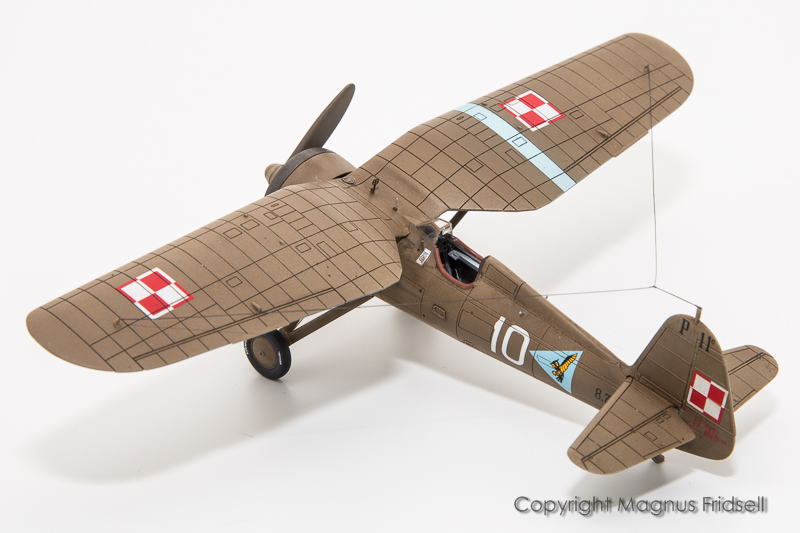
So, now it finally is officially finished ! Final tasks were weathering the wheels (I'm not too happy with it, might return to them at a later date) and adding the last parts to the rather complex antenna installation.
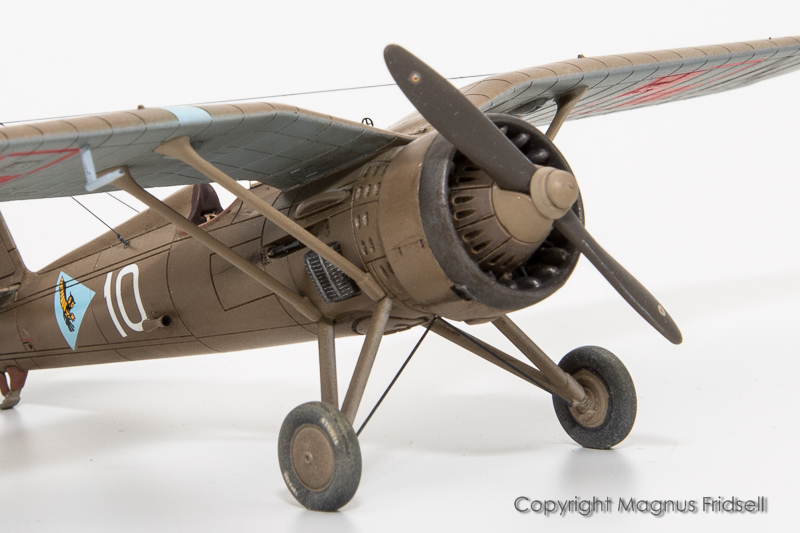
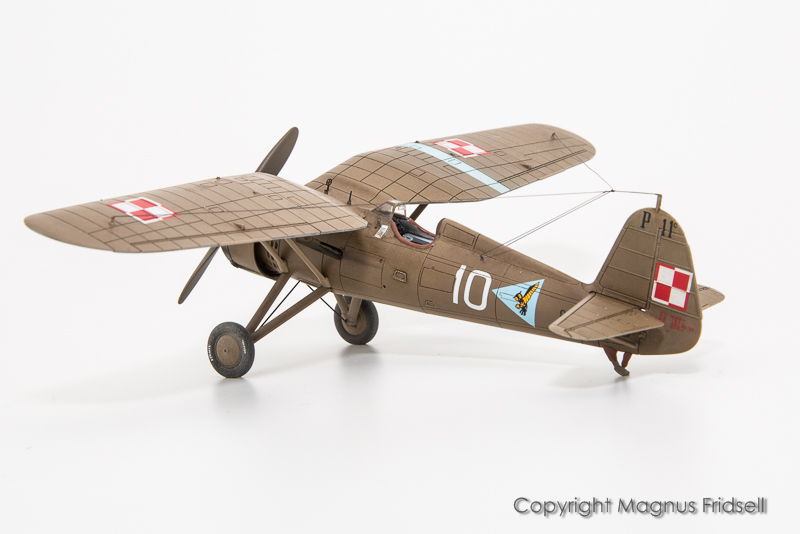
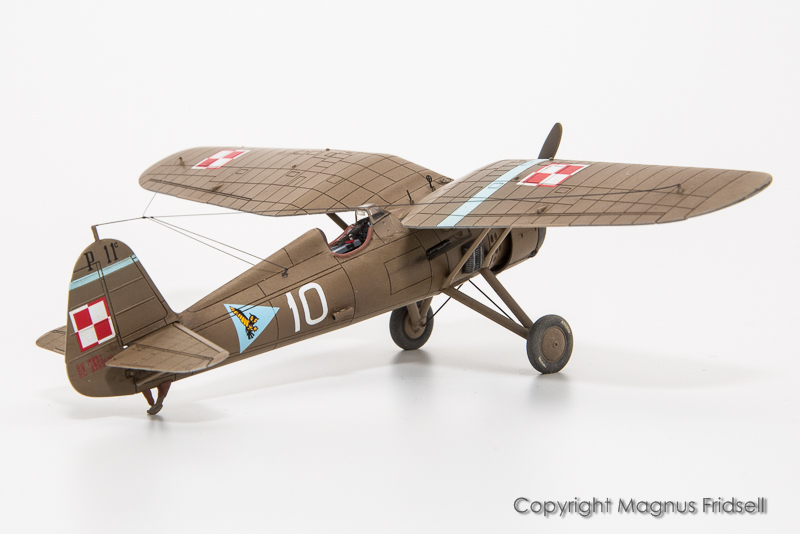
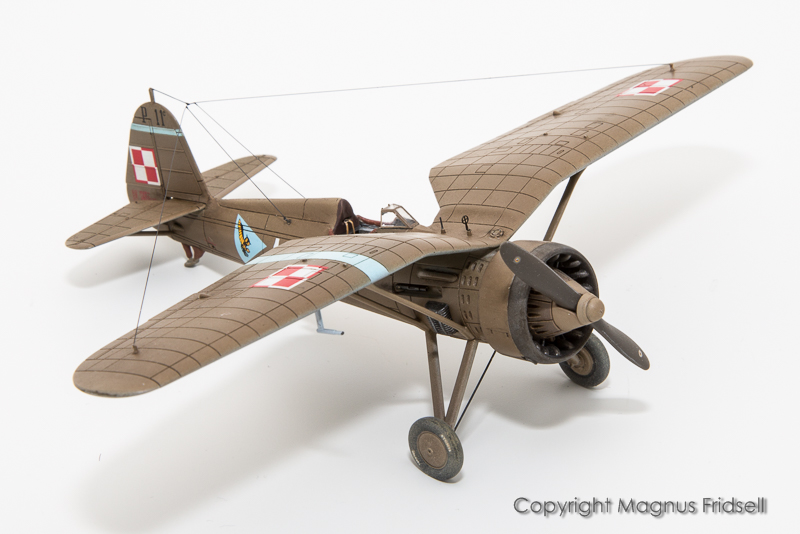
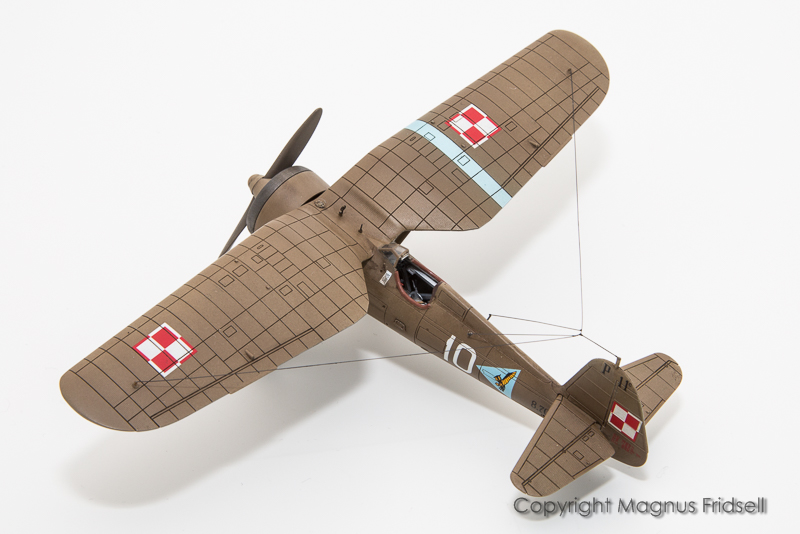
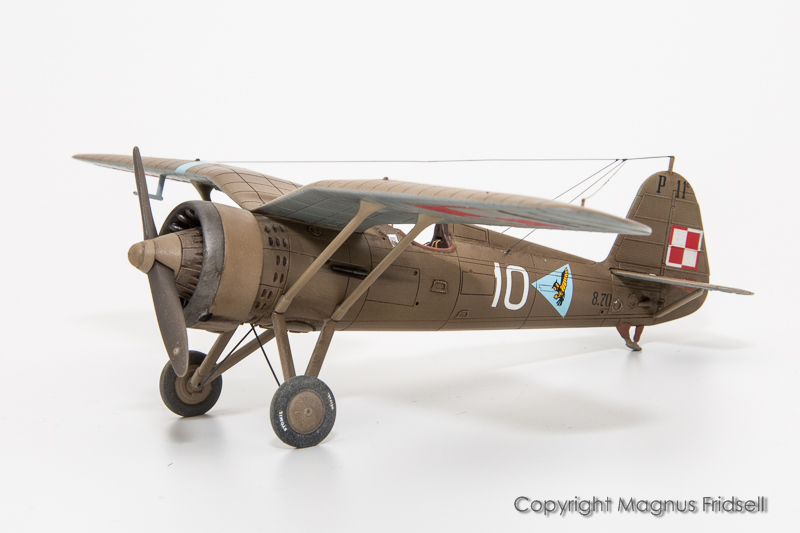
This has been a thoroughly enjoyable build, it is a simple and very well-engineered kit of a somewhat rare subject that is well detailed already out of the box. The added goodies in the "Expert" boxings bring it one bit further and are well worth the moderately higher price.
I'm looking forward to the Hurricane that hopefully gets released within a few weeks and I'm even pondering over getting myself an Iskra!
One thing I wish was included is a sketch of the antenna installation and the extra struts/wires between the wheels and the fuselage.
I rate it a solid 8 on a scale of 10! Recommended for anyone from your average PZL-enthusiast to the modeller who wants a fun and simple build !
!

With a final "Uwaga!" it has now moved on to the collection and the avatar has been peacefully retired...

Magnus
 ! I hope you get another chance to roll some photo etch so you can try out the erasers!
Torsten! Being used to small-scale helps
 ! The decals were quite a lot of work, there were MANY applications of setting solution before getting them to settle. Thanks!
So, now it finally is officially finished
 ! Final tasks were weathering the wheels (I'm not too happy with it, might return to them at a later date) and adding the last parts to the rather complex antenna installation.


This has been a thoroughly enjoyable build, it is a simple and very well-engineered kit of a somewhat rare subject that is well detailed already out of the box. The added goodies in the "Expert" boxings bring it one bit further and are well worth the moderately higher price.
I'm looking forward to the Hurricane that hopefully gets released within a few weeks and I'm even pondering over getting myself an Iskra!
One thing I wish was included is a sketch of the antenna installation and the extra struts/wires between the wheels and the fuselage.
I rate it a solid 8 on a scale of 10! Recommended for anyone from your average PZL-enthusiast to the modeller who wants a fun and simple build
 !
!With a final "Uwaga!" it has now moved on to the collection and the avatar has been peacefully retired...

Magnus
Szmann

Joined: September 02, 2014
KitMaker: 1,977 posts
AeroScale: 295 posts

Posted: Tuesday, October 23, 2018 - 08:10 AM UTC
Superb! You've rendered me speechless, Magnus!
phumbles

Joined: June 14, 2013
KitMaker: 82 posts
AeroScale: 81 posts
Posted: Saturday, October 27, 2018 - 08:43 PM UTC
Hi Magnus ;thank you for your reply to my question. You have done a beautiful job on this. Regards Phil. 

thegirl

Joined: January 19, 2008
KitMaker: 6,743 posts
AeroScale: 6,151 posts

Posted: Sunday, October 28, 2018 - 12:27 AM UTC
Another wonderful project Magnus . Really impressed with this build .
Whats next ?
Terri
Whats next ?
Terri

goodn8

Joined: October 12, 2008
KitMaker: 709 posts
AeroScale: 651 posts

Posted: Sunday, October 28, 2018 - 12:48 AM UTC
Magnus,
beautifully done in all aspects!
Thanks for sharing your work and hopefully see you back soon with another nice subject.
Really thinking about to get a kit from ArmaHobby in the future.
Cheers
Th mas
mas
beautifully done in all aspects!
Thanks for sharing your work and hopefully see you back soon with another nice subject.
Really thinking about to get a kit from ArmaHobby in the future.
Cheers

Th
 mas
masJoel_W

Joined: December 04, 2010
KitMaker: 11,666 posts
AeroScale: 7,410 posts

Posted: Sunday, October 28, 2018 - 02:05 AM UTC
Magnus,
Just a 1st rate build. The finished model really is very well done. as for the all those Antenna wires, you made it look rather easy and straight forward, but I'm quite sure that it was a nightmare and took great skill and a really soft touch to get them to look that way.
Joel
Just a 1st rate build. The finished model really is very well done. as for the all those Antenna wires, you made it look rather easy and straight forward, but I'm quite sure that it was a nightmare and took great skill and a really soft touch to get them to look that way.
Joel

magnusf

Joined: May 02, 2006
KitMaker: 1,953 posts
AeroScale: 1,902 posts

Posted: Sunday, October 28, 2018 - 06:26 PM UTC
Friends! Thanks a lot for your kind comments  !
!
As I said earlier, this was a fun build that I can recommend to anyone with an interest in the less mainstream!
Terri Back to the Lanc now...
Joel! Patience and sprue obviously can take one further than one expect One thread at a time and letting the glue set in between did the trick!
Finally, a friend at another site asked about the size of the PZL. I took out a standard Spitfire (the Eduard 1/72 Mk VIII to be precise) as a comparison: the PZL is slightly smaller but not by much!
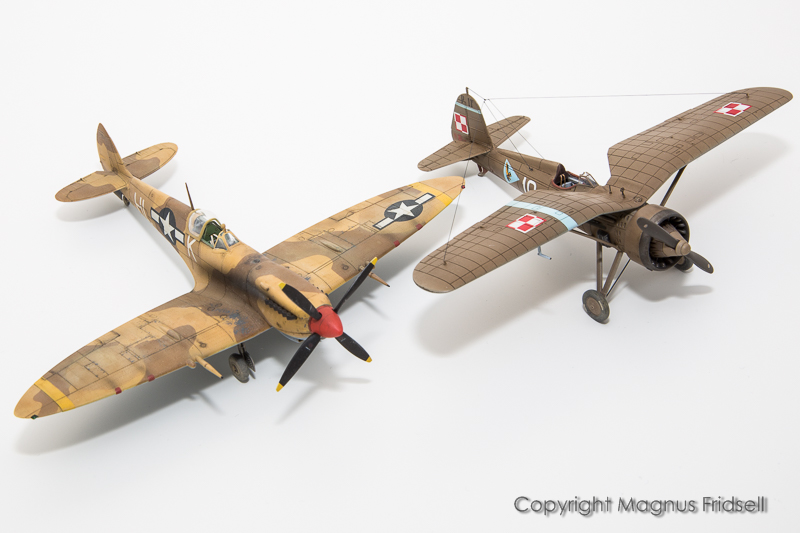

Magnus
 !
!As I said earlier, this was a fun build that I can recommend to anyone with an interest in the less mainstream!
Terri Back to the Lanc now...
Joel! Patience and sprue obviously can take one further than one expect
 One thread at a time and letting the glue set in between did the trick!
Finally, a friend at another site asked about the size of the PZL. I took out a standard Spitfire (the Eduard 1/72 Mk VIII to be precise) as a comparison: the PZL is slightly smaller but not by much!


Magnus
Posted: Wednesday, October 31, 2018 - 08:51 AM UTC
ah, Magnus! This is where you have been hiding! And here's me thinking you were hiding in the Lancaster with a riveting tool! 
This is beautiful work, as per your usual excellent standard!
Arma hobbies are making some interesting kits: I'm watching closely their development of the metal wing Hurricane due for imminent release
Looking forward to seeing more progress on the Lanc soon

This is beautiful work, as per your usual excellent standard!

Arma hobbies are making some interesting kits: I'm watching closely their development of the metal wing Hurricane due for imminent release

Looking forward to seeing more progress on the Lanc soon

 |


