_GOTOBOTTOM
World War II: Great Britain
Aircraft of Great Britain in WWII.
Hosted by Rowan Baylis
Hawker Typhoon, progress
Holdfast
Staff MemberPresident
IPMS-UK KITMAKER BRANCH
#056
_VISITCOMMUNITY
England - South West, United Kingdom
Joined: September 30, 2002
KitMaker: 8,581 posts
AeroScale: 4,913 posts
Posted: Tuesday, June 15, 2004 - 07:15 AM UTC
Here's my Hawker Typhoon, the first pics show the gap on top of the fuselage decking, after gluing the inserts to each of the fuselage sides before bringing them together. Oddly the port side comes to the centre line and the gap is caused by the starboard half being short. The size is correct for the windscreen part of the canopy, but to get the sliding half to fit correctly you need to bring the front of the rear section together. This is easily done and caused no great drama, other than the gluing, trimming and sanding. Also the canopy rail, on the spine had to go, to be replaced with square stock.:


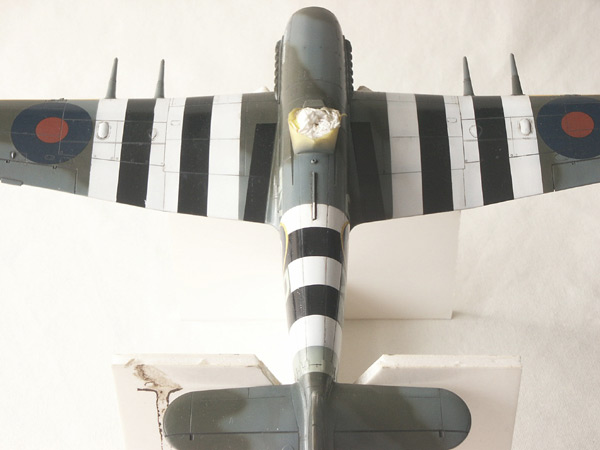
This model was under construction for the Overlord 2004 campaign. I really wanted to finish it, to honour the men who took part in the D-Day landings. Time was against me and I had got to the stage where I couls finish it, providing nothing went wrong. This is when I made the fatal mistake of using an unfamiliar brand of paint, Tamiya. I ended up with a "pebble dash" finish. I tried sanding it off but in places took the paint off completely. This ment respraying, which I haven't done yet.


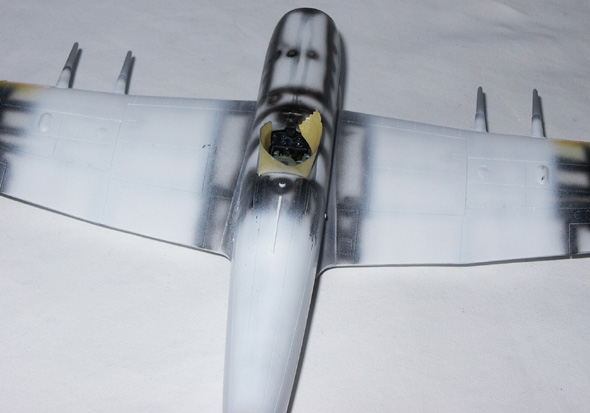
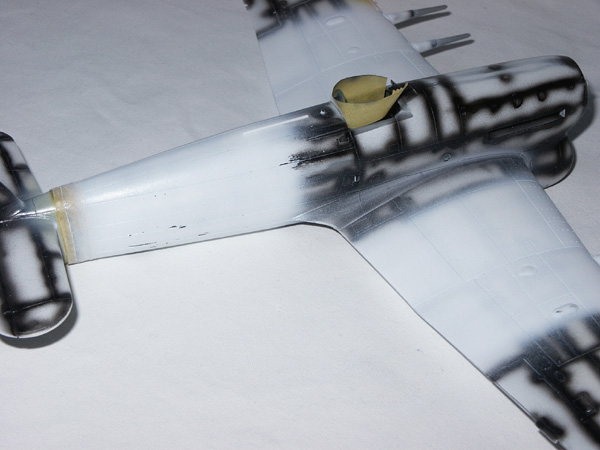
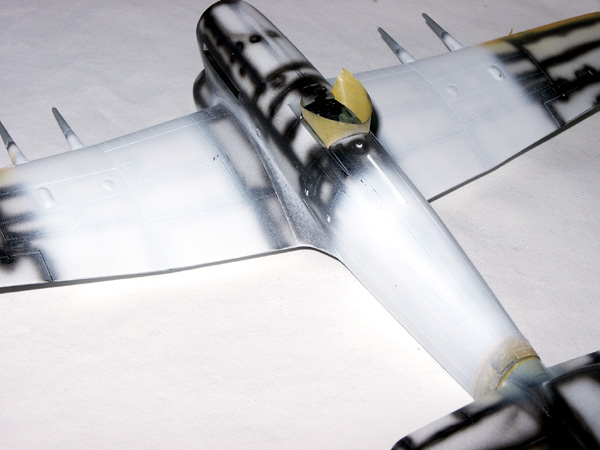
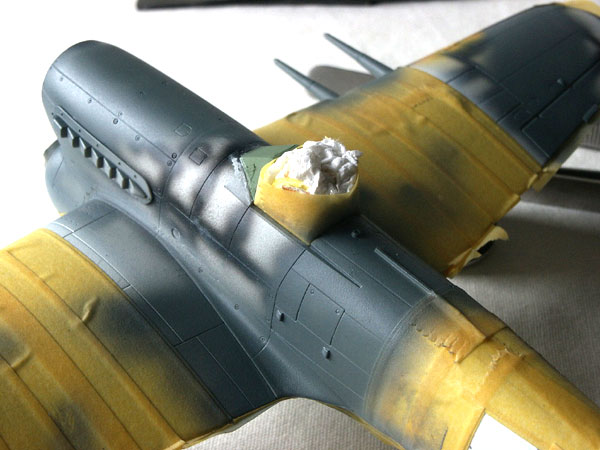
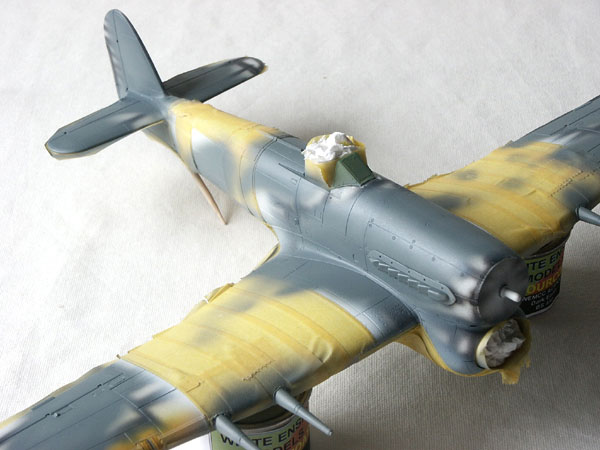
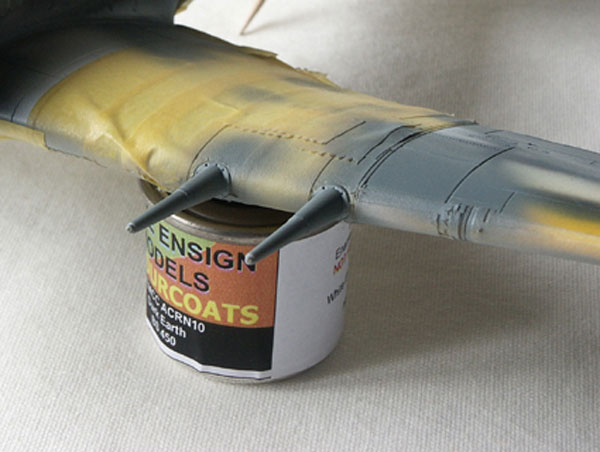
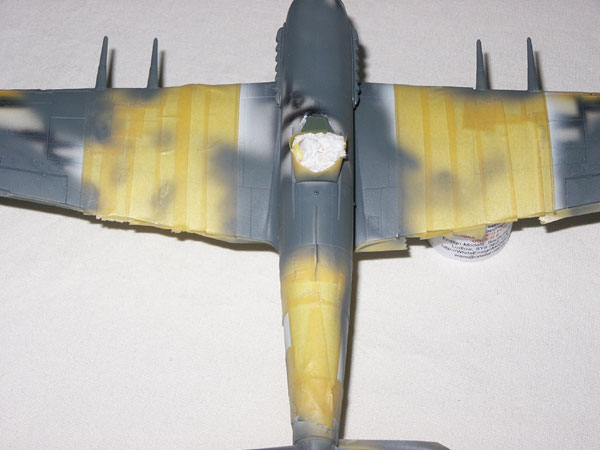
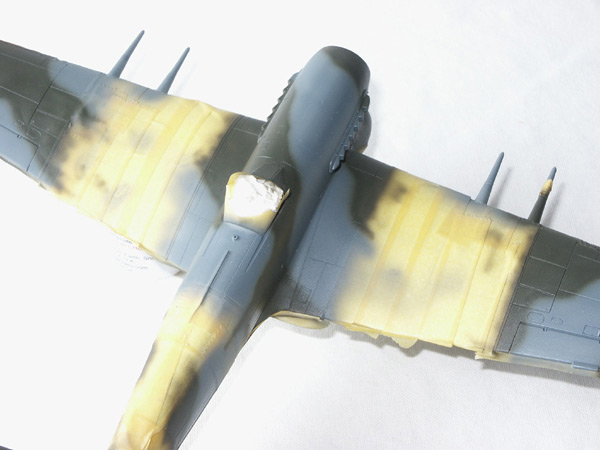
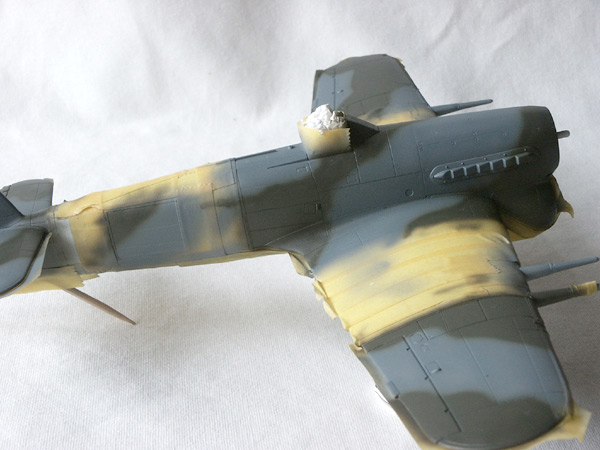
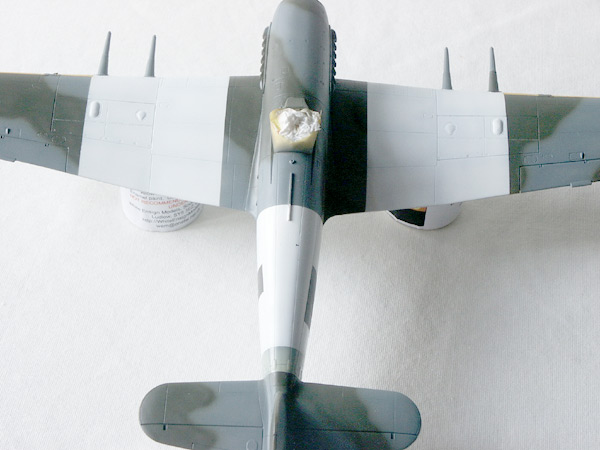
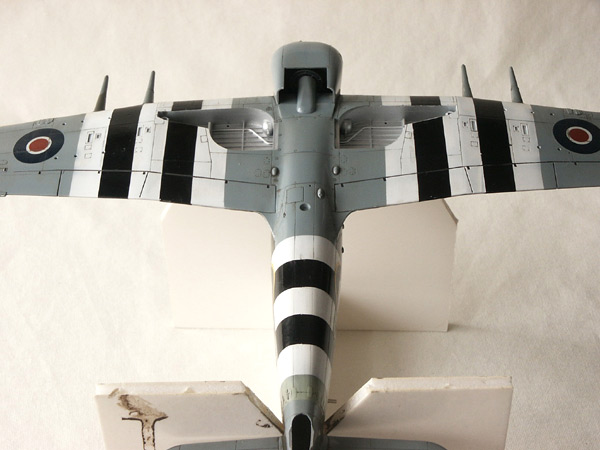
For those who have read my article on pre-shading may remember that I say it is very difficult to get the pre-shading effect under white (reasons explained in the article) and I advocate using white as a primer (which I always use now). These next pics show that it works. Here The model is primed, with white auto plastic primer, pre-shaded with black, the I.D. elements have been added, sky band and yellow wing leading edges and the white, for the D-Day stripes has been applied and sanded (after the pebble dashing effect)

Mal
Merlin
Staff MemberSenior Editor
AEROSCALE
#017
_VISITCOMMUNITY
United Kingdom
Joined: June 11, 2003
KitMaker: 17,582 posts
AeroScale: 12,795 posts
Posted: Tuesday, June 15, 2004 - 08:00 AM UTC
Hi Mal

Wow!! That is one heck of a seam!... not what we expect from Hasegawa... That's more akin to what I take for granted in a short-run kit! I've got one of these on the shelf, so thanks for the heads up!

One thing I'd love to get sorted out... some references say that Typhoon and Tempest cockpits were finished in black, others say grey-green. Are both right? It'd be great to put this one to bed!

Re- weathering invasion stripes... remember they were painted on just prior to D-Day, so they may or may not appear worn, depending on what date you're depicting.

It might have missed Overlord, but this'll be a STUNNER for the Storm Build!

All the best

Rowan
OllieC-FWOL
_VISITCOMMUNITY
Quebec, Canada
Joined: March 31, 2004
KitMaker: 446 posts
AeroScale: 0 posts
Posted: Tuesday, June 15, 2004 - 12:15 PM UTC
Nice Typhie!!

I have the same waiting to be built, it'll end up as a 440 Sqn. bird. Then I need another two for 438 and 439 Sqns.!!!

One will be Hase, the other Monogram (gotta limit the spendings!!).


Keep up the good work buddy!!

Holdfast
Staff MemberPresident
IPMS-UK KITMAKER BRANCH
#056
_VISITCOMMUNITY
England - South West, United Kingdom
Joined: September 30, 2002
KitMaker: 8,581 posts
AeroScale: 4,913 posts
Posted: Wednesday, June 16, 2004 - 06:47 AM UTC
Yeah, it's a wierd gap, like I say the port half is about perfect. The gap is there because the starboard half is short. If you were to join the insert together first, then try and fit it to the rest of the fuselage you would have megga problems. As it is the front is the correct width, with the gap, for the windscreen, so you need to fill in the gap. Not a major deal. If you do this with the rear then you will loose both the base for the anti-collision light and the canopy rail. However, when I test fitted the canopy, the rear deck was just a tad to wide. If I held it together the canopy fitted better. So I braught the front of the rear deck together, which ment I saved the light base as well. You can see in the last 3 picks that the light base is central, I have also added a replacement canopy rail. I'nt modelling fun :-)

Quoted Text

One thing I'd love to get sorted out... some references say that Typhoon and Tempest cockpits were finished in black, others say grey-green. Are both right? It'd be great to put this one to bed!


I could not get any deffinate answer to this question. I'm sort of guessing that early-ish Typhoons had Int green and later ones and Tempests had black? But I don't know for sure. The Tempest I have on the go has Int green at the moment, but I'm planning on re-painting it black.

Quoted Text

Re- weathering invasion stripes... remember they were painted on just prior to D-Day, so they may or may not appear worn, depending on what date you're depicting.


Yep, thought about this too, Rowan. I plan on using a grey wash in the panel lines, on the white areas. As the guns would have been loaded/re-loaded, I'll do some minor paint chipping, just around the gun panels, showing the underlying Green/Grey cammo. The rest of the airframe will be slightly more heavily weathered.

Quoted Text

One will be Hase, the other Monogram


Thanks OllieC-FWOL, I have a Monogram Typhoon, partly built. Nice kit, I re-scribed the panel lines. Not sure why it's not complete, I'll have to look into that.
Mal
Merlin
Staff MemberSenior Editor
AEROSCALE
#017
_VISITCOMMUNITY
United Kingdom
Joined: June 11, 2003
KitMaker: 17,582 posts
AeroScale: 12,795 posts
Posted: Wednesday, June 16, 2004 - 07:53 AM UTC
Hi Mal

I can't wait to see this one finished!

I wonder whether the black or grey-green depended on whether an aircraft was Hawker or Gloster - built? A theory at least...

I've come to the same conclusion about invasion stripes; just a little weathering to add "character" - totally clean looks too "toy-like".

It might be "artistic licence"... but, in my book, you and some of the other guys and gals on Armorama are true artists!

Sorry, in my query about the colour, I forgot to say the cockpit details look superb! How did you do the panel and seat-harness?

All the best

Rowan
Holdfast
Staff MemberPresident
IPMS-UK KITMAKER BRANCH
#056
_VISITCOMMUNITY
England - South West, United Kingdom
Joined: September 30, 2002
KitMaker: 8,581 posts
AeroScale: 4,913 posts
Posted: Thursday, June 17, 2004 - 08:26 AM UTC

Quoted Text

Sorry, in my query about the colour, I forgot to say the cockpit details look superb! How did you do the panel and seat-harness?


Seat harness is good old Eduard coloured etch. The instrument panel is the kit item, painted flat black, dry brushed with dark grey. I then dry brush the dial details with white, I then re-paint the bezels semi-gloss black and add Klear to the dial faces, to represent glass. Details are then picked out with appropriate colours.

PM, I intend to enter a Westland Whirlwind into the storm force campaign but I will enter this as well

Mal
Holdfast
Staff MemberPresident
IPMS-UK KITMAKER BRANCH
#056
_VISITCOMMUNITY
England - South West, United Kingdom
Joined: September 30, 2002
KitMaker: 8,581 posts
AeroScale: 4,913 posts
Posted: Tuesday, August 31, 2004 - 05:31 AM UTC
An update on my Typhoon
Masked up to the eyeballs, this finished off my supply of Tamiya masking tape, hope it's worth it

The Ocean Grey was applied, using my new airbrush and White Ensign Colourcoats enamel paint. (I am in the process of writing a review on these paints)


The masking took a bit of thought, in places. Apart from masking around the cannon areas had to be carefully measured, on the fuselage sides, to accommodate the codes. These had areas left around them, in the original camo colours.


Mal
MrRoo
_VISITCOMMUNITY
Queensland, Australia
Joined: October 07, 2002
KitMaker: 3,856 posts
AeroScale: 0 posts
Posted: Tuesday, August 31, 2004 - 06:59 AM UTC
This is one plane type I have always liked and it appears to me you are doing a superb job of it. I look forward to seeing the finished plane and I know it will be to a high standard.

Cliff

PS> No I do not want to do one myself :-)
SpiritsEye
_VISITCOMMUNITY
Singapore / 新加坡
Joined: May 09, 2004
KitMaker: 1,041 posts
AeroScale: 0 posts
Posted: Tuesday, August 31, 2004 - 02:17 PM UTC
wow looking good Mal

Merlin
Staff MemberSenior Editor
AEROSCALE
#017
_VISITCOMMUNITY
United Kingdom
Joined: June 11, 2003
KitMaker: 17,582 posts
AeroScale: 12,795 posts
Posted: Tuesday, August 31, 2004 - 03:20 PM UTC
Hi Mal

Looking good! !

What's your first impression of the Colourcoats in terms of application and accuracy? (For some reason, I expected them to be gloss finish like Xtracolour)

All the best

Rowan
flitzer
_VISITCOMMUNITY
England - North West, United Kingdom
Joined: November 13, 2003
KitMaker: 2,240 posts
AeroScale: 743 posts
Posted: Tuesday, August 31, 2004 - 05:17 PM UTC
Hi Mal...
so there is life after...no...inbetween Spitfires.
The old battle axe is one of my favourites and this promises to be a cracker.

Looking at that gap...it brought to mind A Bridge Too Far....but well filled.

Cheers and looking forward to more pics....

Cheers again
Peter
:-)
Holdfast
Staff MemberPresident
IPMS-UK KITMAKER BRANCH
#056
_VISITCOMMUNITY
England - South West, United Kingdom
Joined: September 30, 2002
KitMaker: 8,581 posts
AeroScale: 4,913 posts
Posted: Thursday, September 02, 2004 - 05:15 AM UTC

Quoted Text

What's your first impression of the Colourcoats in terms of application and accuracy? (For some reason, I expected them to be gloss finish like Xtracolour)


First impressions of colourcoats is that they're excellant. They cover well, even well thinned for intricate work, as you can see with the freehand application of the dark green. I can't comment on there accuracy, as I have nothing to compare them with, but they look good to me :-) They are prodoced to the same formula as Xtracolor, but are a smooth semi gloss, rather than gloss. This prevides a suitably smooth surface for decals, but the paint dries far quicker than Xtracolor. With out using driers, it was cured after 24 hours. I also did a test with driers, more in the review.


Quoted Text

so there is life after...no...inbetween Spitfires.
The old battle axe is one of my favourites and this promises to be a cracker


A Mk V Spit was supposed to be the next up, but I need codes for it, anyone got RAF 30" Sky codes that are not required, I need YO-Q

Update pics, dark green added, freehand.


Mal
propboy44256
_VISITCOMMUNITY
Ohio, United States
Joined: November 20, 2002
KitMaker: 1,038 posts
AeroScale: 285 posts
Posted: Thursday, September 02, 2004 - 11:40 PM UTC
Hey Mal:

How long does it normally take you to build a 1/48 scale plane-start to finish?

Johnny
Holdfast
Staff MemberPresident
IPMS-UK KITMAKER BRANCH
#056
_VISITCOMMUNITY
England - South West, United Kingdom
Joined: September 30, 2002
KitMaker: 8,581 posts
AeroScale: 4,913 posts
Posted: Friday, September 03, 2004 - 03:17 AM UTC
Hi Johnny, to be perfectly honest I haven't got a clue obviously some require more effort than others and therefor probably take longer to complete. The masking on this Typhoon took a long time to do, but is worth it. Sometimes, what appears to be a simple project stalls for lack of skill, detail or reference, or a million and one other things...............(excuses)............. My Do 17z is a case in point, it started out as a simple project, but the props and spinners are awful. I tried alsorts to rectify the problem but couldn't get them to my satisfaction. Recently I found props and spinners for the kit. Now, after several years it's back on the work bench.
As I don't build one at a time, but have around 30 on the go, I can go months without finishing anything, then finish many in a month. Last year I finished 19 models including 3 Bf 109, for a group build (one of which is at the top of the page ) This year I won't finish anything like as many, mainly because I won't to do more multi engined planes. I also want to do some of the more difficult kits that I have stached away, putting more in the online builds.
Mal
ShermiesRule
_VISITCOMMUNITY
Michigan, United States
Joined: December 11, 2003
KitMaker: 5,409 posts
AeroScale: 0 posts
Posted: Friday, September 03, 2004 - 05:27 AM UTC
Looking forward to seeing those invasion stripes. It will really stand out next to that dull camo
Holdfast
Staff MemberPresident
IPMS-UK KITMAKER BRANCH
#056
_VISITCOMMUNITY
England - South West, United Kingdom
Joined: September 30, 2002
KitMaker: 8,581 posts
AeroScale: 4,913 posts
Posted: Saturday, September 04, 2004 - 03:42 AM UTC
Masking removed, except for the cockpit, air intake, landing lights and nav lights.


Mal
Merlin
Staff MemberSenior Editor
AEROSCALE
#017
_VISITCOMMUNITY
United Kingdom
Joined: June 11, 2003
KitMaker: 17,582 posts
AeroScale: 12,795 posts
Posted: Saturday, September 04, 2004 - 04:17 AM UTC
Awesome Mal! It's going to be a stunner!

I thought you'd got the black stripes hidden under all that tape... Tamiya are going to love you by the time you're finished!

All the best

Rowan
brandydoguk
_VISITCOMMUNITY
England - North, United Kingdom
Joined: October 04, 2002
KitMaker: 1,495 posts
AeroScale: 643 posts
Posted: Saturday, September 04, 2004 - 05:29 AM UTC
That is going to be a beauty Mal! I can't wait to see it finished.
ShermiesRule
_VISITCOMMUNITY
Michigan, United States
Joined: December 11, 2003
KitMaker: 5,409 posts
AeroScale: 0 posts
Posted: Saturday, September 04, 2004 - 07:49 AM UTC
I might have to do a P47 next time instead of a Sherman!!
Holdfast
Staff MemberPresident
IPMS-UK KITMAKER BRANCH
#056
_VISITCOMMUNITY
England - South West, United Kingdom
Joined: September 30, 2002
KitMaker: 8,581 posts
AeroScale: 4,913 posts
Posted: Sunday, September 05, 2004 - 03:41 AM UTC

Quoted Text

thought you'd got the black stripes hidden under all that tape... Tamiya are going to love you by the time you're finished!


Hehe, Yes it would have been to easy to mask and paint the black stripes :-) I have used the kit decals and I'm pretty pleased with the results :-) I will be posting those pics soon.


Quoted Text

That is going to be a beauty Mal! I can't wait to see it finished.


Thanks Martin, I'm quite looking forward to finishing it as well :-) I'm a bit behind where I would have been, I have tried to fit etched fins to the rockets. Even building a cutting jig, to cut a crusiform into round stock. Just couldn't get it central. I was then going to replace the rockets with some from Paragon, just needed to scratch the launch clips. On closer inspection, however, I discovered pin holes in the warheads. I'm now in the process of grafting the resin fins onto the Tamiya bodies. Ain't modelling fun :-) Painting the rockets is going to be even more fun. There are 2 coloured rings, right near the tip, of the warhead. Watch out for some more interesting masking :-)


Quoted Text

I might have to do a P47 next time instead of a Sherman!!


That would be a good idea, Alan, I might join you :-)

Mal
Holdfast
Staff MemberPresident
IPMS-UK KITMAKER BRANCH
#056
_VISITCOMMUNITY
England - South West, United Kingdom
Joined: September 30, 2002
KitMaker: 8,581 posts
AeroScale: 4,913 posts
Posted: Wednesday, September 08, 2004 - 04:29 AM UTC
Decals and wash done


Decals are from the kit, 247 Sqn, the wash was done with artist oils.
Mal
Merlin
Staff MemberSenior Editor
AEROSCALE
#017
_VISITCOMMUNITY
United Kingdom
Joined: June 11, 2003
KitMaker: 17,582 posts
AeroScale: 12,795 posts
Posted: Wednesday, September 08, 2004 - 04:48 AM UTC
Hi Mal

Another beautiful build!

The cradle to keep everything safe is a neat idea. Is it made from artists' board or similar?

All the best

Rowan
SS-74
_VISITCOMMUNITY
Vatican City
Joined: May 13, 2002
KitMaker: 3,271 posts
AeroScale: 0 posts
Posted: Wednesday, September 08, 2004 - 08:24 AM UTC
Lord Holdfast,

This is one awesome looking bird, youi are one hell of good plane builder. Nice work!!!
ShermiesRule
_VISITCOMMUNITY
Michigan, United States
Joined: December 11, 2003
KitMaker: 5,409 posts
AeroScale: 0 posts
Posted: Wednesday, September 08, 2004 - 11:00 AM UTC
Oh man that is just beautiful. I fully expected the invasion stripes to look awesome just like that!
 _GOTOTOP