Here are some shots showing my A-1 Skyraider in progress.
I casted about 30 of the revetment wall sections but decided to use only a part of the wall on this base. However if I ever deciced to build an F-4 or something I have some extra to work with!
The walls are primed - the one on the right has a base color of silver on it. It will be painted and weathered some when it's done.
The base is a rough texture drawing paper glued to a foamboard base. It's been painted with Model Mater acrylic RLM 02 mixed 50:50 with Sand.
I still have lots of weathering and detailing to do to the base - but at least I got over the hump of making the walls. Oh yea - the A-1 is almost done as well. I finally have all the ordnance painted and the anti-sway braces installed. Now I need to paint the bolts, braces, and add a few antenna and it's done.
Any comments or critisim most welcome.
Regards,
--Frank
Pre-Flight Check
Constructive critique of your finished or in-progress photos.
Hosted by Jim Starkweather
A-1 Skyraider in progress
FrankC
Colorado, United States
Joined: March 14, 2004
KitMaker: 26 posts
AeroScale: 26 posts
Joined: March 14, 2004
KitMaker: 26 posts
AeroScale: 26 posts
Posted: Monday, September 06, 2004 - 02:07 PM UTC
jimbrae
Provincia de Lugo, Spain / Espaņa
Joined: April 23, 2003
KitMaker: 12,927 posts
AeroScale: 291 posts
Joined: April 23, 2003
KitMaker: 12,927 posts
AeroScale: 291 posts
Posted: Monday, September 06, 2004 - 06:02 PM UTC
Well Frank, as a card-carrying member of the 'Skyraider Fan-club', I have to say that you have done more than justice to a complicated subject...
Perhaps you need a little more weathering on the prop-blades - I personally would also dull-down the wheel hubs...
The revetment walls are truly superb - have you thought of considering selling the masters of these to an accessory company?
What about the armament? Personally I think the Skyraider looks at its best with rockets...
Thanks for sharing it with us - Nice One!, Jim
steeldog51
England - East Anglia, United Kingdom
Joined: September 04, 2004
KitMaker: 1,114 posts
AeroScale: 0 posts
Joined: September 04, 2004
KitMaker: 1,114 posts
AeroScale: 0 posts
Posted: Monday, September 06, 2004 - 06:12 PM UTC
Hi fantastic! nice weathering! i lov the "sandy"
its one of my all time fave's! i would agree that for now all i can see that looks slightly out of place are the prop blades and wheel hubs! and that she aint packin yet! , this going to be awsome when she's finished!
brilliant mate! K
its one of my all time fave's! i would agree that for now all i can see that looks slightly out of place are the prop blades and wheel hubs! and that she aint packin yet! , this going to be awsome when she's finished!
brilliant mate! K
Grumpyoldman
_ADVISOR
Florida, United States
Joined: October 17, 2003
KitMaker: 15,338 posts
AeroScale: 836 posts
Joined: October 17, 2003
KitMaker: 15,338 posts
AeroScale: 836 posts
Posted: Monday, September 06, 2004 - 06:24 PM UTC
Nice Job, brings back fond memories of watching Spads in different colors take off from the carrier deck. I use to always be amazied in my youth to the size and varied loads they carried,
and the large flames from the exhaust when revving up for take off.
Agree with Jim, perhaps a little weathering on the prop is in order to blend with the rest of the aircraft, and a little oxidation on the wheels.
Really like the revetment wall, you did a bang up job on them.
and the large flames from the exhaust when revving up for take off.
Agree with Jim, perhaps a little weathering on the prop is in order to blend with the rest of the aircraft, and a little oxidation on the wheels.
Really like the revetment wall, you did a bang up job on them.
matt
Campaigns Administrator
New York, United States
Joined: February 28, 2002
KitMaker: 5,957 posts
AeroScale: 70 posts
Joined: February 28, 2002
KitMaker: 5,957 posts
AeroScale: 70 posts
Posted: Tuesday, September 07, 2004 - 03:20 AM UTC
What did you make the walls from????
USArmy2534
Indiana, United States
Joined: January 28, 2004
KitMaker: 2,716 posts
AeroScale: 246 posts
Joined: January 28, 2004
KitMaker: 2,716 posts
AeroScale: 246 posts
Posted: Tuesday, September 07, 2004 - 03:29 AM UTC
You are doing an awesome job. I am with Jim in wondering what armament you are putting on. I also would think (and this may not be possible now) but with all the dirt, oil, and exhaust that engine has put on the aircraft, that the engine be a little more weathered on top of the comments above. Otherwise, that is a truely dirty Skyraider - just the way they really were.
Jeff
Jeff
FrankC
Colorado, United States
Joined: March 14, 2004
KitMaker: 26 posts
AeroScale: 26 posts
Joined: March 14, 2004
KitMaker: 26 posts
AeroScale: 26 posts
Posted: Tuesday, September 07, 2004 - 03:50 AM UTC
Thanks for the comments guys..
Some answers to particulars points brought up..
1. Prop - interestingly enough the props on USAF skyraiders seem to have been very well taken care of on otherwise filthy birds (I checked out www.skyraider.org extensively). I will do some weathering on the props - but not much. Infact I found a picture of a prop that has decals on it (real prop with real decals).The prop itself is flat but the decals are very glossy. I am going to try this and see how it translates in scale.. Sometimes details like that don't look right even though they are OK technically. But the prop probably won't be much more weathered than it is (other than dirtying up the tips and adding some very slight chipping to the edges and fading the black paint some).
But I do have some work to do on the model, such as flatting and weathering the tires (the gear isn't actually glued on yet - that's why it looks kinda funny) - and I apprecate the comments about toning down the wheel hubs etc. I'll make sure I take care of that stuff.
2. Ordnance - it's going to be loaded with rocket pods and cluster dispensers
Here is a shot of the scratchbuilt cluster dispensers.
3. revetment.
The revetment master was made from sheet stryrene. A simple mold was made (actually two of them to make it faster to cast sections) then castings were made from plaster - very cheap, and easy to work with (but abit messy).
Again - thanks for all the comments.
Regards,
--Frank
Quoted Text
You are doing an awesome job. I am with Jim in wondering what armament you are putting on. I also would think (and this may not be possible now) but with all the dirt, oil, and exhaust that engine has put on the aircraft, that the engine be a little more weathered on top of the comments above. Otherwise, that is a truely dirty Skyraider - just the way they really were.
Jeff
stm
Florida, United States
Joined: March 07, 2004
KitMaker: 98 posts
AeroScale: 96 posts
Joined: March 07, 2004
KitMaker: 98 posts
AeroScale: 96 posts
Posted: Friday, September 10, 2004 - 11:37 AM UTC
It is really coming along Frank. The revetment looks very good. Are you planning to do anything with the ground? Here is a good photo showing the "deck" area, it would be a bunch of work to say the least! :
The weathering comments don't need repeated. There is a whip aerial on the port side aft of the cockpit and antenna wire also, I am assuming you are waiting until is is near done to add those, to avoid damage. There were also static wicks on the rudder. The anti-collision light atop the tail is actually half clear and half red, with the red facing forward. I replaced the kit piece with a piece of clear styrene and painted the front clear red.
I am assuming that this is the Tamiya kit. The prop tips always seemed a little pointy compared to most photos. I squared them off a bit. This photo of "Bad News" shows the prop tips painted yellow, not alternating white and red and a silver hub. Was this an earlier/later prop? The "Bad News" also looks different in the photo than on the decals (though this is hardly your fault).
Overall a great effort! Throw some nape canisters under those wings and don't forget the RBF flags!
SS-74
Vatican City
Joined: May 13, 2002
KitMaker: 3,271 posts
AeroScale: 0 posts
Joined: May 13, 2002
KitMaker: 3,271 posts
AeroScale: 0 posts
Posted: Friday, September 10, 2004 - 12:00 PM UTC
As another card carrying member of the Sandy Club. This is one awesome looking skyraider. The weapon load looked very nice, and the wall makes it a very nice setting for the plane.
Very good job!
By the way, what's with the tail wheel?
Very good job!
By the way, what's with the tail wheel?
Tin_Can
Florida, United States
Joined: January 26, 2002
KitMaker: 1,560 posts
AeroScale: 750 posts
Joined: January 26, 2002
KitMaker: 1,560 posts
AeroScale: 750 posts
Posted: Saturday, September 11, 2004 - 12:28 AM UTC
Frank, another fine build-just like your 109.
I have two comments. Looks like there might be a bit of extra plastic on the trailing corner of the rudder on the sixth picture posted just below the pic showing your molding process for the walls. Also, the pins on the sway braces for the weapons and fuel tanks-re they supposed to be copper in color?
FrankC
Colorado, United States
Joined: March 14, 2004
KitMaker: 26 posts
AeroScale: 26 posts
Joined: March 14, 2004
KitMaker: 26 posts
AeroScale: 26 posts
Posted: Tuesday, September 14, 2004 - 09:52 PM UTC
Guys,
again thanks for the comments.
The Skyraider isn't quite finished so things like the pins on the weapons pylons hadn't been painted in the photo (and the tailwheel still needed to be attached).
As to the markings.. They are from an aeromaster sheet. We all know that aeromaster somtimes makes errors - big ones. After seeing the photos shown by scott -at first I was worried that this was the case. But the photos scott posted are from 609 in 1971. Some things to note are the gunship grey undersides and black tail markings that read TC -609..
Now check out this picture (which I found hiding over on www.skyraider.org)
http://www.skyraider.org/skyassn/otherpics/isham/isham.htm
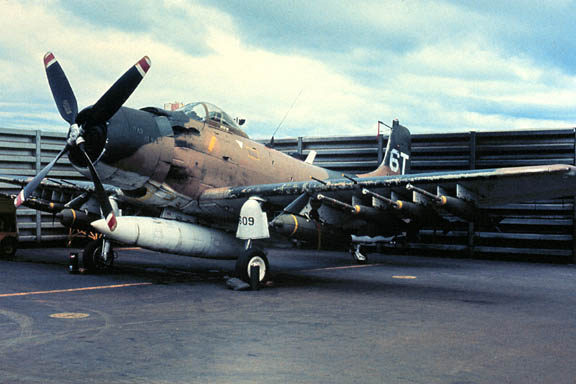
The label is "A-1H, ????75, 6th SOS @ Pleiku, Oct '69 ". I don't know why the website doesn't link to the photo, or why the caption doesn't reflect the last three "609" because that's clearly visible on the well door covers - if you click on the photo it takes it to a different photo (from the next picture over), but if you remove the "t" in the url line for the small picture it takes you to the picture I inserted. Looks like they need to clean that link up :-).
It is "Bad News" 6T-609 with a different squadron at a different time. The airframe is very heavily weathered (more than I wanted to do actually), and note the prop (and other details such as the heavily weathered "bad news" ,concrete pad, Sea grey droptank , and sliver prop hub - have to change that prop hub ). It's dated Oct 1969. So obviously the markings changed, or it's even a different AC with the same last three digits. I bet this is the AC that aeromaster based thier decals off of.
The other very interesting thing about this picture is that none of the weapons seem to have any Remove Before Flight tags!, I see tags on the tail, just not on the weapons. I am sure there is a reason - but I have no idea what that would be.
I have attached all the weapons, and have a few things left to do. So I'll try to post pictures of the completed model this week.
I certainly appreciate all the comments (even the ones about my 109 - thanks Tin!)
Regards,
--Frank
FrankC
Colorado, United States
Joined: March 14, 2004
KitMaker: 26 posts
AeroScale: 26 posts
Joined: March 14, 2004
KitMaker: 26 posts
AeroScale: 26 posts
Posted: Wednesday, September 15, 2004 - 12:59 PM UTC
I needed to change a few details. I changed the color of the wheels to white, and painted the prop hub silver. Pretty minor changes really.
Then I saw a picture of a pilots helmet sitting on the side of an alert bird. There is a small peg there and, in a couple photos, there is a helmet hanging off of it. I decided to add a pilots helmet to the peg that is just below the windscreen on the left side of the plane.
Here is the result after carving the innards out of a Hasegawa pilot's head(he came with the F-18).. I still need to detail paint it, but I am very happy with how it came out thanks to some very good information from Murph from over on ARC!
The helmet hasn't been detail painted yet, and the peg it's mounted on needs to be touched up, but it gives the general idea of what's there.
I have all the ordnance on except for the minigunpod.. But it's painted! I found some a picture on the internet that shows that the prop has a silver hub and the wheels on this particular plane are white, so I had to repaint those. The wheels still need to be weathered , so don't worry the hubs won't be so "neon" when I am done.
Oh yea - and I still need to weather the prop..
Cheers,
--Frank
jimbrae
Provincia de Lugo, Spain / Espaņa
Joined: April 23, 2003
KitMaker: 12,927 posts
AeroScale: 291 posts
Joined: April 23, 2003
KitMaker: 12,927 posts
AeroScale: 291 posts
Posted: Wednesday, September 15, 2004 - 03:17 PM UTC
Frank, this is just getting better and better just keep the pics coming.. The helmet is a real nice touch!..Jim
lestweforget
Victoria, Australia
Joined: November 08, 2002
KitMaker: 2,832 posts
AeroScale: 224 posts
Joined: November 08, 2002
KitMaker: 2,832 posts
AeroScale: 224 posts
Posted: Wednesday, September 15, 2004 - 04:58 PM UTC
WOW, that really is excellent! ive always wanted to have a crack at a skyraider, this makes me want to evern more!
great job so far! cheers