_GOTOBOTTOM
General Aircraft
This forum is for general aircraft modelling discussions.
Model of the Month MOM May.
Holdfast
Staff MemberPresident
IPMS-UK KITMAKER BRANCH
#056
_VISITCOMMUNITY
England - South West, United Kingdom
Joined: September 30, 2002
KitMaker: 8,581 posts
AeroScale: 4,913 posts
Posted: Saturday, April 30, 2005 - 10:28 PM UTC
Post your entries for the MOM for May here.

Please read the following.
1. Do not forget to add information about the model, voters will be encouraged to check this out before voting and it my influence thier vote
2. Only post 3 pics, no composits
3. New Please indicate which of the 3 pics you like best. This will be posted as a thumbnail in the voting thread, along with the info from 1.

Lets see if we can get an even better turn out this month.
Mal

Edit. If no pic is indicated for the thumbnail the first pic will be used.
Holdfast
Staff MemberPresident
IPMS-UK KITMAKER BRANCH
#056
_VISITCOMMUNITY
England - South West, United Kingdom
Joined: September 30, 2002
KitMaker: 8,581 posts
AeroScale: 4,913 posts
Posted: Sunday, May 01, 2005 - 09:16 PM UTC
Well I did plan on something completely different, but the batteries in my camera gave out and I didn't have my spare set charged. I'll take the pics for next month.
I have had to shoose something that's already in my gallery, so, as this was entered when we were struggling for entries and where allowing 2 per member, but was pulled out when things bucked up. I thought I would enter my Spitfire Mk VB.

1. Model by Hasegawa. Spitfire Mk VB representing a machine of 401 squadron RCAF, "Corps of Frontiersmen" (badge under windscreen) July 1943.
2. Painted with Colourcoats enamel paint. Camo is freehand airbrushed.
3. Kit decals, apart from the codes by Superscale.
4. Model is primed with white, preshaded with black. Hand brushed Klear for decal application and another couple of coats to protect them. Wash applied using white spirit and artist oil colour, paint chipping done with a silver pencil. Other staining achieved with neat oil paint.
5. OOB, except for Cannon barrels which were replaced with stainless tube, and heat treated to get the colouring, PE seat harness and wing tip nav lights replaced with clear sprue, drilled to represent bulbs which were painted red and blue.


The first pic for thumbnail.


Mal
newtothegame
_VISITCOMMUNITY
Washington, United States
Joined: October 05, 2003
KitMaker: 588 posts
AeroScale: 468 posts
Posted: Wednesday, May 04, 2005 - 02:09 AM UTC
Here is my F4F Wildcat for the MOM. I notice in the pictures that I need to clean the clear parts. Is there a good way to do this?? Rubbing alcohol or windex?? Thanks for any advice - maybe PM if you have tips.

Anyway,

1. The Model is by Tamiya 1/48 scale - great kit; I have another to convert to a Martlett someday.
2. It is painted with Tamiya acrylics - I went with Tamiya's recommended mixes.
3. The decals were superscale.
4. Model was preshaded with black. Panel lines were washed with an acrylic / dish soap / water mix. Future was used in preparation for decals. Testors MM flat was used after decals. Gun stains were done with ground pastel chalks and chipping was done with silver from a 'silver paint pen.'
5. I used Eduard's zoom PE set for the instrument panel and seatbelts and installed hypodermic needles for gun barrels.
6. The base is made from cutting little popsicle type sticks and glueing them to a paper. They were stained and then some stripes were painted. Finally all of this was installed into a picture frame and I used the label from the PE set to label the frame.

Thanks for looking.
Leon

The first pic for thumbnail.


OllieC-FWOL
_VISITCOMMUNITY
Quebec, Canada
Joined: March 31, 2004
KitMaker: 446 posts
AeroScale: 0 posts
Posted: Thursday, May 05, 2005 - 07:39 AM UTC
Hi!

Here's my Hasegawa 1/48 P-51D Mustang with Aeromaster decals.

Paint is ALCLAD and Gunze, model is 100% OOB (decals were included in it).

My favourite is #2.


CPTKelley
_VISITCOMMUNITY
Pennsylvania, United States
Joined: January 15, 2005
KitMaker: 206 posts
AeroScale: 115 posts
Posted: Thursday, May 05, 2005 - 11:57 AM UTC
OK, here we go......

Arii 1/48 Grumman F6F-3Hellcat, depicting an aircraft of VF-27, USS Princeton, 1944. The kit, as you probably have seen already, was a review article subject for some paint masks for IPMS/USA. I used a combination of Tamiya, Gunze, and testors paints. I also included a True Details cockpit and wheels. The National Insignias were painted on using the review masks, and the .50 cal weapons were replaced with stainless steel hypodermic needles. The antennae wire are 6-0 nylon sutures.


mother
_VISITCOMMUNITY
New York, United States
Joined: January 29, 2004
KitMaker: 3,836 posts
AeroScale: 1,036 posts
Posted: Thursday, May 05, 2005 - 03:55 PM UTC
This is my first entry in the MOM. Academys 1/48th CH-46E. There are construction photos in my galley under "helicopter"

(1) Added evergreen card stock, rod and some wire to dress up the cargo bay walls. Added seatbelts to the pilots and troop seats.
(2) Cut and reworked the rotor head so as the blades folded back.
(3) Replaced the kit engine armor plates and intake screens with Voyagers update set, kit no# FE48004
(4) Pre- shaded with flat black. Model Masters acrylic Lt. Ghost Gray and Medium Gray for the overall low-vis Oils were used to bring out the details, exhaust stain was achieved using Tamiya's clear smoke and a drop of flat brown, 10% paint-90% thinner. Decals are from the kit.

Thumbnail pic


bf443
_VISITCOMMUNITY
Idaho, United States
Joined: May 16, 2003
KitMaker: 895 posts
AeroScale: 457 posts
Posted: Thursday, May 05, 2005 - 04:22 PM UTC
I just completed this Monogram F6F-5 Hellcat for the "Air over the Sea" campaign. I built it out of the box and painted with Humrol Dk. Sea Blue and Model Master enamels. Decals are from Aeromaster and represent a aircraft used during raids on Japanese mainland in 1945. Applied Testors gloss and setting solution for decals and after dry I sealed them with Testors Semi-gloss. Weathering was kept to a minimum smoke/exhaust stains with some minor paint chipping. I simple, fun build that was very relaxing.


This photo for thumbnail:


Merlin
Staff MemberSenior Editor
AEROSCALE
#017
_VISITCOMMUNITY
United Kingdom
Joined: June 11, 2003
KitMaker: 17,582 posts
AeroScale: 12,795 posts
Posted: Friday, May 06, 2005 - 07:23 PM UTC
Hi there

Wingman (Michael Wolfe) has been having trouble accessing the gallery, so this is his entry:

Hi guys. Here is my entry for MOM. Yep, it's another Stuka. This is Hasegawas 1/48 scale Ju 87D-4 Torpedoflieger. The cockpit is OOB with photo-etch belts. I drilled holes in the clear parts to represent the rivets in the canopy framing. I tried to use my own hair for the rear gunners gun sights, they came out o.k. The torpedo was made using a pencil with a lead ball attached to the front. Squadron green was used to fill the void between the ball and the pencil. The fins and propeller from the kit were used for the torpedo. The molded on flap actuators on the kit were removed and replaced with thin metal rod and bits of photo-etch. Holes were put in the bottom of the wings to accept the flap actuators. Thin strips of masking tape were used to represent the non-slip surface on the wings. ModelMaster paints and the kit decals were used. I chose to build the training version of this aircraft which has a hypothetical paint scheme of light blue. Since this is a training version, weathering was kept to minimum. Pic #1 for thumbail Thanks for looking, Wingman out.


Merlin
Staff MemberSenior Editor
AEROSCALE
#017
_VISITCOMMUNITY
United Kingdom
Joined: June 11, 2003
KitMaker: 17,582 posts
AeroScale: 12,795 posts
Posted: Saturday, May 07, 2005 - 09:49 AM UTC
LOL! I can hardly add Michael's pics and not throw in some of my own! Sadly, no Ju 87 yet...

Anyway, I'll turn the clock right back and re-submit the first model I posted on armorama. All thanks to Mal and a part of his Battle of Britain campaign.

Details?... now that's asking!

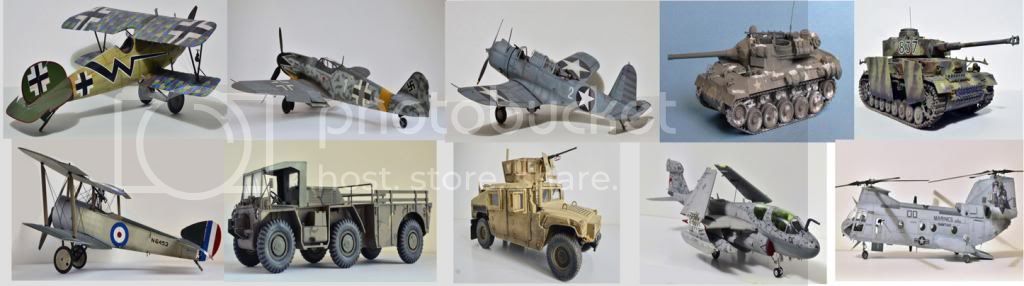
It's Adolf Galland's Bf 109E from the summer of 1940 - apparently, he petrified his Staffel-mates by concocting several home-brewed camouflage schemes and nearly got shot down by his own side because of it.

This one used "local paints" for mottled all grey upper surfaces.

The model is Tamiya's 1/48 scale kit with a dressed-up interior (mostly scratch - 'cause I was feeling stingy ) and decals robbed from spare sheets.

The paints are (shock, horror) all Revell! I wasn't too worried about the top colours - but the Revell RLM 65 for the undersides isn't bad and all the paints are a fair match to pics of the original in terms of tone. Painting was with my beloved old Badger Crescendo, turned upside-down to make it into a gravity feed! I joined the campaign late, so everything had to work first time and, for once, luck was with me. Pic 3 for thumbnail.


All the best

Rowan
brandydoguk
_VISITCOMMUNITY
England - North, United Kingdom
Joined: October 04, 2002
KitMaker: 1,495 posts
AeroScale: 643 posts
Posted: Sunday, May 08, 2005 - 09:30 AM UTC
1. Model by ICM. 1/48 Spitfire Mk. XVI, 74 squadron.
2. Main camouflage painted with colourcoats enamels.
3. Propellor taken from Airfix Seafire, seatbelts by Eduard.


The kit is my first for over 6 months and it was a dificult build. In some areas the detail is excellent but it is let down by poor quality control. The plastic is rather soft and it was a pain sanding parts to get a good fit while being careful not to remove too much plastic. The elevators were cut off and repositioned with a slight droop.


Wad_ware
_VISITCOMMUNITY
Illinois, United States
Joined: September 09, 2002
KitMaker: 537 posts
AeroScale: 437 posts
Posted: Sunday, May 08, 2005 - 11:44 AM UTC
Hi all and here is my entry for MOM.
It is the 1/48th Tamiya Me262 A-2a painted with MM enamels. The camo on the wings was masked off and the camo on the fuselage was all free hand.
I used the Eduard PE set for the cockpit and some wiring and exterior enhancements.
99% of decals are kit decals. The skeleton hand holding the lightning bolt is my own design and homemade decal.

This pic for thumbnail:


Wayne
modelguy2
_VISITCOMMUNITY
Ohio, United States
Joined: March 09, 2002
KitMaker: 818 posts
AeroScale: 137 posts
Posted: Tuesday, May 10, 2005 - 04:48 PM UTC
Here's my Eduard Albatros D.V Profi-Pack with Eagle Editions Markings from sheet # 48041 for Ltn Ulrich Neckel, Jasta 12. .004 boron fiber ised for rigging.

Thumb


JPTRR
Staff MemberManaging Editor
RAILROAD MODELING
#051
_VISITCOMMUNITY
Tennessee, United States
Joined: December 21, 2002
KitMaker: 7,772 posts
AeroScale: 3,175 posts
Posted: Thursday, May 12, 2005 - 02:37 AM UTC
DML 1/48 Fokker Dr.I.

Built OOB.
Early Dr.Is were skinned with a blue fabric, then the fabric was streaked with olive, eventually at the factory. The fabric was applied in rows, giving the uneven streaking on the wings.

Painted with Humbrol, Pactra and Polly Scale, airbrushed blue, then the streaks were handbrushed--quasi drybrush style, masked each edge with a card. The prop was hand painted, as were the oil stains those radial engines spewed forth. At the Gunthersville WWI fly-in of 1993 I shot several pix of the Dr.Is there and used these for the exhaust/spatter patterns. I'll try to find, and post, the pix.

The unit and markings are unconfirmed. The streaking showed throught he yellow fuselage cheverons, they had to be darkened prior to the decal, as the decal was too opaque.


matrixone
_VISITCOMMUNITY
Oregon, United States
Joined: February 07, 2004
KitMaker: 869 posts
AeroScale: 862 posts
Posted: Sunday, May 15, 2005 - 04:39 AM UTC
This is my entry for Model Of the Month for May.

The model is the Tamiya 1/48 scale Do 335B.

This model was built OOB except for different decals, I wanted to finish this model in a ''what-if'' paint and markings scheme.
The uppersurfaces are painted in the usual factory splinter pattern with field applied light blue RLM 76 scribble pattern added to the sides, I used Model Master II enamels for this.
Undersurfaces are NMF which various shades of AlcladII were used.
Decals were mostly Cutting Edge and some from my spares box.
Canopy and spinner spiral hand painted.
The model was photographed on my photobase I made last year, I always use natural light for my pics which means all pics are taken outside.


Matrixone
 _GOTOTOP