Detailing wrecked or derelict WWI aircraft
Colorado, United States
Joined: January 25, 2004
KitMaker: 11,669 posts
AeroScale: 11,011 posts
Posted: Tuesday, December 26, 2006 - 08:41 AM UTC

After having served in Jasta 15, Alb. D.V 2042/17 was a assigned to training duties at Lübeck-Travemunde and is known to have been destroyed in a landing in July 1918. Its pilot Ltn. Wegener is listed as KIC. This diorama took a first place at the IPMS USA Nationals in 2003.

This is the early issued Eduard Albatros D.V kit with their aftermarket PE set.
". . .The most important thing is to know why you build and then get the most that you can out of building." via D.D.
Colorado, United States
Joined: January 25, 2004
KitMaker: 11,669 posts
AeroScale: 11,011 posts
Posted: Sunday, December 31, 2006 - 01:38 AM UTC
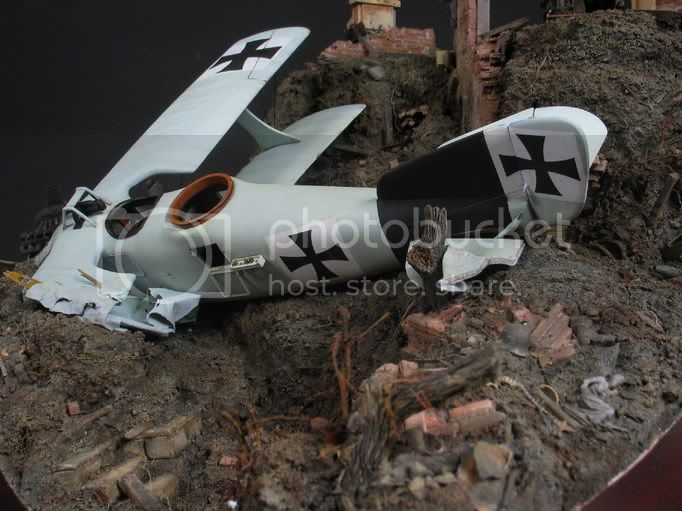
The beauty for us is the details we find in the actual photo images of wrecked or derelict machines. Here is Fok. Dr.I 115/17 after brought down by wing failure, fatally wounding its pilot Ltn. Gontermann.

Did anyone see that the turtledeck behind the pilot was overpainted?
". . .The most important thing is to know why you build and then get the most that you can out of building." via D.D.
Colorado, United States
Joined: January 25, 2004
KitMaker: 11,669 posts
AeroScale: 11,011 posts
Posted: Sunday, January 07, 2007 - 04:48 PM UTC
You have to admit it is wrecked...

". . .The most important thing is to know why you build and then get the most that you can out of building." via D.D.
Gelderland, Netherlands
Joined: July 20, 2006
KitMaker: 258 posts
AeroScale: 256 posts
Posted: Monday, January 08, 2007 - 02:08 AM UTC
Scotland, United Kingdom
Joined: June 01, 2006
KitMaker: 1,707 posts
AeroScale: 1,119 posts
Posted: Monday, January 08, 2007 - 08:16 AM UTC
I'd say poor wee plane.....

:-)
"I´m going back to the front to relax"
"THE BLACK CATS FLIES TONIGHT"
"Find your enemy and shoot him down - everything else is unimportant"
"When you're out of F-8's... You're out of fighters!"
Colorado, United States
Joined: January 25, 2004
KitMaker: 11,669 posts
AeroScale: 11,011 posts
Posted: Monday, January 08, 2007 - 10:46 AM UTC
Is the tree half empty or half full?.... Never mind.
Detailing wrecked or derelict aircraft kits means the builder has to know how far to take the resulting image. What do you want to display? what is the purpose. Open frameworks could be fuselages or wings in a tutorial setting. Think of them as classroom instructional aids, factory floors, repair depots or boneyards.
". . .The most important thing is to know why you build and then get the most that you can out of building." via D.D.
Colorado, United States
Joined: January 25, 2004
KitMaker: 11,669 posts
AeroScale: 11,011 posts
Posted: Monday, January 08, 2007 - 01:25 PM UTC
". . .The most important thing is to know why you build and then get the most that you can out of building." via D.D.
Colorado, United States
Joined: January 25, 2004
KitMaker: 11,669 posts
AeroScale: 11,011 posts
Posted: Monday, January 08, 2007 - 01:27 PM UTC
Here is the finished 1/32 diorama.

". . .The most important thing is to know why you build and then get the most that you can out of building." via D.D.
Gelderland, Netherlands
Joined: July 20, 2006
KitMaker: 258 posts
AeroScale: 256 posts
Posted: Monday, January 08, 2007 - 11:20 PM UTC
Wow most impressive diorama! Really worth while looking at it for a long time.
Greetings, Nico
Colorado, United States
Joined: January 25, 2004
KitMaker: 11,669 posts
AeroScale: 11,011 posts
Posted: Thursday, January 25, 2007 - 06:45 AM UTC


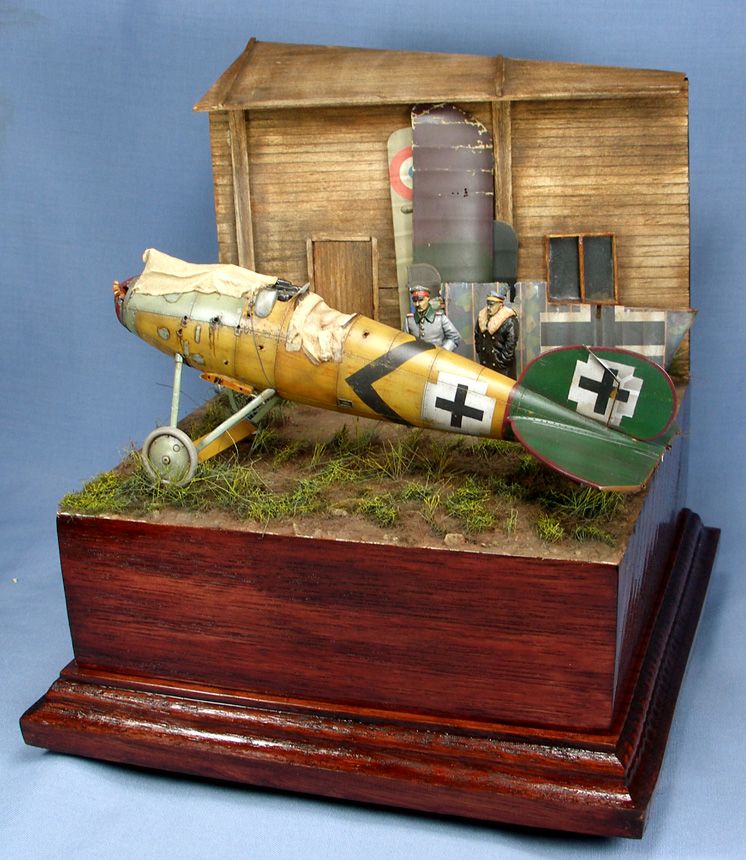
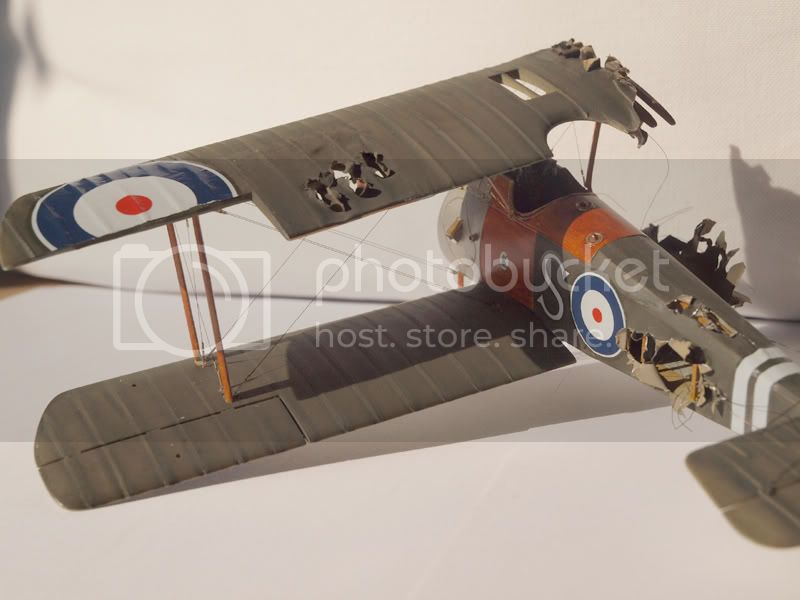
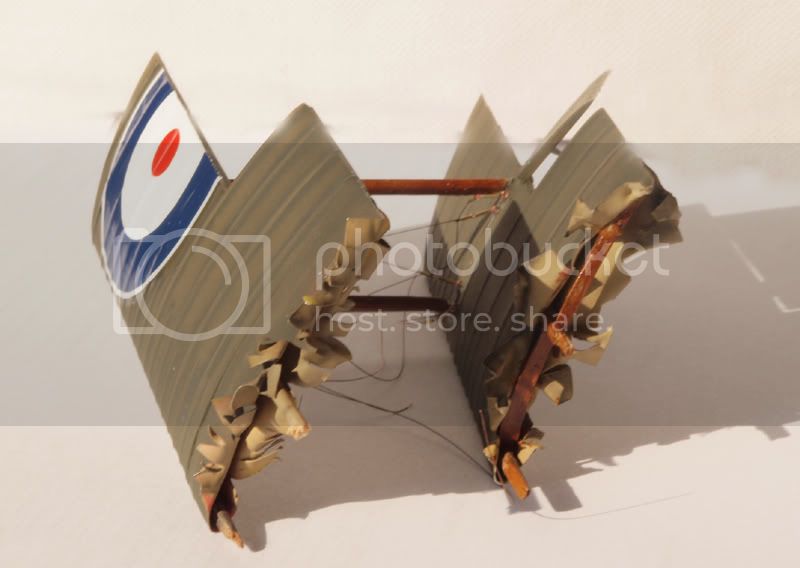
This kit represents Fokker Dr.I 144/17 flown by Ltn Eberhard Stapenhorst of Jasta 11 when he was brought down by Anti-aircraft fire and captured on 13 Jan. 1918. It was given the British capture number G.125 It was later displayed with other captured aircraft in the Agriculture Hall in Islington. All of which had half of their coverings removed displaying their internal structures to the public for the price of 1 penny. Proceeds went to the RAF Hospital Fund. On the original machine the half fabric coverings tended to sag and had to be stapled in several places but two strips of its original covering were left intact on the fuselage to help stay the fabric as well.
This is the Aerobase 1/48 brass etched Fokker Dr.I kit. Almost all cockpit details, engine, wheels, cowlings and port side wing sections are from the DML / Dragon kit. I had to add 1/16 of an inch to the DML / Dragon wings used as the covered port side items. The ammunition box is modified by cutting out notches in the lower corners per the original type. The upper forward bracing is metal rod and the instruments on the original piece is not found on the real aircraft. Two scratchbuilt instruments are added to the sides attached to the metal rods as on the original type. These were the tachometer and oil pressure gauges. All of the national markings are from Americal / Gryphon decal sheets. The rigging is fine wire. The propellor is a hand carved wood item from Martin Digmayers line. The fuselage half covering is made from decal film and painted then applied in sections.

". . .The most important thing is to know why you build and then get the most that you can out of building." via D.D.
Colorado, United States
Joined: January 25, 2004
KitMaker: 11,669 posts
AeroScale: 11,011 posts
Posted: Sunday, August 17, 2008 - 08:18 AM UTC
Quoted Text
JohnReid; ". . .Shep Paine says"even when there are no people at all,as in the case of a derelict,it is the conspicuous absence that tells the story and makes the scene work."


". . .The most important thing is to know why you build and then get the most that you can out of building." via D.D.
Colorado, United States
Joined: January 25, 2004
KitMaker: 11,669 posts
AeroScale: 11,011 posts
Posted: Sunday, August 17, 2008 - 08:27 AM UTC
The diorama master John Reid has started another thread that
we might do well to consider here. Quoted Text
"If it is OK with you guys and admin I would like to start a new thread dealing just with creative ideas for storyboard dioramas of all genres.
Storyboard dioramas tend to break down certain artificial barriers between model makers as they usually contain elements of other types of modeling.It would be great if all modelers could participate not just to display their work but share with the rest of us their ideas and where they came from.It would be wonderful if the 2D artists could participate as well as I know a lot of them have done 3D work too.Coming up with good creative ideas has always been one of the hardest aspects of creating any art including dioramas.Most of us will never live to see all of our creative ideas come to fruition but we all can all share some of those ideas with others. What to you think?"
". . .The most important thing is to know why you build and then get the most that you can out of building." via D.D.
Alberta, Canada
Joined: January 19, 2008
KitMaker: 6,743 posts
AeroScale: 6,151 posts
Posted: Sunday, August 17, 2008 - 02:27 PM UTC
I like the idea . Would be most helpful for the ones who are just starting with diaromas and need the advice to get their ideas in view . Also is great for getting people together and talking about what we love the best about our hobby .
Colorado, United States
Joined: January 25, 2004
KitMaker: 11,669 posts
AeroScale: 11,011 posts
Posted: Friday, October 10, 2008 - 11:25 PM UTC
Quoted Text
Greetings all; Here is a bit of fun I have been experimenting with. This is a Nieuport 21 (80hp) N.4545 School #1100) from Issoudon. This school number was assigned to Field # Five. The machine has the fuselage of N4545 but the wings from N4579. Often times when wings were reconditioned or repaired the American star and meatball was applied instead of the French cockade. Though more and more toward the end of 1918 this was done on instructor's machines (Nieuport 24, 24, bis and 27 types) exclusively. Also some Nieuport trainers had two sets of rigging cables on the landing gear instead of just one set.
My experiment was with duplicating the castor oil exhaust glaze that tended to build up on the trainers of the AEF. Crews often had several aircraft that had to be readied for the next days instruction. This exhaust buildup usually had to be sanded off and the area repainted. In the AEF training units it was considered a waste of time to do, as portions of the machine would probably be recovered or repaired several times within a three month period. Quarterly reviews were done on airframes to note the amount of work involved in maintaining their serviceability.
Greetings all just an update as it were I had some spare time last night so I finished one wall of the workshop diorama and shot some quick images.


". . .The most important thing is to know why you build and then get the most that you can out of building." via D.D.
Colorado, United States
Joined: January 25, 2004
KitMaker: 11,669 posts
AeroScale: 11,011 posts
Posted: Sunday, October 12, 2008 - 01:25 PM UTC
Greetings all;
This is just a reminder to tale a look at John Reid's dioramas threads. Good stuff there for the modeler wishing to detail a scene or a kit.
Click Here=". . .The most important thing is to know why you build and then get the most that you can out of building." via D.D.
Colorado, United States
Joined: January 25, 2004
KitMaker: 11,669 posts
AeroScale: 11,011 posts
Posted: Tuesday, November 11, 2008 - 05:37 PM UTC
Quoted Text
This kit represents Fokker Dr.I 144/17 flown by Ltn Eberhard Stapenhorst of Jasta 11 when he was brought down by Anti-aircraft fire and captured on 13 Jan. 1918. It was given the British capture number G.125 It was later displayed with other captured aircraft in the Agriculture Hall in Islington. All of which had half of their coverings removed displaying their internal structures to the public for the price of 1 penny. Proceeds went to the RAF Hospital Fund. On the original machine the half fabric coverings tended to sag and had to be stapled in several places but two strips of its original covering were left intact on the fuselage to help stay the fabric as well.
This is the Aerobase 1/48 brass etched Fokker Dr.I kit. Almost all cockpit details, engine, wheels, cowlings and port side wing sections are from the DML / Dragon kit. I had to add 1/16 of an inch to the DML / Dragon wings used as the covered port side items. The ammunition box is modified by cutting out notches in the lower corners per the original type. The upper forward bracing is metal rod and the instruments on the original piece is not found on the real aircraft. Two scratchbuilt instruments are added to the sides attached to the metal rods as on the original type. These were the tachometer and oil pressure gauges. All of the national markings are from Americal / Gryphon decal sheets. The rigging is fine wire. The propellor is a hand carved wood item from Martin Digmayers line. The fuselage half covering is made from decal film and painted then applied in sections.
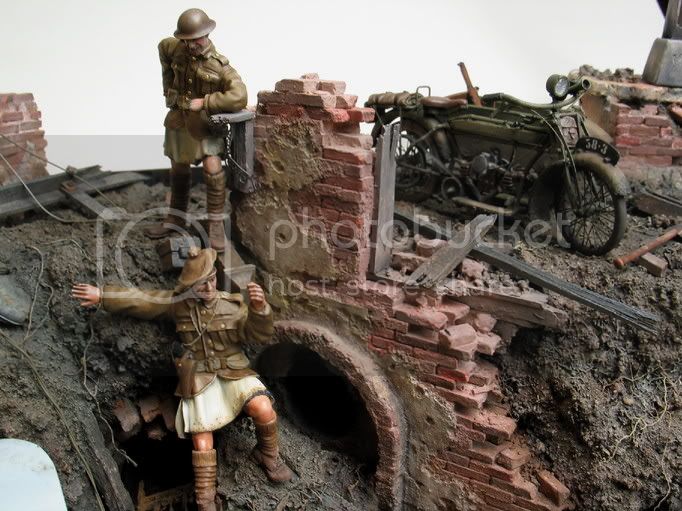
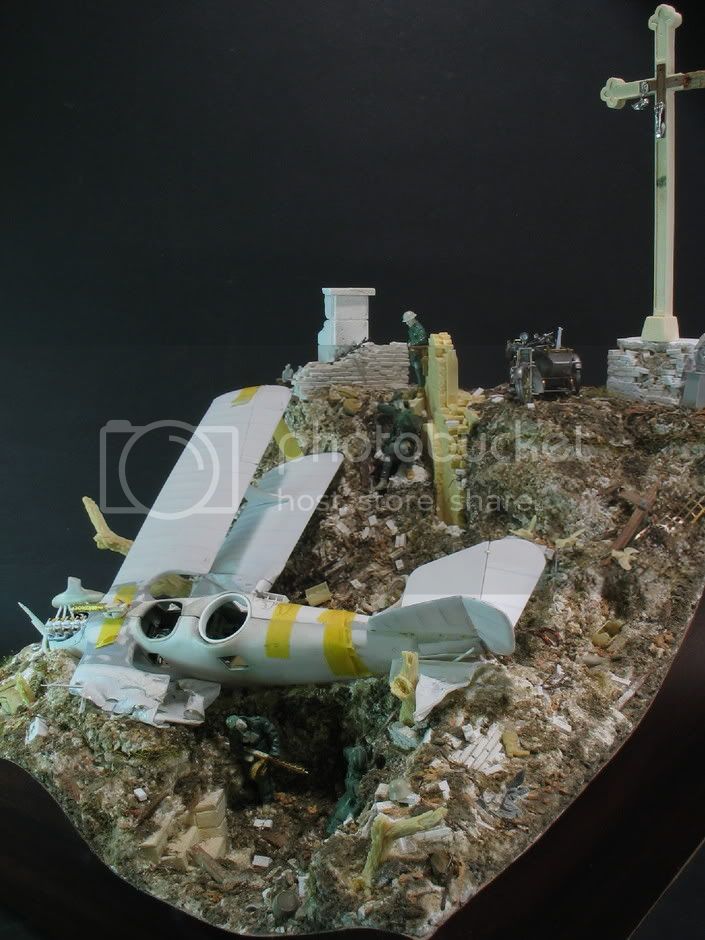
Now to finish this bit of fun. I want to display all of the stripdown - captured aircraft I do in this manner. I have a whole list of the Ilsington displayed aircraft and this one only needs the stantion rail and plaquard. The strip down Fok. D.VII 368/18 will be in this series.


I want to title this one;
"Mummy, is this the one daddy shot down?" Note the mourning dress of the female and the black arm band of the boy.
". . .The most important thing is to know why you build and then get the most that you can out of building." via D.D.
Colorado, United States
Joined: January 25, 2004
KitMaker: 11,669 posts
AeroScale: 11,011 posts
Posted: Friday, August 21, 2009 - 08:47 AM UTC
Progressing with my own dioramas The Fokker D.VII is being fitted for its own case to go next to the Dr.I. The Issoudon repair shop and German EOW turn-in-depot are proceeding along.
From my Nieuport portfolio part 3. Nieuport 27, 84xx? School number #576 The Nieuport 27 & 27 bis was essentially a Nieuport 24 & 24 bis with a split axle like those found on Sopwith fighter aircraft. This is the old Waldo resin fuselage with modifications. It will remain wingless to be incorporated in a pending diorama.

". . .The most important thing is to know why you build and then get the most that you can out of building." via D.D.
Colorado, United States
Joined: January 25, 2004
KitMaker: 11,669 posts
AeroScale: 11,011 posts
Posted: Friday, August 21, 2009 - 02:24 PM UTC
From one of my IPMS Nats 2000 dioramas here is a favorite of mine. My version of Capt. Rickenbacker's 22nd victory on Oct. 23, 1918. The victim was a Vzfw. Klaudat. It is based on a Stan Stokes painting of one of Capt. Eddie's victories, titled Gotcha! I call mine "Gotcha II."
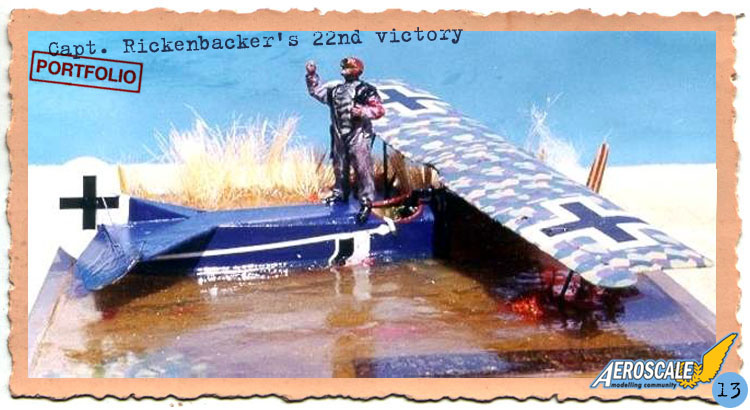

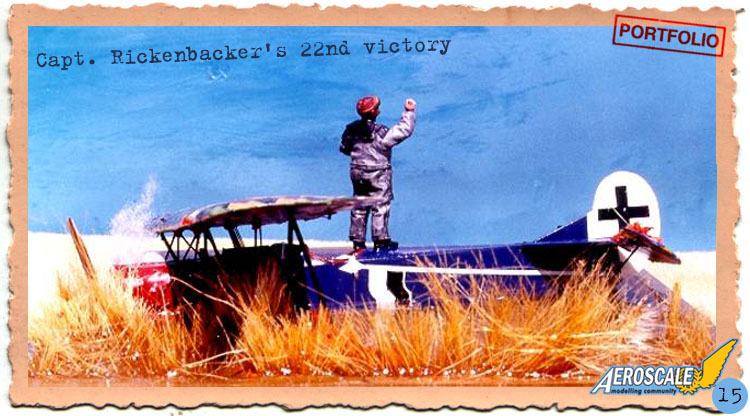
The Kit is a slightly modified 1/48 DML / Dragon Fokker D.VII. The pilot is a modified Jaguar item. The markings are from he old Americal / Gryphon sheets for Jasta 15. The out of tune lozenge is the old Aeromaster sheets before they were corrected and labeled "Eagle Strike". The "water" is common 20 minute two part epoxy. Add some smears of Testors Model Masters "Field Drab" between layers. This gives one the feeling of depth and belies the base depth to the viewer. In other words the bottom of the water looks deeper than the actual base. I drilled some holes in the bottom of the fuselage to allow the resin to seep in and sink the fuselage. Then drilled a sheet metal screw up through the bottom of the "river bed" through the juncture of the lower wing and fuselage then began the series of pour layers. I cut off a lowr wing tip and detail the break with broken spar ends and part of the wing tip is seen at the bottom of the "river bed". Puring in latyers allows you to tip the resin in various directions as it sets and give you that river current surface. The figure is a modified Jaguar item. The woodland scenics tall grass was inserted in the last three layers of the pour.
Allow me this note of pride to say it took a respectable third in the 1/48 aircraft diorama class at the 2000 IPMS Nats in Dallas TX.
". . .The most important thing is to know why you build and then get the most that you can out of building." via D.D.
Colorado, United States
Joined: January 25, 2004
KitMaker: 11,669 posts
AeroScale: 11,011 posts
Posted: Friday, August 21, 2009 - 02:46 PM UTC
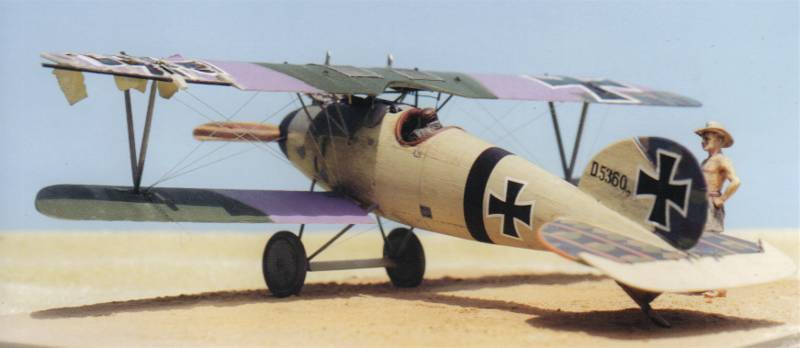
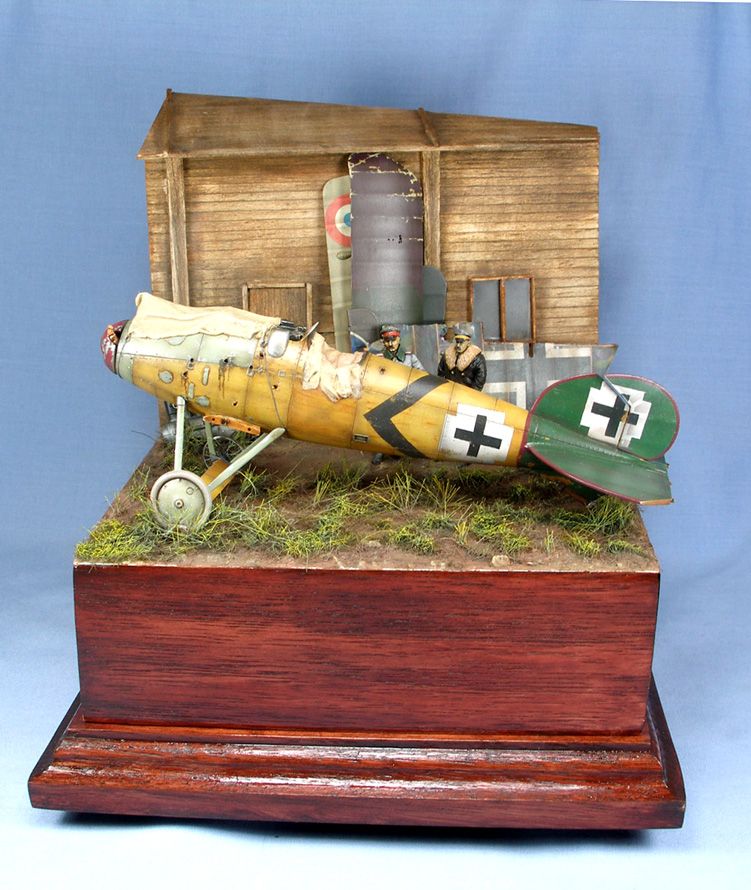
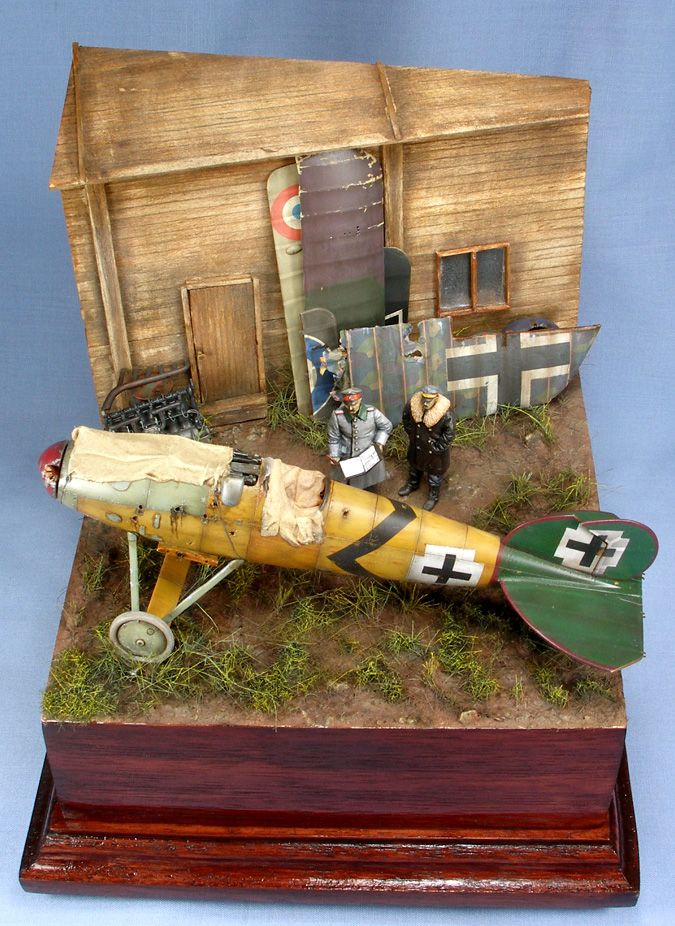
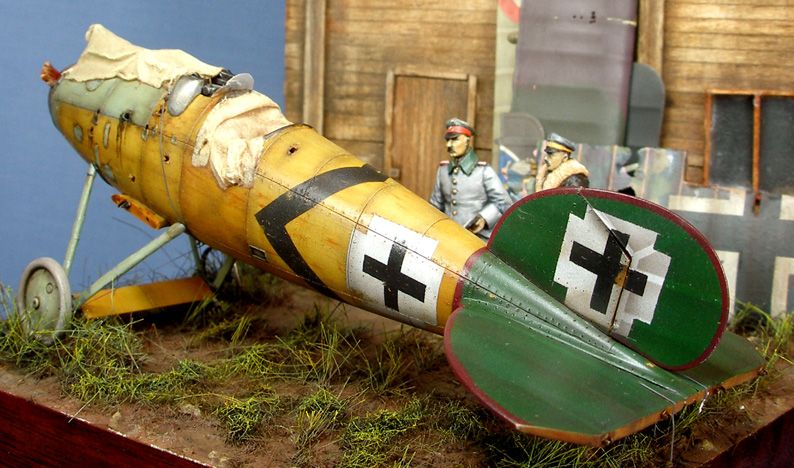
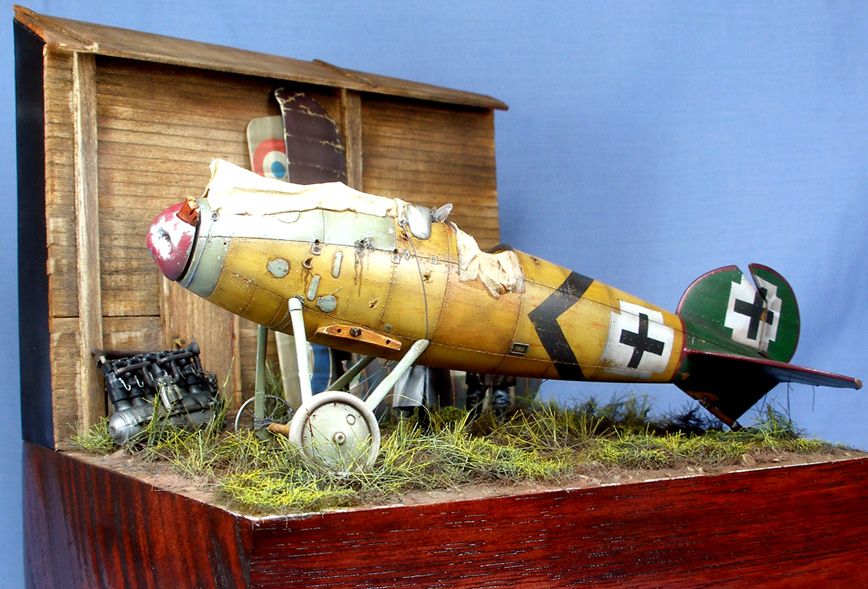
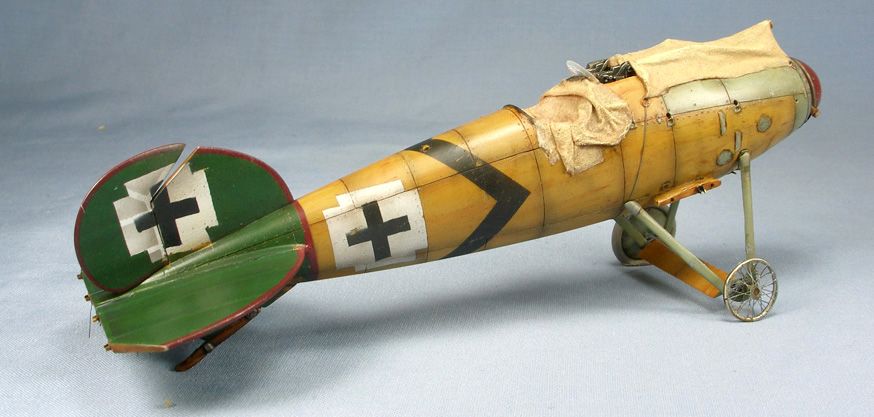
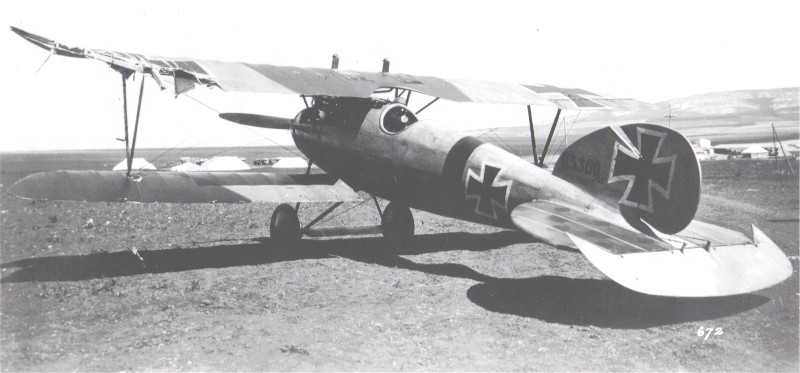
From my portfolio 1, Here is my version of Alb. D.Va 5360/17 in FA300 after an inflight collapse of the left wing tip. Titled "Nice landing herr Leutnant." This is the Eduard 1/48 kit #8109. At the beginning of 2002 we saw the introduction of Eduard's release their 'neu' mold of the Albatros D.V kits (Feb, #8109 and in March #8110 Profipack.) The new process allows finer more exacting details be included in the overall plastic mold. It easily competes with any of the Tamigawa' companies processes. To simulate the Wood panel sections of the fuselage I used applications of acrylic and enamel paints. Rigging is monofilament, The cockpit is detailed to include structure and equipment using modified kit items and Eduards brass fret #48218. Lozenge decals are Eagle Strike 5 colour Camouflage sheets. National markings are kit items. Plumbing and landing gear struts are brass rod bent and cut to shape. Propellor is laminated wood carved to shape. The upper left wing tip was scratchbuilt and cover with layers of decal film.
The upper left wing tip was scratchbuilt from plastic stock and painted a light wood colour with only a wash of Testors 1166 for grain and covered with prepainted with layers of decal film. The second set of radiator facades are from the Eduard PE aftermarket set #48 218 for the Albatros D. V/ Va.
I repositioned the left arm and the head to represent the pilot slumped and attempting to hold his head in shock. Or he could be just pulling his gogles off.
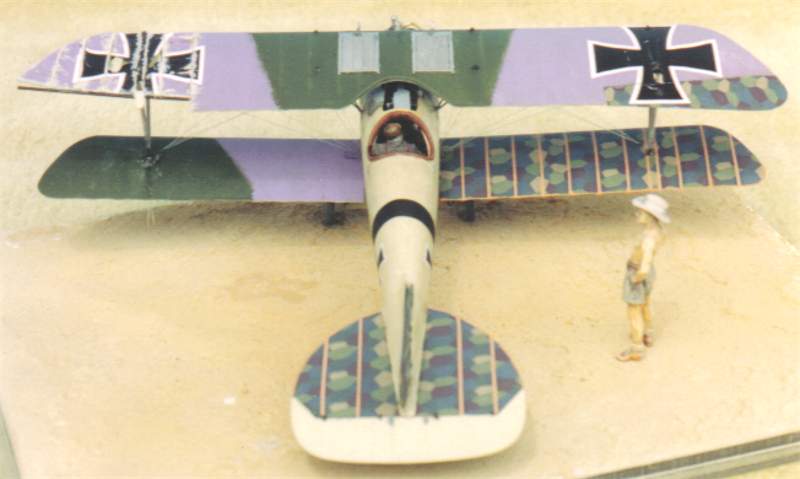
This kit represents a Johannistahl built Albatros D.Va 5360/17 flown by Ltn. Victor Häfner of FA300 & 304. Sometime in June - July 1918 after the ground crew had completed repairs To this machine, Ltn. Häfner took it up for a test flight one morning in his pajamas. At about 3000 ft the pilot heard a loud crack the resultant emergency landing was due to a collapsed upper left wing tip. He managed to land at Afuleh airfield. This was one of several instances where the Top wing tip of a Tropical Albatros D.Va failed. An interesting note is that this machine doesnt appear to have the outboard stay wire seen typically on Western front Albatros D.Va types. Since the wing probably failed due to over stressing and the original photo of the aircraft bears this out I wonder if the Ltn. was actually just in level flight at cruising speed when the damage occured as his report stated or at the top of a loop that he didn't want to discuss?
". . .The most important thing is to know why you build and then get the most that you can out of building." via D.D.
Colorado, United States
Joined: January 25, 2004
KitMaker: 11,669 posts
AeroScale: 11,011 posts
Posted: Friday, August 21, 2009 - 02:58 PM UTC
Also from my portfolio 1"The Pride of the German officer Corps" Strickly for the fun of doing it.
 See here also.
". . .The most important thing is to know why you build and then get the most that you can out of building." via D.D.
Queensland, Australia
Joined: August 30, 2006
KitMaker: 285 posts
AeroScale: 281 posts
Posted: Sunday, March 13, 2011 - 09:12 PM UTC
Alabama, United States
Joined: January 26, 2006
KitMaker: 1,381 posts
AeroScale: 20 posts
Posted: Monday, March 14, 2011 - 05:10 AM UTC
Lovely as always. One question that was sparked is on the wing in the back of the scene. With lozenge and/or painted linen, would they show areas of the buff linen color at areas of wear or damage. It looks lovely here and it makes sense based on what happens when I wear out clothing but I've always been curious if linen "chipping" (sorry, armor modeler guy right here) was appropriate for areas of wear.
Matt
England - South East, United Kingdom
Joined: November 06, 2005
KitMaker: 1,667 posts
AeroScale: 1,551 posts
Posted: Monday, March 14, 2011 - 12:43 PM UTC
I believe so yes on doped fabric it would chip and crack where the fabric flexes. Theres shots where the trailing edges of flying surfaces have shed their dope.
On the printed fabric then the protective clear dope would but the ink printed directly onto the fabric wouldnt. Saying that though the rear surface would be a paler mirror image of the face if it were showing.
thats just my two penneth, I'm sure someone more knowledgeable will corrct me.
Keith
Still can't cure the AMS even with sausage finger implants & olde eyes.
Colorado, United States
Joined: January 25, 2004
KitMaker: 11,669 posts
AeroScale: 11,011 posts
Posted: Thursday, March 15, 2012 - 01:22 PM UTC
". . .The most important thing is to know why you build and then get the most that you can out of building." via D.D.
Quebec, Canada
Joined: May 20, 2004
KitMaker: 8,227 posts
AeroScale: 3,915 posts
Posted: Saturday, March 17, 2012 - 10:43 PM UTC
The creative diorama maker sees things not as they are but as they could be.(JohnReid)
My photobucket:
http://s6.photobucket.com/albums/y250/JohnReid/