_GOTOBOTTOM
Air Campaigns
Want to start or join a group build? This is where to start.
Duel - Phantom2 vs JPTRR
Phantom2
_VISITCOMMUNITY
Östergötland, Sweden
Joined: April 18, 2006
KitMaker: 708 posts
AeroScale: 678 posts
Posted: Monday, August 07, 2006 - 03:06 AM UTC
Beware!

I have choosen my weapon, the sleek and deadly Kawasaki Ki-61 Hein (swallow?) or as the allied named it, "Tony".


Not so many parts in this kit and i will build it almost OOB, just some belts from an Eduard set.


It will be a 244th Sentai airplane flown by Sentai Hon-cho Major Teruhiro Kobayashi.

Assembly has begun, come and get me, If you can...

Stefan
JPTRR
Staff MemberManaging Editor
RAILROAD MODELING
#051
_VISITCOMMUNITY
Tennessee, United States
Joined: December 21, 2002
KitMaker: 7,772 posts
AeroScale: 3,175 posts
Posted: Monday, August 07, 2006 - 07:46 AM UTC
Hi Stefan,

You are coming after my "Klunker" with a Swallow??? I'll have to do some pretty fancy flying to get my 37mm nose cannon pointing your way!

Hmmm...maybe I should upgrade to a P-38 or Corsair?

Photos soon!
Phantom2
_VISITCOMMUNITY
Östergötland, Sweden
Joined: April 18, 2006
KitMaker: 708 posts
AeroScale: 678 posts
Posted: Wednesday, August 09, 2006 - 03:02 AM UTC
Hi Fred!

Yes, you would have a far better chance in a P-38 or Corsair!

I have done some basic assembly and painting, pics coming soon!

Greetings!

Stefan E


Phantom2
_VISITCOMMUNITY
Östergötland, Sweden
Joined: April 18, 2006
KitMaker: 708 posts
AeroScale: 678 posts
Posted: Monday, August 21, 2006 - 03:50 PM UTC
Hi!

Now I have completed the cockpit!

I added etched belts from an Eduard set, everything else is OOB.

I have painted the cockpit as per the instructions, Humbrol #93 Sand-brown overall, seat cushion Rust brown (H#113).
After picking out some details, I gave the cockpit a light drybrushing with silver and a black wash.


Left fuselage/cockpit side;


Right side;


Instrument panel;


Finally, i glued the cockpit floor and instrument panel to the right fuselage half.


Now this duel have taken to the air!

Greetings!

Stefan
Phantom2
_VISITCOMMUNITY
Östergötland, Sweden
Joined: April 18, 2006
KitMaker: 708 posts
AeroScale: 678 posts
Posted: Monday, September 04, 2006 - 06:57 PM UTC
Hi!

The skies are empty, perhaps my opponent is too scared of me? :-) :-) :-)

I have closed the fuselage and the cockpit is all done!


After the fuselage was closed it was no matter adding the wings and tailplanes.


This is a lovley little kit, very little filler were needed on some seams, NONE in the wingroots!


I added the prop temporarly for the photos and i have sprayed the wing leading edges white as a primer for the yellow.

Soon it will be in the paintshop!

Cheers!

Stefan E
TedMamere
_VISITCOMMUNITY
Moselle, France
Joined: May 15, 2005
KitMaker: 5,653 posts
AeroScale: 4,347 posts
Posted: Monday, September 04, 2006 - 10:11 PM UTC

Quoted Text

The skies are empty, perhaps my opponent is too scared of me?


Hi Stefan!

Don't worry, it's the same situation in "my" duel. It seems my opponent doesn't want to enter a doghfight neither! :-)
Your "Tony" is looking good! Will you do the paintscheme on the box?

Jean-Luc
JPTRR
Staff MemberManaging Editor
RAILROAD MODELING
#051
_VISITCOMMUNITY
Tennessee, United States
Joined: December 21, 2002
KitMaker: 7,772 posts
AeroScale: 3,175 posts
Posted: Friday, September 08, 2006 - 05:39 AM UTC

Quoted Text

The skies are empty, perhaps my opponent is too scared of me?


Hi Stefan!

Now now, my Swallow-Swatting business needs a front office:


Too Big Too Heavy will be too big in your rearview mirror too soon :-)
Phantom2
_VISITCOMMUNITY
Östergötland, Sweden
Joined: April 18, 2006
KitMaker: 708 posts
AeroScale: 678 posts
Posted: Saturday, September 09, 2006 - 07:28 PM UTC
Hi Fred!

That´s looking very good so far!

Too Big, Too heavy is a favourite P-47 scheme of mine!
I have the Mono Pro-Modeller in a Revell box, but the nose art was somewhat "censored"!
I bought the Academy P-47N instead, much better details on the decals but those decals are usually quite bad to use!
I missed out on the PYN-up decals!
Wich kit (and decals) are you using, Academy or Monogram/Revell?
I assume we talk 1/48, right?

I will do my Tony in a NMF paint job, and this will be my first attempt on a larger model.

I have decided to do it in plain NMF, without the spots, just to play around with different shades of Alclad.

I should be quite colorful with brown propeller, black antiglare, yellow leading edges and tanks, red tail with white markings, red Hinomarus and blue fuselage stripes!

Pics coming soon!

Cheers!

Stefan E
JPTRR
Staff MemberManaging Editor
RAILROAD MODELING
#051
_VISITCOMMUNITY
Tennessee, United States
Joined: December 21, 2002
KitMaker: 7,772 posts
AeroScale: 3,175 posts
Posted: Tuesday, September 19, 2006 - 01:10 PM UTC
Hi Stefan,


Quoted Text

Too Big, Too heavy is a favourite P-47 scheme of mine!
I have the Mono Pro-Modeller in a Revell box, but the nose art was somewhat "censored"!


Really? It looked normal on the box. I have the Pro-Modeller, but not Too Big Too Heavy version.


Quoted Text

I bought the Academy P-47N instead, much better details on the decals but those decals are usually quite bad to use! I missed out on the PYN-up decals! Wich kit (and decals) are you using, Academy or Monogram/Revell?
I assume we talk 1/48, right?


Mine is 1/48 Academy. I have an AM decal sheet, but I think it is Super Scale


Quoted Text

...my Tony ...plain NMF, without the spots, just to play around with different shades of Alclad....quite colorful with brown propeller, black antiglare, yellow leading edges and tanks, red tail with white markings, red Hinomarus and blue fuselage stripes!


Yes, she will be a beauty!

Here's mine. I have still not decided Alcad or some of my tried and true NMF. For the first time I have pre-NMF primed with a gloss paint, Krylon Fusion.. A test piece, a Stuka fuselage painted with Polly Scale aluminum, had Model Master automobile lacqere gloss black shot over it. This both tests the can laqcere upon an acrylic and the gloss black under whatever silver I use. I am preparing a feature on my various NMF ideas, coming soon.


Phantom2
_VISITCOMMUNITY
Östergötland, Sweden
Joined: April 18, 2006
KitMaker: 708 posts
AeroScale: 678 posts
Posted: Thursday, September 21, 2006 - 02:14 AM UTC
Hi Fred!


It´s looking really good!

My P-47N kit is a Revell-Germany re-issue of the Monogram pro-modeller kit!
Phew, it can be quite complicated nowadays with this mould-swapping! :-)

The Academy decals were printed perfectly, crisp and detailed, while Revells were good but not as sharp and crisp.
Think as if one pic is somewhat blurred and the other in focus, not much difference but when you see them side by side it´s obvious.

My Tony is about the same stage as your P-47, I have to mask the canopy and then I´ll prime the airframe before the Alclad.

I have always had a fear of Silver or NMF-finished aircrafts, but since i learned how to handle an airbrush and discovered Alclad, It´s a pure joy!
Now i´m stocking up on Sabres, F-84 and all the others!

This will be my first attempt at a larger aircraft, I have done some 1/144 scale "tests" that worked fine.

Hope i can get some work done tomorrow, pics follows!

Cheers!

Stefan E
JPTRR
Staff MemberManaging Editor
RAILROAD MODELING
#051
_VISITCOMMUNITY
Tennessee, United States
Joined: December 21, 2002
KitMaker: 7,772 posts
AeroScale: 3,175 posts
Posted: Monday, October 02, 2006 - 05:33 AM UTC
Hi Stefan,

My Juggie has encountered severe corrossion on its duraluminum Here is the progress report: Boo Boo!

Right now it is drying--just hit it with a heavy coat of gloss black.

More ASAP!

How's my victim--er, opponent?
JPTRR
Staff MemberManaging Editor
RAILROAD MODELING
#051
_VISITCOMMUNITY
Tennessee, United States
Joined: December 21, 2002
KitMaker: 7,772 posts
AeroScale: 3,175 posts
Posted: Monday, October 16, 2006 - 10:08 AM UTC
My latest progress (the hour is nigh so I'll write more ASAP):


Phantom2
_VISITCOMMUNITY
Östergötland, Sweden
Joined: April 18, 2006
KitMaker: 708 posts
AeroScale: 678 posts
Posted: Monday, October 16, 2006 - 02:34 PM UTC
Hi Fred!

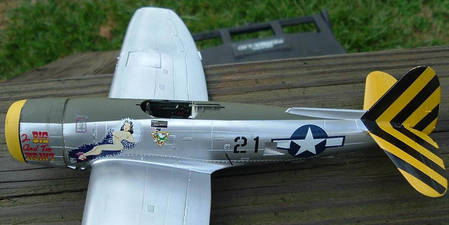
Your Jug looks really awesome!
You have done well with the NMF!

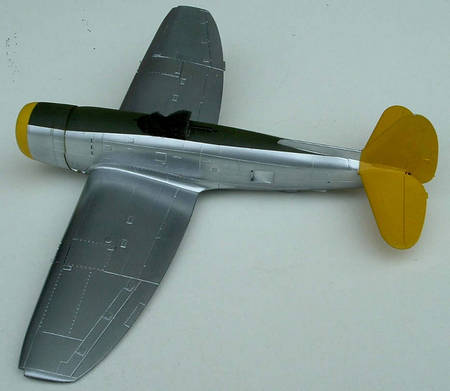
I painted my Tony´s wing leading edges first white, then yellow and masked off.

I painted the tail red and masked that off before the NMF.

This far everything looked very nice and smooth, then disaster struck!


Lower side went quite well, just some of that dreaded "corrosion" effect.


But when I was spraying the top side of the wings I heard a loud crackling noice.

Yes, the sound came from the model in my hands!

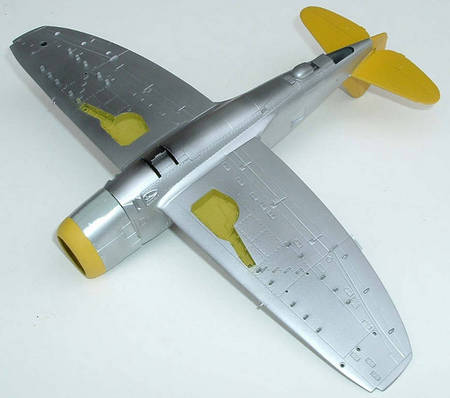
After painting the tail I had some left-over paint in the cup so I used it to check the wing-root seams.
But this paint reacted badly with the Alclad paint in the wing root area, at the tail everything was OK?

Now I have a airframe with a surface coarse as sandpaper and does not look that good at all.


I had a moment I nearly gave the model a quick, hard flight in the nearest wall, but I restrained myself, put it down and let it be for a while.

Now, i don´t know what to do.
Keep on going and try to save the model, or bin it and start another one?

Funny enough, it looks quite good at my pics???


Do you have any sound advice, I sure could use It now!

Cheers!

Stefan E
JPTRR
Staff MemberManaging Editor
RAILROAD MODELING
#051
_VISITCOMMUNITY
Tennessee, United States
Joined: December 21, 2002
KitMaker: 7,772 posts
AeroScale: 3,175 posts
Posted: Monday, October 16, 2006 - 07:39 PM UTC
Hi Stefan,

(To the sound of a police bullhorn:p) PUT THE AIRBRUSH DOWN AND STEP AWAY FROM THE HEIN! WE CAN WORK THIS OUT!

One of modelings great irritations! But all is not lost! I had the gritty paint on a NMF before. You can recover. In fact, one in particular is my Aichi "Grace" She is overall NMF under all of that--well, what is left of--IJN green. The belly is NMF. Painted with [Polly Scale[/b] aluminum, as is my Hein, most of the paint went on smooth and shiny except the belly. I had to polish / sand / repaint the belly a couple of times. How...?

SOLUTION Find some micro mesh polishing pads and polish the grit away, as I have done on some paint blobs on my Jug (can you find them? Sanded/polished but not repainted.) If you don't have any, fine sanding paper can work to knock the grit off, and then use a tooth paste like Colgate to polish the scratches smooth. Cognate or whatever brand has a fine abrasive. Use a cotton bud and/or clean cotton tee shirt.

It can be done and with the work you have already put into her, it is worth it!

BTW, it looks like the grit is along the wing roots. Had you ceased spraying for a while? Perhaps the leftover paint had began to cure in the cup. Looks like the paint may have also began to dry as you sprayed--did you change the psi?

Write Siderius, he has suffered through these trials with his NMF P-51 and YB-35.
Phantom2
_VISITCOMMUNITY
Östergötland, Sweden
Joined: April 18, 2006
KitMaker: 708 posts
AeroScale: 678 posts
Posted: Tuesday, October 17, 2006 - 02:01 PM UTC
Hi Fred!

I´m fine..... I´m calm now....... I can do it....... really....

:-) :-) :-) :-)

My Tony´s fine too, well, it´s still around!
I have never been beaten by any kit yet, I´m too stubborn for that!

Thanks for the tips, I´ll try to find some of that micro-mesh stuff.

I´ll try to polish the wings, if that doesn´t work, I´ll have to sand and repaint.


I have used Alclad many times before without any problems, but never primed anything until now.
I´ll never use any primer with "regular" Alclad paints again!

Back to work....

Cheers!

Stefan E
Phantom2
_VISITCOMMUNITY
Östergötland, Sweden
Joined: April 18, 2006
KitMaker: 708 posts
AeroScale: 678 posts
Posted: Tuesday, October 17, 2006 - 09:35 PM UTC
Hi Again Fred!

This afternoon (15.00) here in Sweden, i sat down with my Tony at the work bench.

I sanded off the paint down to the bare plastic at the wing roots, and gave the whole airframe a good swipe with a 2000 grit sandpaper.

The roots looked awful, but the airframe were smooth again.


Then I repainted the wole aircraft, but in "White Aluminium" this time.
This shade is slightly lighter and shinier then regular Aluminium.

The result was stunning;


&:)

Quite a difference, eh?

Now I was flying high again so I decided to unmask the aircaft;


And while I was at it, I masked the antiglare panel and painted it satin black.
Couldnt resist to add the landing gears and tailwheel at the same time, but mostly to protect the belly from scratches.


From there to here in less than 60 minutes!
Not a contest winner by far, but now I´m happy with it again!


Do you use any clear/matt coat for the decals on a NMF aircraft?

Hasegawa suggests the wheel wells to be a sand-brown color (same as in the cockpit), is this correct for a Ki-61?

Cheers! I´ll need some of those now!

Stefan E
Phantom2
_VISITCOMMUNITY
Östergötland, Sweden
Joined: April 18, 2006
KitMaker: 708 posts
AeroScale: 678 posts
Posted: Saturday, October 28, 2006 - 02:48 PM UTC
Hi Fred!

My Tony is finished!

Well, not completly as I still have to get some decals on! :-)

I didn´t like the Hasgawa decals as they had yellowed a bit and the bands were almost black instead of blue.

I found that Techmod had a set for my aircraft so i have that on order.

this is how it looks today;


Now when my Tony is airborne, do you dare to meet me in the big blue?

Cheers!

Stefan E
TedMamere
_VISITCOMMUNITY
Moselle, France
Joined: May 15, 2005
KitMaker: 5,653 posts
AeroScale: 4,347 posts
Posted: Saturday, October 28, 2006 - 06:36 PM UTC
Hi Stefan!

No green blotches then...

Jean-Luc
Phantom2
_VISITCOMMUNITY
Östergötland, Sweden
Joined: April 18, 2006
KitMaker: 708 posts
AeroScale: 678 posts
Posted: Saturday, October 28, 2006 - 10:34 PM UTC

Quoted Text

Hi Stefan!

No green blotches then...

Jean-Luc


Hi jean-Luc!

Nope, no blotches on this one!

All Ki-61´s were delivered to their squadrons in a bare metal finish and camouflaged at the bases, after all other markings were applied.

The camouflage was painted around the markings and I know my limitations with the airbrush, so I´ll take the easy way out!

Besides that, every Ki-61 I have ever seen is blotched, so this will look quite different!

I plan to build another Ki-61 tough, and that will be full of green blotches!

Cheers!

Stefan E
Phantom2
_VISITCOMMUNITY
Östergötland, Sweden
Joined: April 18, 2006
KitMaker: 708 posts
AeroScale: 678 posts
Posted: Monday, November 06, 2006 - 11:27 PM UTC
Hi!

Now, are we "Dressed for success", or a kill?

Got my Techmod decals yesterday, and they did a really good job!


As you can see, Techmod provides a complete set of paintmasks, one general stencil plan in A-4 and one A-4 on the options in the set.

Almost the same options as the Hasegawa kit, as It is the same pilot´s plane;


But here the colors are vibrant, in register and wonderfully thin;


They were a joy to work with and went on smoothly with micro-set.
No need for Micro-sol as they snuggled down on their own.

There´s a complete set of stencils, fully readable and of course in Japanese!

So here is my Blue 24;


Well, will I get another killmark soon?


Only some washes, weathering and a few remaining parts before i can call It done!

Fred, How are you doing?

Cheers!

Stefan E
JPTRR
Staff MemberManaging Editor
RAILROAD MODELING
#051
_VISITCOMMUNITY
Tennessee, United States
Joined: December 21, 2002
KitMaker: 7,772 posts
AeroScale: 3,175 posts
Posted: Tuesday, November 07, 2006 - 01:07 AM UTC
Hi Stefan,

Sorry I didn't get back to you. Been tied up last couple of weeks.

Stunning indeed! Like Joe Foss when he splashed his first Zero, I may pause to admire before I fire!

Glad you repainted her. I buffed and repainted the belly of my Grace 3 0r 4 times..

My P-47 has the decals on her left side. Soon to be everywhere. Pix soon!
wizard179
_VISITCOMMUNITY
New South Wales, Australia
Joined: January 27, 2006
KitMaker: 251 posts
AeroScale: 179 posts
Posted: Tuesday, November 07, 2006 - 02:04 AM UTC
Hi Stefan

Excellent model. Congratulations on sticking with it and doing the repaint. Looks like you're well rewarded for your efforts.

Cheers
Wiz
Phantom2
_VISITCOMMUNITY
Östergötland, Sweden
Joined: April 18, 2006
KitMaker: 708 posts
AeroScale: 678 posts
Posted: Monday, November 13, 2006 - 07:32 PM UTC

Quoted Text


Excellent model. Congratulations on sticking with it and doing the repaint. Looks like you're well rewarded for your efforts.


Hi Wiz!

Yeah, It was a very, very close call for this kit! :-)

But in the end, I´m glad i stuck with It as It turned out really good (If I may say so myself!)!

Fred!

Now I can say my Ki-61 Tony´s done and ready to take on ANY opponent!


See ýa in the big blue!

Cheers!

Stefan E
JPTRR
Staff MemberManaging Editor
RAILROAD MODELING
#051
_VISITCOMMUNITY
Tennessee, United States
Joined: December 21, 2002
KitMaker: 7,772 posts
AeroScale: 3,175 posts
Posted: Sunday, November 19, 2006 - 10:26 PM UTC
Heeeeeerrree's T'bolt!

Lucky13
_VISITCOMMUNITY
Scotland, United Kingdom
Joined: June 01, 2006
KitMaker: 1,707 posts
AeroScale: 1,119 posts
Posted: Sunday, November 19, 2006 - 10:57 PM UTC
Sweeeet Thunderbolt Fred....
 _GOTOTOP