

Good deal on the 'skin' good plan for a review kit.
That figure is awsome - I'm not a heavy AC guy so I have never seen this position in a figure.
World War II
Discuss WWII and the era directly before and after the war from 1935-1949.
Discuss WWII and the era directly before and after the war from 1935-1949.
Hosted by Rowan Baylis
REVIEW
P-51 D Mustang
slodder

Joined: February 22, 2002
KitMaker: 11,718 posts
AeroScale: 305 posts
Posted: Tuesday, January 09, 2007 - 04:23 PM UTC


TedMamere

Joined: May 15, 2005
KitMaker: 5,653 posts
AeroScale: 4,347 posts

Posted: Wednesday, January 10, 2007 - 12:11 AM UTC
Hi all!
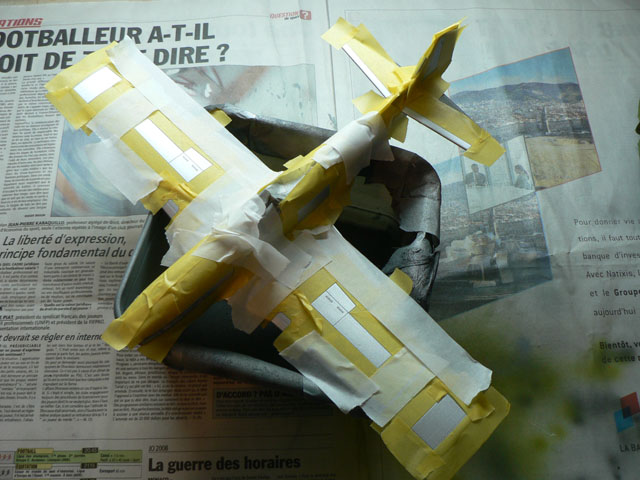
Daily update! Today step 3, cockpit assembly...
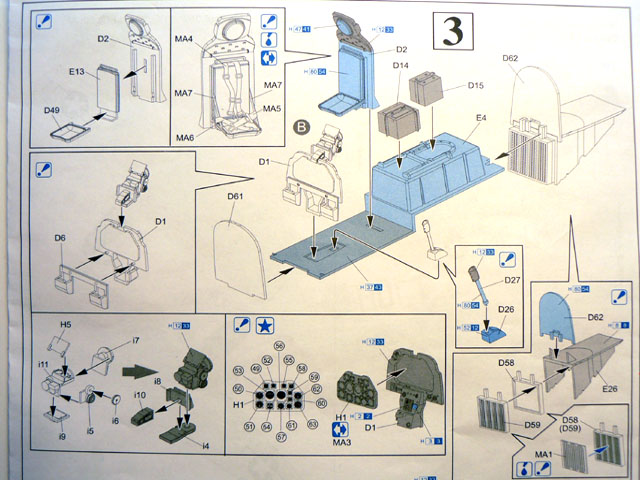
The various sub-assemblies are looking pretty good out of the box. I didn't use the PE instrument panel and applied the dial decals directly on the transparent plastic part which was painted black. I still have to add the seatbelts...
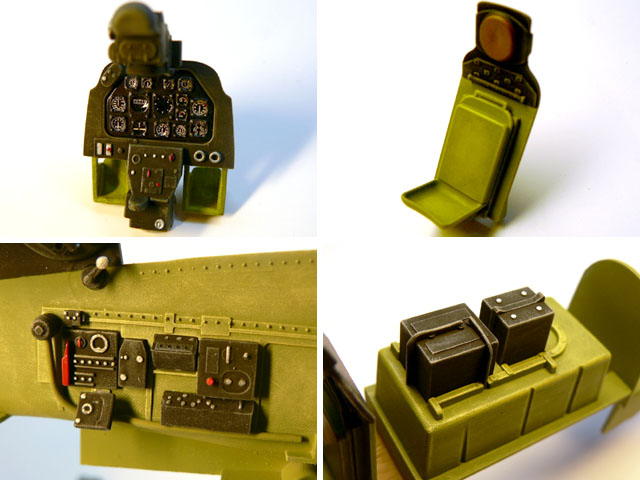
Inside the fuselage, the cockpit looks nice but it seems as if the seat is to far forward. I think I will move it back a little...
I test fitted the cockpit inside the fuselage halves and noticed the floor is to small. A least 1mm on each side are missing so there is a gap on both sides. Once I'm finished with the cockpit I'll try to shoot a picture...
Tomorrow I will wash and weather the interior and try to glue the fuselage halves together...
Jean-Luc
Daily update! Today step 3, cockpit assembly...
The various sub-assemblies are looking pretty good out of the box. I didn't use the PE instrument panel and applied the dial decals directly on the transparent plastic part which was painted black. I still have to add the seatbelts...
Inside the fuselage, the cockpit looks nice but it seems as if the seat is to far forward. I think I will move it back a little...
I test fitted the cockpit inside the fuselage halves and noticed the floor is to small. A least 1mm on each side are missing so there is a gap on both sides. Once I'm finished with the cockpit I'll try to shoot a picture...
Tomorrow I will wash and weather the interior and try to glue the fuselage halves together...
Jean-Luc


Bigskip

Joined: June 27, 2006
KitMaker: 2,487 posts
AeroScale: 575 posts

Posted: Wednesday, January 10, 2007 - 12:19 AM UTC
Jean-Luc
This is looking fabulous - were do you find the time to do this?
Andy
This is looking fabulous - were do you find the time to do this?
Andy


Clanky44

Joined: September 15, 2005
KitMaker: 1,901 posts
AeroScale: 133 posts

Posted: Wednesday, January 10, 2007 - 08:44 AM UTC
Hi Jean-Luc,
It's nice to see you building a model that has been so thoroughly trashed by the so called 'experts' . Too many 'out of box' reviewers these days are quick to praise or condemn a model by just opening the kit and examining the contents.
Great work Jean-Luc,
Frank
It's nice to see you building a model that has been so thoroughly trashed by the so called 'experts'
. Too many 'out of box' reviewers these days are quick to praise or condemn a model by just opening the kit and examining the contents.Great work Jean-Luc,
Frank
TedMamere
Joined: May 15, 2005
KitMaker: 5,653 posts
AeroScale: 4,347 posts
Posted: Thursday, January 11, 2007 - 09:53 PM UTC
Hi all!
Andy, I mainly work with Tamiya Acrylic paints and they dry very fast...
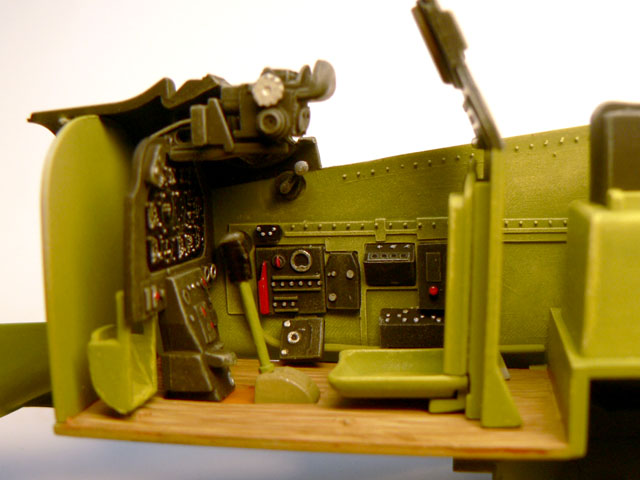
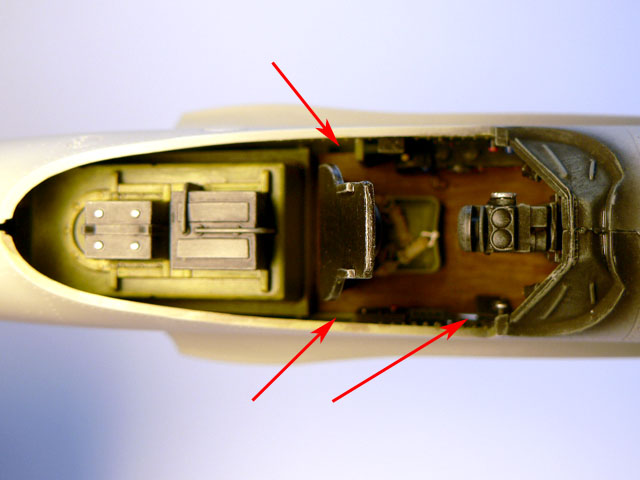
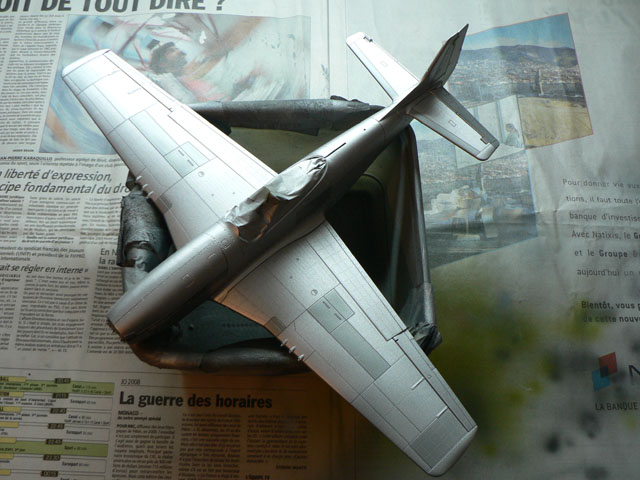
Sorry for missing yesterday's daily update but I was a little busy. But I managed to make some progress today: I washed the interior and glued the cockpit and engine assembly inside the fuselage. I also glued the PE frontal radiator grill (red arrow) which had to be reduced by approx. 1mm to fit properly...
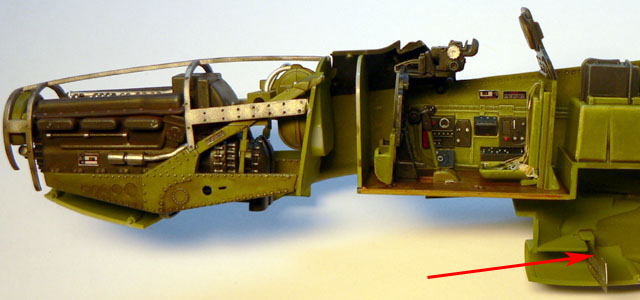
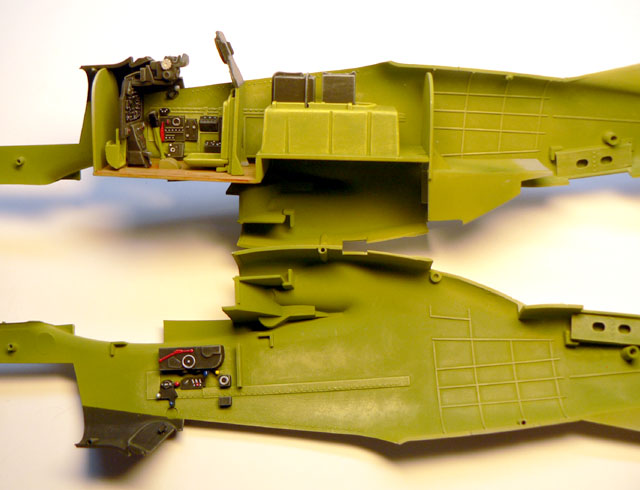
Before gluing the fuselage halves together, make sure you didn't forgot something! I say that because I forgot the ventral radiator. Look at the picture and you will see it is missing!
At last the fuselage is complete! The fit is very good and I didn't had to use clamps, tape or anything else to keep the two halves together. Sometimes it seems as if there is a seam visible on the pictures but it is black paint. I don't think I will need a lot of filler on the fuselage...
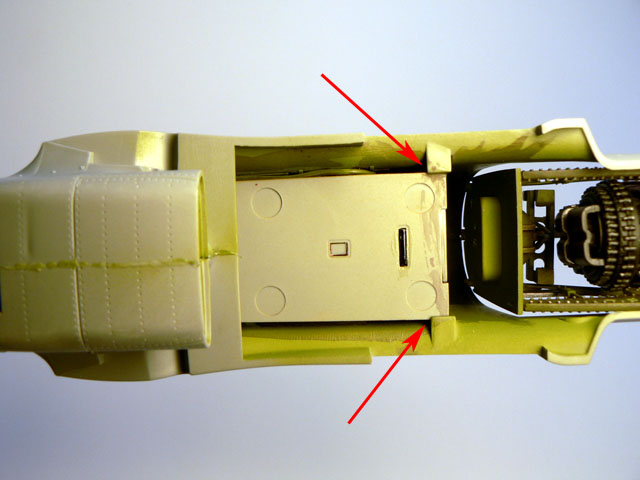
As I said earlier in the thread, the cockpit floor is undersized and some gaps are visible from above even if most of them are hidden by instrument boxes. Viewed from the underside, you can note the locators are almost to small. If you want to get it right, you can easily scratchbuild a bigger floor out of plasticard... I don't know how the people at Dragon could miss that!?
I hope to get the wings done tomorrow...
Jean-Luc
Quoted Text
were do you find the time to do this?
Andy, I mainly work with Tamiya Acrylic paints and they dry very fast...
Sorry for missing yesterday's daily update but I was a little busy. But I managed to make some progress today: I washed the interior and glued the cockpit and engine assembly inside the fuselage. I also glued the PE frontal radiator grill (red arrow) which had to be reduced by approx. 1mm to fit properly...
Before gluing the fuselage halves together, make sure you didn't forgot something! I say that because I forgot the ventral radiator. Look at the picture and you will see it is missing!
At last the fuselage is complete! The fit is very good and I didn't had to use clamps, tape or anything else to keep the two halves together. Sometimes it seems as if there is a seam visible on the pictures but it is black paint. I don't think I will need a lot of filler on the fuselage...
As I said earlier in the thread, the cockpit floor is undersized and some gaps are visible from above even if most of them are hidden by instrument boxes. Viewed from the underside, you can note the locators are almost to small. If you want to get it right, you can easily scratchbuild a bigger floor out of plasticard... I don't know how the people at Dragon could miss that!?
I hope to get the wings done tomorrow...
Jean-Luc

Lucky13

Joined: June 01, 2006
KitMaker: 1,707 posts
AeroScale: 1,119 posts

Posted: Thursday, January 11, 2007 - 10:18 PM UTC
This so much better than what you see in many books out there Jean-Luc. Absolutely fantastic!

TedMamere
Joined: May 15, 2005
KitMaker: 5,653 posts
AeroScale: 4,347 posts
Posted: Friday, January 12, 2007 - 11:16 PM UTC
Hi All!
Daily update!
I made some progress on the kit, mainly building...
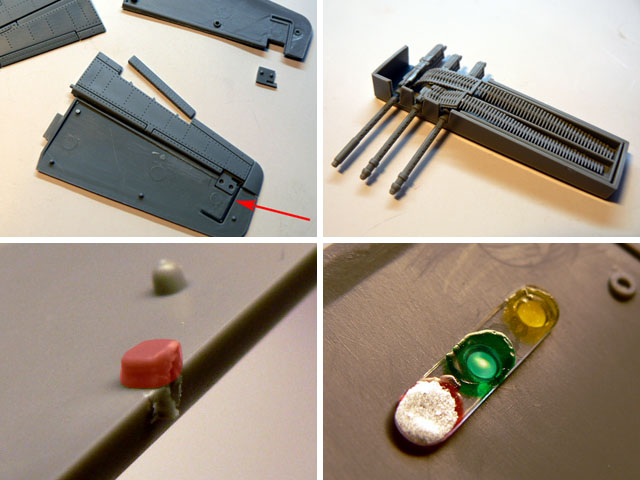
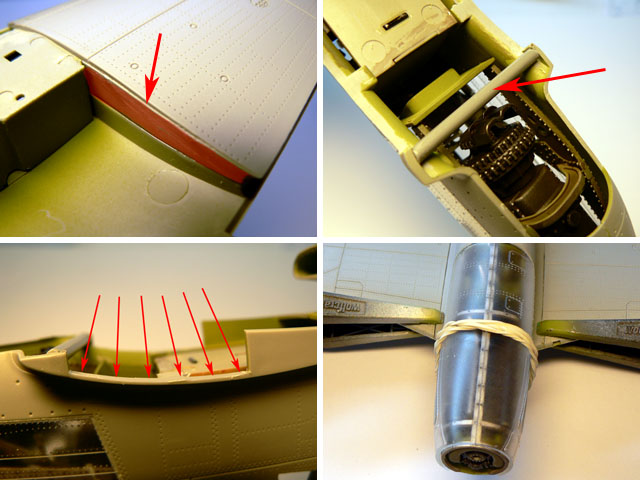
I glued the horizontal tailplanes and the elevators. You need metal hinges (included in the kit, see arrow) to keep them movable. The gun bays are very nice out of the box, especially the ammunition belts... but I won't build the kit with the wing panels in the opened position so I didn't painted this area. One of the most annoying characteristic of the kit are the sprue attachment points of the parts. In this kit they are always located on the gluing surface (red area) so you always have to remove them with an X-acto knife and sand them away. There are about hundred of them all over the kit parts! The last picture shows the navigation light under the wing. They are made of one piece of clear plastic. I painted them with Tamiya Clear Colors and then with silver paint...
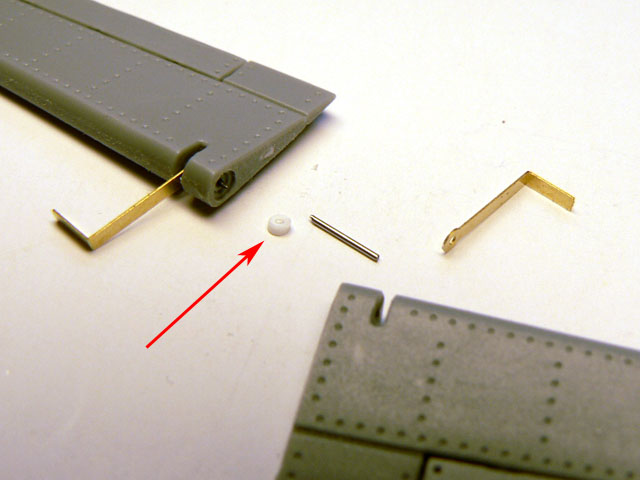
The ailerons are also movable if you properly use the PE and metal parts (included in the kit). I added a small plastic rod to keep the metal wire in place (see red arrow)...
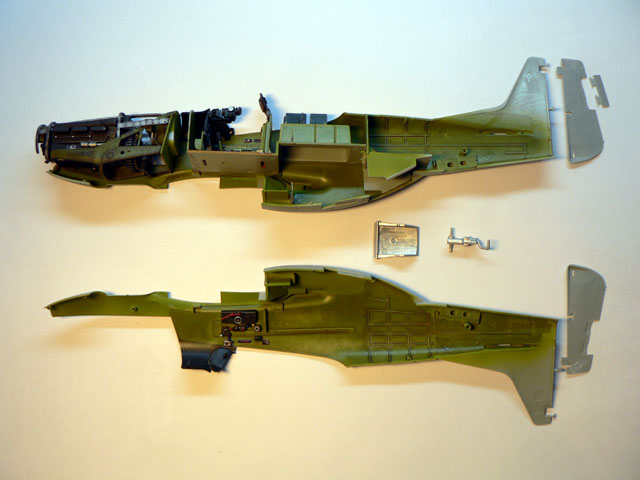
Below is a picture of the wing parts before and after assembly. I used almost all my clamps to get them together because it's a tight fit with the wheel bays...
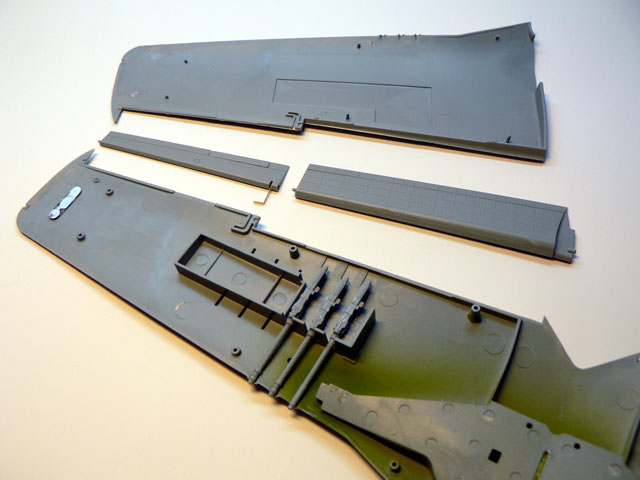
Finally, I said "good-bye" to the engine and glued the two cowling parts together. I tried to get the perfect possible fit to avoid the use of filler and to keep the surface detail of the kit...
I hope I will be able to get the wings on the fuselage tomorrow. I can't wait to apply a primer to the model to see if there are misalignments...
Jean-Luc
Daily update!
I made some progress on the kit, mainly building...
I glued the horizontal tailplanes and the elevators. You need metal hinges (included in the kit, see arrow) to keep them movable. The gun bays are very nice out of the box, especially the ammunition belts... but I won't build the kit with the wing panels in the opened position so I didn't painted this area. One of the most annoying characteristic of the kit are the sprue attachment points of the parts. In this kit they are always located on the gluing surface (red area) so you always have to remove them with an X-acto knife and sand them away. There are about hundred of them all over the kit parts!
The last picture shows the navigation light under the wing. They are made of one piece of clear plastic. I painted them with Tamiya Clear Colors and then with silver paint...The ailerons are also movable if you properly use the PE and metal parts (included in the kit). I added a small plastic rod to keep the metal wire in place (see red arrow)...
Below is a picture of the wing parts before and after assembly. I used almost all my clamps to get them together because it's a tight fit with the wheel bays...
Finally, I said "good-bye" to the engine and glued the two cowling parts together. I tried to get the perfect possible fit to avoid the use of filler and to keep the surface detail of the kit...
I hope I will be able to get the wings on the fuselage tomorrow. I can't wait to apply a primer to the model to see if there are misalignments...
Jean-Luc
TedMamere
Joined: May 15, 2005
KitMaker: 5,653 posts
AeroScale: 4,347 posts
Posted: Sunday, January 14, 2007 - 12:05 AM UTC
Hi all!
At last I have an airplane!
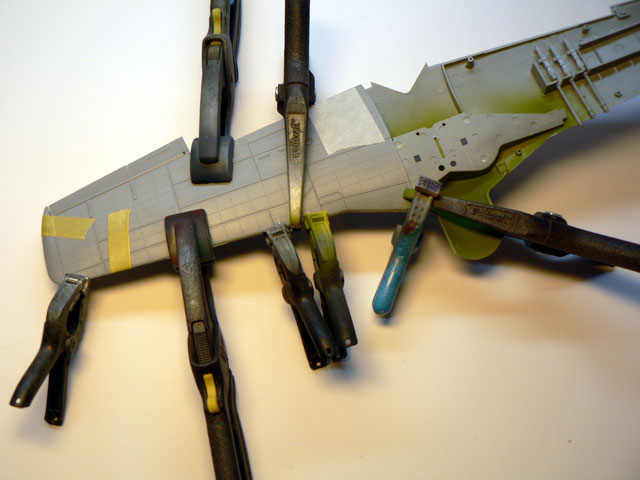
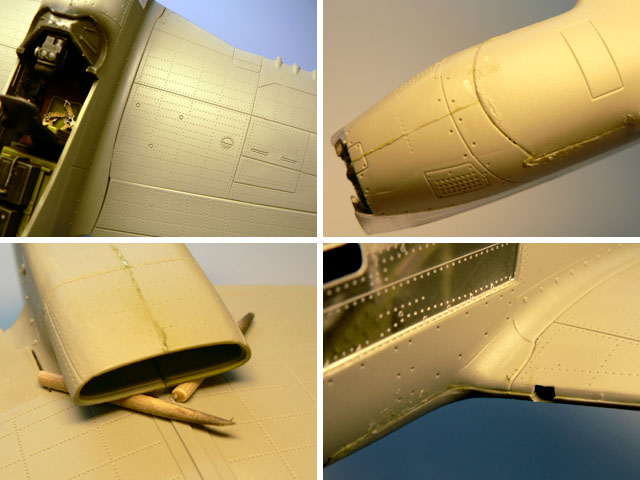
Before assembling the wings and the fuselage together there are some things one has to take care of:
1 - there is a step at the wing root (arrow). This represents in fact the panel line. The red area is where you have to put the cement.
2 - if you add a spreader (plastic rod from a sprue) just below the engine, you will have less problems later.
3 - to achieve a better fit, you must scratch some plastic away under the fuselage (red arrows). This will avoid the front of the wing to stand proud of the fuselage.
4 - use clamps in the forward area (that's why I added the spreader in fact) and a rubber band around the nose to get the forward part of the wing right.
If you do all this you will have a nice Mustang model which will almost need no filler!
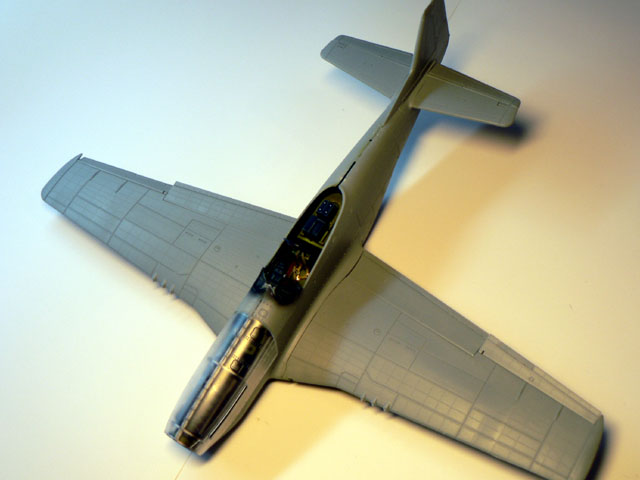
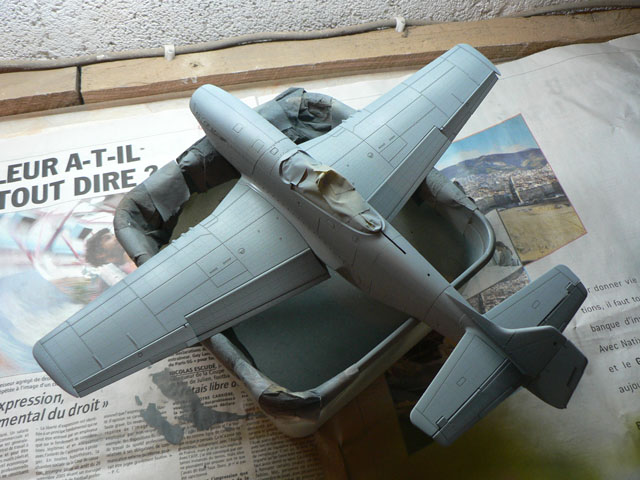
The wing root is perfect but some putty will be needed under the nose. Nothing dramatic though as there are almost no surface details in this area. While the cement dried, I added cocktail sticks between the ventral radiator and the wing assembly to get it to stick to the fuselage. There is a small step on the leading edge of the wings but this will be easy to sand away...
Finally I started to assemble the landing gear with workable oleos thanks to small springs (arrow).
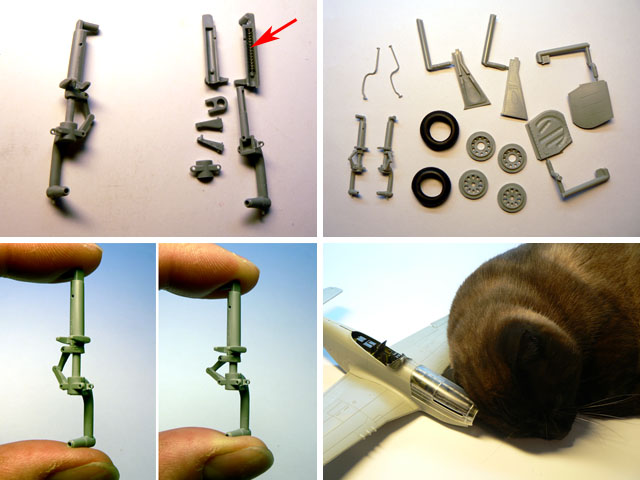
So far I'm really pleased with this kit and as you can see it was also adopted by my cat! :-)
Jean-Luc
At last I have an airplane!
Before assembling the wings and the fuselage together there are some things one has to take care of:
1 - there is a step at the wing root (arrow). This represents in fact the panel line. The red area is where you have to put the cement.
2 - if you add a spreader (plastic rod from a sprue) just below the engine, you will have less problems later.
3 - to achieve a better fit, you must scratch some plastic away under the fuselage (red arrows). This will avoid the front of the wing to stand proud of the fuselage.
4 - use clamps in the forward area (that's why I added the spreader in fact) and a rubber band around the nose to get the forward part of the wing right.
If you do all this you will have a nice Mustang model which will almost need no filler!
The wing root is perfect but some putty will be needed under the nose. Nothing dramatic though as there are almost no surface details in this area. While the cement dried, I added cocktail sticks between the ventral radiator and the wing assembly to get it to stick to the fuselage. There is a small step on the leading edge of the wings but this will be easy to sand away...
Finally I started to assemble the landing gear with workable oleos thanks to small springs (arrow).
So far I'm really pleased with this kit and as you can see it was also adopted by my cat! :-)
Jean-Luc
Lucky13
Joined: June 01, 2006
KitMaker: 1,707 posts
AeroScale: 1,119 posts
Posted: Sunday, January 14, 2007 - 12:21 AM UTC
Superb!
slodder
Joined: February 22, 2002
KitMaker: 11,718 posts
AeroScale: 305 posts
Posted: Sunday, January 14, 2007 - 05:35 PM UTC
All that engine work - hidden. It's the same on the armor side, people build interiors just to 'button them up'. At least you know (and we all know) its there and fantastic.
Question - what glue to use for the wings and body? You mention the fit is tight and you do a lot of 'fit' adjustments (spreader etc). What glue do you find hold the best the longest etc.
Question - what glue to use for the wings and body? You mention the fit is tight and you do a lot of 'fit' adjustments (spreader etc). What glue do you find hold the best the longest etc.
TedMamere
Joined: May 15, 2005
KitMaker: 5,653 posts
AeroScale: 4,347 posts
Posted: Monday, January 15, 2007 - 12:04 AM UTC
Hi all!
Scott, if it wouldn't have been a review build, I wouldn't have built and painted the engine. I wanted to close the cowling panels from the very beginning, but I thought some would be interested to see how this part of the model would look like...
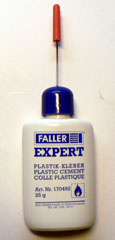
I used my usual plastic cement from Faller. I added quite a lot to allow the parts to "melt" together
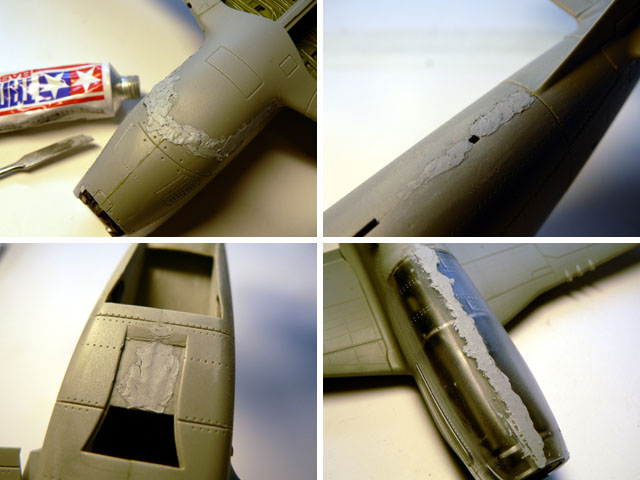
I didn't made a lot of progress today. I filled some areas with putty, mainly under the nose and on the two part cowlings. For the latter, it was probably my fault...
I think I can spray a base coat tomorrow... at last!
Jean-Luc
Quoted Text
All that engine work - hidden. It's the same on the armor side, people build interiors just to 'button them up'. At least you know (and we all know) its there and fantastic.
Scott, if it wouldn't have been a review build, I wouldn't have built and painted the engine. I wanted to close the cowling panels from the very beginning, but I thought some would be interested to see how this part of the model would look like...
Quoted Text
Question - what glue to use for the wings and body? You mention the fit is tight and you do a lot of 'fit' adjustments (spreader etc). What glue do you find hold the best the longest etc.
I used my usual plastic cement from Faller. I added quite a lot to allow the parts to "melt" together
I didn't made a lot of progress today. I filled some areas with putty, mainly under the nose and on the two part cowlings. For the latter, it was probably my fault...
I think I can spray a base coat tomorrow... at last!
Jean-Luc

csch

Joined: December 27, 2002
KitMaker: 1,941 posts
AeroScale: 1,040 posts
Posted: Monday, January 15, 2007 - 03:16 AM UTC
Hi Jean Luc:
I took a look to the thread and all I can say is WOW. This one is turning out in a fantastic way. Congratulations.
The kit seems to have very good and crisp detail. Can´t wait to see it finished.
I took a look to the thread and all I can say is WOW. This one is turning out in a fantastic way. Congratulations.
The kit seems to have very good and crisp detail. Can´t wait to see it finished.

TedMamere
Joined: May 15, 2005
KitMaker: 5,653 posts
AeroScale: 4,347 posts
Posted: Tuesday, January 16, 2007 - 12:50 AM UTC
Hi Carlos and all!
Not much to report today, but at last the model has got a first coat of paint, mainly to see if there are surface imperfections...
I see the end of the tunnel!
Jean-Luc
Not much to report today, but at last the model has got a first coat of paint, mainly to see if there are surface imperfections...
I see the end of the tunnel!
Jean-Luc

DAK66
Joined: April 28, 2006
KitMaker: 286 posts
AeroScale: 45 posts
Posted: Wednesday, January 17, 2007 - 05:45 PM UTC
He Jean -Luc looking forward to seeing some paint on this one .

newtothegame
Joined: October 05, 2003
KitMaker: 588 posts
AeroScale: 468 posts
Posted: Thursday, January 18, 2007 - 05:34 AM UTC
I just want to say again how much I enjoy watching you build. Your building goes quickly and is very high quality. Thanks again for sharing this with us.
Have you read all of the hubbub about the propellors?
Leon
Have you read all of the hubbub about the propellors?
Leon

TedMamere
Joined: May 15, 2005
KitMaker: 5,653 posts
AeroScale: 4,347 posts
Posted: Thursday, January 18, 2007 - 12:59 PM UTC
Quoted Text
Have you read all of the hubbub about the propellors?
Hi Leon and Doug!
Thanks for your kind words.
Yes I know about the propellors. But since this is a review build, I will simply glue them in place, paint them and live with it! :-) I'll let the specialists discuss of the accuracy of the kit... I'm not a Mustang expert...
I think I will make more progress during the week-end and maybe will have finished the model by Sunday!
Jean-Luc
TedMamere
Joined: May 15, 2005
KitMaker: 5,653 posts
AeroScale: 4,347 posts
Posted: Thursday, January 18, 2007 - 04:50 PM UTC
Hi again!
Here a some new progress pictures...
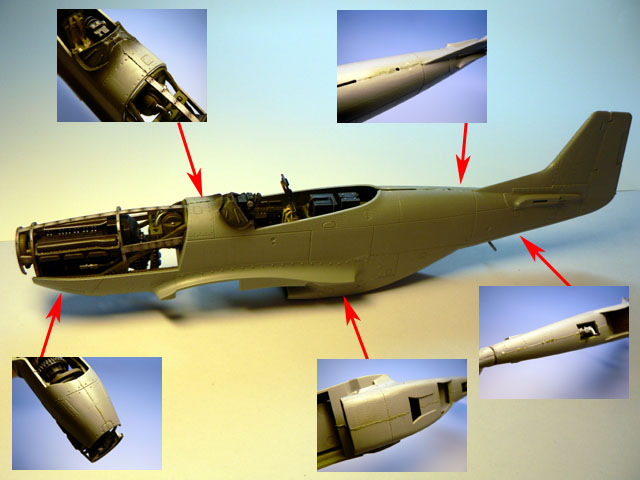
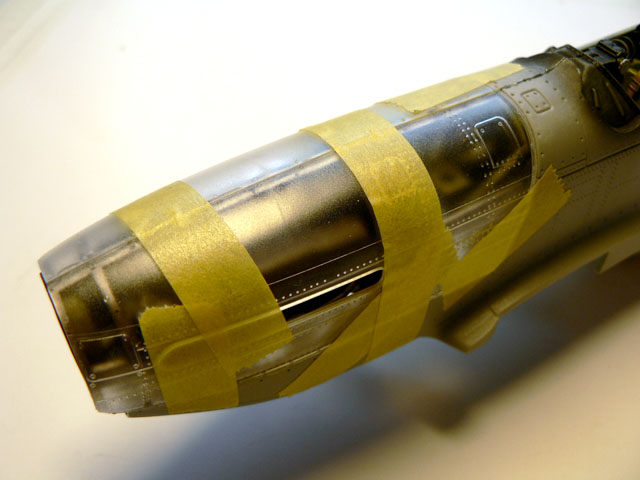
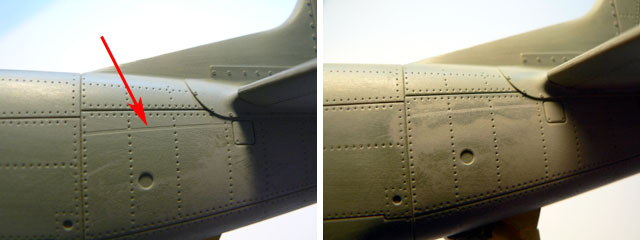
I mainly did "surface treatment" lately to eliminate the imperfections that could be visible under the aluminium coat. One strange thing is this seam on the left fuselage side (red arrow), probably a "bug" in the tooling process...
The second imperfection is a more classical sink mark...
And finally there is the seam of the wing to fuselage assembly that needs much care...
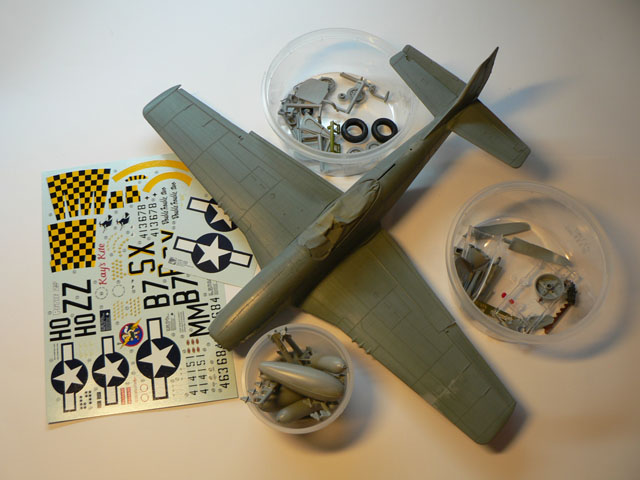
Below is the kit prior to receive it's first coats of silver paint. I divided the left over parts in three: landing gear assembly, details parts and bomb/fuel load...
I think next time the Mustang will wear it's aluminium color!
Jean-Luc
Here a some new progress pictures...
I mainly did "surface treatment" lately to eliminate the imperfections that could be visible under the aluminium coat. One strange thing is this seam on the left fuselage side (red arrow), probably a "bug" in the tooling process...
The second imperfection is a more classical sink mark...
And finally there is the seam of the wing to fuselage assembly that needs much care...
Below is the kit prior to receive it's first coats of silver paint. I divided the left over parts in three: landing gear assembly, details parts and bomb/fuel load...
I think next time the Mustang will wear it's aluminium color!
Jean-Luc

Merlin

#017


Joined: June 11, 2003
KitMaker: 17,582 posts
AeroScale: 12,795 posts

Posted: Thursday, January 18, 2007 - 05:18 PM UTC
Hi Jean-Luc
Great work! - and I can't believe you've made such progress so quickly! I know you're staying pretty much OOB, but are you going to do something to fill those rivets etc. before the silver coat? I've finally had a chance to examine the kit properly and was pretty shocked by how heavy the surface finish is - I think I'll try spraying the major parts with aerosol primer to level the surface somewhat...
All the best
Rowan
Great work! - and I can't believe you've made such progress so quickly!
I know you're staying pretty much OOB, but are you going to do something to fill those rivets etc. before the silver coat? I've finally had a chance to examine the kit properly and was pretty shocked by how heavy the surface finish is - I think I'll try spraying the major parts with aerosol primer to level the surface somewhat...All the best
Rowan


betheyn
#019
Joined: October 14, 2004
KitMaker: 4,560 posts
AeroScale: 2,225 posts

Posted: Thursday, January 18, 2007 - 05:30 PM UTC
I can't believe how fast you are building this kit. So far it looks great, keep up the good work and keep posting the updates.
Still a shame to cover that engine up though .
Andy
Still a shame to cover that engine up though
.Andy

TedMamere
Joined: May 15, 2005
KitMaker: 5,653 posts
AeroScale: 4,347 posts
Posted: Friday, January 19, 2007 - 02:48 PM UTC
Quoted Text
I know you're staying pretty much OOB, but are you going to do something to fill those rivets etc. before the silver coat? I've finally had a chance to examine the kit properly and was pretty shocked by how heavy the surface finish is - I think I'll try spraying the major parts with aerosol primer to level the surface somewhat...
Hi all!
Rowan, no I won't try to level the surface. I'll build it "from the box" with the heavy surface finish so we have something to discuss about once it's finished! :-)
Andy, like modellers say: "I know it's there!"

As promised, here are pictures of the model with a first coat of Aluminium paint (Tamiya X11 Chrome Silver).
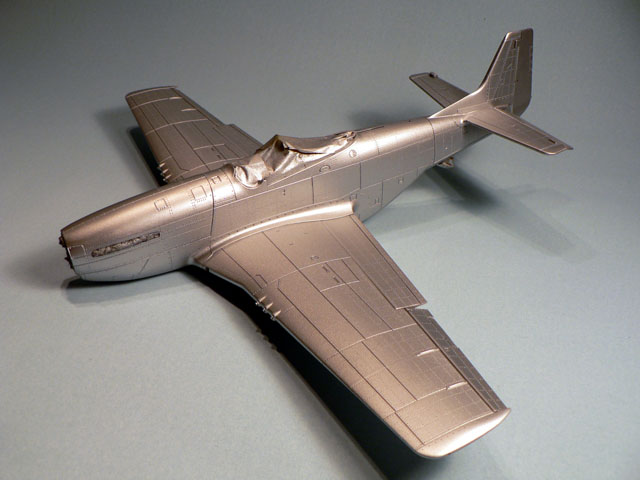
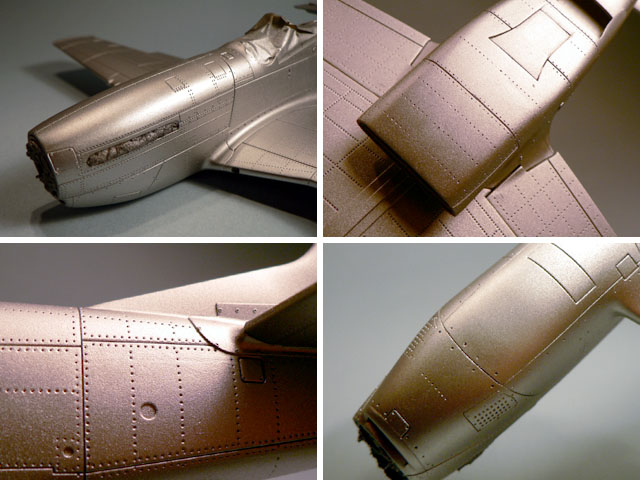
Looks better no? I will make some variations in the shades of the panels like on the real planes...
Jean-Luc
Merlin
#017
Joined: June 11, 2003
KitMaker: 17,582 posts
AeroScale: 12,795 posts
Posted: Friday, January 19, 2007 - 03:24 PM UTC
Quoted Text
I will make some variations in the shades of the panels like on the real planes...
Hi Jean-Luc
Just remember that the wings were actally painted silver on factory finish "natural metal" P-51Ds.
All the best
Rowan
DAK66
Joined: April 28, 2006
KitMaker: 286 posts
AeroScale: 45 posts
Posted: Friday, January 19, 2007 - 07:32 PM UTC
Looking good Jean !! What markings are you going to use ?
TedMamere
Joined: May 15, 2005
KitMaker: 5,653 posts
AeroScale: 4,347 posts
Posted: Friday, January 19, 2007 - 08:58 PM UTC
Quoted Text
Just remember that the wings were actally painted silver on factory finish "natural metal" P-51Ds.
Hi Rowan!
Doh! That's too boring! I think I will still make some variations... if you look at the pictures below you will notice the panels on the fuselage have various shades. It seems the wings also if you look at the panels near the guns openings.
Anyway, I think some artistic license is allowed in modelling.
Quoted Text
Looking good Jean !! What markings are you going to use ?
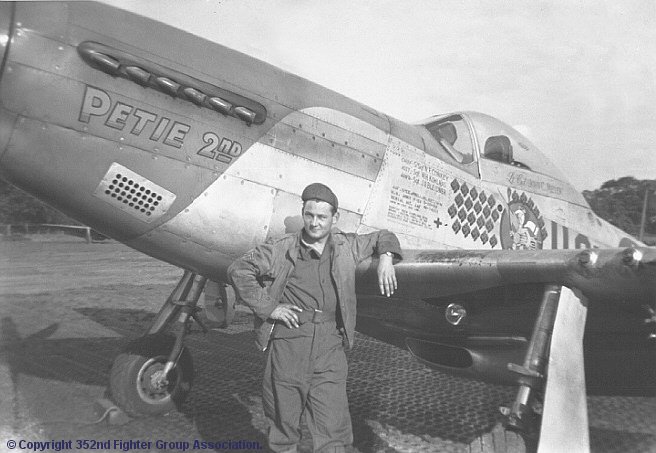
I will do the plane of the boxart "Petie 2nd". Not very original but it looks good!
Jean-Luc
Merlin
#017
Joined: June 11, 2003
KitMaker: 17,582 posts
AeroScale: 12,795 posts
Posted: Friday, January 19, 2007 - 09:24 PM UTC
Hi Jean-Luc
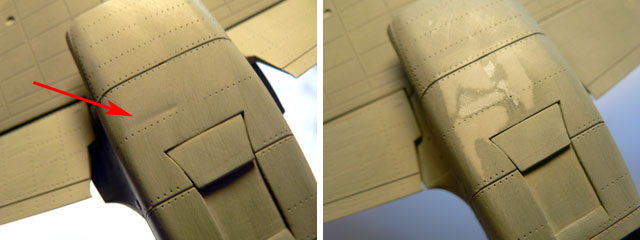
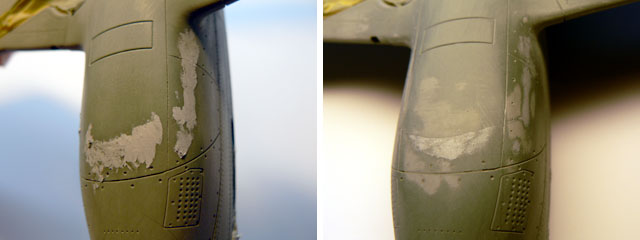
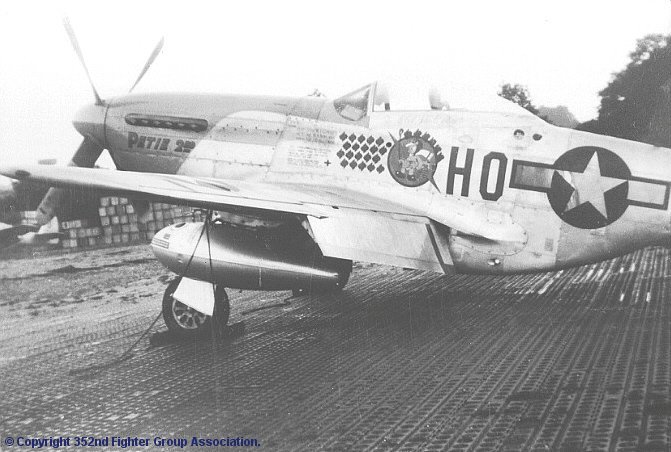
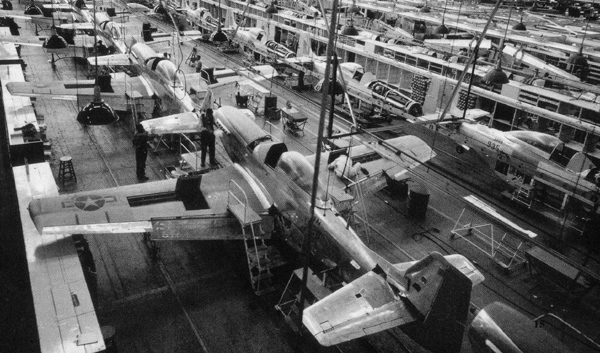
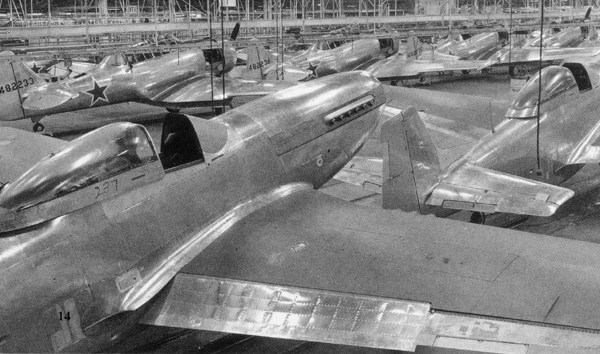
Actually, you've got some scope anyway without resorting to artistic licence. Squadron Signal kindly allowed us to use some photos from their excellent P-51D Walkaround book and you can see the flaps and ailerons weren't filled and painted along with the rest of the wing:
All the best
Rowan
Actually, you've got some scope anyway without resorting to artistic licence. Squadron Signal kindly allowed us to use some photos from their excellent P-51D Walkaround book and you can see the flaps and ailerons weren't filled and painted along with the rest of the wing:
All the best
Rowan
TedMamere
Joined: May 15, 2005
KitMaker: 5,653 posts
AeroScale: 4,347 posts
Posted: Saturday, January 20, 2007 - 04:28 AM UTC
Hi Rowan!
Thanks for the pictures!
Well, I don't know if my Mustang will have a 100% accurate finish. Anyway I started to paint some panels in different shades. It's a time consuming job because you always have to wait for the paint to dry before masking...
So far I painted some panels in a darker shade but I will add some more tomorrow...
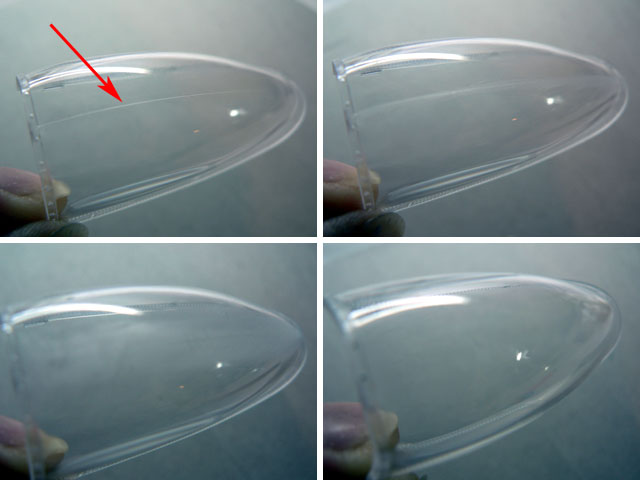
While the paint dried, I sanded and polished the seam on the canopy away. I first scratched the seam with an X-acto knife, then sanded it with Tamiya sanding paper (Gold-1000) and finally used Tamiya Polishing Compound...
Jean-Luc
Thanks for the pictures!
Well, I don't know if my Mustang will have a 100% accurate finish. Anyway I started to paint some panels in different shades. It's a time consuming job because you always have to wait for the paint to dry before masking...
So far I painted some panels in a darker shade but I will add some more tomorrow...
While the paint dried, I sanded and polished the seam on the canopy away. I first scratched the seam with an X-acto knife, then sanded it with Tamiya sanding paper (Gold-1000) and finally used Tamiya Polishing Compound...
Jean-Luc
 |

WEB HOSTING BY


Copyright ©2021 AeroScale and Kitmaker Network, a subsidiary of Silver Star Enterprises
All Rights Reserved. Please read our Conditions of Use and Privacy Policy.
All Rights Reserved. Please read our Conditions of Use and Privacy Policy.