_GOTOBOTTOM
World War II
Discuss WWII and the era directly before and after the war from 1935-1949.
Hosted by Rowan Baylis
REVIEW
Fairey Fulmar Mk 1
Merlin
Staff MemberSenior Editor
AEROSCALE
#017
_VISITCOMMUNITY
United Kingdom
Joined: June 11, 2003
KitMaker: 17,582 posts
AeroScale: 12,795 posts
Posted: Sunday, June 24, 2007 - 08:55 AM UTC
Hi again Jean-Luc

There's no really clear pic of the catapult spools in the 4+ book - they're not fitted to the FAA Museum aircraft. This is the best shot I've found - it's a detail from a photo in a 1982 Scale Models Warplane Special. Whoever said it's a waste of space keeping old magazines!?


It should tie in with you 3-view to make sense of what goes where.

All the best

Rowan
TedMamere
_VISITCOMMUNITY
Moselle, France
Joined: May 15, 2005
KitMaker: 5,653 posts
AeroScale: 4,347 posts
Posted: Monday, June 25, 2007 - 08:24 AM UTC
Hi Rowan!

Thanks for the picture. I will try to do something with it...

I painted the two tone camouflage using the Blu Tac method. I used Tamiya Dark Grey (XF24) and my own mix for the green.


I didn't wanted the paint shipping to be overdone but I think I failed once again. I'm afraid this Fulmar will be a very war beaten specimen... Well, on the instruction it is said the plane served aboard the HMS Victorious in December 1940. Let's say the weather was bad and the plane was often in service. I will try to tone down the effect a little though...


Jean-Luc
TedMamere
_VISITCOMMUNITY
Moselle, France
Joined: May 15, 2005
KitMaker: 5,653 posts
AeroScale: 4,347 posts
Posted: Wednesday, June 27, 2007 - 07:15 AM UTC
Hi all!

Some more progress on the Fulmar front...
I've "Futured" and then sanded the model smooth using 1000 grid sand paper from Tamiya.


Then I polished the model with Tamiya Polishing Compound and applied the decals. They went on very well with a little Micro Sol and do look excellent I must say.


After just a few minutes, all the recesses reappeared!


Next step will be the panel line wash, weathering etc...

Jean-Luc
TedMamere
_VISITCOMMUNITY
Moselle, France
Joined: May 15, 2005
KitMaker: 5,653 posts
AeroScale: 4,347 posts
Posted: Friday, June 29, 2007 - 09:35 AM UTC
Hi all!

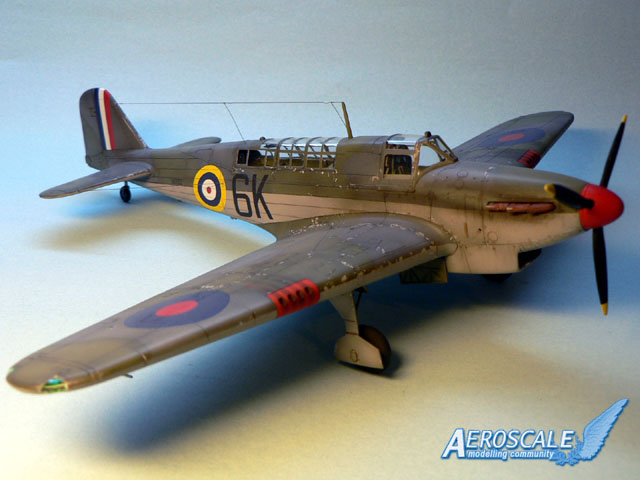
Things are starting to become serious! The Fulmar is on it's feet!

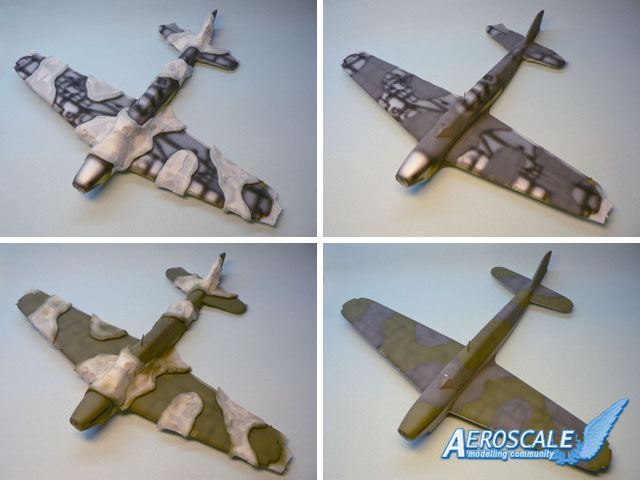
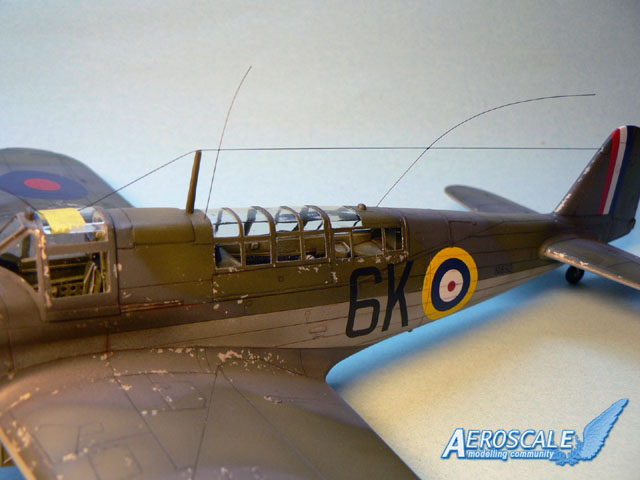
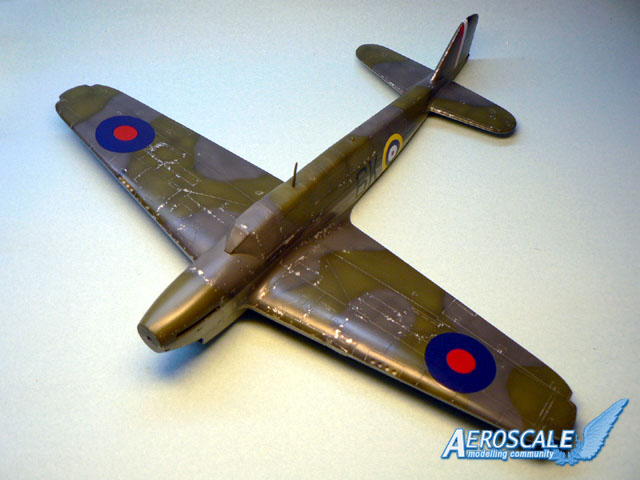
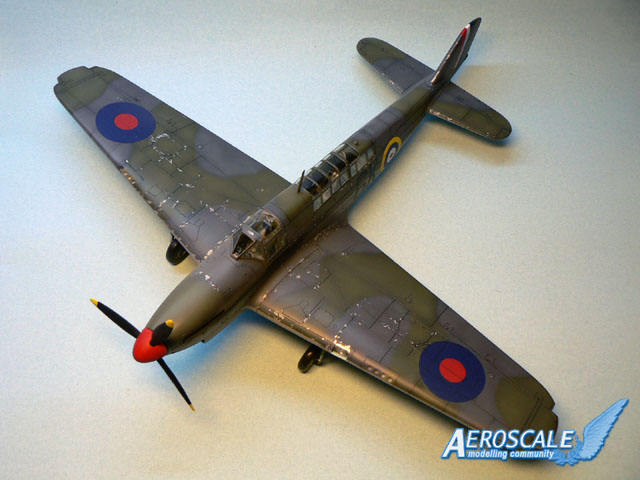
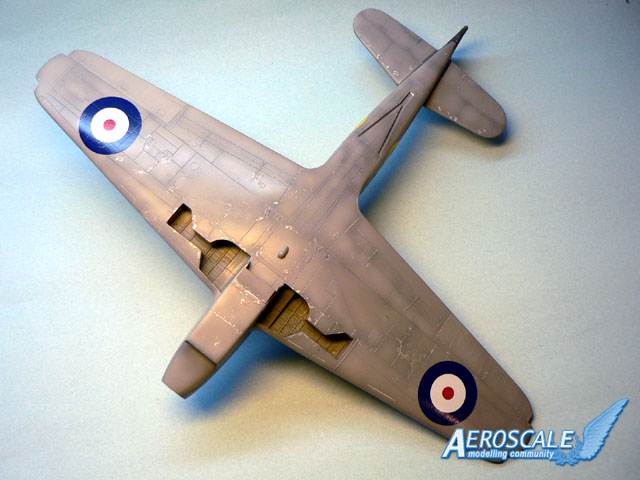
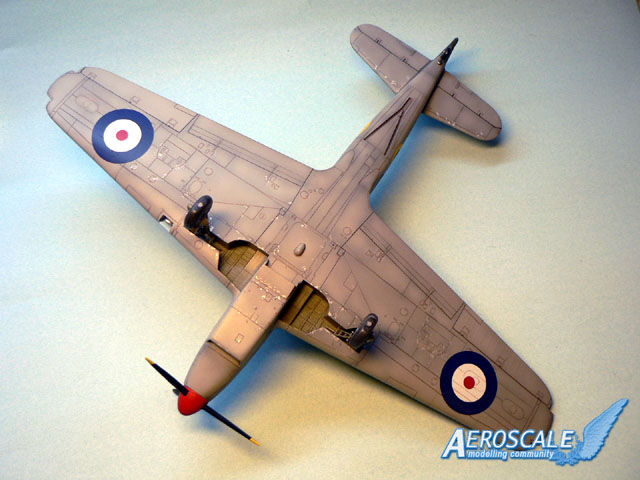
I have added the panel lines to the model using colored Future. I don't apply it as a wash but paint the panel lines with a 00 brush. It's time consuming but it's the way I do it. A propos "Panel lines", some modelers think it is not realistic to accentuate them and do their models without. Below are "before/after" pictures. My choice is made!

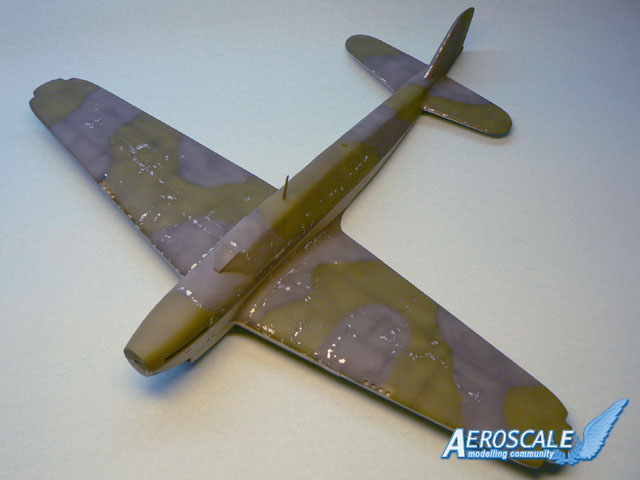
First the upper side...


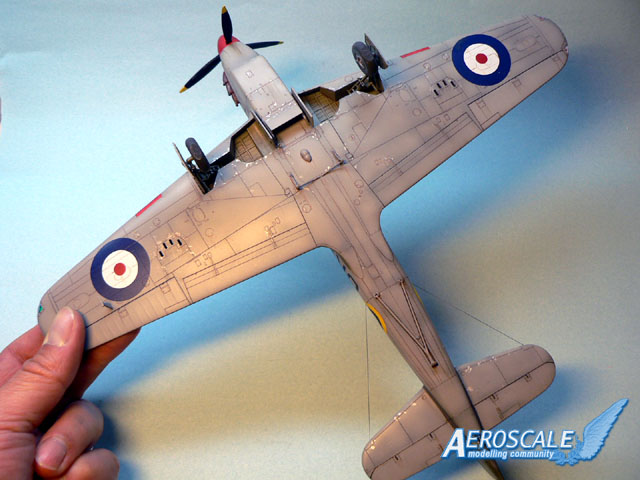
... then the underside...


... I think the pictures speak for themselves!

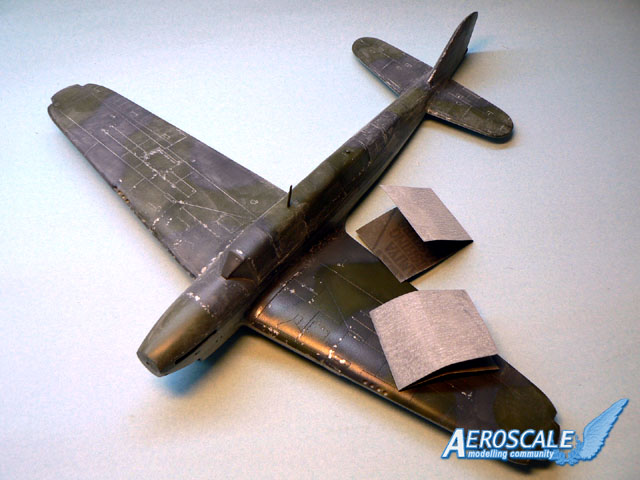
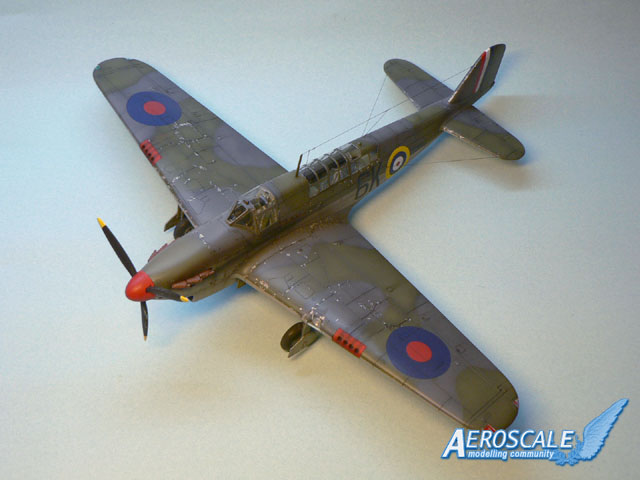
I dull coated the model using a mix of Future and Tamiya Flat Base to a ratio of 10 to 1. The good thing about the Future + Flat Base mix is that you can achieve every finish you want, from high gloss to matt and everything in between. The result only depends on the ratio.

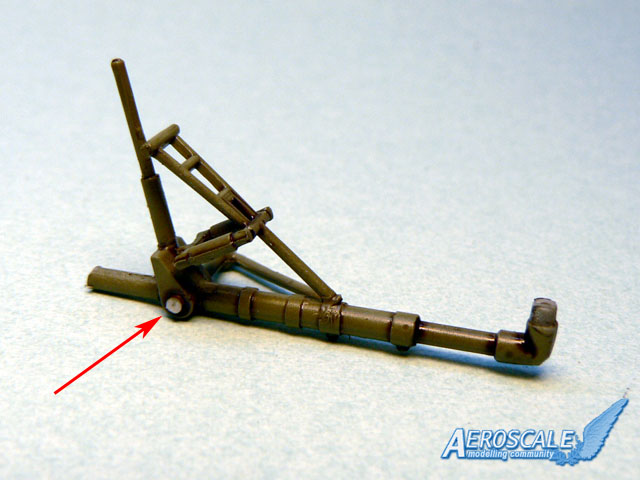
I glued the gear legs in place and if you don't want them to lean backwards you will have to cut a little piece of plastic (1/2 mm) where indicated by the red arrow...


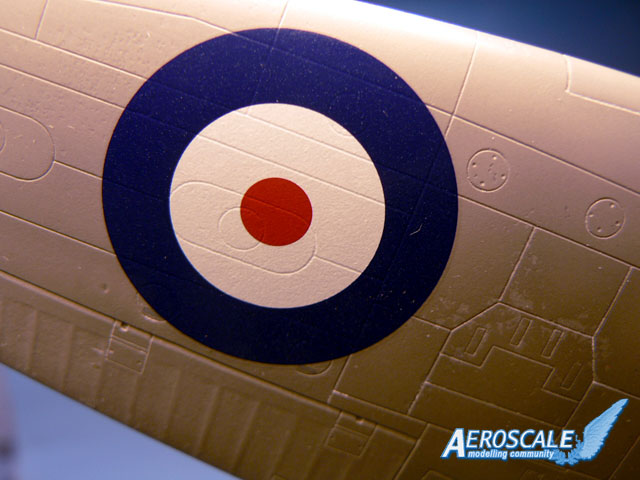
All I have to do is adding the gear doors, aerial wires, exhausts, position lights, pitot tube, arrester hook, catapult spools, guns, etc... Well, enough to keep me busy during the week-end!

Jean-Luc
csch
_VISITCOMMUNITY
Buenos Aires, Argentina
Joined: December 27, 2002
KitMaker: 1,941 posts
AeroScale: 1,040 posts
Posted: Friday, June 29, 2007 - 10:50 AM UTC
Hi Jean Luc:

Amazing how it´s turning out !
The chipped paint effect looks great, I´ll try your Maskol method (I always
learn something here )
What is the thing that you used for masking and painting the camo ?

Congratulations, fantastic model.
alpha_tango
_VISITCOMMUNITY
Germany
Joined: September 07, 2005
KitMaker: 5,609 posts
AeroScale: 5,231 posts
Posted: Friday, June 29, 2007 - 09:41 PM UTC
Hi Captain

I agree with Carlos .. looks great.

As you mentioned you are not satisfied with the chipping. For a finer effect you could try the Karismacolor pencils. I have seen great results (I still have to master it) using greys insted of silver also gives a realistic effect.

best wishes

Steffen
TedMamere
_VISITCOMMUNITY
Moselle, France
Joined: May 15, 2005
KitMaker: 5,653 posts
AeroScale: 4,347 posts
Posted: Saturday, June 30, 2007 - 11:09 AM UTC
Hi Carlos and Steffen!

Thanks for showing some interest in this build!


Quoted Text

What is the thing that you used for masking and painting the camo?


It's Blu-tack adhesive. It is something you usually use to hang posters on the walls. It looks like modelling clay. It's useful to do a nice separation between the camouflage colors and the final result is not too blurry and not too sharp.


Quoted Text

As you mentioned you are not satisfied with the chipping. For a finer effect you could try the Karismacolor pencils. I have seen great results (I still have to master it) using greys insted of silver also gives a realistic effect.


Actually I find that the maskol chipping method gives good results. it's not that I'm not satisfied with the technique, it's only that I have again overdone the effect. I always apply too much...

Anyway, after having done the final detail work I can say that the model is finished!


The model was finished after I glued the rather complex aerial wire network. But before that I hollowed the casings ejection openings on the underwing. I almost forgot to do it!


I will try to shoot better pictures tomorrow but I already noticed that whatever angle you use, the aircraft always looks ugly! I apologise in advance dear British friends, but I've seen more beautiful fighters than the Fulmar!

Jean-Luc
lampie
#029
_VISITCOMMUNITY
England - East Midlands, United Kingdom
Joined: December 23, 2005
KitMaker: 6,249 posts
AeroScale: 3,270 posts
Posted: Sunday, July 01, 2007 - 11:36 AM UTC
Nice Job Jean-Luc!
I have to disagree with your verdict on the paint chipping. I think it looks just right. These carrier based aircraft would have got a lot of attention from the elements. Look how battered Corsiars ended up!
Another build for me to aspire to.
Congratulations
Nige
csch
_VISITCOMMUNITY
Buenos Aires, Argentina
Joined: December 27, 2002
KitMaker: 1,941 posts
AeroScale: 1,040 posts
Posted: Sunday, July 01, 2007 - 01:00 PM UTC
Congratulations Jean Luc, your model looks fantastic
TedMamere
_VISITCOMMUNITY
Moselle, France
Joined: May 15, 2005
KitMaker: 5,653 posts
AeroScale: 4,347 posts
Posted: Sunday, July 01, 2007 - 11:49 PM UTC
Hi Nigel and Carlos!

Thanks again for your kind comments.


Quoted Text

I have to disagree with your verdict on the paint chipping. I think it looks just right. These carrier based aircraft would have got a lot of attention from the elements.


Nigel, after all you are right. While searching on the web for some reference pictures, I came across this one...


Maybe I must add even more weathering!

Jean-Luc
lampie
#029
_VISITCOMMUNITY
England - East Midlands, United Kingdom
Joined: December 23, 2005
KitMaker: 6,249 posts
AeroScale: 3,270 posts
Posted: Monday, July 02, 2007 - 12:19 AM UTC

Quoted Text

Maybe I must add even more weathering!

Jean-Luc


Perhaps you should, but beware,,long term exposure to salt water can have a very detrimental effect on a Fulmars airframe.

Nige
TedMamere
_VISITCOMMUNITY
Moselle, France
Joined: May 15, 2005
KitMaker: 5,653 posts
AeroScale: 4,347 posts
Posted: Monday, July 02, 2007 - 01:03 AM UTC

Quoted Text


Quoted Text

Maybe I must add even more weathering!

Jean-Luc


Perhaps you should, but beware,,long term exposure to salt water can have a very detrimental effect on a Fulmars airframe.


Nigel... I don't think I will go that far!

Jean-Luc
Merlin
Staff MemberSenior Editor
AEROSCALE
#017
_VISITCOMMUNITY
United Kingdom
Joined: June 11, 2003
KitMaker: 17,582 posts
AeroScale: 12,795 posts
Posted: Monday, July 02, 2007 - 01:08 AM UTC
Hi Jean-Luc

It looks absolutely superb! I was initially worried that the Dark Slate Grey was looking too green, but it's knocked back nicely with the weathering.

It's proving to be a great year for British naval aviation modellers - the Special Hobby Roc has just arrived at work and I've taken a break from my video edit to drool over the contents!

All the best

Rowan
_H_Dori
_VISITCOMMUNITY
England - East Anglia, United Kingdom
Joined: November 09, 2006
KitMaker: 295 posts
AeroScale: 276 posts
Posted: Monday, July 02, 2007 - 10:45 PM UTC
In my opinion that has come out superb, yes it's an ugly plane but it has a character.

Nice work really enjoyed reading the thread.

H
SGTJKJ
#041
_VISITCOMMUNITY
Kobenhavn, Denmark
Joined: July 20, 2006
KitMaker: 10,069 posts
AeroScale: 3,788 posts
Posted: Monday, July 02, 2007 - 11:02 PM UTC
Great job on that one, Jean-Luc! As usual a great plane to look at.

I must agree with Howard - ugly plane, but in a good way

Thanks for sharing
Maxidad
_VISITCOMMUNITY
England - South East, United Kingdom
Joined: August 18, 2006
KitMaker: 11 posts
AeroScale: 9 posts
Posted: Friday, January 25, 2008 - 01:42 AM UTC
Thanks for this great build. Not only is your step-by-step method very instructive, but the model looks falulous. Well done!
Removed by original poster on 02/08/08 - 01:58:42 (GMT).
 _GOTOTOP