_GOTOBOTTOM
World War II
Discuss WWII and the era directly before and after the war from 1935-1949.
Hosted by Rowan Baylis
REVIEW
Fairey Fulmar Mk 1
Merlin
Staff MemberSenior Editor
AEROSCALE
#017
_VISITCOMMUNITY
United Kingdom
Joined: June 11, 2003
KitMaker: 17,582 posts
AeroScale: 12,795 posts
Posted: Saturday, April 07, 2007 - 08:28 PM UTC


Here's a First Look at MPM's new 1/48 scale Fulmar. Jean-Luc's hopefully got this beauty waiting for him for when he gets back from holiday, so watch out for his full Review soon.

Link to Item

If you have comments or questions please post them here.

Thanks!
Merlin
Staff MemberSenior Editor
AEROSCALE
#017
_VISITCOMMUNITY
United Kingdom
Joined: June 11, 2003
KitMaker: 17,582 posts
AeroScale: 12,795 posts
Posted: Sunday, April 29, 2007 - 02:34 AM UTC
Hi again

Well, as the world's fastest builder (LOL!) I've made a start.

Using the 4+ Publications book as my primary reference, I've added a bit of detail to the innards and confirmed the position of a few items that are vague in the MPM instructions. The 4+ book is definitely recommended as a reference for anyone tackling the MPM kit, but there are still ambiguities because the only extent extant Fulmar had its rear cockpit thoroughly gutted during its post-war career.


So I'm not claiming total veracity in my build - it's a combination of the 4+ diagrams and photos with a little "gizmology" for a busier office. All good fun and the important thing is to be back and building!

All the best

Rowan
TedMamere
_VISITCOMMUNITY
Moselle, France
Joined: May 15, 2005
KitMaker: 5,653 posts
AeroScale: 4,347 posts
Posted: Thursday, June 07, 2007 - 08:56 AM UTC

Quoted Text

Jean-Luc's hopefully got this beauty waiting for him for when he gets back from holiday, so watch out for his full Review soon.


Hi Rowan!

If "soon" means two months then it's ok...

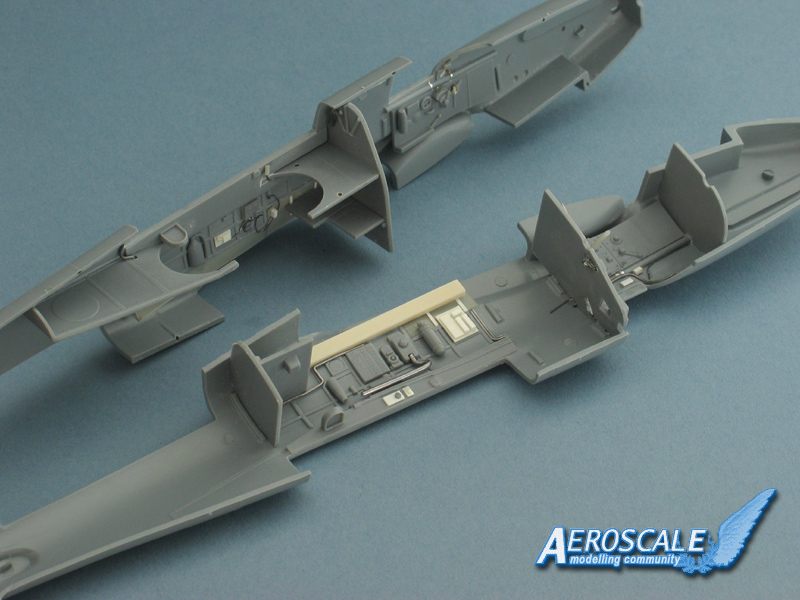
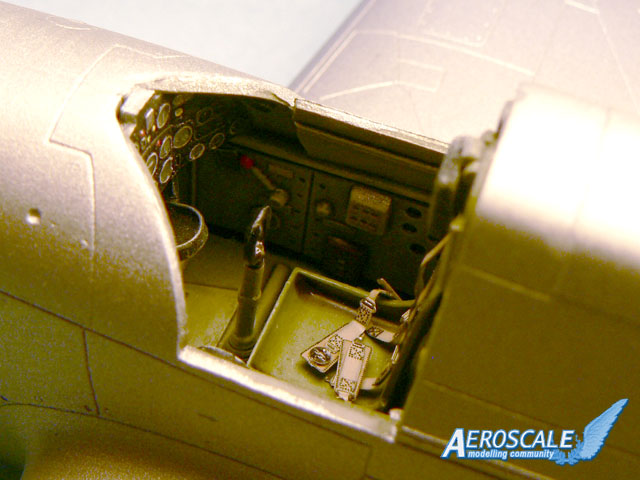
I started the Fulmar kit and I will make an "out of the box" review build here if you don't mind. So far I completed the cockpit...


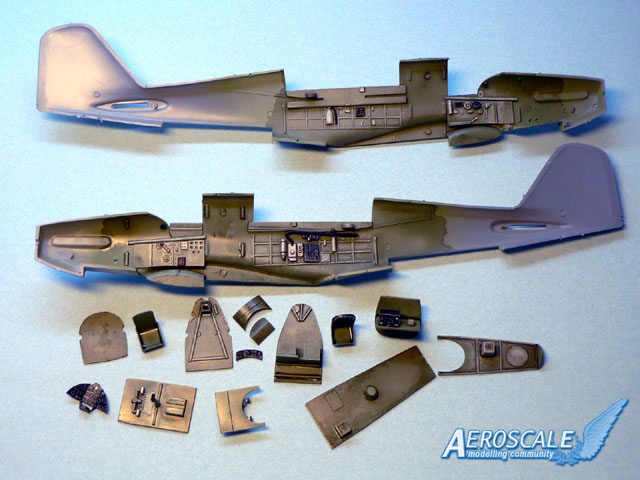
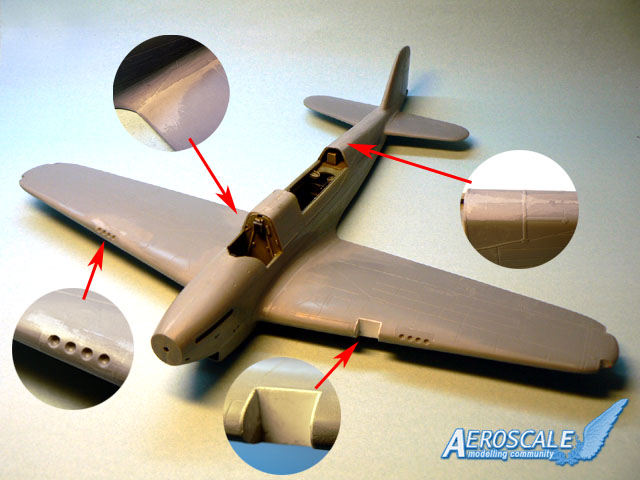
The interior detail is ok but I'm missing the resin and photo etched parts that can be found in most of the MPM kits. While the Fulmar kit seems to be easier to build than a typical short run kit, it is (unfortunately) also less detailed. It seems that the Czech manufacturer took a step forward the casual builder to the detriment of the detail freaks. It's a choice but personaly I regret it. Maybe they will do an "expert" boxing in the future... who knows.


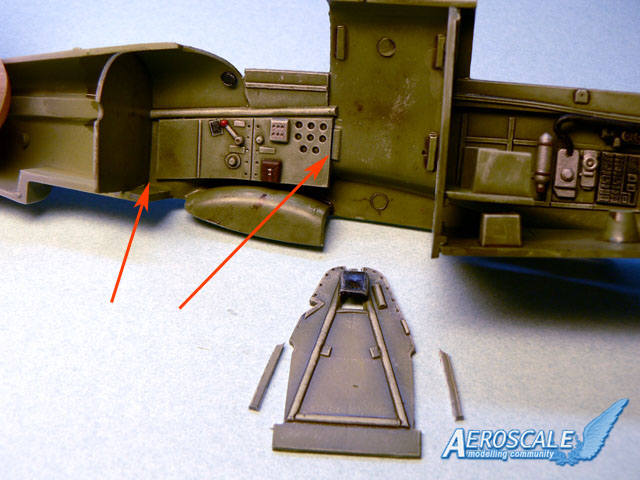
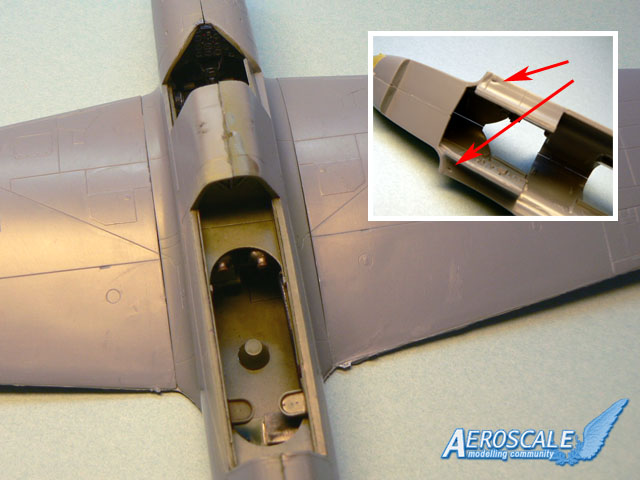
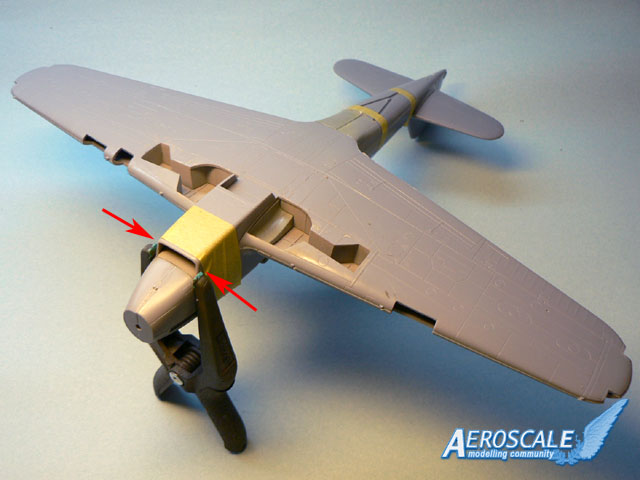
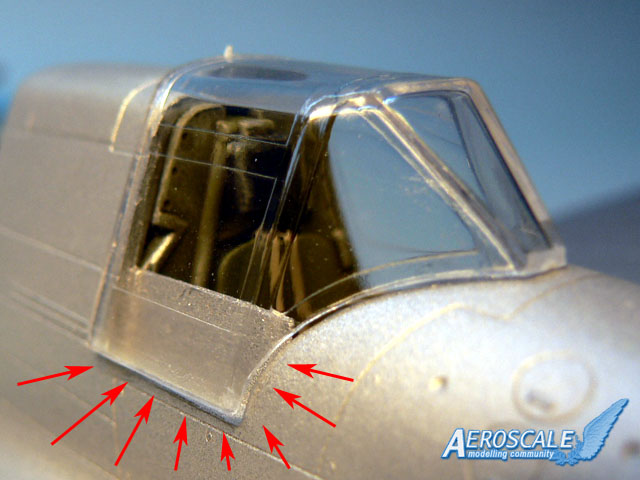
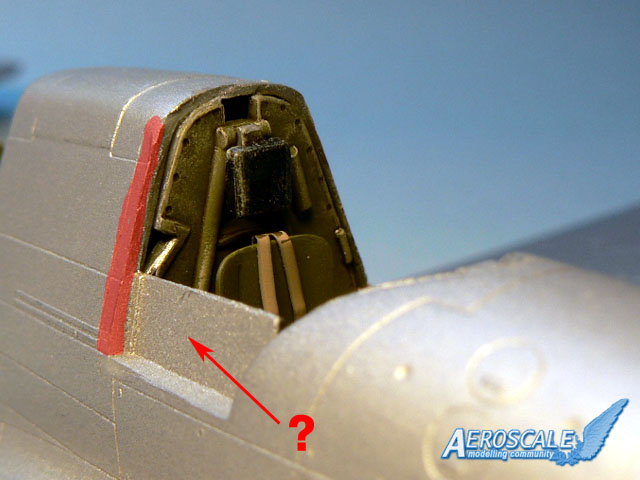
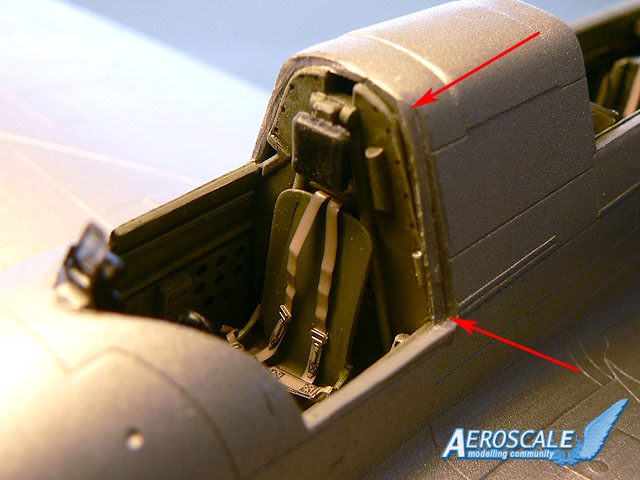
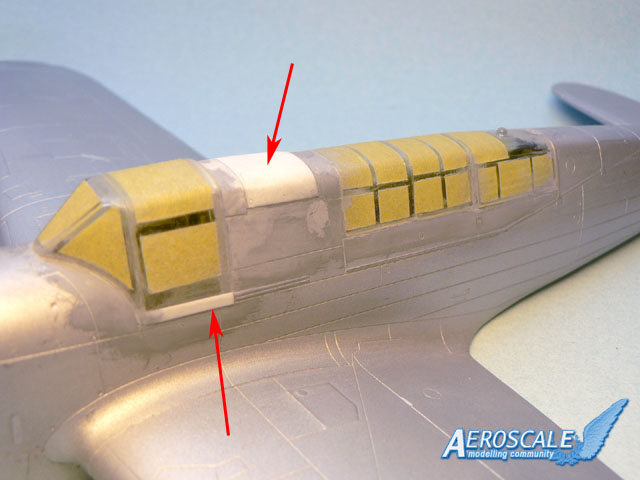
While gluing the interior parts, I made a mistake (see red arrows). I placed the sidewalls to much behind and I had to cut the rear bulkhead so it could fit. This is my fault, I should have checked twice, but I can confirm what Rowan said, in some places the MPM instructions are rather vague. For example, there are no color instructions at all for the interior!? The builder is left on his own for the painting so don't take my model as reference... it's mainly guesswork! For the basic "Grey Green" interior color (thanks Rowan for the info about that), I used a mix recommended by Tamiya for their RAF kits (XF5:1 + XF21:3 + XF65:1) and then sprayed pure Sky (XF21) to achieve a lighter tone. After some drybrushing and a wash, the result is a rather indefinable and speculative color... exactely what I wanted!


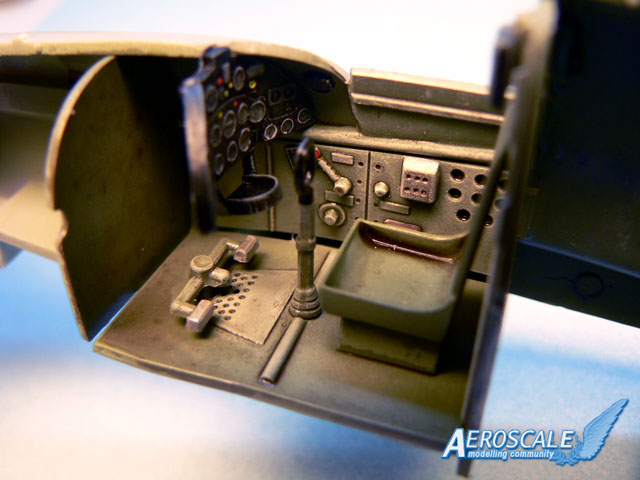
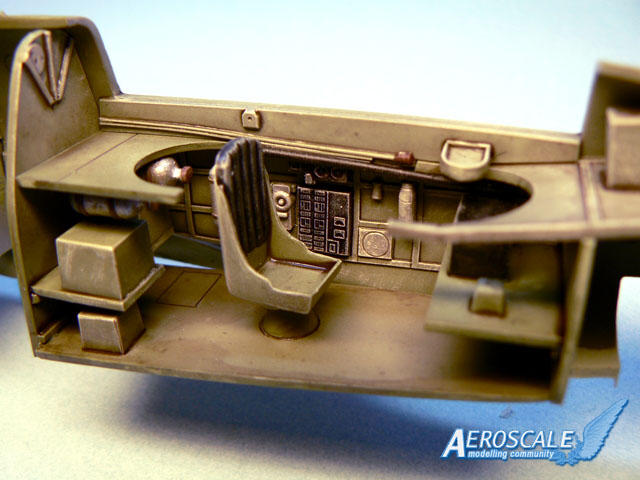
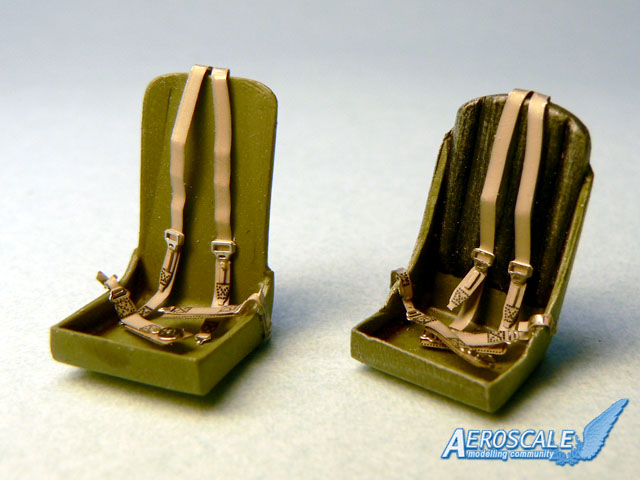
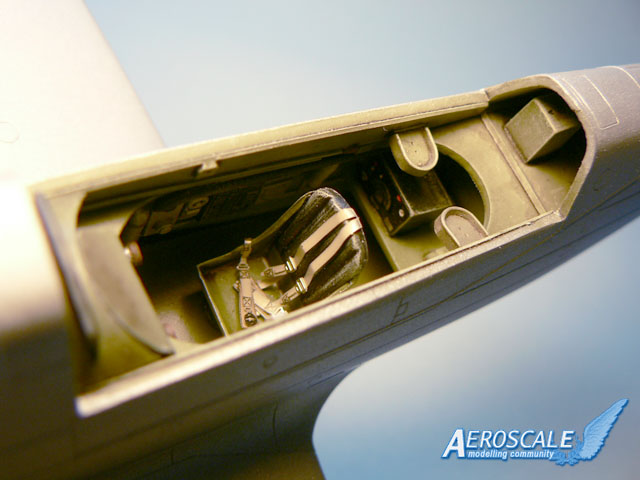
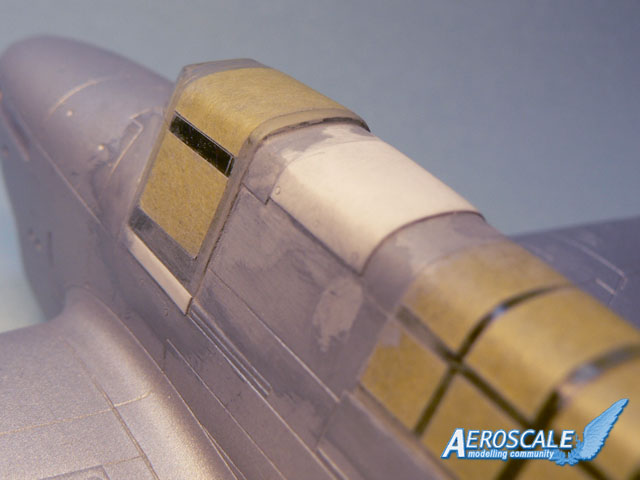
Anyway, once completed, the interior looks not too bad and since I want to build the model with a closed canopy I think I can live with it. The only things I will add later are aftermarket seatbelts because there are none provided in the kit.


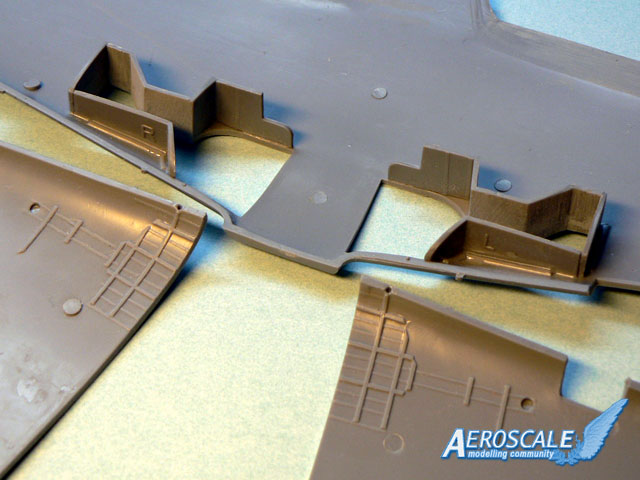
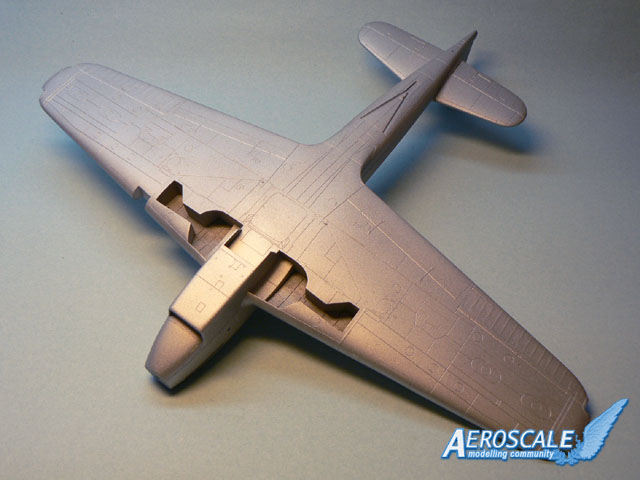
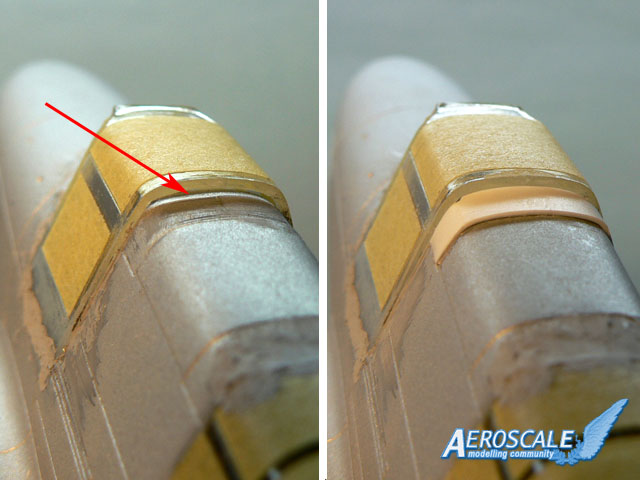
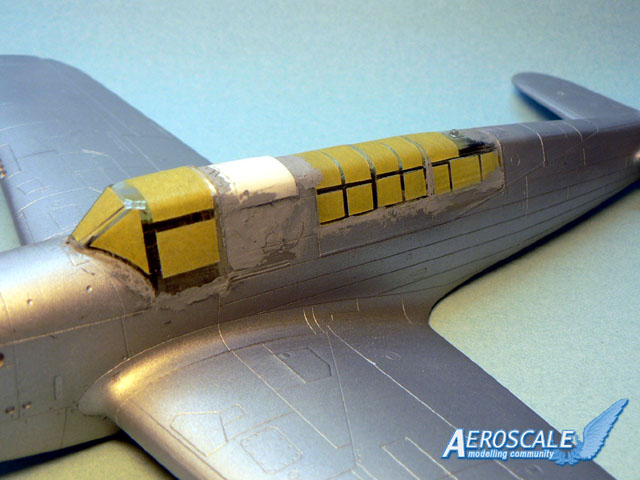
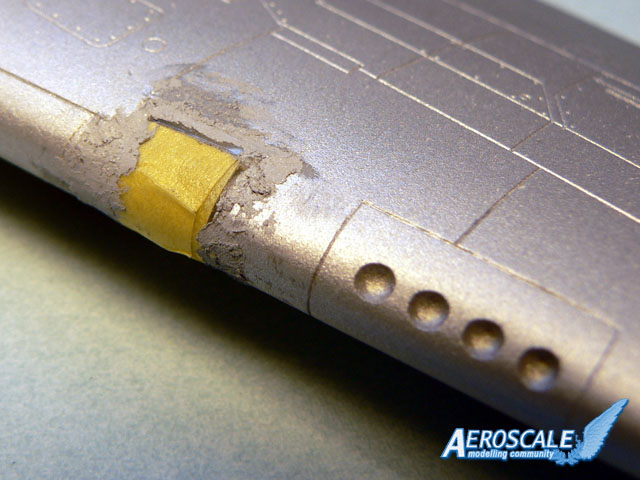
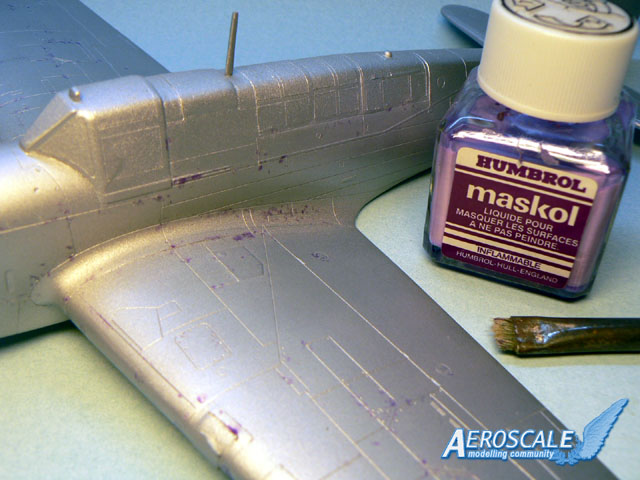
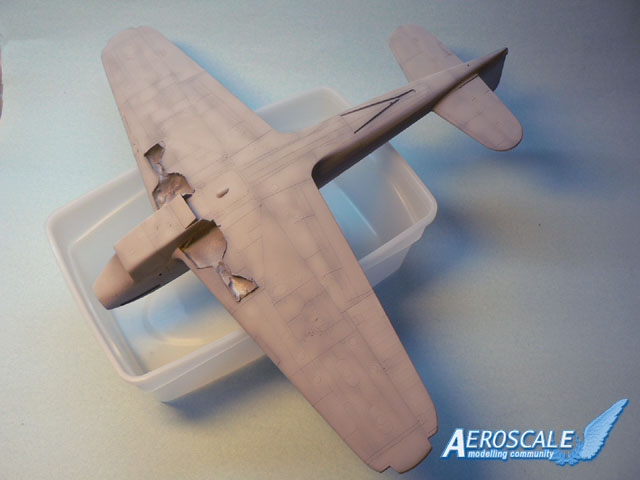
I also glued the wheel bays sidewalls in place and assembled the wings. The fit is good but you will need to add some putty if you want a clean result where the sidewall parts meet the lower wing part. Unfortunately, some details will get lost in the process if you are not carefull... like me.

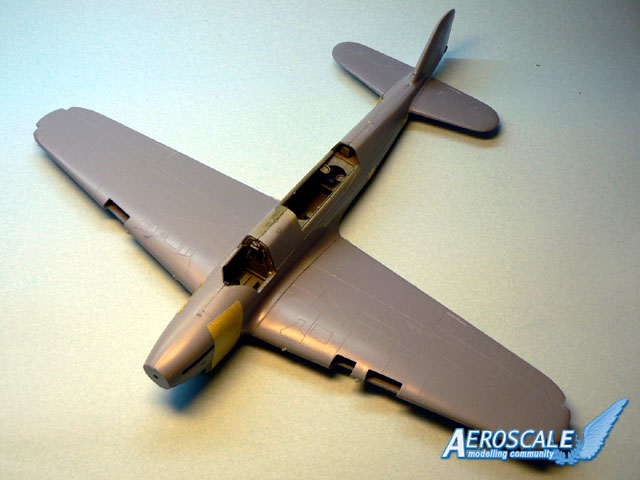
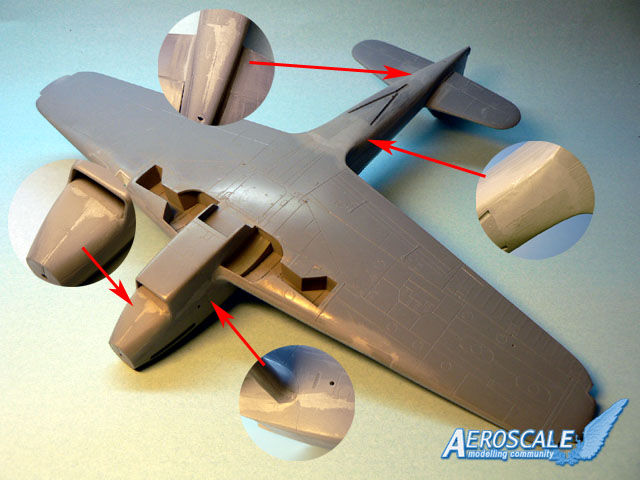
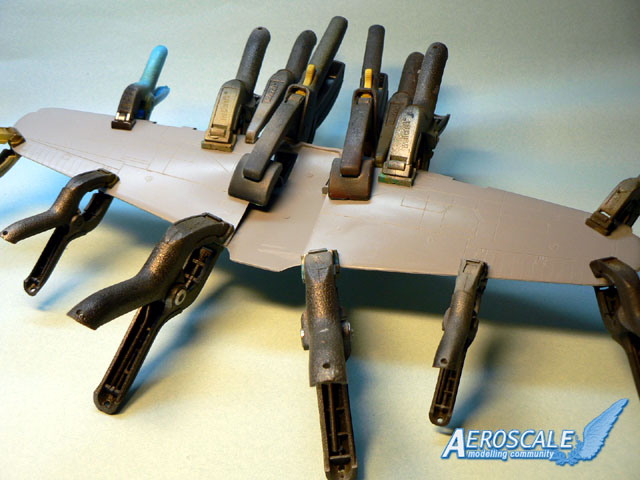
I hope to glue the wings to the fuselage next. I already made some dry fittings and it looks promising!

Jean-Luc
lampie
#029
_VISITCOMMUNITY
England - East Midlands, United Kingdom
Joined: December 23, 2005
KitMaker: 6,249 posts
AeroScale: 3,270 posts
Posted: Thursday, June 07, 2007 - 09:10 AM UTC
Looking fabulous Jean Luc.
I shall be watching this thread with interest
Nige
Merlin
Staff MemberSenior Editor
AEROSCALE
#017
_VISITCOMMUNITY
United Kingdom
Joined: June 11, 2003
KitMaker: 17,582 posts
AeroScale: 12,795 posts
Posted: Thursday, June 07, 2007 - 09:19 AM UTC
Nice one Jean-Luc

And looking superb!

Now you're officially in business, I'll feel free to get back to my own Fulmar.

All the best

Rowan
TedMamere
_VISITCOMMUNITY
Moselle, France
Joined: May 15, 2005
KitMaker: 5,653 posts
AeroScale: 4,347 posts
Posted: Friday, June 08, 2007 - 08:23 AM UTC
Hi Nigel and Rowan!

Thanks for the kind words...

Construction continued with the wings to fuselage assembly. On the picture below you can see the fit is very good despite the fact that the parts are not glued together but only dry fitted. However I noticed two sink marks inside the wheel bays wich you may want to remove prior to gluing the wing assembly in place. If you don't do it now, filling them and sanding the area smooth will prove to be very difficult later.


Once the wings and the horizontal tailplanes have been glued to the fuselage, then you can realize how big the Fairey Fulmar was, despite the fact that it was a carrier based fighter.


At this stage I also added the big air intake under the engine. The red arrows show were pressure must be applied with a clamp where the lips of the U shaped part meets the fuselage. If you don't do so, a significant step will remain.
I also added the insert which represents the arrester hook housing on the back of the fuselage. The fit is not terrible and it's a bit odd that you have to use an additional part for this. But let us be fair, limitations in the plastic moulding technology are probably the reason why it wasn't possible for MPM to do otherwise.


To be continued...

Jean-Luc
alpha_tango
_VISITCOMMUNITY
Germany
Joined: September 07, 2005
KitMaker: 5,609 posts
AeroScale: 5,231 posts
Posted: Friday, June 08, 2007 - 08:47 AM UTC
Hi Jean-Luc

Nice progress !!

BTW I remembered a comment from Steven Modeldad Eisenmann over at HS, who wrote:


Quoted Text

Also, the Mk. I had the carb intake in the main radiator intake. I tried to represent this by using a cut down trop filter from a Hurricane. You can see it when viewing the model head on.


Sadly his pix are gone in the thread, but maybe you can send him a note to repost them (or send them to you)

http://www.network54.com/Forum/149674/message/1177420388/

best wishes

Steffen
TedMamere
_VISITCOMMUNITY
Moselle, France
Joined: May 15, 2005
KitMaker: 5,653 posts
AeroScale: 4,347 posts
Posted: Wednesday, June 13, 2007 - 07:47 AM UTC

Quoted Text

Also, the Mk. I had the carb intake in the main radiator intake. I tried to represent this by using a cut down trop filter from a Hurricane. You can see it when viewing the model head on.


Hi Steffen!

Thanks for the heads up! But as I said before, this will be a review build so I will only do minor modifications to the kit. I also want this to be a relaxing build so I won't do too much researches. If I start this game, I won't be finished until next year!

I made some progress on the Fulmar. Wings and fuselage are glued together and I filled the seams. Below are two pictures which show the areas which require a little more care...


You may have noticed that I used small evergreen pieces to close the landing light "box" on the port wing. On MPM's instructions the transparent part which represents the landing light is shown to be glued... in empty space!
I didn't rescribed the panel lines yet but as soon as this is done I will cover the model with a first coat of paint. I think I will use silver.

To be continued...

Jean-Luc
TedMamere
_VISITCOMMUNITY
Moselle, France
Joined: May 15, 2005
KitMaker: 5,653 posts
AeroScale: 4,347 posts
Posted: Friday, June 15, 2007 - 08:27 AM UTC
Hi all!


Quoted Text

I think I will use silver.


... and I followed the plan!


Of course, before applying the paint I sanded the surface of the kit smooth, eliminated all the imperfections and rescribed the panel lines that where lost. While waiting for the paint to dry, I've assembled the gear legs and I must say they look very nice even without resin or PE parts.


Now I have a few questions for Master Merlin (or anybody who has the answers):
1 - In the kit, two types of propellers are included. Which on should I use? The pointed or the rounded ones?
2 - For the wheel bay and undercarriage, what color should I use? Interior green or the color of the underside? Or maybe silver? I would go for the color of the underside (light grey) but I really don't know...
3 - What is the color of the arrester hook? Black, grey, white, pink?
4 - There is no gunsight in the kit. I suppose the real aircraft had one?

Ok, this is enough for now... You've guessed it, the instructions are poor on color informations!

Jean-Luc
Merlin
Staff MemberSenior Editor
AEROSCALE
#017
_VISITCOMMUNITY
United Kingdom
Joined: June 11, 2003
KitMaker: 17,582 posts
AeroScale: 12,795 posts
Posted: Friday, June 15, 2007 - 08:43 AM UTC
Hi Jean-Luc

Sorry, work's prevented me getting near my kit to follow in the footsteps of your build. I'll get get back to you with the details on the questions you asked.

I have to admit, my first reaction to your questions was that I covered them in my Review... and then I realised that what I wrote was an attempt at a First Look and I didn't address any of the points in my mind in sufficient detail. In retrospect, the format simply doesn't satisfy me - and with no prospect of finding more time to write for Aeroscale, I'll just submit fewer Reviews - better nothing than something I wouldn't put my name to...

All the best

Rowan

TedMamere
_VISITCOMMUNITY
Moselle, France
Joined: May 15, 2005
KitMaker: 5,653 posts
AeroScale: 4,347 posts
Posted: Friday, June 15, 2007 - 09:20 AM UTC

Quoted Text

I have to admit, my first reaction to your questions was that I covered them in my Review... and then I realised that what I wrote was an attempt at a First Look and I didn't address any of the points in my mind in sufficient detail. In retrospect, the format simply doesn't satisfy me - and with no prospect of finding more time to write for Aeroscale, I'll just submit fewer Reviews - better nothing than something I wouldn't put my name to...


Hi Rowan!

I don't agree with what you've said. I don't think it is necessarily your job to give the exact colors for the kit in place of MPM in an Aeroscale review. A first look should be based mainly on pictures and informations about the kit's quality (molding, level of detail, decal sheet, markings etc...)
I think Steffen (alpha_tango) was right in saying that pictures are better than thousand words in a review. I would prefer to see more (simplier) First Look reviews than lesser (more detailed) Reviews. But that's a personal opinion. The best for me would be to write a "First Look" and then a "Full Build review" with more precise comments on the accuracy and buildability of the kit.

And for the exact color or accuracy questions about a kit, there is a "discuss this" link in each review. Basically, we are discussing about the buildability, accuracy and overall quality of the kit here...

Thanks in advance for any help. It is much appreciated...

Jean-Luc
Merlin
Staff MemberSenior Editor
AEROSCALE
#017
_VISITCOMMUNITY
United Kingdom
Joined: June 11, 2003
KitMaker: 17,582 posts
AeroScale: 12,795 posts
Posted: Saturday, June 16, 2007 - 08:36 PM UTC
Hi Jean-Luc

Sorry for the delay.

1 - In the kit, two types of propellers are included. Which on should I use? The pointed or the rounded ones?
Early Fulmars carried the propeller with the pointed blades, so I'm assuming Parts #3 are correct for the kit decals.

2 - For the wheel bay and undercarriage, what color should I use? Interior green or the color of the underside? Or maybe silver? I would go for the color of the underside (light grey) but I really don't know...
4+ Publication state Grey-Green (not Interior Green - that's a U.S. colour) for the wheel-wells. The preserved a/c at the FAA Museum has them painted in the underside colour.

3 - What is the color of the arrester hook? Black, grey, white, pink?
I've no idea! LOL! There are no clear shots in the book, but I'd assume the underside colour.

4 - There is no gunsight in the kit. I suppose the real aircraft had one?
Yes - the Fulmar carried a Reflector Sight Mk.II. These pics are from British Aircraft Armament Volume 2 - PSL, 1994:


I hope that helps - all the best

Rowan
TedMamere
_VISITCOMMUNITY
Moselle, France
Joined: May 15, 2005
KitMaker: 5,653 posts
AeroScale: 4,347 posts
Posted: Sunday, June 17, 2007 - 02:13 AM UTC

Quoted Text

I hope that helps - all the best


Hi Rowan!

Yes, that was great help! Thanks a lot!

I would have used the rounder propellers, painted the wheel-wells in grey, the arrester hook in black and omitted the gunsight!

Err... one precision if you don't mind: are the landing gears and the inner gear doors also painted in grey green?

Jean-Luc
Merlin
Staff MemberSenior Editor
AEROSCALE
#017
_VISITCOMMUNITY
United Kingdom
Joined: June 11, 2003
KitMaker: 17,582 posts
AeroScale: 12,795 posts
Posted: Sunday, June 17, 2007 - 02:38 AM UTC
Hi again Jean-Luc

4+ state Grey-Green for the gear legs and doors and that seems to be the case in most of the shots of operational aircraft where the undercarriage is visible. In a few vintage shots, the legs seem to be painted Aluminium, while in the FAA Museum restoration they are painted in the underside colour. Take your pick. (I'll probably go for Grey-Green when I get back to the kit.)

All the best

Rowan
TedMamere
_VISITCOMMUNITY
Moselle, France
Joined: May 15, 2005
KitMaker: 5,653 posts
AeroScale: 4,347 posts
Posted: Sunday, June 17, 2007 - 05:29 AM UTC
Hi Rowan!

Thanks again! But I'm afraid it was not my last question...


I've completed the seats and include Eduard pre-painted RAF seatbelts. They are the only aftermarket addition to the kit so far and will be the last... remember this is an out of the box review build. If you wonder who will have the seat with the leather cushion (the pilot or the radio operator?), take a look below...


Yes, the radio operator has the cushion, lucky guy...

I test fitted the forward canopy and noticed that the fit is a bit problematic. In the picture below, the arrows show where the plastic part is not flush with the fuselage.


The solution will be to take some plastic away on the rear of the cockpit opening (red area).


Now here is my next question for you Rowan. What is that panel on the right side of the cockpit (?). There is no such panel on the other side and I can't figure out what it should represent...

Jean-Luc
Merlin
Staff MemberSenior Editor
AEROSCALE
#017
_VISITCOMMUNITY
United Kingdom
Joined: June 11, 2003
KitMaker: 17,582 posts
AeroScale: 12,795 posts
Posted: Sunday, June 17, 2007 - 06:22 AM UTC
Hi Jean-Luc

Although the kit's rear seat looks nice, it probably isn't correct, because MPM seem to have based it on the one fitted to the FAA Museum's machine when it was converted to carry a passenger as a post-war communications and hack aircraft. Unfortunately, 4+ don't show the correct style of seat in their book.

The panel on the starboard side of the canopy was a shield to prevent exhaust fumes entering the cockpit.

All the best

Rowan
TedMamere
_VISITCOMMUNITY
Moselle, France
Joined: May 15, 2005
KitMaker: 5,653 posts
AeroScale: 4,347 posts
Posted: Sunday, June 17, 2007 - 08:10 AM UTC

Quoted Text

The panel on the starboard side of the canopy was a shield to prevent exhaust fumes entering the cockpit.


Hi Rowan!

Wow, this is something I would have never guessed!

And now, what color should I paint the outside of it? Grey green or camouflage color?

Jean-Luc
TedMamere
_VISITCOMMUNITY
Moselle, France
Joined: May 15, 2005
KitMaker: 5,653 posts
AeroScale: 4,347 posts
Posted: Tuesday, June 19, 2007 - 07:44 AM UTC
Hi all!

Some more progress today...

As I feared, the fit of the transparent parts needed a lot of work, especially for the pilot's canopy which is too thick and too large. I had to take some plastic away at the rear of the cockpit opening to get the clear plastic part to fit but even with this radical measure It isn't perfect as you can see on the second picture. There is a noticable gap between the hood and the top of the fuselage which I eliminated with a thin piece of plasticard (Evergreen).


Usually I use white glue for the clear parts, but in this case it would have been impossible. I used regular plastic cement instead and also strong clamps to keep the canopy in place. The fit of the three piece transparent housing of the radio operator is better, but filler is needed nonetheless.


Even the landing light window needed some additional work... doh!


I hope I have the most difficult part of the build behind me... but with a short run kit one never knows!

Jean-Luc
TedMamere
_VISITCOMMUNITY
Moselle, France
Joined: May 15, 2005
KitMaker: 5,653 posts
AeroScale: 4,347 posts
Posted: Saturday, June 23, 2007 - 07:53 AM UTC
Hi all!

Small progress, but progress nevertheless! I managed to blend the clear parts to the fuselage for an acceptable result, but I must say that so far the transparent plastic parts are the weakness of the kit. Especially the pilot canopy is very difficult to get to fit properly. Let's hope that aftermaket vacuform canopy manufacturers will produce replacement parts soon! The red arrow show where I added small pieces of plasticard.


I also painted the gear legs and gear doors in grey green as suggested. I think I will paint the wheel hubs in silver though. I don't know why but I don't imagine them grey green...


Hopefully next time I will have more to show!

Jean-Luc
alpha_tango
_VISITCOMMUNITY
Germany
Joined: September 07, 2005
KitMaker: 5,609 posts
AeroScale: 5,231 posts
Posted: Saturday, June 23, 2007 - 08:14 AM UTC
As the forum is almost dead over the last days let me be the one who praises your excellent build!

please continue to post your progress ... I am on a stall since two weeks .. motivation zero...

best wishes

Steffen
Merlin
Staff MemberSenior Editor
AEROSCALE
#017
_VISITCOMMUNITY
United Kingdom
Joined: June 11, 2003
KitMaker: 17,582 posts
AeroScale: 12,795 posts
Posted: Saturday, June 23, 2007 - 08:36 AM UTC
Hi Jean-Luc

Looking good - I wish I could claim such progress (well, any progress!) on my own builds.

Looking at your pics has highlighted another trick the MPM Fulmar has up its sleeve to bite us... the windscreen not only fits badly, but the style is wrong for all but very early aircraft! (Compare it with the boxtop).

I've just done some hasty searching through the 4+ book and it's clear that the designers have again copied the FAA Museum exhibit, which was the first production Fulmar. According to the text, only this and the first 4 aircraft had this style of windscreen - that's N1854 through to N1858. After that, the windscreen was modified.

The painting instructions show the correct style for the decals supplied and I didn't think to check that the transparencies matched!

All the best

Rowan
Merlin
Staff MemberSenior Editor
AEROSCALE
#017
_VISITCOMMUNITY
United Kingdom
Joined: June 11, 2003
KitMaker: 17,582 posts
AeroScale: 12,795 posts
Posted: Saturday, June 23, 2007 - 08:54 AM UTC
Hi again Jean-Luc

One other easy fix you could add at this stage is that the circular scribed "panel" behind the observer's cockpit was actually a window - you can just see where I'd already opened it up in the first of my pictures.

All the best

Rowan
TedMamere
_VISITCOMMUNITY
Moselle, France
Joined: May 15, 2005
KitMaker: 5,653 posts
AeroScale: 4,347 posts
Posted: Sunday, June 24, 2007 - 07:47 AM UTC
Hi Steffen and Rowan!

Thanks for following this build...

Today I started to spray the three tone camouflage. But before I applied some Maskol with an old brush to do paint shipping effects. It's the second time I try this method and the first time I found it was overdone (I applied the Maskol with a cocktail stick) so I used less this time. Let's see how it will work...


For the camouflage I sprayed the Sky Grey (Tamiya XF 19) first with the usual pre-shading technique. I also sprayed a much lighter grey to give a faded effect.


Next I will apply the two-tone upper camouflage.

Rowan, I have another question for you. In the assembly step n°13 it is said to glue the parts D8 (2X) and D22. What are these parts for? D22 looks like a pipe and I guess it could be the fuel emergency release. Parts D8 are more difficult to identify. It seems on the three view plans that cables are attached to them. Are these part of the wing folding mechanism? Or are these attachments to secure the plane on the flight deck? It would be nice if you had a picture of this area of the plane to show me.

As for the Windscreen and the round window, well I will leave it as it is. After all, if it's wrong, blame MPM!

Jean-Luc
Merlin
Staff MemberSenior Editor
AEROSCALE
#017
_VISITCOMMUNITY
United Kingdom
Joined: June 11, 2003
KitMaker: 17,582 posts
AeroScale: 12,795 posts
Posted: Sunday, June 24, 2007 - 08:11 AM UTC
Hi Jean-Luc

Part D22 is the signal flare tube - the pistol was beside the pilot's seat.
Parts D8 are the catapult spools. As you say, they should have additional diagonal cables / braces. I'll sort out a picture.

All the best

Rowan
TedMamere
_VISITCOMMUNITY
Moselle, France
Joined: May 15, 2005
KitMaker: 5,653 posts
AeroScale: 4,347 posts
Posted: Sunday, June 24, 2007 - 08:43 AM UTC

Quoted Text

Part D22 is the signal flare tube - the pistol was beside the pilot's seat.
Parts D8 are the catapult spools. As you say, they should have additional diagonal cables / braces. I'll sort out a picture.


Hi again Rowan!

Ok, I got it 99% wrong... I am lucky to have you! Thanks!

Jean-Luc
 _GOTOTOP