


Early Aviation
Discuss World War I and the early years of aviation thru 1934.
Discuss World War I and the early years of aviation thru 1934.
Hosted by Jim Starkweather
Online Build - Roden 1/32 Albatros D.III

DAK66

Joined: April 28, 2006
KitMaker: 286 posts
AeroScale: 45 posts
Posted: Sunday, August 12, 2007 - 09:19 AM UTC
Nice build so far keep it coming

Dwaynewilly
Joined: December 15, 2006
KitMaker: 365 posts
AeroScale: 344 posts
Posted: Monday, August 13, 2007 - 01:49 PM UTC
Brad,
Really gorgeous work, a pleasure to look at and excellent photography as well. Looks like you could change the oil and plugs on the Mercedes! Can't wait to see whats next.
Dwayne
Really gorgeous work, a pleasure to look at and excellent photography as well. Looks like you could change the oil and plugs on the Mercedes! Can't wait to see whats next.
Dwayne

BradCancian

Joined: August 30, 2006
KitMaker: 285 posts
AeroScale: 281 posts

Posted: Saturday, September 08, 2007 - 11:53 PM UTC
A very minor update as I have been struggling to find time to progress this one... Tonight I played with the Spandaus using the Eduard etched set - the etched jackets add alot to the overall appearance. Roden, in their wisdom, supply the Spandaus without the jackets as well as with a moulded plastic jacket to give the builder the option. Here's the upgraded Spandau next to the kit Spandau:

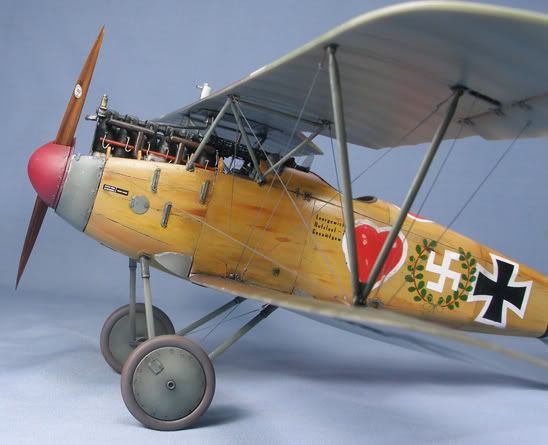
I also sanded off the radiator detail without too many dramas - the Eduard etched set allows for the building of the offset radiator of the later D.III. I should be up to painting the wings shortly - I have seen a number of versions of Voss' later D.III - one with three tone dark green / light green / brown and one with two tone dark green / brown upper surfaces - anyone know which is right for Voss' later version?
BC


Rittersbach
Joined: August 16, 2007
KitMaker: 83 posts
AeroScale: 80 posts
Posted: Sunday, September 09, 2007 - 01:58 AM UTC
Brad,
Just as impressive as your builds are, so is that digital camera or yours. We're all jealous of the close ups it takes.
Jeff
Just as impressive as your builds are, so is that digital camera or yours. We're all jealous of the close ups it takes.
Jeff

BradCancian
Joined: August 30, 2006
KitMaker: 285 posts
AeroScale: 281 posts
Posted: Friday, September 14, 2007 - 05:41 PM UTC
Another minor update - basic camo colours are now on. As mentioned previously, I am building this kit for a fellow forumite who is a fan of Werner Voss, so the model is being painted in Voss' colours. Also apparent in these pics is the filling and removal of the kit radiator - I will be using the radiator on the Eduard etched fret to represent the later offset radiator version of the D.III.


Cheers!
BC
Cheers!
BC

JackFlash
Joined: January 25, 2004
KitMaker: 11,669 posts
AeroScale: 11,011 posts
Posted: Friday, September 14, 2007 - 06:29 PM UTC
Most impressive Brad! I really like yor wing ribs and wood ply!
JackFlash
Joined: January 25, 2004
KitMaker: 11,669 posts
AeroScale: 11,011 posts
Posted: Friday, September 14, 2007 - 06:31 PM UTC
What do you plan on doing to the propeller?

CaptainA
Joined: May 14, 2007
KitMaker: 3,117 posts
AeroScale: 2,270 posts
Posted: Saturday, September 15, 2007 - 01:54 AM UTC
How is progress coming on this one Brad?

BradCancian
Joined: August 30, 2006
KitMaker: 285 posts
AeroScale: 281 posts
Posted: Saturday, September 22, 2007 - 05:37 PM UTC
Hi guys, yet more progress pics...
Since last update, I have painted and added the machine guns to the upper decking. They did not sit straight - they both rotated about 20 degrees off vertical due to the kit ammo chutes on part 5A - and as such needed some persuasion to get to the right angle. The ammo chutes fitted in step 20 (parts 33A and 24A) also needed trimming and adjustment to get them to fit. In fact, I ditched the port chute (part 24A) as I couldn't get it to fit, plus I didn't think it would really be visible.
I have also added all of the little hatches and panels to the kit from the Eduard etched fret. I decided to re-attach the lower nose cowling as I was not happy with the big gap between the front fuselage frame (part 12A) and the fuselage halves - re-attaching the cowling hid this flaw. Also, I had trouble with the wing to fusealge fillet panels (parts 9B, 8B, 40A and 41A). They didn't fit very well at all (may have been self inflicted with all of the hassle I created getting the fuselage halves and wings on) and had sink marks which needed filling.
The undercarriage and struts were also cleaned up and painted - be careful removing these from the sprue as they are realistically thin.
It was then time for clear coating and decalling. I used a combination of the kit decals and the new Spada decals for Voss' machine. I found these decals to be at almost opposite ends of the "required techniques" spectrum. The kit decals were very quick to come away from the backing, but were rather thick. I also found out that once they are on the model, they don't want to budge, so lots of water was needed to float the decals into place. Microset didn't seem to make much of a dent in them either. That said, I didn't get any silvering. This was my first experience with Spada decals, and they were almost the opposite in some key areas. They required trimming (no biggie), and were extremely thin and slightly translucent. I had to take great care to get them into place without folding, wrinkling or cracking through handling, but once on they bedded down extremely well. I replaced the swastika decal with some cut from white decal film as I didn't think the Spada swastika would survive the handling. Overall, I was quite pleased with the Spada product once I worked out how best to use them.
Once the decals were on, it was time for clear coat, an oil wash, and the major weathering step (it is much easier to do this prior to the top wing going on).
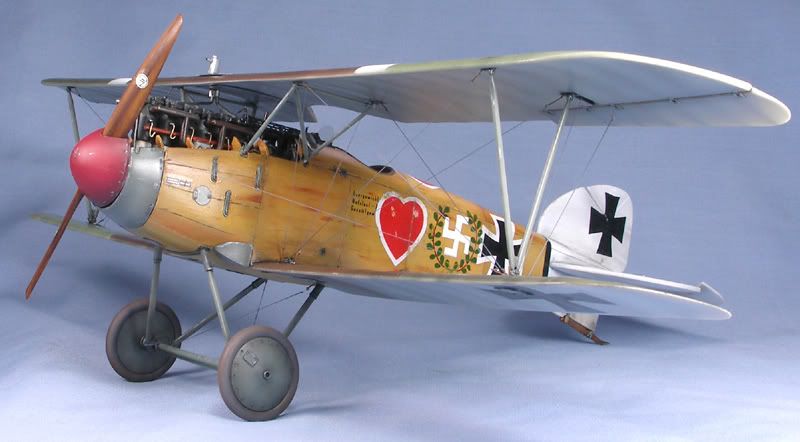
I went for a heavily weathered look on this aircraft. I did this for a couple of reasons. Voss used this Albatros extensively throughout Feb-Jun 1917 (some sources say he used 2 Albatros' in this period), and scored a large number of his kills on it - it underwent an upper wing change at one point and followed him from Jasta 2 to Jasta 5. The aircraft markings also changed throughout its life - it initally had only the two hearts on the fusealge sides - the one on the upper decking was added later. In addition, Voss' spinner was likely painted black in Jasta 2, and overpainted red when he moved to command Jasta 5 as per squadron practice (hence why I went with a darker red than the hearts to replicate this overpainting). He was wounded in this aircraft on 6 Jun 1917 in his last combat flight with Jasta 5 - he crash landed and the aircraft was likely written off at this point. It was this period of time that I wanted to replicate, hence the heavy weathering.
Weathering was done using silver paint for paint chips and various oversprays of the panel lines. I also chipped away the heart decal on the port side where lots of scuffs from ladders and pilot / groundcrew climbing in and out of the cockpit would have occured. Some may think it is overdone....
Anyways, here are some quick pics of her dryfitted to the undercarriage and wheels...


Next is onto painting the prop and exhaust, then on to the big step of attaching the top wing... the end is in sight! Comments welcome!
BC
Since last update, I have painted and added the machine guns to the upper decking. They did not sit straight - they both rotated about 20 degrees off vertical due to the kit ammo chutes on part 5A - and as such needed some persuasion to get to the right angle. The ammo chutes fitted in step 20 (parts 33A and 24A) also needed trimming and adjustment to get them to fit. In fact, I ditched the port chute (part 24A) as I couldn't get it to fit, plus I didn't think it would really be visible.
I have also added all of the little hatches and panels to the kit from the Eduard etched fret. I decided to re-attach the lower nose cowling as I was not happy with the big gap between the front fuselage frame (part 12A) and the fuselage halves - re-attaching the cowling hid this flaw. Also, I had trouble with the wing to fusealge fillet panels (parts 9B, 8B, 40A and 41A). They didn't fit very well at all (may have been self inflicted with all of the hassle I created getting the fuselage halves and wings on) and had sink marks which needed filling.
The undercarriage and struts were also cleaned up and painted - be careful removing these from the sprue as they are realistically thin.
It was then time for clear coating and decalling. I used a combination of the kit decals and the new Spada decals for Voss' machine. I found these decals to be at almost opposite ends of the "required techniques" spectrum. The kit decals were very quick to come away from the backing, but were rather thick. I also found out that once they are on the model, they don't want to budge, so lots of water was needed to float the decals into place. Microset didn't seem to make much of a dent in them either. That said, I didn't get any silvering. This was my first experience with Spada decals, and they were almost the opposite in some key areas. They required trimming (no biggie), and were extremely thin and slightly translucent. I had to take great care to get them into place without folding, wrinkling or cracking through handling, but once on they bedded down extremely well. I replaced the swastika decal with some cut from white decal film as I didn't think the Spada swastika would survive the handling. Overall, I was quite pleased with the Spada product once I worked out how best to use them.
Once the decals were on, it was time for clear coat, an oil wash, and the major weathering step (it is much easier to do this prior to the top wing going on).
I went for a heavily weathered look on this aircraft. I did this for a couple of reasons. Voss used this Albatros extensively throughout Feb-Jun 1917 (some sources say he used 2 Albatros' in this period), and scored a large number of his kills on it - it underwent an upper wing change at one point and followed him from Jasta 2 to Jasta 5. The aircraft markings also changed throughout its life - it initally had only the two hearts on the fusealge sides - the one on the upper decking was added later. In addition, Voss' spinner was likely painted black in Jasta 2, and overpainted red when he moved to command Jasta 5 as per squadron practice (hence why I went with a darker red than the hearts to replicate this overpainting). He was wounded in this aircraft on 6 Jun 1917 in his last combat flight with Jasta 5 - he crash landed and the aircraft was likely written off at this point. It was this period of time that I wanted to replicate, hence the heavy weathering.
Weathering was done using silver paint for paint chips and various oversprays of the panel lines. I also chipped away the heart decal on the port side where lots of scuffs from ladders and pilot / groundcrew climbing in and out of the cockpit would have occured. Some may think it is overdone....
Anyways, here are some quick pics of her dryfitted to the undercarriage and wheels...
Next is onto painting the prop and exhaust, then on to the big step of attaching the top wing... the end is in sight! Comments welcome!
BC
JackFlash
Joined: January 25, 2004
KitMaker: 11,669 posts
AeroScale: 11,011 posts
Posted: Sunday, September 23, 2007 - 12:33 AM UTC
Most impressive Brad. And you have done your homework admirably!
Dwaynewilly
Joined: December 15, 2006
KitMaker: 365 posts
AeroScale: 344 posts
Posted: Sunday, September 23, 2007 - 04:00 AM UTC
Brad,
Outstanding work! I have one question concerning the decals. I have seen you mention Spada decals in this article and have seen them mentioned in others but I have been unable to find any on-line store that has them and my local guy is baffled. Where are these items to be had?
Thanks for any help you can offer and once again, just an outstanding job on this kit!
Dwayne
BradCancian
Joined: August 30, 2006
KitMaker: 285 posts
AeroScale: 281 posts
Posted: Monday, September 24, 2007 - 01:10 AM UTC

MerlinV
Joined: November 26, 2006
KitMaker: 608 posts
AeroScale: 602 posts

Posted: Tuesday, September 25, 2007 - 10:12 AM UTC
Brad, You are turning this into a work of art!
Truly awe inspiring stuff.
Your customer will be well pleased I think.
Cheers,
Hugh
Truly awe inspiring stuff.
Your customer will be well pleased I think.
Cheers,
Hugh
CaptainA
Joined: May 14, 2007
KitMaker: 3,117 posts
AeroScale: 2,270 posts
Posted: Tuesday, September 25, 2007 - 11:44 AM UTC
Super job. Looks like you will have her done in a few days.
BradCancian
Joined: August 30, 2006
KitMaker: 285 posts
AeroScale: 281 posts
Posted: Saturday, October 06, 2007 - 10:26 PM UTC
Well the rest of the build has progressed smoothly and quickly.
The rigging was done using Ezline elastic attached to Bob's Buckles 1/32 scale buckles - these are very finely done and were kindly donated by Bob at no charge - as always, I can highly recommend Bob's products!
Once the top wing and undercarriage was on and rigged, all that was left to do construction wise was to add the exhausts and radiator pipes. The kit exhaust has a number of large sink marks that require filling. I also hollowed out the end of the exhaust. The radiator pipes were scratch built from solder as the kit parts would not fit (as they are designed for the centrally mounted radiator of the kit). A final dash of weathering, a clear coat, and the addition of the windscreen, and she was done!
So, here are some pics of the finished product:


In addition, here is the Model Cellar Voss figure, painted very nicely by Stephen Lawson:


So, now that I have built this kit, what are my overall impressions?
Without a doubt, this is the best 1/32 Albatros of any mark on the market. Although I have not built the Battle Axe offering, from the distain thrown at it by all that have tried, I am quite sure it is no competition to Roden's offering. Roden's kit offers a very comprehensive interior, some very nicely rendered flying surfaces, and some very fine details. This kit easily can be built into a spectacular model straight out of the box.
That said, the Roden kit is not without its tricks. There are still mould and fit issues, notably in actually getting that gorgeous interior into the kit, and getting the fuselage and wings to fit together. Many parts require dry fitting, and many parts have sink marks that require attention. None of this is beyind the patient modeller.
Unfortunately Roden continues to persist with leaving photo-etch out of their kits, leaving it to the builder to find their own seat belts and spandau jackets. To Roden's credit, they have acknowledged this by having small details like jacketless spandaus included in the kit.
So, is it accurate? Well, it looks like an Albatros to me, although one area of accuracy does concern me, and that is in the profile of the nose. To me, the nose looks a little too pinched in plan view, giving the model a slightly odd pointed appearance. The rest, however, looks pretty well spot on.
More than anything else, it was a satisfying build.
As always, all comments, feedback and criticisms welcome!
BC
The rigging was done using Ezline elastic attached to Bob's Buckles 1/32 scale buckles - these are very finely done and were kindly donated by Bob at no charge - as always, I can highly recommend Bob's products!
Once the top wing and undercarriage was on and rigged, all that was left to do construction wise was to add the exhausts and radiator pipes. The kit exhaust has a number of large sink marks that require filling. I also hollowed out the end of the exhaust. The radiator pipes were scratch built from solder as the kit parts would not fit (as they are designed for the centrally mounted radiator of the kit). A final dash of weathering, a clear coat, and the addition of the windscreen, and she was done!
So, here are some pics of the finished product:
In addition, here is the Model Cellar Voss figure, painted very nicely by Stephen Lawson:
So, now that I have built this kit, what are my overall impressions?
Without a doubt, this is the best 1/32 Albatros of any mark on the market. Although I have not built the Battle Axe offering, from the distain thrown at it by all that have tried, I am quite sure it is no competition to Roden's offering. Roden's kit offers a very comprehensive interior, some very nicely rendered flying surfaces, and some very fine details. This kit easily can be built into a spectacular model straight out of the box.
That said, the Roden kit is not without its tricks. There are still mould and fit issues, notably in actually getting that gorgeous interior into the kit, and getting the fuselage and wings to fit together. Many parts require dry fitting, and many parts have sink marks that require attention. None of this is beyind the patient modeller.
Unfortunately Roden continues to persist with leaving photo-etch out of their kits, leaving it to the builder to find their own seat belts and spandau jackets. To Roden's credit, they have acknowledged this by having small details like jacketless spandaus included in the kit.
So, is it accurate? Well, it looks like an Albatros to me, although one area of accuracy does concern me, and that is in the profile of the nose. To me, the nose looks a little too pinched in plan view, giving the model a slightly odd pointed appearance. The rest, however, looks pretty well spot on.
More than anything else, it was a satisfying build.
As always, all comments, feedback and criticisms welcome!
BC
BradCancian
Joined: August 30, 2006
KitMaker: 285 posts
AeroScale: 281 posts
Posted: Saturday, October 06, 2007 - 10:30 PM UTC

JackFlash
Joined: January 25, 2004
KitMaker: 11,669 posts
AeroScale: 11,011 posts
Posted: Sunday, October 07, 2007 - 05:16 AM UTC
Greetings Brad and all;
A most impressive build Brad. You really have outdone yourself! Most impressive!
A most impressive build Brad. You really have outdone yourself! Most impressive!

RAGIII
Joined: June 19, 2007
KitMaker: 604 posts
AeroScale: 600 posts
Posted: Sunday, October 07, 2007 - 05:54 AM UTC
What Stephen said, DOUBLE!
RAGIII
RAGIII
CaptainA
Joined: May 14, 2007
KitMaker: 3,117 posts
AeroScale: 2,270 posts
Posted: Sunday, October 07, 2007 - 07:18 AM UTC
Fantastic. This build is beyond any words of praise I can think up. This is probably one of the best model builds I have ever seen.
I hope Roden is watching this build thread. If they are, how about a 1/32 D.V.?
I hope Roden is watching this build thread. If they are, how about a 1/32 D.V.?
JackFlash
Joined: January 25, 2004
KitMaker: 11,669 posts
AeroScale: 11,011 posts
Posted: Tuesday, November 13, 2007 - 07:36 AM UTC
Yes I sent Roden this thread too! Now your really in for it!
Dwaynewilly
Joined: December 15, 2006
KitMaker: 365 posts
AeroScale: 344 posts
Posted: Wednesday, November 14, 2007 - 02:50 AM UTC
Brad,
It's going to be hard to top yourself from now on, this is one of the best pieces I have ever seen. Really outstanding work and I think Stephen is so right in referring this work over to Roden, I can't think of a better way for them to promote their product. To have a modeler like yourself showcase what can be achieved with their kits can only be a boost to their sales. I'm looking forward to seeing what you come up with next.
Dwayne
eagledoc2000
Joined: August 03, 2003
KitMaker: 34 posts
AeroScale: 22 posts
Posted: Wednesday, November 14, 2007 - 06:41 AM UTC
Are you going to do a build article and tell us all the details on the construction of the kit? Thanks

str72

Joined: November 12, 2005
KitMaker: 189 posts
AeroScale: 20 posts
Posted: Wednesday, December 19, 2007 - 07:57 AM UTC
Great build! How did you paint that the fuselage to make it look like plywood?
Torbjörn.
Torbjörn.
 |

WEB HOSTING BY


Copyright ©2021 AeroScale and Kitmaker Network, a subsidiary of Silver Star Enterprises
All Rights Reserved. Please read our Conditions of Use and Privacy Policy.
All Rights Reserved. Please read our Conditions of Use and Privacy Policy.