_GOTOBOTTOM
Early Aviation
Discuss World War I and the early years of aviation thru 1934.
Online Build - Roden 1/32 Albatros D.III
BradCancian
_VISITCOMMUNITY
Queensland, Australia
Joined: August 30, 2006
KitMaker: 285 posts
AeroScale: 281 posts
Posted: Thursday, May 03, 2007 - 06:04 PM UTC
Hi all,

Like fellow forumite Lars, I am currently building the Roden 1/32 scale Albatros D.III. I am doing this build on consignment for a good friend of mine who is a big fan of the mercurial German Ace, Werner Voss, and he has asked me to paint the aircraft in Voss' markings. I mainly build in 1/48 scale, however my last project was in 1/72 scale and was quite an eye strain, so moving stright from 1/72 to 1/32 was a bit of a jump. Alot has been written already on the Roden Albatros, so I will not repeat it here, rather I will show what I did and let you decide on the merits of the kit for yourself!

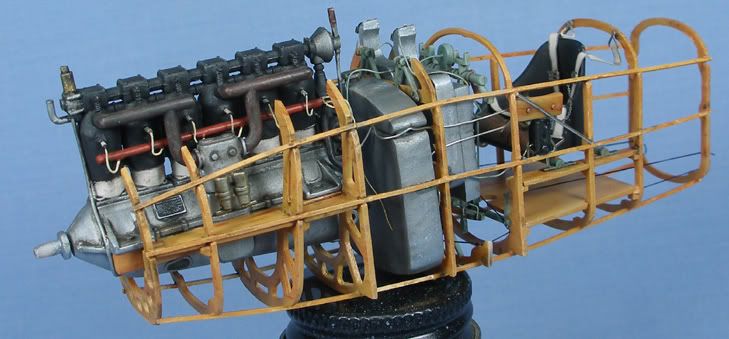
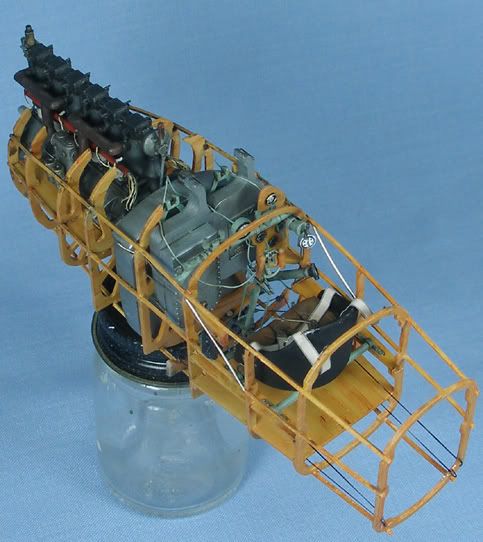
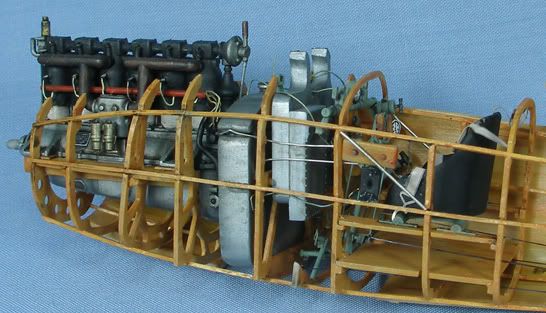
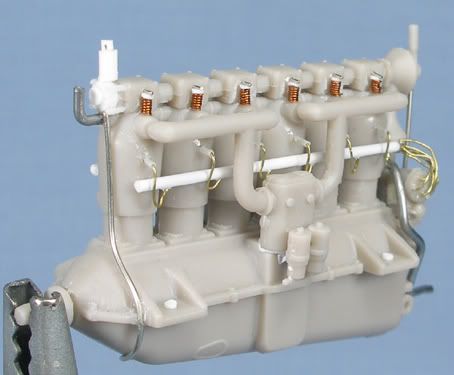
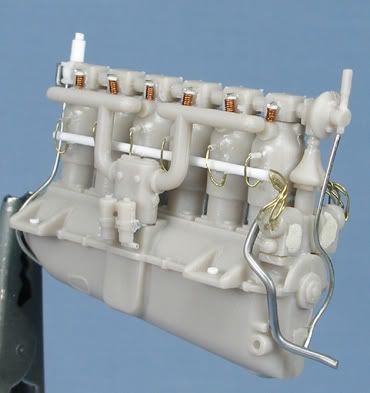
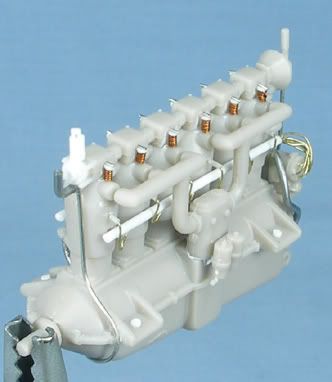
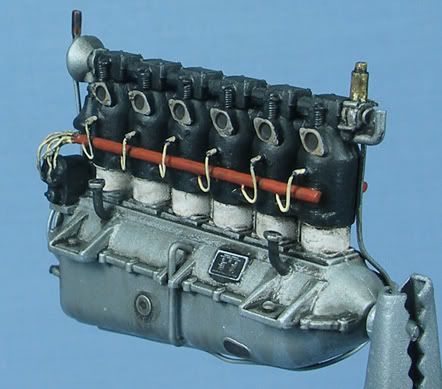
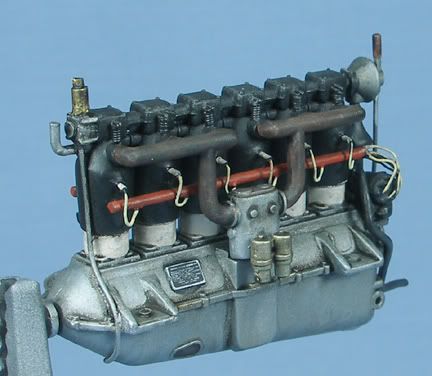
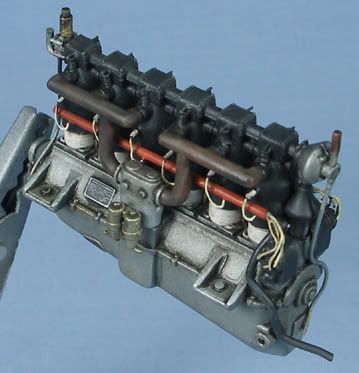
The first step was the engine - Roden has made a nice representation of the 160HP Mercedes D.III, but improvements can be made. Firstly, the distributor boxes (parts 8Z) have major sinkholes that need filling. I did so with putty. The prop shaft (part 9Z) is not included in the instructions - it should be sandwiched between the engine halves in step 6. I drilled holes in the distributor caps on part 8Z to accept the ignition wires. Roden represents the spark plugs as little blobs on the side of each cylinder - I cut these off and drilled holes in their place to take lengths of fuse wire to represent the ignition wires. Over these wires, I threaded some finely heat streched Q-tips cut to size and glued them at the cylinder end to represent the end of the spark plugs - these to me look much better. I also replaced kit parts 6Z, 3Z and 7Z with plastic rod or fine solder as the kit parts were not round and had seam lines that would require clean up (hey I'm lazy). The kit engine's rocker arm springs are also a bit too blobby - I replaced these with wound fuse wire, added caps from sliced plastic rod, and arms from wire. Again, in my opinion these look much more convincing. Other additions included scratchbuilding fuel pressurisation air pump on the front of the engine (why do manufacturers ALWAYS omit this from their kits??), and adding some other bits of wiring.

Here are some pics of the engine before and after paint:


Currently, I am working on the cockpit and foward fuselage structure.

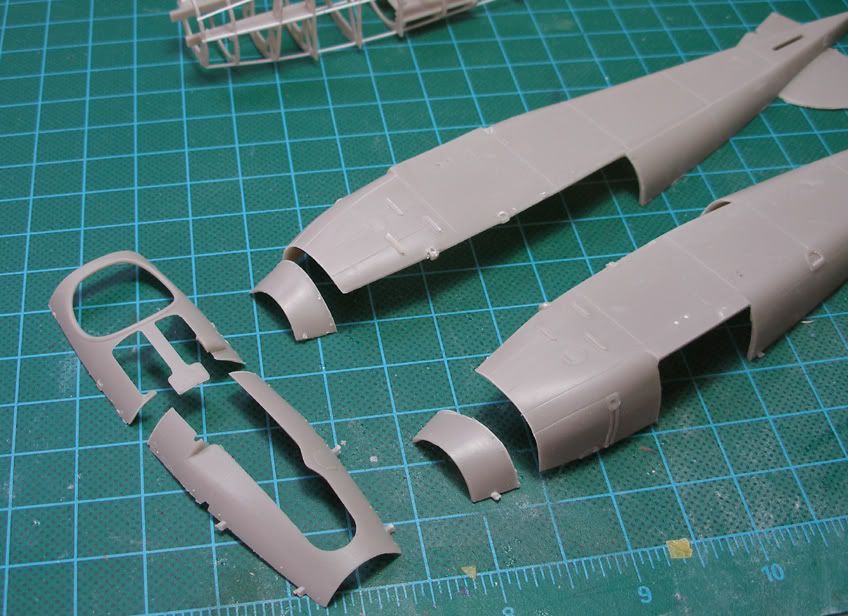
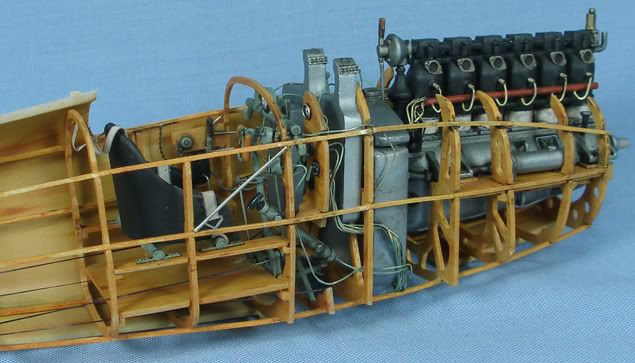
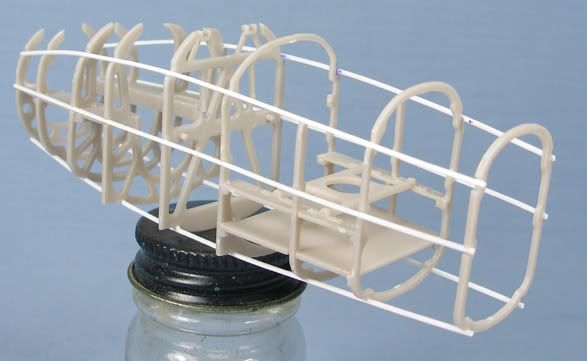
Roden supplies all of the bulkheads in the forward fuselage, which is great! There are alot of sprue attachment points and mould release tabs on the bulkheads, and a number of them were bent. Careful removal with a sharp knife and straightening helps here. Also, I beleive Roden gets you to install the 3rd bulkhead from the front (part 45A) backwards - the side with the rounded top should be on the port side to match the others, and the flat topped side should be on the starboard side. Also, make sure this bulkhead is slanted at the correct angle. In fact, the entire engine support frame work structure was a little tricky - I installed the fwd and aft most bulkheads onto the supporting boards first, aligning, then fitting the centre bulkheads.

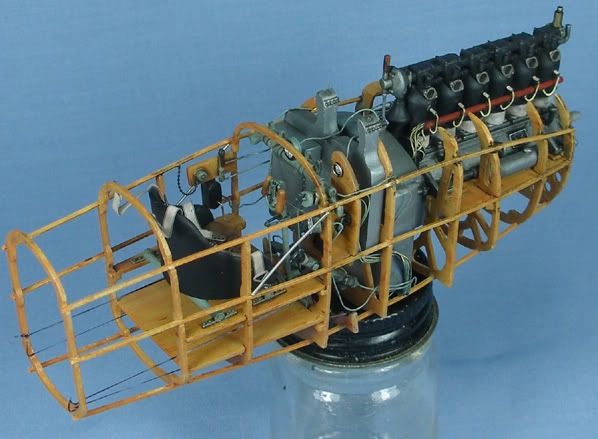
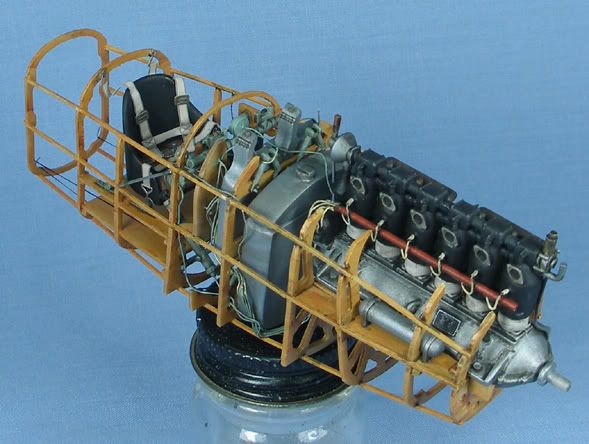
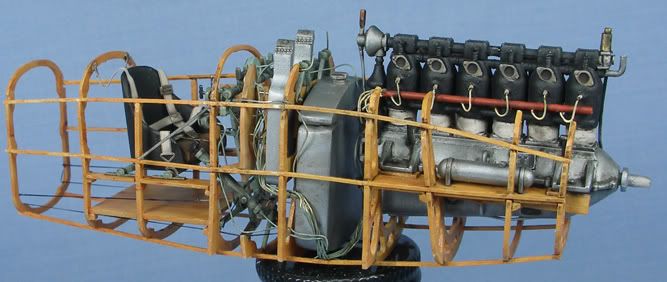
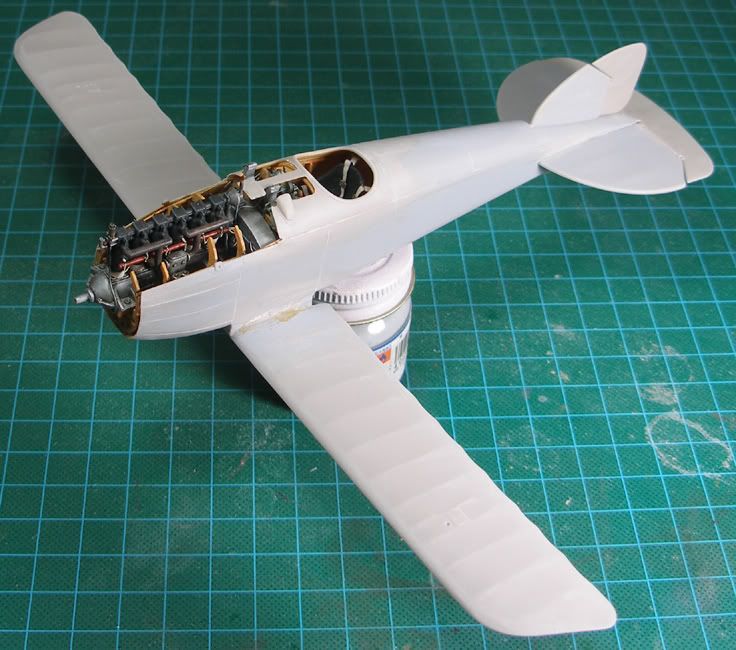
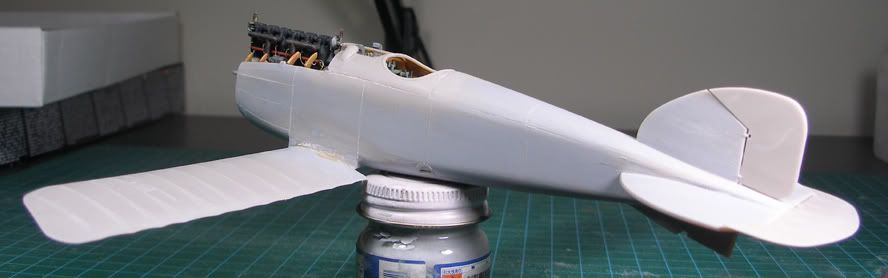
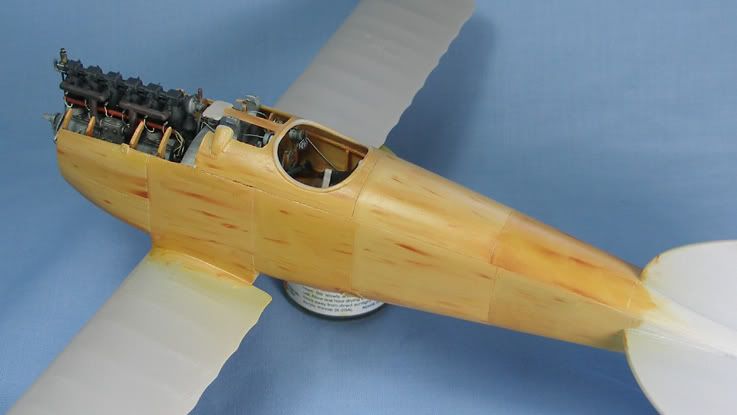
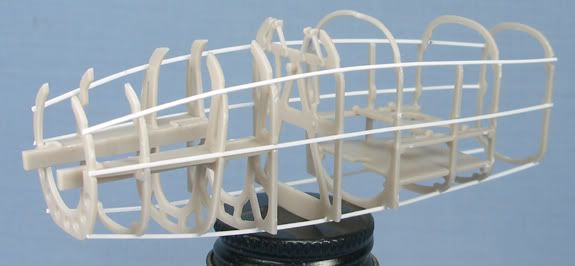
Roden provide positive locating tabs on the fuselage sides for the bulkheads, which in the instructions attach to the fuselage before closing. As the roden fuselage is not very stiff, I could see alignment issues if I followed the instructions. Therefore, I decided to take a different approach and build the forward fuselage interior as one assembly before installation into the fuselage. This ensures allignment of all of the forward fuselage interior, and as the bulkheads have recesses for the moulded fusealge stringers, it is an easy job to scratch the stringers and run them all the way back along the fuselage. Here's how it looks (obviously unpainted):


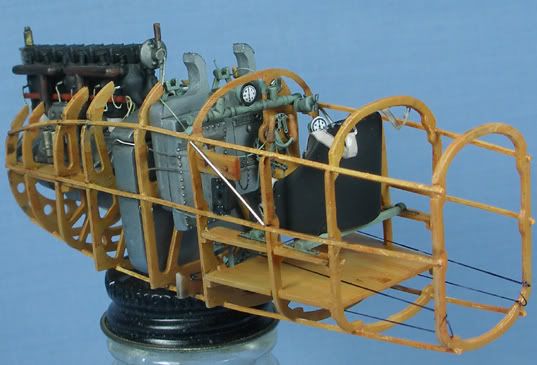
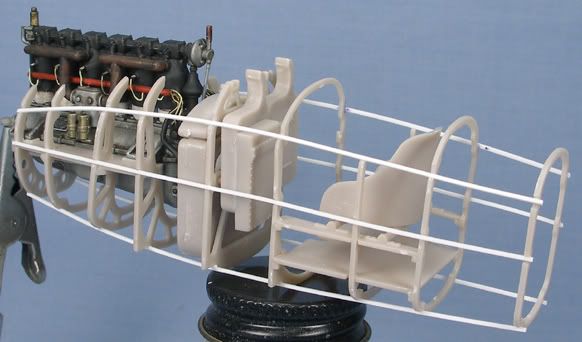
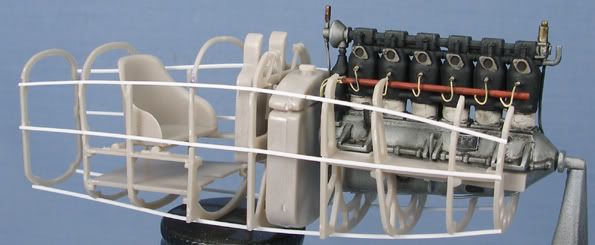
And here is is with some of the major components dry fitted to give an idea of where everything sits.


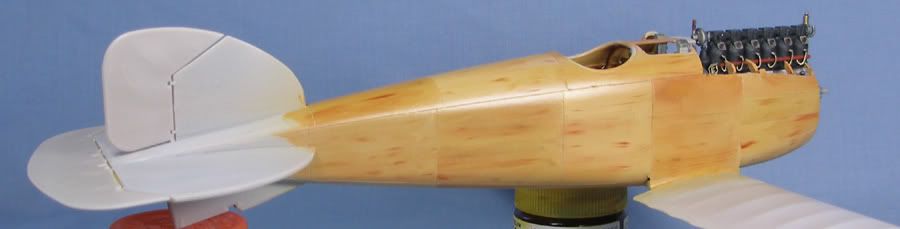
Next is on to painting - I have never tried to replicate a wood grain in this scale befoe so it should be fun.

All comments and feedback welcome!

BC

JackFlash
_VISITCOMMUNITY
Colorado, United States
Joined: January 25, 2004
KitMaker: 11,669 posts
AeroScale: 11,011 posts
Posted: Thursday, May 03, 2007 - 07:03 PM UTC
I like your approach to this build Brad. Very cool!
TedMamere
_VISITCOMMUNITY
Moselle, France
Joined: May 15, 2005
KitMaker: 5,653 posts
AeroScale: 4,347 posts
Posted: Thursday, May 03, 2007 - 07:46 PM UTC
Hi Brad!

Wow, this looks very good so far! I will follow this build with great interest...

The engine looks fantastic, great work!

Is there an explanation as to why the third frame starting from the front isn't vertical?

Jean-Luc
Repainted
_VISITCOMMUNITY
Östergötland, Sweden
Joined: April 04, 2006
KitMaker: 1,058 posts
AeroScale: 1,004 posts
Posted: Thursday, May 03, 2007 - 08:34 PM UTC
Hi Brad
Lovley, and thanks for charing. Now I can contineu my work in the Garden ( Hi Stephen)


Lars
JackFlash
_VISITCOMMUNITY
Colorado, United States
Joined: January 25, 2004
KitMaker: 11,669 posts
AeroScale: 11,011 posts
Posted: Friday, May 04, 2007 - 02:03 AM UTC
Hello Jean-Luc! The third former back is not vertical to given the nose area a bit of strength especially over the engine area.

Lars! Not so quickly there young man. This is a big kit and needs the talent of both you fine fellows. Model now, radishes later!
Merlin
Staff MemberSenior Editor
AEROSCALE
#017
_VISITCOMMUNITY
United Kingdom
Joined: June 11, 2003
KitMaker: 17,582 posts
AeroScale: 12,795 posts
Posted: Friday, May 04, 2007 - 02:38 AM UTC
Hi Brad

Beautiful work - I hardly dare guess what you have in store for us with the finished model!

Going back a step - there's definitely a Feature in how you detailed just the engine alone! The techniques are applicable across the board and the result is simply superb! Please... get writing, because this would just the type of article that Aeroscale could really benefit from.

All the best

Rowan
MerlinV
_VISITCOMMUNITY
Victoria, Australia
Joined: November 26, 2006
KitMaker: 608 posts
AeroScale: 602 posts
Posted: Saturday, May 05, 2007 - 11:28 AM UTC
Magical work as always Brad.
Can't wait to see waht you do with the wood grain.
Keep it coming!

Cheers,

Hugh
BradCancian
_VISITCOMMUNITY
Queensland, Australia
Joined: August 30, 2006
KitMaker: 285 posts
AeroScale: 281 posts
Posted: Saturday, May 05, 2007 - 03:11 PM UTC
Thanks guys! I've started playing with the wood grain, but I am struggling as I have never had to do it in 1/32... I actually find the smaller scales easier as all you are trying to replicate is tonal changes.... I'll keep trying...

Rowan - what sort of article are you after? If you give some specifics I could put something together for you I'm still struggling through an article on my BE-12b that I was asked to put together for Aeroscale a while ago (so I can't write articles very fast...)

BC
BradCancian
_VISITCOMMUNITY
Queensland, Australia
Joined: August 30, 2006
KitMaker: 285 posts
AeroScale: 281 posts
Posted: Saturday, May 19, 2007 - 04:21 PM UTC
Hi all - finally some more progress on this kit.

Firstly, I decided to display the cowls off. It was a relatively easy job to remove the cowls and thin the edges.


The fuselage halves had large sink holes smack bang in the middle that needed filling and sanding. As I had basically already built up the interior framework, I sanded off the frame work on the fuselage halves.

The cockpit supplied in the kit is well detailed and I didn't have to add anything drastic at all - I only added a few bits and pieces from the Eduard etched set and some scratchbuilding. Extra details included seat cushions made from putty, control horns and pulleys to the control column and rudder bar, triggers to the control column, trigger wires to the triggers, wiring to all of the gauges, switches and controls, and rigging of the controls from Aeroclub elastic. Seat belts came from the coloured part of the Eduard etched set, as did the gauges. Here's some pics (ok, lots of pics!) of the whole interior painted.


And finally, dry fitted to the fuselage:


Next, onto major construction. As always, feedback welcomed!

BC
JackFlash
_VISITCOMMUNITY
Colorado, United States
Joined: January 25, 2004
KitMaker: 11,669 posts
AeroScale: 11,011 posts
Posted: Saturday, May 19, 2007 - 04:36 PM UTC
Inspirational Brad! Most impressive.
Removed by original poster on 10/31/07 - 19:07:53 (GMT).
Repainted
_VISITCOMMUNITY
Östergötland, Sweden
Joined: April 04, 2006
KitMaker: 1,058 posts
AeroScale: 1,004 posts
Posted: Saturday, May 19, 2007 - 04:49 PM UTC
"but I am struggling as I have never had to do it in 1/32"
From the pics I can say that you don´t have any problems painting wood. Did you use a bigger brush?That will be the tip from me. A broad flat brush is the better choice when you are dealing with wood simulation.

Your build i awesome mate. Soon I´ll start up my, and I can tell you it´s not going to be close to your. This is one for the books mates.

Lars
alpha_tango
_VISITCOMMUNITY
Germany
Joined: September 07, 2005
KitMaker: 5,609 posts
AeroScale: 5,231 posts
Posted: Saturday, May 19, 2007 - 05:25 PM UTC
Hi Brad

this is cool stuff!

Very well done and photographed .. it reminds me of some 3D art works (Mark Miller?, my link to his site at The Aerodrome does no longer work???, so I can't check)

I really envy you for your craftsmanship, attention to detail and patience!!


best wishes

Steffen
JackFlash
_VISITCOMMUNITY
Colorado, United States
Joined: January 25, 2004
KitMaker: 11,669 posts
AeroScale: 11,011 posts
Posted: Thursday, June 21, 2007 - 07:28 PM UTC
Hey Brad, any progress on this? I know that some smaller issues have your attention but this one is too fine not to finish.
CaptainA
_VISITCOMMUNITY
Indiana, United States
Joined: May 14, 2007
KitMaker: 3,117 posts
AeroScale: 2,270 posts
Posted: Friday, June 22, 2007 - 01:24 AM UTC
Hard work and perseverance do pay off in the long run.

I am duly impressed. Wow. I am really looking forward to seeing this one completed.
BradCancian
_VISITCOMMUNITY
Queensland, Australia
Joined: August 30, 2006
KitMaker: 285 posts
AeroScale: 281 posts
Posted: Saturday, June 23, 2007 - 03:27 PM UTC
Hey there guys - not too much progress of late due to focussing on a smaller scale kit as well as being in the process of moving house (and therefore having no modelling desk or tools!).

In terms of progress on this one, the fuselage and lower wings are together and awaiting installation of the cockpit and upper decking. I found it quite a struggle to get everything lined up with a minimum of gaps. I suspect that the soft Roden plastic had slightly warped on the fuselage halves as the nose contours really did not match the fuselage section on the lower wings. With some superglue and some friendly pressure it all came together, although I feat getting the cockpit in may be more of a challenge... oh well, I elected to do it this way so we shall see....

I should have a modelling desk up and running in my new place by Friday this week, then I will post some pics and continue to work on this one!

BC
rolf
_VISITCOMMUNITY
Washington, United States
Joined: August 17, 2004
KitMaker: 301 posts
AeroScale: 26 posts
Posted: Friday, June 29, 2007 - 02:16 AM UTC
You are doing a great job on this plane. Very inspiring. Will be watching the progress.

Roy
MerlinV
_VISITCOMMUNITY
Victoria, Australia
Joined: November 26, 2006
KitMaker: 608 posts
AeroScale: 602 posts
Posted: Friday, June 29, 2007 - 08:58 PM UTC
My Hard drive has a new folder:
C//: Aircraft Models/Brad
This is gold!
Hope you have your bench set up by now Brad. Looking forward to seeing your next update.

Cheers,

Hugh
BradCancian
_VISITCOMMUNITY
Queensland, Australia
Joined: August 30, 2006
KitMaker: 285 posts
AeroScale: 281 posts
Posted: Friday, July 20, 2007 - 08:46 PM UTC
Hi all - another small update (just to show that I am still working on this one!) At my last update, the fuselage and lower wings were glued together and awaiting clean up and installation of the cockpit and upper decking. As I mentioned above, I did strruggle to get the fuselage and lower wing together, and the "persuasion" I used to get it all to fit had the converse effect for narrowing the upper decking opening. Using all three of my hands, I managed to spread open the fuselage halves enough to squeeze in the interior sub-assembly. I suspect that this would not have been an issue had I installed the interior before joining the fuselage halves, but I suspect that if I had of tried it this way that I would have done more damage to the interior trying to get the fuselage and wings to line up. To make matters worse, the upper decking didn't quite fit over the cockpit frames. Sigh. More superglue and pressure...

Through the clean up process I had managed to sand off most of the panel and hatch detail - not to worry as the Eduard etched fret has all of the hatches etc - all I had to do was re-scribe the panel lines (which I hate doing and screwed up a couple of times!)...

Anyways, here's the proof it's together to this point....


CaptainA
_VISITCOMMUNITY
Indiana, United States
Joined: May 14, 2007
KitMaker: 3,117 posts
AeroScale: 2,270 posts
Posted: Saturday, July 21, 2007 - 01:18 AM UTC
I also had trouble with the upper deck fit. I think it is the kit, since I did mine OOB. The kit does not go together easily. But the finnished results are fantastic.

Brad, you are building what I can only describe as a museum showpiece. Your pictures remind me of Mark Millers 3d renderings, as pointed out by Steffen. I am glad to see you will display this one opened up.

I am anxiously awaiting your next post.
BradCancian
_VISITCOMMUNITY
Queensland, Australia
Joined: August 30, 2006
KitMaker: 285 posts
AeroScale: 281 posts
Posted: Saturday, July 28, 2007 - 01:46 PM UTC
Here's my attempt at varnished plywood on the fuselage... still practicing...


BC
JackFlash
_VISITCOMMUNITY
Colorado, United States
Joined: January 25, 2004
KitMaker: 11,669 posts
AeroScale: 11,011 posts
Posted: Saturday, July 28, 2007 - 02:01 PM UTC
Looking Very cool Brad! Tell us about your simulated plywood method.
BradCancian
_VISITCOMMUNITY
Queensland, Australia
Joined: August 30, 2006
KitMaker: 285 posts
AeroScale: 281 posts
Posted: Saturday, July 28, 2007 - 02:14 PM UTC
Thanks Stephen - I will be writing a quick how-to article for Aeroscale today which may appear in the near future so all will be revealed there
CaptainA
_VISITCOMMUNITY
Indiana, United States
Joined: May 14, 2007
KitMaker: 3,117 posts
AeroScale: 2,270 posts
Posted: Wednesday, August 08, 2007 - 03:03 AM UTC
So is it up and flying yet? I am anxious to see how this one comes out.
BradCancian
_VISITCOMMUNITY
Queensland, Australia
Joined: August 30, 2006
KitMaker: 285 posts
AeroScale: 281 posts
Posted: Wednesday, August 08, 2007 - 11:47 AM UTC
No progress at all in the last 10 days or so Carl unfortunately - been very busy with work and study... alas I plan to get some more done this weekend - my next challenge will be moving the radiator to the offset position (as that is what my customer is after) - shouldn't be too hard with the Eduard etched set.

BC
 _GOTOTOP