

1⁄35Focke-Wulf Fw 190 D-9 - Part 3
...
Post a Comment
THE LITTLE "WIGGLY ENGINE" THAT COULD, . . . WITH A LOT OF HELP
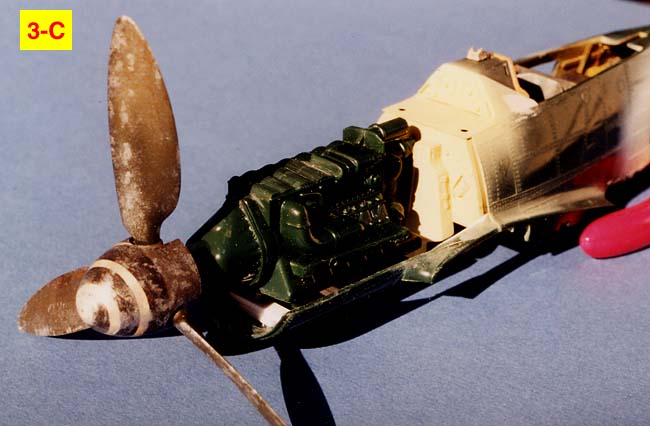
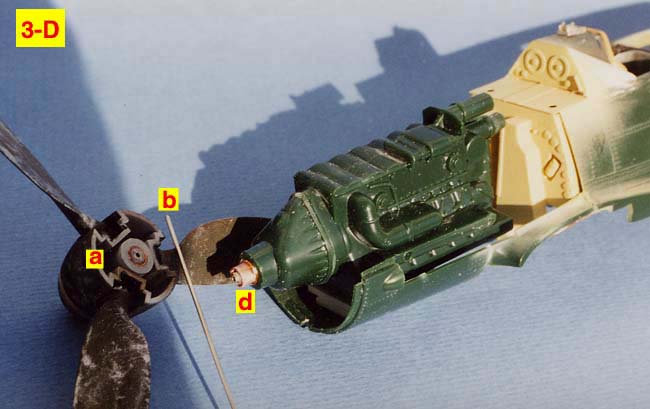
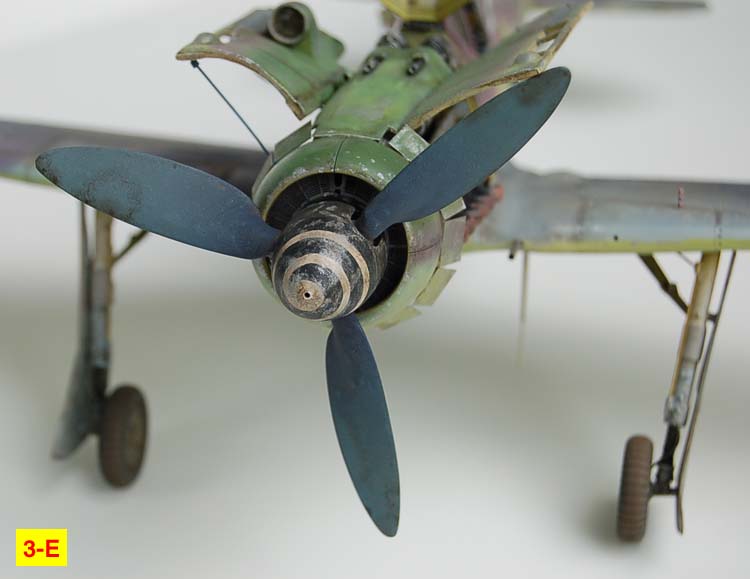
At this point things started to get tricky. I left my past experience comfort zone and was in a territory as a modelbuilder that I hadn't been into before. The old adage, "Ignorance is Bliss" sang a few choruses it seems. As you've probably guessed, when I decided to use "some" Revell kit parts, and some of the old Hasegawa kit parts and the Verlinden resin/PE detail set, that meant that fitting it all together nice and snug, was going to be a major problem. Before I got to this point, I don't believe I understood just how significant that problem would be. See Photos 3-C and 3-D. I apologize for the poor picture quality in photo 3-C. (Most of these WIP photos were taken long before I bought my Nikon D50 SLR camera, just this past Summer.) You see the kit engine sitting in place and the propeller (expressed as "prop" in future) and spinner from the Hasegawa kit. I wanted the prop to be able to spin but the Hasegawa prop shaft would not fit into the Revell kit engine. I'll also mention that many FW 190 D-9s (D-13s) used the Junkers VS 10 varibale pitch propeller. (And fortunately, I later discovered that the chipping of paint on my kit prop was incorrect. More on that with Photo 3-E.) See Photo 3-D. Here you see my attempt to solve that Hasegawa kit-RevellUSA kit "incompatability problem", so the Hasegawa prop would mate with the Revell engine. Letter "a" is in shadow but hopefully you can see the copper tubing I used. Letter "d" shows that same sized diameter copper tubing super glued into the kit engine. (It seems I need to spend more time watching Sesame Street on Television. Big Bird, Grover or Mr. Herbert Birdsfeet could remind me that in the alphabet, "c" does indeed come before "d". So meanwhile back at TypoCity, letter "d" should have been a "b". Hummmmmm. . . duh?)I used a combination of big and small diameter copper tubing (for added strength), plastic tubing and various diameter drill bits to make holes into the plastic pieces. Letter "b", Mr. Birdsfeet, shows the steel rod that was later super glued into the Hasegawa prop/spinner (at letter "a"). The steel rod slid down into the opening in the front of the RevellUSA engine. A small diameter section of plastic tubing had been glued previously, iinside the Revell engine. The diameter was just wide enough to receive the steel rod without any wiggle room. So the prop/spinner attached to the steel wire woud revolve quite easily. When traveling with the completed model, I removed the prop/spinner from the engine and reinserted it when on display. Just a slight blowing on the prop would allow it to spin very fast for quite some time. Us boys and our toys. . . yadda, yadda, yadda, . . . . . botta bomb, batta bing! See Photo 3-E. Oh oh, trick photography! What happened to the black heavily weathered paint chipped prop? It turned dark green. Well, after the early prop pictures were taken I discovered through research that many of the late war Doras has wooden props. And so on a wooden prop, there would be no paint chipping that reveals a metal propeller. So the weathered paint layer on the prop was repainted dark blackish-green later.
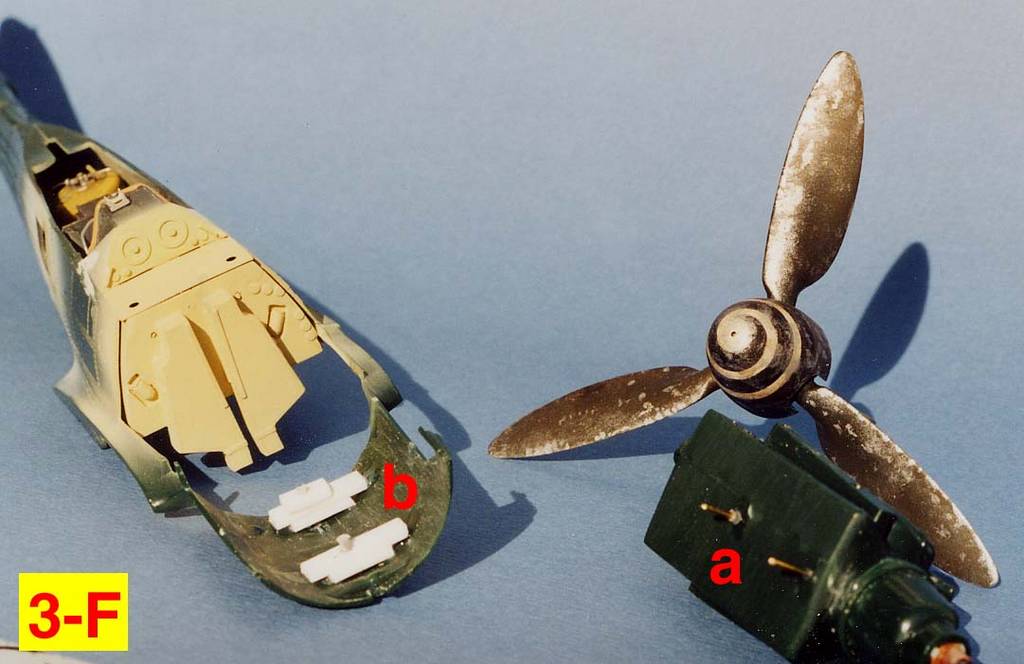
See Photo 3-F. At letter "a" you see the bottom of the kit engine. It has two brass "pins" inserted into it. Actually these pins were short lengths of brass rod, cut with my wire cutters. I buy most of my basswood, brass sheet stock of various thicknesses plus brass tubing and brass solid rod from local hobby stores. But these kind of scratchbuilding supplies are available online. Micromark is one supplier in New Jersey, USA that has these supplies as well as a wide variety of tools. The Micromark web site will be listed at the end of this Part III. At letter "b" is the location in the engine compartment where I glued in several pieces of white styrene strips for a foundation. And on the center line of that compartment, I drilled holes and inserted plastic tubing pieces just the right diameter for the pins in the kit engine to fit down into. That way I devised a means of keeping the engine in its proper place without having to hold it with one hand. Both hands would be free. I couldn't proceed with an engine wiggling all over the place every time I tried to dryfit a scratchbuild coolant tank or reservoir and then check if it would all fit underneath the "hood", so to speak. And I still had to align the two over engine MG 131 machine guns so that they would line up correctly to protrude through the openings in the top engine cowling.
You start to understand that there had to be a system created so I could dryfit each item in the engine compartment, which include connecting wires and hoses (which will be delt with soon) to see if everything fit in conjunction with the other scratchbuilt parts and kit parts so it would hopefully, create the illusion of reality and make the viewer think of the real thing when they looked at it. And solving this problem was very difficult to do. A lot of thinking went into it as I contemplated just how I would solve the dilemma. I would need to be able to dryfit it all together and then be able to take it all apart again to make adjustments. In a couple of cases, that will be explained below, I had to make a scratchbuilt part more than once, because the first try was too big to fit with all the other pieces and still have the look of realism.
Isn't it interesting how we change as time passes; how we grow and improve in our ability to understand, to solve problems, to change for the better but still accept what can not be changed? For me now, one of the things about model building that appeals to me most, is the mental part of it; the mulling it over in my mind as I consider how to create what I'm after, the concentration to develop an idea that will work for certain aspect of the build. Yes, my body is old. But I feel my mind is still very active and ready for the next challenge be it with modeling or with life in general.
About the Author


FROM: KANSAS, UNITED STATES
I am primarily a figure painter and have been painting figures about 3 years now; still consider myself a novice. However, I started building models in 1965 and as a retired newspaper artist, I now have time to build models all the time, just for the fun of it and as a way to express my creative inn...
Comments
Copyright ©2021 by Rick Brownlee. Images also by copyright holder unless otherwise noted. The views and opinions expressed herein are solely the views and opinions of the authors and/or contributors to this Web site and do not necessarily represent the views and/or opinions of AeroScale, KitMaker Network, or Silver Star Enterrpises. Images also by copyright holder unless otherwise noted. Opinions expressed are those of the author(s) and not necessarily those of AeroScale. All rights reserved. Originally published on: 2007-01-20 00:00:00. Unique Reads: 9076

WEB HOSTING BY


Copyright ©2021 AeroScale and Kitmaker Network, a subsidiary of Silver Star Enterprises
All Rights Reserved. Please read our Conditions of Use and Privacy Policy.
All Rights Reserved. Please read our Conditions of Use and Privacy Policy.