Victoria, Australia
Joined: August 23, 2007
KitMaker: 629 posts
AeroScale: 539 posts
Posted: Saturday, March 27, 2010 - 12:22 PM UTC
Quoted Text
wow .. two finishes already! And great paint jobs... Andrew I like the feathering (?) of the paint job (not sure if I am using the righrt nomenclature, sorry I am a newbie!). How did you achieve the effect? Cheers 
Thanks James. First of all not all modellers like the style of finishing i use. In fact over on Hyperscale there is a huge arguement about once a month or so about just this sort of thing...should panel lines be visable, should they be raised or engraved, should paint be faded etc etc. Then after a few baby- dummies have bounced off walls it all goes quiet for another month or so.
I vary the paint beause i like it. And flat even surfaces just don't look right to me- aircraft do not have nice flat panels believe it or not. Aircraft flex and as they get older you can see the structure under the skin and the skin ripples, quite a lot on some aircraft- especially pressurized aircraft. And that is why i like to vary the surface paint the way i do...it's probably over done for sure, but i like it the way i do it.
If you like the effect then there are two main ways i do it. On light coloured aircraft i still preshade using dark grey. But mostly these days, after spraying every top colour (and whilst i still have the remaining paint in the jar) i simply lighten the paint, thin it a bit more and go back over the surface to break up the colour. The airbrush is set very fine and i keep it moving very fast. I keep it random but loosely along the panel and rivet lines because as the skin deforms it DOES highlight the structural lines underneath. Most colours can be lightened by adding white, but not all. Never lighten Greens with white or you will end up with a pastel shade that looks wrong. For green use a very light tan colour...i use Gunze "Sail Colour".
I like post shading more than pre-shading because pre shading tends to darken the finish whilst post shading lightens it, and i feel that scale models tend to end up looking too dark.
Hope that helps
Andrew
Current Projects:
Eduard 1/48 F6F-3 Hellcat
Hasegawa 1/350 Yukikaze
1/6 JJ Models Sarah "Gothic"
Moselle, France
Joined: May 15, 2005
KitMaker: 5,653 posts
AeroScale: 4,347 posts
Posted: Saturday, March 27, 2010 - 08:14 PM UTC
Hi all,
Wow, there are some great models in progress here...
Quoted Text
First of all not all modellers like the style of finishing i use.
I must say I'm in the "I like it a lot" side. Can you send us some more pictures for a photo feature? Or even better a full build feature?

Jean-Luc

Better think one hour and build five minutes...
Than think five minutes and build an hour!
AussieReg
 Associate Editor
#007
Victoria, Australia
Joined: June 09, 2009
KitMaker: 8,156 posts
AeroScale: 3,756 posts
Posted: Saturday, March 27, 2010 - 09:32 PM UTC
Quoted Text
First of all not all modellers like the style of finishing i use.
Andrew, I love it. It's subtle but still clearly visible.
Quoted Text
And that is why i like to vary the surface paint the way i do...it's probably over done for sure, but i like it the way i do it.
And therein lies the truth of the matter, who are you trying to please? I build for me, for the enjoyment and relaxation, and for the history lesson that inevitably goes with the build. That's all there is to it.
Thanks a million for the painting and weathering lesson, hopefully one day one of mine will turn out as nice as yours !!
Cheers, D
ON the bench
Revell 1/24 '53 Corvette (building as '54)
Revell 1/24 BMW 507 Coupe and Cabrio
Italeri 1/48 Me262 B-1a/U1 Nightfighter
Monogram 1/24 '57 Chevy Nomad
Dragon 1/350 USS Frank Knox DD-742
#041
Kobenhavn, Denmark
Joined: July 20, 2006
KitMaker: 10,069 posts
AeroScale: 3,788 posts
Posted: Saturday, March 27, 2010 - 10:37 PM UTC
Andrew, I agree with the others. Your 109 has some really nice faded paintwork. I like it a lot.
Thanks for participating - and share it like Jean-Luc suggested
I have started slowly on my 109. It is the old Airfix kit from 1978. It actually looks OK, but time will tell if it fits together. More to follow over Easter....
Campaign'oholic - 252+ campaigns completed
New Jersey, United States
Joined: October 18, 2007
KitMaker: 1,698 posts
AeroScale: 96 posts
Posted: Sunday, March 28, 2010 - 01:58 AM UTC
Andrew,
Thanks for taking the time to reply and explain your technique. To echo other's sentiments, I like it a lot both at an aesthetic and realistic level. Once my AB skills increase a bit, I will try your technique...probably would also work with Olive Drab P-40/P47s. Again, thanks for sharing such a beautiful build! cheers
Indiana, United States
Joined: May 18, 2008
KitMaker: 210 posts
AeroScale: 80 posts
Posted: Sunday, March 28, 2010 - 03:33 PM UTC
Hey Terri, just finished this one today, it's the 1/48 Hasegawa BF109F (Eastern Front). BOB, finished with Lifecolor acrylics, the kit went together like a charm. The kit decals are Aeromaster and are quite good. Depicted is Gerhard Barkhorn's(301 victories) aircraft as it may have looked when he became flight leader of IV./JG52 in the spring of 1942.

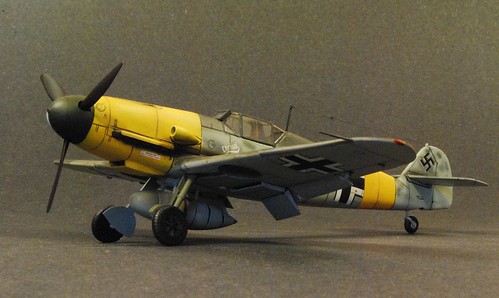
" BORDER="0">

" BORDER="0">
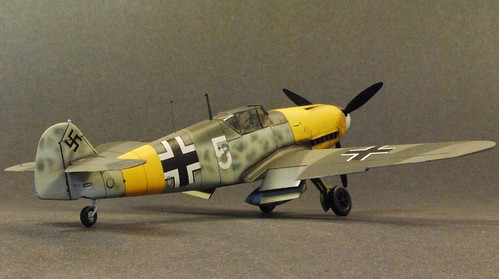
" BORDER="0">
Mobious
"I don't give a d@mn what command says about anything, I'll tell'em when to hold!" Big Joe
Scotland, United Kingdom
Joined: February 07, 2008
KitMaker: 1,699 posts
AeroScale: 1,384 posts
Posted: Sunday, March 28, 2010 - 10:45 PM UTC
Really great progress everyone. I'm going to try out a bit of Andrew's style on me Condor Legion 109 since these are all a single colour (but which colour is the $64 question?) RLM 63 or RLM02 or even RLM73.
I'm still siding with RLM63 but it'll take a lot of staring at b/w photos from my Reis/Ring book to decide. In the meantime all I've done is saw the canopy so it can be posed opem (phew that is delicate operation) and loose the gunsight to the carpet monster. I can make a new one with a bit of sprue and clear plastic though and I'll need to now that the canopy is open. Darn it

Missouri, United States
Joined: November 24, 2008
KitMaker: 564 posts
AeroScale: 510 posts
Posted: Monday, March 29, 2010 - 12:07 AM UTC
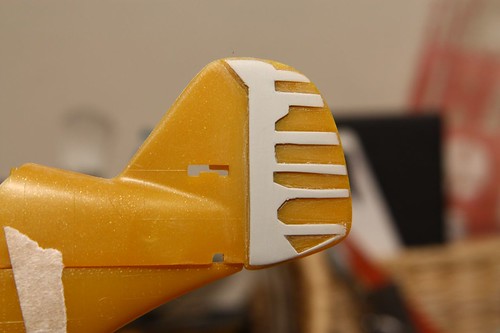
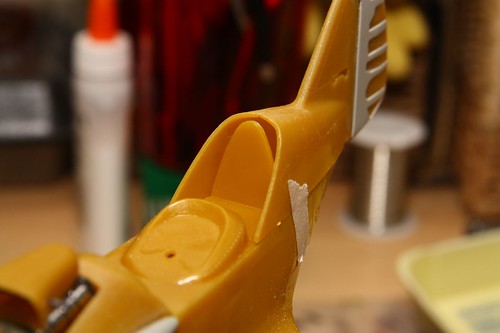
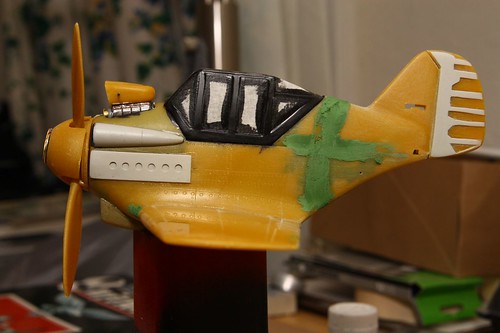
OK, monday update.
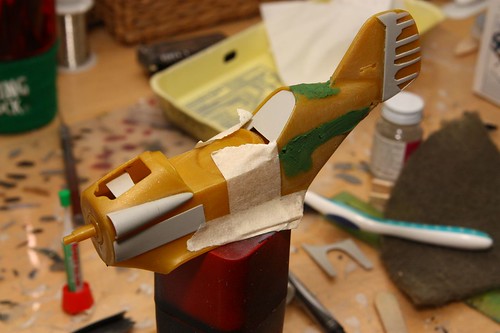
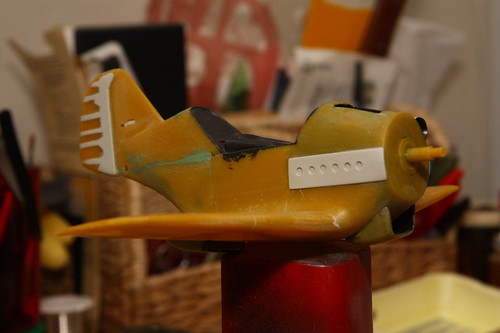
Glued the fuse together this weekend, made a new rear cockpit bulk head, finished off the exhaust panels, added the wings, added the oil cooler scoop, created my rudder structure and started doing the surface prep for paint.
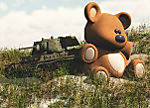
Now on the paint, there is a long standing debate weather the aircraft was blue or red. Most sources show it as blue, but there is a newspaper reference that states it was red and red was also Udets personal color of choice....
But the blue is reaaaaly pretty and the wife likes it....Blue it Is.
Pics!
Nothing quite like getting lost in plastic
On the bench:Revell 1/48 P-38 Lightning built as an F-5B
Next:??
Missouri, United States
Joined: November 24, 2008
KitMaker: 564 posts
AeroScale: 510 posts
Posted: Monday, March 29, 2010 - 12:13 AM UTC
Quoted Text
Really great progress everyone. I'm going to try out a bit of Andrew's style on me Condor Legion 109 since these are all a single colour (but which colour is the $64 question?) RLM 63 or RLM02 or even RLM73.
I'm still siding with RLM63 but it'll take a lot of staring at b/w photos from my Reis/Ring book to decide. In the meantime all I've done is saw the canopy so it can be posed opem (phew that is delicate operation) and loose the gunsight to the carpet monster. I can make a new one with a bit of sprue and clear plastic though and I'll need to now that the canopy is open. Darn it
If you'd like I can check what ref's I have at home for you?
Nothing quite like getting lost in plastic
On the bench:Revell 1/48 P-38 Lightning built as an F-5B
Next:??
Scotland, United Kingdom
Joined: February 07, 2008
KitMaker: 1,699 posts
AeroScale: 1,384 posts
Posted: Monday, March 29, 2010 - 01:20 AM UTC
Aye sure Shaun any input is welcome. It is just one of those things that doesn't ever have a sure answer. I'll maybe ask over at hyperscale or the experten forum for ideas. Lynn Ritger helped me out with the 109 night fighter code colours, I'm sure he'll have an opinion on it too.
Great job on the toon. That really must give you a kick doing something that funky.
Missouri, United States
Joined: November 24, 2008
KitMaker: 564 posts
AeroScale: 510 posts
Posted: Monday, March 29, 2010 - 01:59 AM UTC
these little toon jobs make me remember why I build, they're straight fun!
Nothing quite like getting lost in plastic
On the bench:Revell 1/48 P-38 Lightning built as an F-5B
Next:??
New Jersey, United States
Joined: October 18, 2007
KitMaker: 1,698 posts
AeroScale: 96 posts
Posted: Monday, March 29, 2010 - 03:07 AM UTC
Mobious - beautiful 109, great paint job. Nice subtle weathering, cheers
Washington, United States
Joined: August 03, 2008
KitMaker: 436 posts
AeroScale: 69 posts
Posted: Monday, March 29, 2010 - 04:10 AM UTC
Shawn,
Nice progress on your toon......... I am still working on the nose of mine. I want that "drop" that the E versions had just behind the spinner as well as the top deck guns.
Still have to sand down one side but so far it is coming out pretty good...

Have the fuselage together.... but I do like your idea of the new rear bulkhead... I think I will have to put one in mine.... makes more sense than what they have (which looks like a luggage compartment

)....
Photos later, Bob

Missouri, United States
Joined: November 24, 2008
KitMaker: 564 posts
AeroScale: 510 posts
Posted: Monday, March 29, 2010 - 04:27 AM UTC
you could add some hand bags and a beer stein back there?

Nothing quite like getting lost in plastic
On the bench:Revell 1/48 P-38 Lightning built as an F-5B
Next:??
Merlin
Senior Editor #017
United Kingdom
Joined: June 11, 2003
KitMaker: 17,582 posts
AeroScale: 12,795 posts
Posted: Monday, March 29, 2010 - 04:28 AM UTC
Hi there
Wow! Some superb builds already!
Well, I started shifting my Stash this morning to make use of the space for a new workroom, so I plundered one of the "Luftwaffe" packing cases for a kit for this Campaign:
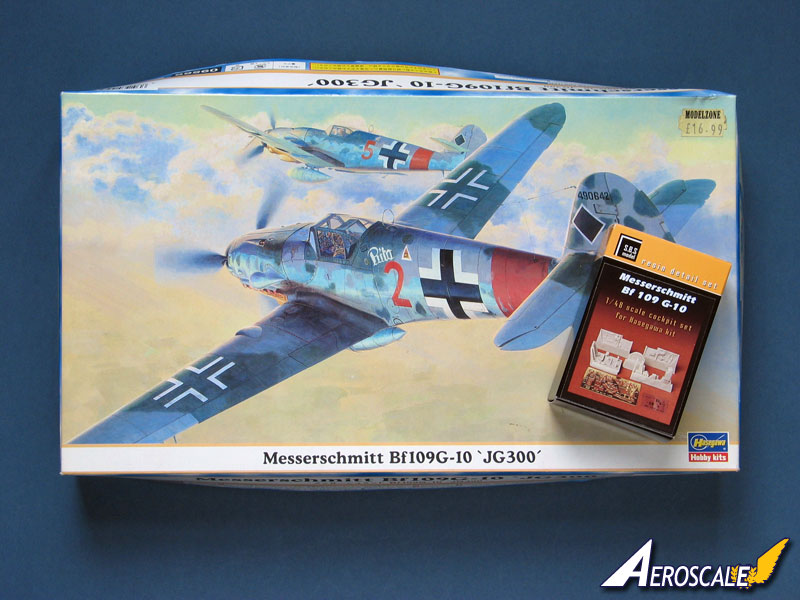
I'll add the SBS Model resin/etch cockpit, as reviewed
HERE.
It'll probably be a week or two before I get underway.
All the best
Rowan
BEWARE OF THE FEW...
As I grow older, I regret to say that a detestable habit of thinking seems to be getting a hold of me. - H. Rider Haggard
Washington, United States
Joined: August 03, 2008
KitMaker: 436 posts
AeroScale: 69 posts
Posted: Monday, March 29, 2010 - 04:30 AM UTC
Now where do I find a Picklehaube helmet that would fit Colonel Klink?
Bob
Missouri, United States
Joined: November 24, 2008
KitMaker: 564 posts
AeroScale: 510 posts
Posted: Monday, March 29, 2010 - 05:37 AM UTC
I though about adding one to the pilot as well...speaking of the pilot, phew what a crap job on the moulding that was!

Nothing quite like getting lost in plastic
On the bench:Revell 1/48 P-38 Lightning built as an F-5B
Next:??
Washington, United States
Joined: August 03, 2008
KitMaker: 436 posts
AeroScale: 69 posts
Posted: Monday, March 29, 2010 - 06:02 AM UTC
Shawn,
Yeah, about 3 hours of work sharpening up the detail.... took me less time to create, print and mount the instruments....

Have the rear bulkhead created.... nice idea on that, thanks...
It lets me put the pilot in later by doing that.... a lot of work on a cartoon. Probably would have been easier to do a "real" model....

Bob
Missouri, United States
Joined: November 24, 2008
KitMaker: 564 posts
AeroScale: 510 posts
Posted: Monday, March 29, 2010 - 06:26 AM UTC
hahaha
a "real" model may have been faster, but I love laughing when I build versus swearing and getting mad.
Some day I should build a real version of the Me-109 and Spitfire, so far I've only done toons of them.
Glad you liked the rear cockpit wall, the kit one was...well....yeah.
Nothing quite like getting lost in plastic
On the bench:Revell 1/48 P-38 Lightning built as an F-5B
Next:??
Washington, United States
Joined: August 03, 2008
KitMaker: 436 posts
AeroScale: 69 posts
Posted: Monday, March 29, 2010 - 06:35 AM UTC
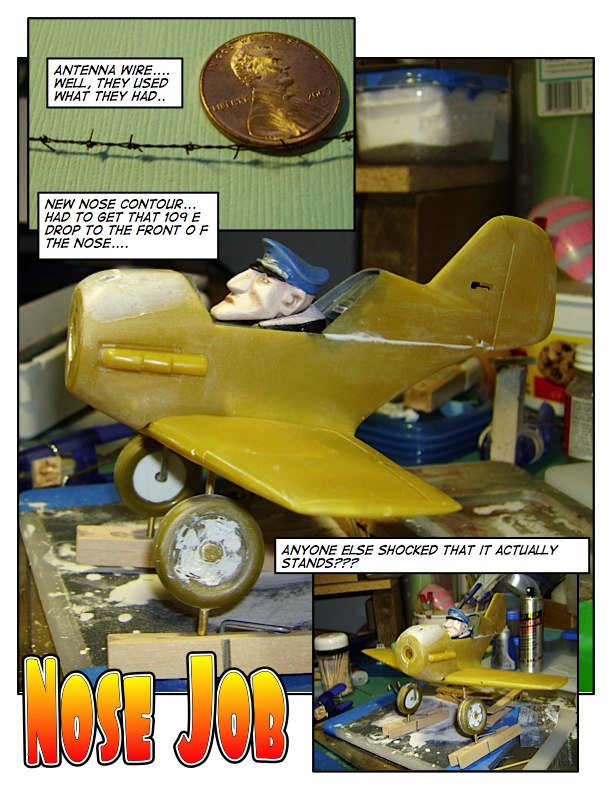
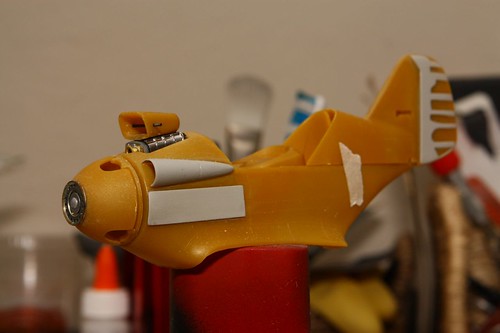
As you can see the gear really does hold the aircraft up on its wheels!!!
One of the things I love about the 109E is that curve on the top of the nose just behind the spinner. Well, I had to put it in along with the top guns. One idea I had was to replace the normal antenna wire with barbed wire

It came out pretty good for my first attempt at making it...
Like Shawn says..... you end up laughing the entire time you are making this thing....
Bob
Missouri, United States
Joined: November 24, 2008
KitMaker: 564 posts
AeroScale: 510 posts
Posted: Monday, March 29, 2010 - 07:18 AM UTC
excellent!
The little details you can add in go a LONG way with these guys...SO much character.
Love it on her mains too! Dont forget to make a new tail wheel and strut as well...that banana thing just wont do (for me)
Nothing quite like getting lost in plastic
On the bench:Revell 1/48 P-38 Lightning built as an F-5B
Next:??
AussieReg
Associate Editor #007
Victoria, Australia
Joined: June 09, 2009
KitMaker: 8,156 posts
AeroScale: 3,756 posts
Posted: Monday, March 29, 2010 - 07:37 AM UTC
Shawn and Bob, you guys look like you're having SOOOO much fun with those kits, superb work so far. I can't wait to see them all painted up.
Got started on the sub-assemblies for my build, no pics yet.
Cheers, D
ON the bench
Revell 1/24 '53 Corvette (building as '54)
Revell 1/24 BMW 507 Coupe and Cabrio
Italeri 1/48 Me262 B-1a/U1 Nightfighter
Monogram 1/24 '57 Chevy Nomad
Dragon 1/350 USS Frank Knox DD-742
Washington, United States
Joined: August 03, 2008
KitMaker: 436 posts
AeroScale: 69 posts
Posted: Monday, March 29, 2010 - 07:57 AM UTC
Thanks Damian, if this was any more fun they would arrest us both...
Oh yeah.......... that banana is going as soon as I find a wheel in the junk pile. What are you doing for the prop? I am looking at using a CD spacer as it is almost the right diameter for the prop swing....
Bob
Missouri, United States
Joined: November 24, 2008
KitMaker: 564 posts
AeroScale: 510 posts
Posted: Monday, March 29, 2010 - 02:46 PM UTC
they may arrest me anyways...
In regards to the prop I got one word.....chrome
The prop on the version Im building was polished metal!
I've seen some builds in the past that were done sans prop, filled in spinner style that looked great!
Nothing quite like getting lost in plastic
On the bench:Revell 1/48 P-38 Lightning built as an F-5B
Next:??
Alberta, Canada
Joined: January 19, 2008
KitMaker: 6,743 posts
AeroScale: 6,151 posts
Posted: Tuesday, March 30, 2010 - 01:56 AM UTC
Wow . we have some excellent finished 109's already and with the live entertaiment from Bob and Shawn this is turning out to be a super campaign so far . Great builds guy's and nicely done !