_GOTOBOTTOM
World War II: Germany
Aircraft of Germany in WWII.
Hosted by Rowan Baylis
Hasegawa FW 190A6/R11
_H_Dori
_VISITCOMMUNITY
England - East Anglia, United Kingdom
Joined: November 09, 2006
KitMaker: 295 posts
AeroScale: 276 posts
Posted: Tuesday, July 28, 2009 - 09:50 PM UTC
Hi
First of all I blame this build entirely on Steffen lol His A4 Turbo (sounds like an 80's hot hatch) build inspired me to get out of my modelling rut I seem to be in and build this.
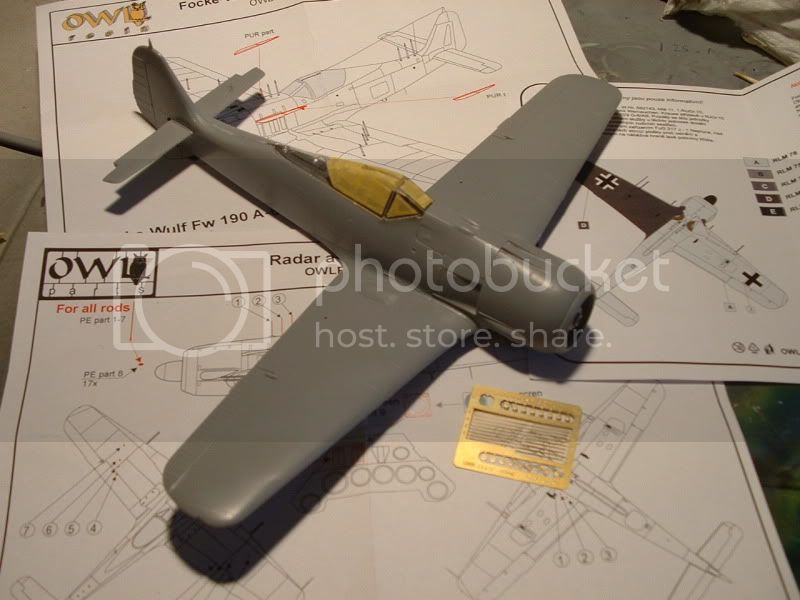
The kit is the 1/48 Hasgawa A6 checker nose boxing but I'll be using the Owl decal sheet, aerials and flame dampers to make it into the R11 version.
Here are the markings:


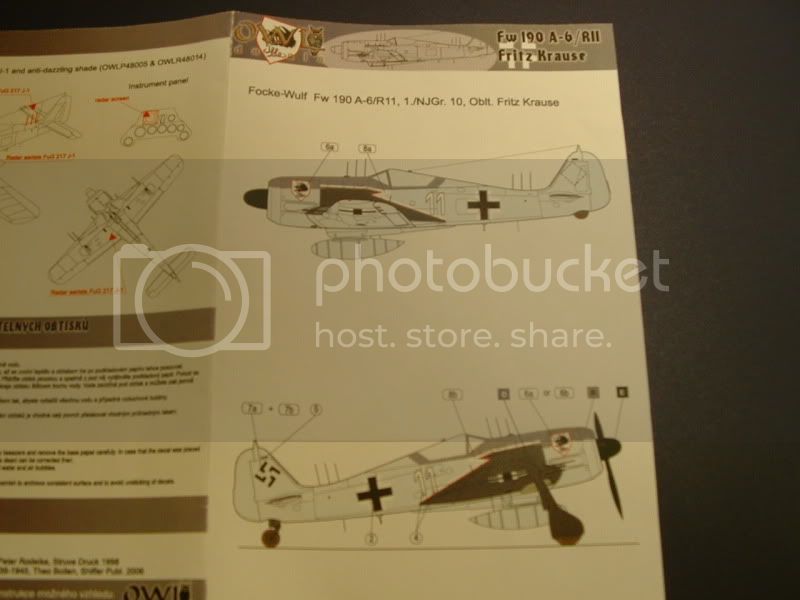
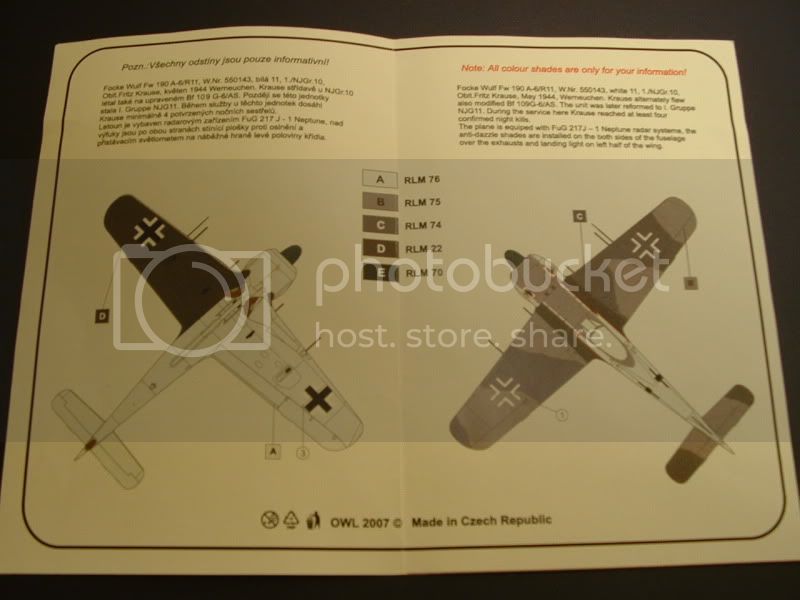
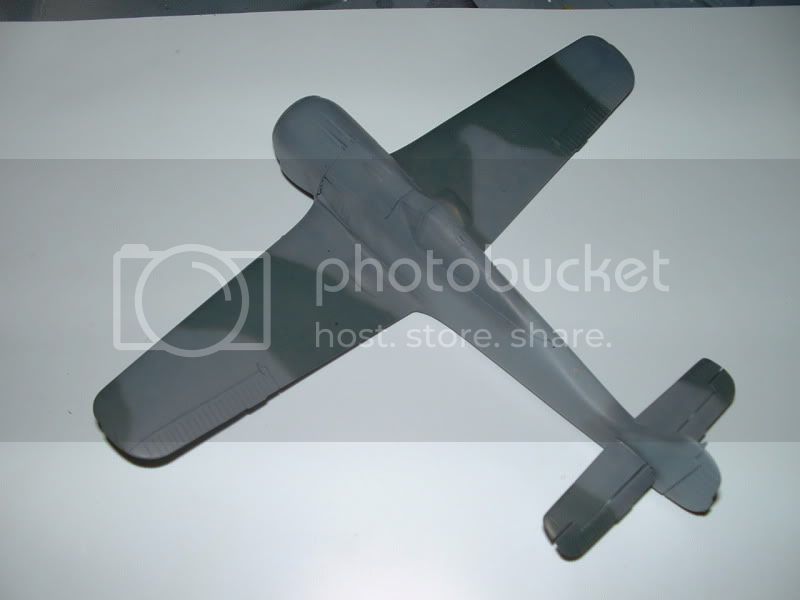
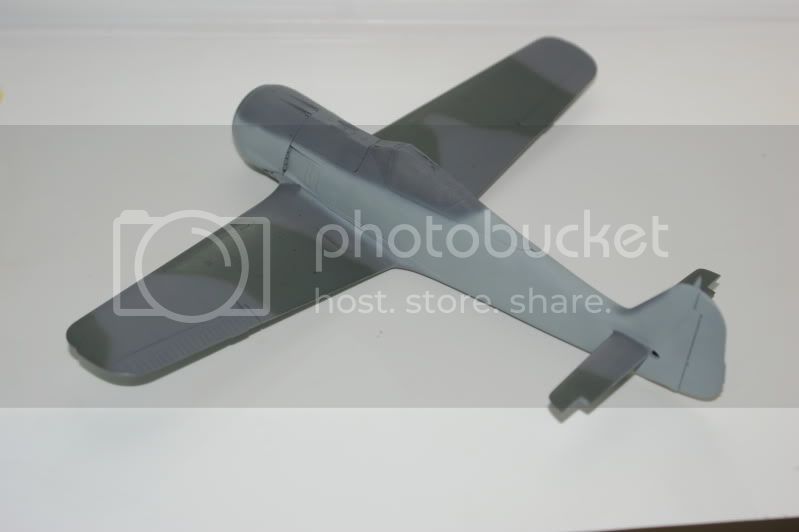
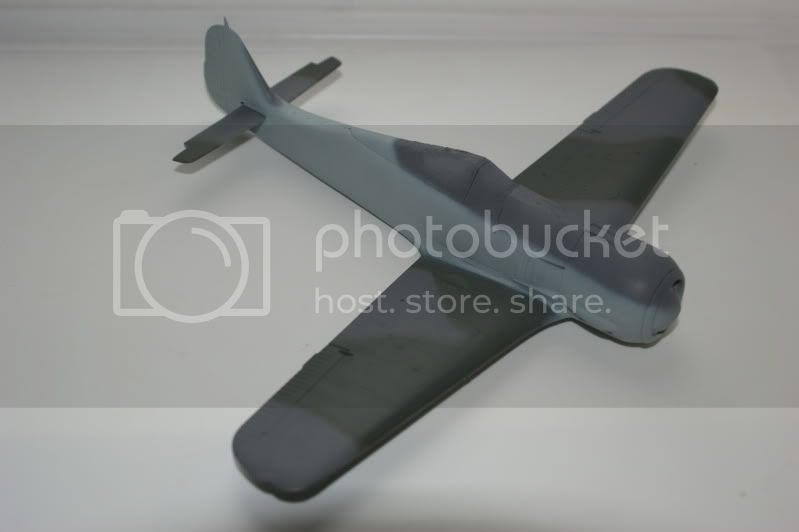
I have yet to find proof of the black underside wing but as it makes a dullish scheme that bit more interesting I shall paint it as per Owls sheet.

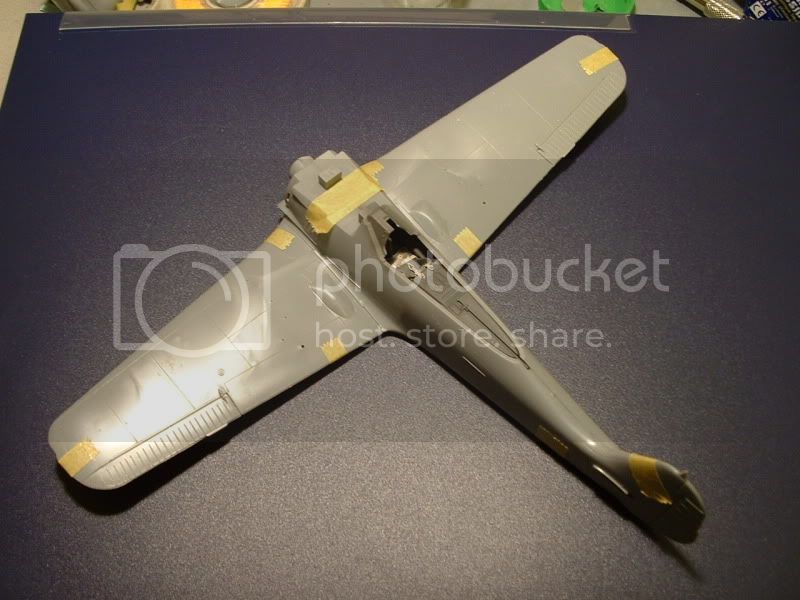
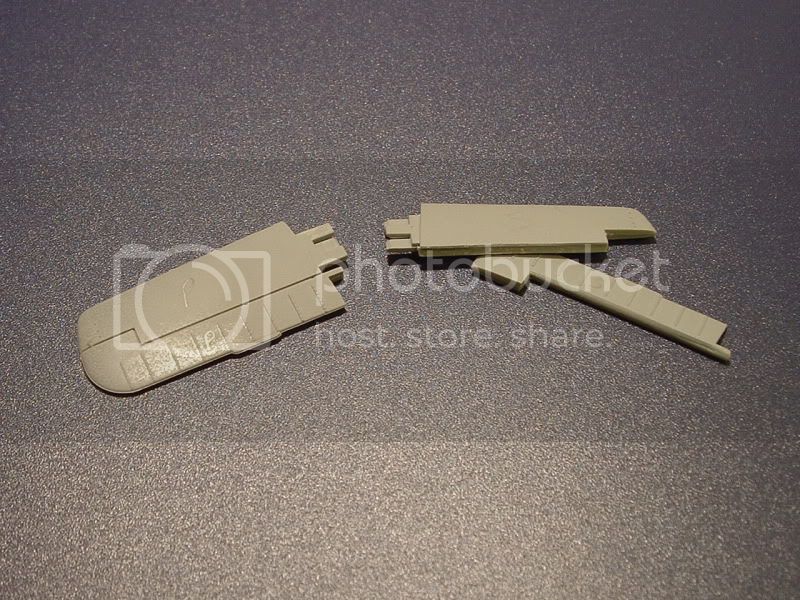
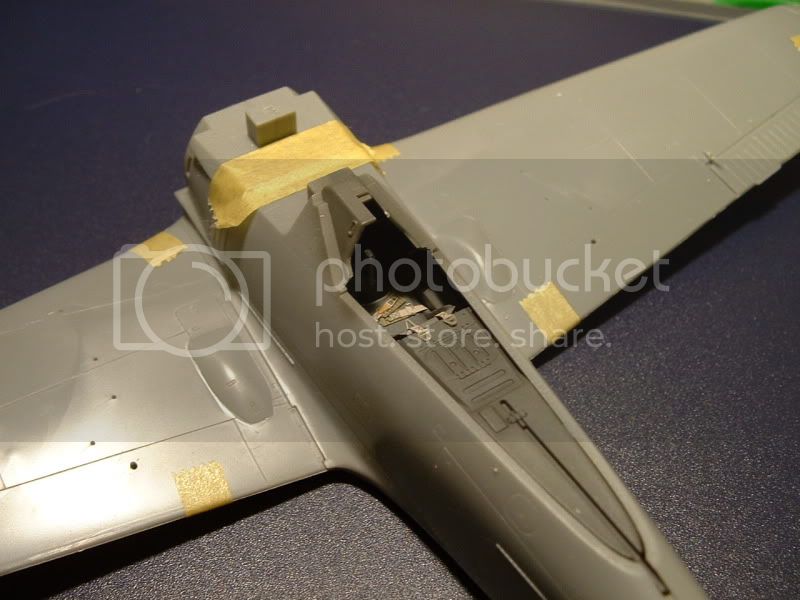
I hoped to have more photo's but they didn't seem to come out as well as I'd hoped but I shall gather more as I go I'm sure
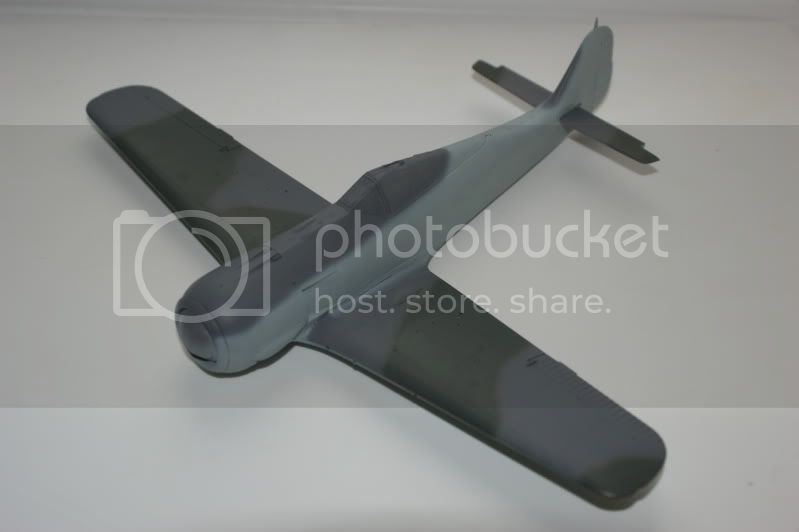
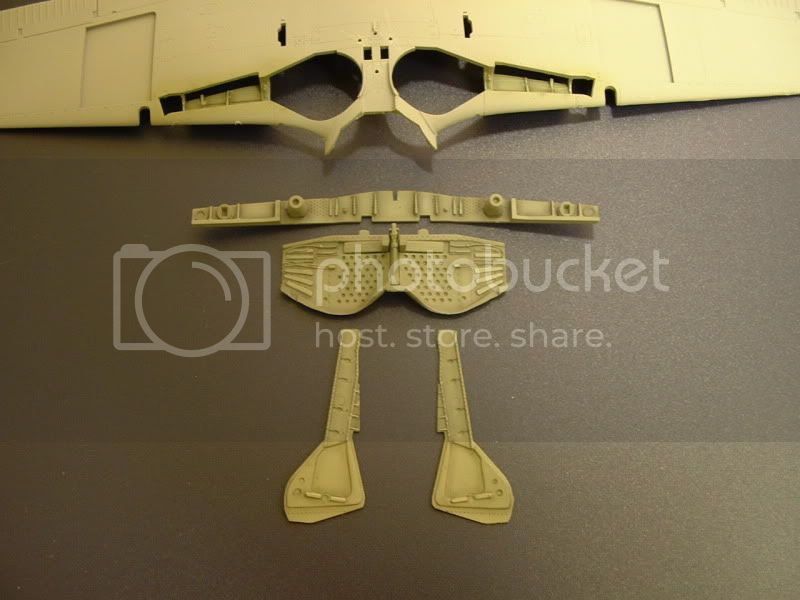
Basically the prop and spinner are sprayed RLM70 but not yet weathered. The cockpit has been sprayed RLM66 and shaded, I plan on finishing the details and highlighhting tonight. Last night I concentrated on the undercarriage bay. I first used a sharp HB pencil to do the outlining and then using a highly thinned mix of matt black I shaded the detail. After that I sprayed a lightened base colour mix in little areas before using that same mix to brush paint the highlights.
Not the greatest of pics but you get the idea:


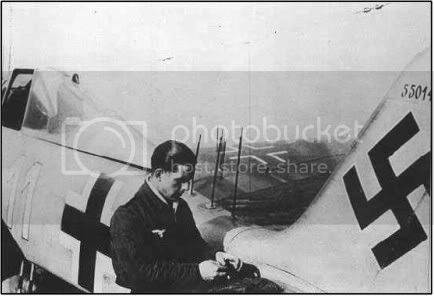
Whilst searching of information on the aircraft I came across these pics. The first is from a book published in 1978 that I've had since childhood and has an interesting piece of information. I hope you can read it:


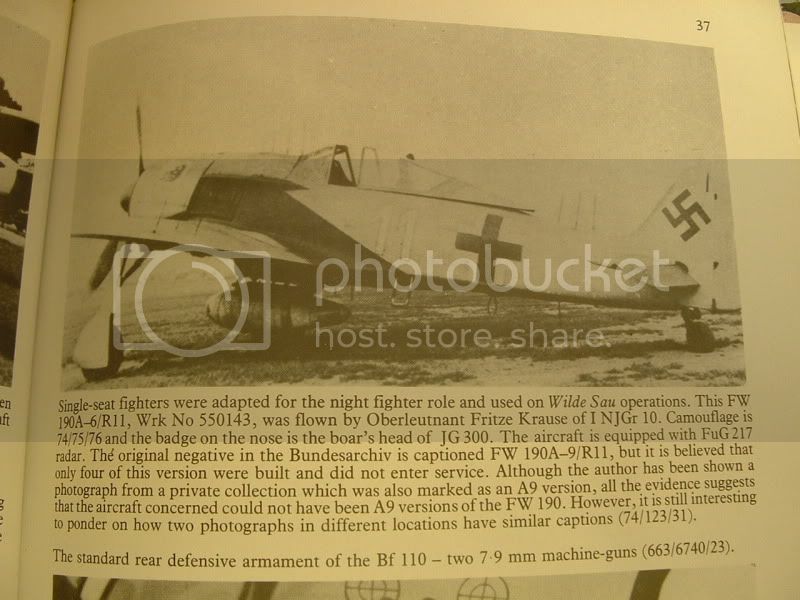
The second is from Osprey's 1999 publication:


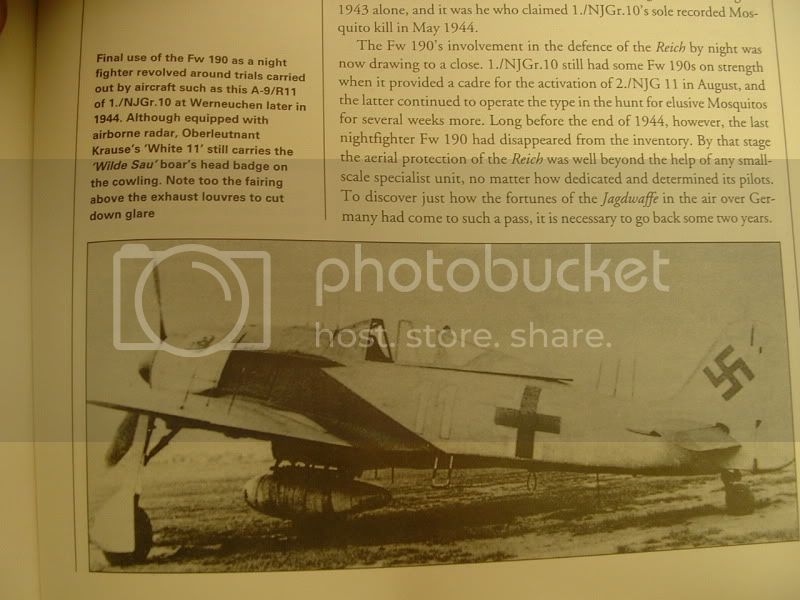
Pretty sure it's not an A9!!

Anyway hope to have more for you guys tomorrow and sorry the pics haven't come out great. I left my card reader at work so was unable to check them before I left this morning.

Howard
alpha_tango
_VISITCOMMUNITY
Germany
Joined: September 07, 2005
KitMaker: 5,609 posts
AeroScale: 5,231 posts
Posted: Tuesday, July 28, 2009 - 10:28 PM UTC
Hi Howard

nice start! Sadly I did not find further photos that a llow a conclusion re the black wing.

Well, and now for something complete differentl ... to bad it is no A-9. the Hasegawa boxing is just a Fw 190A-8 with the cowl and MG cover from a A-5. The problem is, that the instructions are equally just copied from the A-8 This is bad as you will have to fill a few things left and right from the pit and rescribe a filler hatch on the right side.

If you have the Fw 190 A-5 from Hasegawa you can copy the stuff from that one. Here is a drawing from Peter Rodeike he used to show the differences for the Dragon kit. Just ignore the cowl remarks i put on it.


Then there is the large hatch on the underside of the fuselage, but I'd just leave it as it is.

BTW do not let it put you off! Go, Howard, Go!!!

cheers

Steffen

_H_Dori
_VISITCOMMUNITY
England - East Anglia, United Kingdom
Joined: November 09, 2006
KitMaker: 295 posts
AeroScale: 276 posts
Posted: Tuesday, July 28, 2009 - 11:06 PM UTC
Great stuff, cheers Steffen.
I have already doen the port side hatch but I didn't know about the other one so I shall do that tonight.
Inspiration is high at the moment so I hope progress to be swift and efficient

Howard

Edit: One quick qeustion Steffen, what shell ejector parts should I use. The kit supplies two and the bulges for the top of the wing but I'm assuming I won't be using those. I will take pics of the two versions tonight if it may help?

alpha_tango
_VISITCOMMUNITY
Germany
Joined: September 07, 2005
KitMaker: 5,609 posts
AeroScale: 5,231 posts
Posted: Tuesday, July 28, 2009 - 11:12 PM UTC
Hi Howard

you need the same as for the Fw 190 A-8 so the instruction should be correct. this was the main external difference: change from MG FF to MG 151 or 151/20 on the outboard weapon stations.

HTH

cheers

Steffen
_H_Dori
_VISITCOMMUNITY
England - East Anglia, United Kingdom
Joined: November 09, 2006
KitMaker: 295 posts
AeroScale: 276 posts
Posted: Tuesday, July 28, 2009 - 11:32 PM UTC
Brill, thanks very much mate.

Update tomorrow then I hope.

H
_H_Dori
_VISITCOMMUNITY
England - East Anglia, United Kingdom
Joined: November 09, 2006
KitMaker: 295 posts
AeroScale: 276 posts
Posted: Sunday, August 02, 2009 - 09:57 PM UTC
Ok somehwat later on the update than I hoped but I had a pretty good day yesterday and managed a good amount of time at the bench. Totally re-sprayed the cockpit as I wasn't happy with it at all. Then low & highlighted it up, touch of dry brushing and fitted the radar screen. Fitted it all up and got the fuselage together. Whilst that was drying I prepared the wings up and before I knew it I had what was starting to look like a plane!


Then for some reason I thought it would be nice to deflect the horizontal stabilisers like in the original pic.


The engine is near enough ready to go in and I'll be honest and say I haven't really done much to that as I know from previous experience how little of the 801 can be seen. Basically, black, grey and a little bit of silver I didn't even take a pic.

Finally, I did have a slight incident. Part of the instrument coaming got broke. I have no idea how though as it was fine, then the next time I looked it was missing. Oh well.


I have started sorting the seams now in preperation for paint. SOrry for lack of photos. I just get into it and don't think about them until too late!

Howard

alpha_tango
_VISITCOMMUNITY
Germany
Joined: September 07, 2005
KitMaker: 5,609 posts
AeroScale: 5,231 posts
Posted: Sunday, August 02, 2009 - 10:31 PM UTC
Very nice progress, Howard!

IIRC the seat belts are attached to th plate behind the seat, but not much of a problem .. few will know and this way you can see them a bit better ...

keep up the good work!!

all the best

Steffen
_H_Dori
_VISITCOMMUNITY
England - East Anglia, United Kingdom
Joined: November 09, 2006
KitMaker: 295 posts
AeroScale: 276 posts
Posted: Monday, August 03, 2009 - 12:19 AM UTC
Thanks Steffen

Ahh I shall recheck seatbelts. I will admit to not checking the reference before fitting those ha ha.

Thanks again

Howard
_H_Dori
_VISITCOMMUNITY
England - East Anglia, United Kingdom
Joined: November 09, 2006
KitMaker: 295 posts
AeroScale: 276 posts
Posted: Wednesday, August 05, 2009 - 09:49 PM UTC
Got her all built up last night after finally finishing the canopy masking. I shall hopefully get primer on tonight and fix any imperfections.

Really looking forward to getting the paint on now:


Thanks for looking

Howard
alpha_tango
_VISITCOMMUNITY
Germany
Joined: September 07, 2005
KitMaker: 5,609 posts
AeroScale: 5,231 posts
Posted: Saturday, August 08, 2009 - 01:06 AM UTC
Hello Howard

Whats up? .. you are progressing pretty nicely and now no news in 2 days? .. Maybe I am the only one watching, but I sure do

Come on .. get it done!

cheers

Steffen
_H_Dori
_VISITCOMMUNITY
England - East Anglia, United Kingdom
Joined: November 09, 2006
KitMaker: 295 posts
AeroScale: 276 posts
Posted: Sunday, August 09, 2009 - 10:05 PM UTC
Thanks Steffen.

Well I didn't get as much done over the weekend as I'd hoped. I had a late night friday and got most of the FuG aerial bases mounted. On saturday night I finished the aerial bases bar the rear fuselage mounted ones as I wanted to see if I'd got the seam covered first. I then primed the airframe and was generally happy. A few areas to sort but nothing too major. Sadly I didn't get any time at the bench yesterday so I'm hoping to make that up tonight.

Howard
_H_Dori
_VISITCOMMUNITY
England - East Anglia, United Kingdom
Joined: November 09, 2006
KitMaker: 295 posts
AeroScale: 276 posts
Posted: Monday, August 10, 2009 - 10:53 PM UTC
Terrible picture (had to use flash and thats never good for colours) but colours started going on last night. Not happy with the port wing RLM74 shape at all so what I shall do is spray the RLM76 and then redo the wing. I shall also take a better picture lol


Howard

alpha_tango
_VISITCOMMUNITY
Germany
Joined: September 07, 2005
KitMaker: 5,609 posts
AeroScale: 5,231 posts
Posted: Monday, August 10, 2009 - 11:36 PM UTC
Very nice Howard

and the colours do not look that bad ...

all the best

Steffen
_H_Dori
_VISITCOMMUNITY
England - East Anglia, United Kingdom
Joined: November 09, 2006
KitMaker: 295 posts
AeroScale: 276 posts
Posted: Tuesday, August 11, 2009 - 12:37 AM UTC
Not too bad for Xtracrylix eh

If anything I think the 74 is too green up against Merricks swatch. 75 I thought was going to be way too dark has actually come out reasonably well.

I'm still going to re-do the port wing ha ha

Thanks for looking Steffen

Howard
_H_Dori
_VISITCOMMUNITY
England - East Anglia, United Kingdom
Joined: November 09, 2006
KitMaker: 295 posts
AeroScale: 276 posts
Posted: Tuesday, August 11, 2009 - 09:03 PM UTC
Morning

I got the RLM76 sprayed up last night. Again using Xtracrylix thinned with distilled water. I didn't use too much masking as the black exhaust paint is yet to go on and that will cover alot up. Anyway hopefully better pictures although the weather is wet and overcast over here today


Howard
alpha_tango
_VISITCOMMUNITY
Germany
Joined: September 07, 2005
KitMaker: 5,609 posts
AeroScale: 5,231 posts
Posted: Tuesday, August 11, 2009 - 09:53 PM UTC
Looks very nice Howard!

though I do not agree with OWL's interpretatation of the camo on top of the fuselage. IMO it is moe likely the standard scheme and the "border" you see is between RLM74 (dark) and 75 (light) .. if you look closely you can make out the difference to the fuselage sides which are most likely 76. Also the camouflaged leading edge of the rudder speaks for this asumption.

Still I know you can make your own decisions and you have probably put in one or more thoughs ... so again: good work!

looking forward to the next installment!

all th ebest

Steffen
_H_Dori
_VISITCOMMUNITY
England - East Anglia, United Kingdom
Joined: November 09, 2006
KitMaker: 295 posts
AeroScale: 276 posts
Posted: Tuesday, August 11, 2009 - 10:17 PM UTC
Just to clarify Steffen, do you mean the fuselage spine is more likely the standard 74/75 leading down to the tail? That would mean more likely a 74 over the canopy with a split of 75 on the nose cowling etc.

Think I understand what you mean and you may very well be right. I'm still able to change it as I have to redo the 74 on the port wing anyway.

Whats your thoughts mate?

Howard
alpha_tango
_VISITCOMMUNITY
Germany
Joined: September 07, 2005
KitMaker: 5,609 posts
AeroScale: 5,231 posts
Posted: Tuesday, August 11, 2009 - 10:30 PM UTC
Hello Howard

In my opinion the upper side of the fuselage wore the standard fighter scheme, which is 75 over the cowling (roughly) then a broad stipe of 74 over the gun-canopy area and then some more 75 to the tail .. there were several variantions how this was executed and where the color changes are situated respectively how far aft the 75 would end (in this case it goes up the tail a bit). i had another look at the pic in Theo Boitens "Nachtjagd" (pg.123) and IMO this picture confirms my thoughts.

But it is your model and your choice and please do as you think it should be!

all the best

Steffen
_H_Dori
_VISITCOMMUNITY
England - East Anglia, United Kingdom
Joined: November 09, 2006
KitMaker: 295 posts
AeroScale: 276 posts
Posted: Tuesday, August 11, 2009 - 11:38 PM UTC
Steffen, Sadly I do not own that book althought I definately need more Nachtjagd books. I certainly see what you mean though. I will post the only two photo's I have of the aircraft:

The most well known:


And Fritze Krause standing next to the aircraft itself:


Any more thoughts will be greatly appreciated.

Howard
alpha_tango
_VISITCOMMUNITY
Germany
Joined: September 07, 2005
KitMaker: 5,609 posts
AeroScale: 5,231 posts
Posted: Tuesday, August 11, 2009 - 11:59 PM UTC
hello Howard

I mean the lower photo. (though it is printed less reworked in Boiten). You can clearly see how the RLM75 goes down the rudder and further on the fuselage spine then comes Fritz' shadow (where you also see the border between 76 on the side and 75 above it) and then the trace is lost .... or only seen with a lot of imagination.

all the best

Steffen

_H_Dori
_VISITCOMMUNITY
England - East Anglia, United Kingdom
Joined: November 09, 2006
KitMaker: 295 posts
AeroScale: 276 posts
Posted: Wednesday, August 12, 2009 - 12:51 AM UTC
Bang on mate! Now I see it you can't miss it (that might make sense lol)

I shall add the 74/75 on the top of the fuselage spine when next at the bench.

One last question Steffen if I can. The Wilde Sau emblem on the cowling, am I right in thinking these were normally on port side only? Owl give extra emblems but reading through Eduards information in their Nachtjagd 190 boxing it states the emblem normally appeared on port side only. Thank you for any additional info as always.

Howard
alpha_tango
_VISITCOMMUNITY
Germany
Joined: September 07, 2005
KitMaker: 5,609 posts
AeroScale: 5,231 posts
Posted: Wednesday, August 12, 2009 - 01:18 AM UTC
Hello again

well, Nightfighter units are not really my strong side. IIRC I have seen a pic of Migges "Kognak pumpe" with the emblem on the rhs too .. but this might be my memory playing tricks on me ....

sorry mate. Maybe post this on Hyperscale or 12o'clock high. I bet Erich or others will know ...

all the best

Steffen
_H_Dori
_VISITCOMMUNITY
England - East Anglia, United Kingdom
Joined: November 09, 2006
KitMaker: 295 posts
AeroScale: 276 posts
Posted: Wednesday, August 12, 2009 - 01:32 AM UTC
No worries Steffen and thank you for all your time and info.

I'm not sure I shall have an update tomorrow as friends are over tonight so I will post when I have more.

Howard
FalkeEins
_VISITCOMMUNITY
England - South East, United Kingdom
Joined: March 07, 2005
KitMaker: 868 posts
AeroScale: 690 posts
Posted: Friday, August 14, 2009 - 04:38 AM UTC

Howard,

..re thoughts on colours. Given the lack of photos anywhere I think you're very much on your own here. IMHO though its very unlikely that 190s had Owl's black wing during the summer of 1944..the odd machine had them during the early days of wilde Sau, but that was 'uncontrolled' night fighting. As for the emblems - I've a copy of Jean-Yves Lorant's FW 190 book in the Docavia series... he has pictures of NJGr 10 190s, including an entire line-up - but only from the port side in each case.
for some more inspiration SAM magazine covered both Krauze & Migge's a/c in their April 2003 issue - their take on Krauze's colours is rather different. There is little in the way of photos... but possibly something to consider

alpha_tango
_VISITCOMMUNITY
Germany
Joined: September 07, 2005
KitMaker: 5,609 posts
AeroScale: 5,231 posts
Posted: Friday, August 14, 2009 - 04:49 AM UTC
Hi Neil

Where have you been .. I am waiting for you to jump in since Howard started the thread

Übrigens heißt der gute Mann Krause .. ja ich weiß im Englischen gibt es kein stimmhaftes "s" und deshalb nehmt ihr "z"; dafür müsst ihr dann statt "z" "ts" oder ein ähnliche Gerümpel benutzen .. rate mal wie Suzuki im deutschen ausgesprochen wird

BTW hast du Engau's Buch schon durchgelesen?

cheers

Steffen
 _GOTOTOP