

Hi Guys
Please let me introduce myself, my name is Dave Maddox, I have been building Military miniatures for many many years, with the primary subject of figures, having spent the last 9 years painting them, I have been pushed towards the large selection of new one on the market that are predominately WWi / Early Avaition, and this has pushed me to purchase my second only ever model aircraft. Having been looking avidly at the threads that are moving speedily along on the WingNutWings models, I decided I would purchase the LVG, having also looked at the website for many evenings deciding if I could justify the purchase to my wife, who happily accepted it without any malice in any way (Bonus). So I intend to build the aircraft when it arrives as a side line to what is my primary interest and would appreciate any help and advice if you guys would be so kind.
I have considered the Turnbuckles from Bobs Buckles and will purchase them when I get a little closer to the time I need them. The Main thing that really frightens me is the Lozenges for the wings and the application of them, its something I have considered airbrushing but correct colours are a bit hard to match, so any information on the application of said lozenges would be of benefit ..........
Thanks in advance.....
Dave
Early Aviation
Discuss World War I and the early years of aviation thru 1934.
Discuss World War I and the early years of aviation thru 1934.
Hosted by Jim Starkweather
WNW GB 2009 - 10 LVG C.VI Dave M.

FigureMad

Joined: May 09, 2006
KitMaker: 118 posts
AeroScale: 89 posts
Posted: Monday, November 16, 2009 - 12:43 AM UTC

JackFlash

Joined: January 25, 2004
KitMaker: 11,669 posts
AeroScale: 11,011 posts
Posted: Monday, November 16, 2009 - 05:31 AM UTC
Welcome Dave;
Glad to have you here! Tell your good wife that the pinch in the purse will be made up with foot massages and you'll be in like Flynn. As to the Lozenge (Flugzeugstoff ) there is a thread around here somewhere authored by some plugger hereabouts. Something about "Lozenge Camouflage 101". Some people think it is worth a read.
Click here.

CaptainA
Joined: May 14, 2007
KitMaker: 3,117 posts
AeroScale: 2,270 posts
Posted: Monday, November 16, 2009 - 12:22 PM UTC
Welcome Dave. You are going to love this kit. I just gat a second one. If this isn't the kit of the year, the voting is rigged. I was concerned about the lozenge also. But my concerns turned out to be unwarranted. The decals are great. Stephen's Lozenge 101 will tell you just about everything you need to know. The only things I can really add to that are:
1. There are lines along the sides of the decals. Be sure to trim the sides a hair or two. If you don't, you will end up with a very noticeable line.
2. You have enough to do the job, but don't waste any. Measure twice, cut once.
3. I used a gloss white base coat. They stuck great.
4. They settle great with solvent.
5. Be sure you keep them straight.
6. Do them over a few days. If you try to do them all at one time, you will not enjoy the process. I took about 5 days, at about 3-4 hours per day. But I am really, really slow. I also have to take frequent breaks due to back problems.
Additionally, Microsculpt's texture decals really make a big difference on the appearance of the lower side decals. If you are going to do oils for the wood grain, plan on about a week for drying time. You can check out my thread if you haven't already. Also, we love pictures. And we will help all we can.

FigureMad
Joined: May 09, 2006
KitMaker: 118 posts
AeroScale: 89 posts
Posted: Tuesday, November 17, 2009 - 01:42 AM UTC
Thank you Stephen and Carl, its very much appreciated, I will keep you up to date, when the kit arrives and I start the long haul of putting it together, I love the wealth of info available here, thanks again
Dave
Dave
FigureMad
Joined: May 09, 2006
KitMaker: 118 posts
AeroScale: 89 posts
Posted: Friday, November 20, 2009 - 09:29 AM UTC
Hi Guys
Just a quick question, whats been the usual lead time for delivery for the kits from WingnutWings, just wondering....... I cant wait to get into it you see
Cheers
Dave
Just a quick question, whats been the usual lead time for delivery for the kits from WingnutWings, just wondering....... I cant wait to get into it you see
Cheers
Dave
CaptainA
Joined: May 14, 2007
KitMaker: 3,117 posts
AeroScale: 2,270 posts
Posted: Saturday, November 21, 2009 - 08:15 AM UTC
I got mine in about 4-5 days. Over there? Well, good luck.

Torchy

#047

Joined: September 13, 2005
KitMaker: 2,016 posts
AeroScale: 475 posts

Posted: Saturday, November 21, 2009 - 09:48 AM UTC
Quoted Text
Hi Guys
Just a quick question, whats been the usual lead time for delivery for the kits from WingnutWings, just wondering....... I cant wait to get into it you see
Cheers
Dave
Hi Dave

Yet another wingnutter LVG !!! mine took about 9 days,hope you dont get caught by customs like me
 another £9, I've an SE5a on its way,I hope its a twin wing stealth fighter
  .
.There are a ton on builds on here for the LVG,she is a beauty of a kit,I would recommend getting pe set #500 German guns from Tom's modelworks
http://www.tomsmodelworks.com/catalog/index.php?cPath=22_30
Hope to see some pics of your build soon

Andy
p.s ,join the campaign
https://aeroscale.kitmaker.net/modules.php?op=modload&name=Campaigns&file=index&req=showcontent&id=370

Torchy
#047
Joined: September 13, 2005
KitMaker: 2,016 posts
AeroScale: 475 posts
Posted: Thursday, November 26, 2009 - 02:42 AM UTC
My Hisso landed today  ,but not in stealth mode £15.44 to lizzies customs ,bummox
thats twice now! ho hum
Hope yours sneaks in Dave!
Andy
,but not in stealth mode £15.44 to lizzies customs ,bummox thats twice now! ho hum
Hope yours sneaks in Dave!
Andy
FigureMad
Joined: May 09, 2006
KitMaker: 118 posts
AeroScale: 89 posts
Posted: Thursday, November 26, 2009 - 03:00 AM UTC
No such luck Andy, found out last night its waiting for me at her pleasure till I get down there and give her some money to pick it up, at least I know its in the country, just want to get my mits on it...........
Just rung Parcel Force, I can pick it up on Saturday Morning as I cant get to the depot in time on the way home from work, added to that frustration, I have to pay an extra £17.30, handling charge and VAT, where do these guys get off charging an extra handling charge, its their job to handle it.
Dave
CaptainA
Joined: May 14, 2007
KitMaker: 3,117 posts
AeroScale: 2,270 posts
Posted: Thursday, November 26, 2009 - 07:54 AM UTC
It is a wonderful kit.
FigureMad
Joined: May 09, 2006
KitMaker: 118 posts
AeroScale: 89 posts
Posted: Saturday, November 28, 2009 - 04:19 AM UTC
I have finally got it, its in my man cave awaiting the first steps..........
I have joined the campaign as well, so hope to get started as soon as I can, also all of my painting will be in acrylics, something I am very used too.
Amazingly in the time I have been waiting a couple of relatives have suddenly brought round a couple of kits for me, both 1/32 scale, a Sopwith Camel and the Fokker Triplane, I thought they reasonable looking kits until I opened the box that I finally got this morning, and I had forgotten how poor quality some manufacturers were, but after seeing this LVG Kit, its superb............
trying to find my Slaters Mek Pak now........ time to get going
Dave
FigureMad
Joined: May 09, 2006
KitMaker: 118 posts
AeroScale: 89 posts
Posted: Monday, November 30, 2009 - 10:35 AM UTC
Ok Guys
I started the LVG on sunday morning having a relaxing day in my man cave, playing with this beauty, I stated with the engine, I chose the one without the push rods to add my own from plastic rod, I added the ignition lead carriers and leads as I thought it looked bare without them, made from plasticard and lead wire, Painted with Acrylics from andrea, Vallejo, and Alcad metals. Lots of tidying up to do, let me know what you think, I am at your mercy with the comments so please be gentle.......
Dave
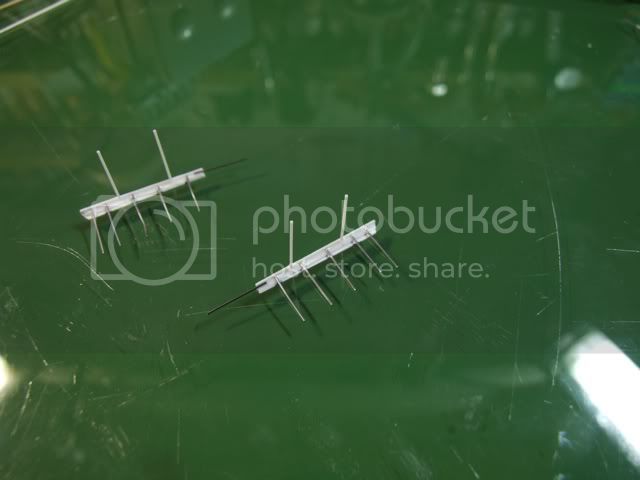
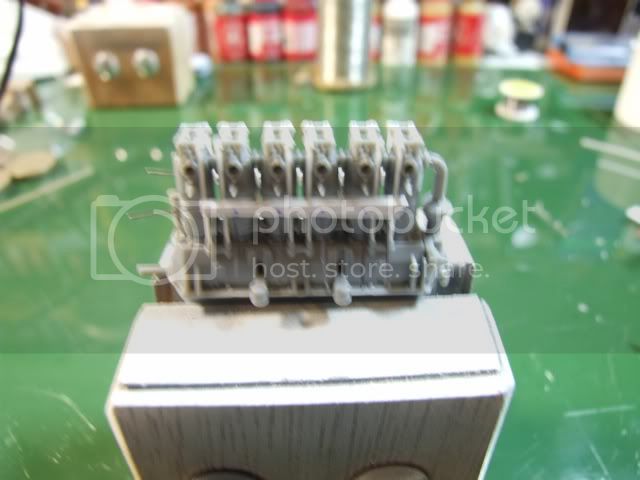
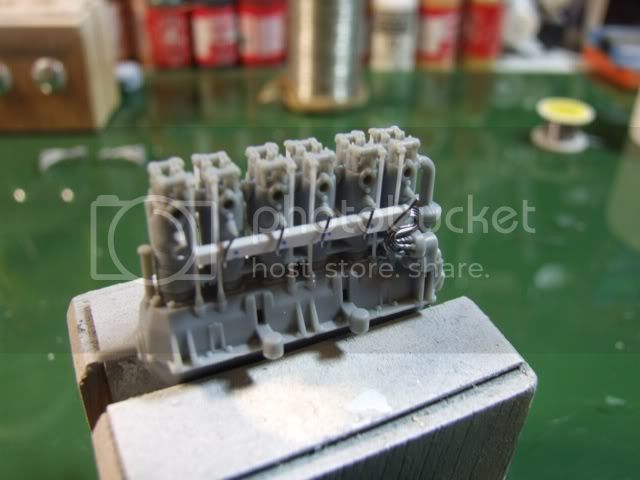
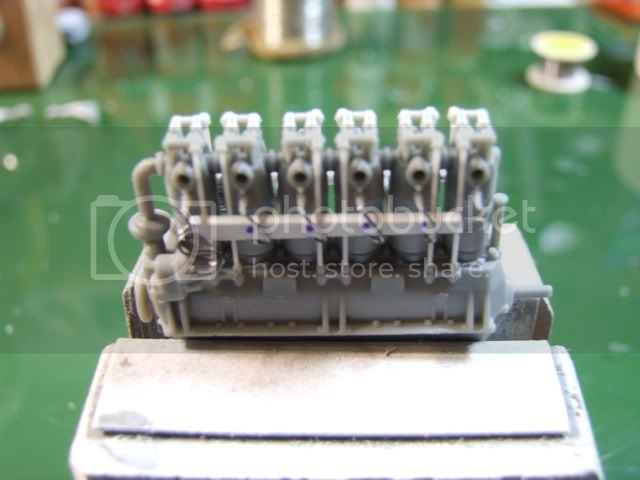
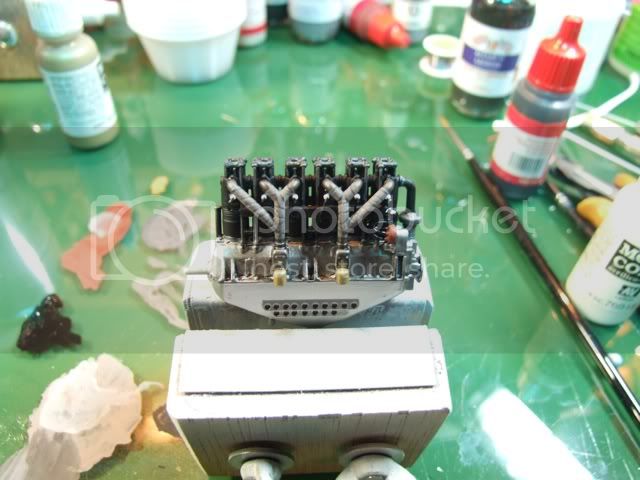
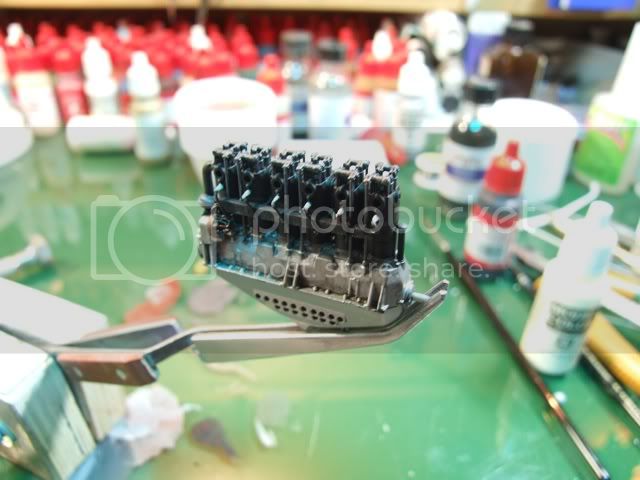
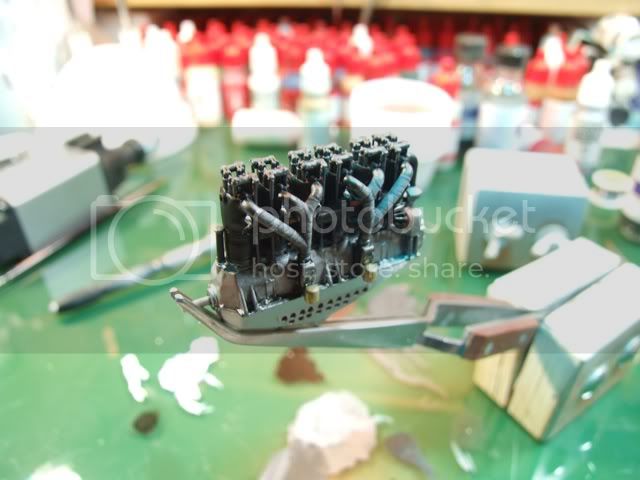
CaptainA
Joined: May 14, 2007
KitMaker: 3,117 posts
AeroScale: 2,270 posts
Posted: Monday, November 30, 2009 - 11:38 AM UTC
Engine looks good.

Mgunns
Joined: December 12, 2008
KitMaker: 1,423 posts
AeroScale: 1,319 posts

Posted: Tuesday, December 01, 2009 - 01:57 AM UTC
It all looks good to me, clean, orderly, looks good.

thegirl

Joined: January 19, 2008
KitMaker: 6,743 posts
AeroScale: 6,151 posts
Posted: Tuesday, December 01, 2009 - 02:12 AM UTC
Agree with the others , very nice done !
FigureMad
Joined: May 09, 2006
KitMaker: 118 posts
AeroScale: 89 posts
Posted: Thursday, December 17, 2009 - 10:09 AM UTC
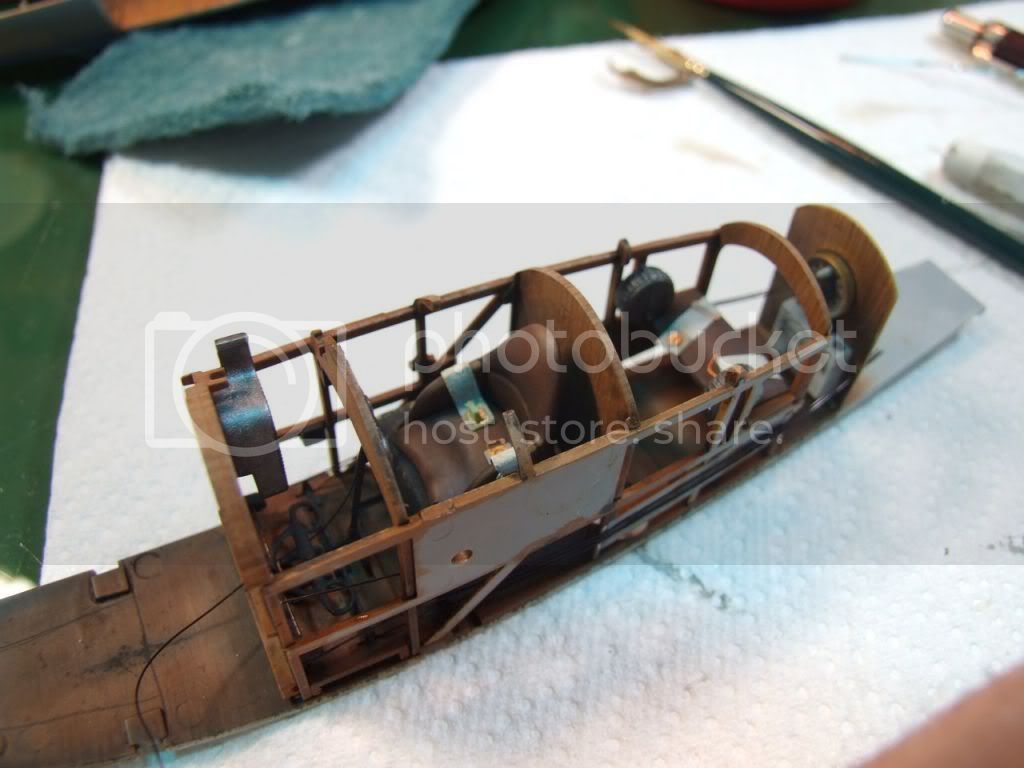
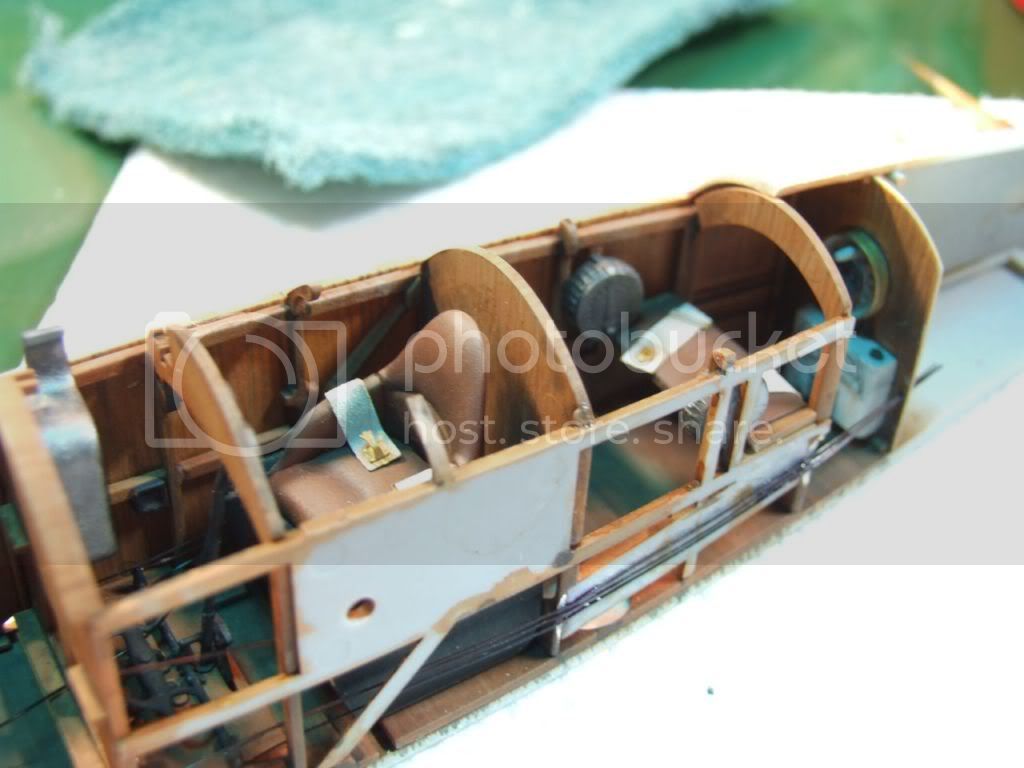
Hi Guys
I have been working on the cockpit of this beauty, I have to say I am loving every bit of it, I am an engineer at heart and love the simple way that everything is so well engineered..... unfortunately the photos are not all that, but I hope you can see I have been trying my best to get the thing looking at least used, I still have loads more to do though.......
Dave
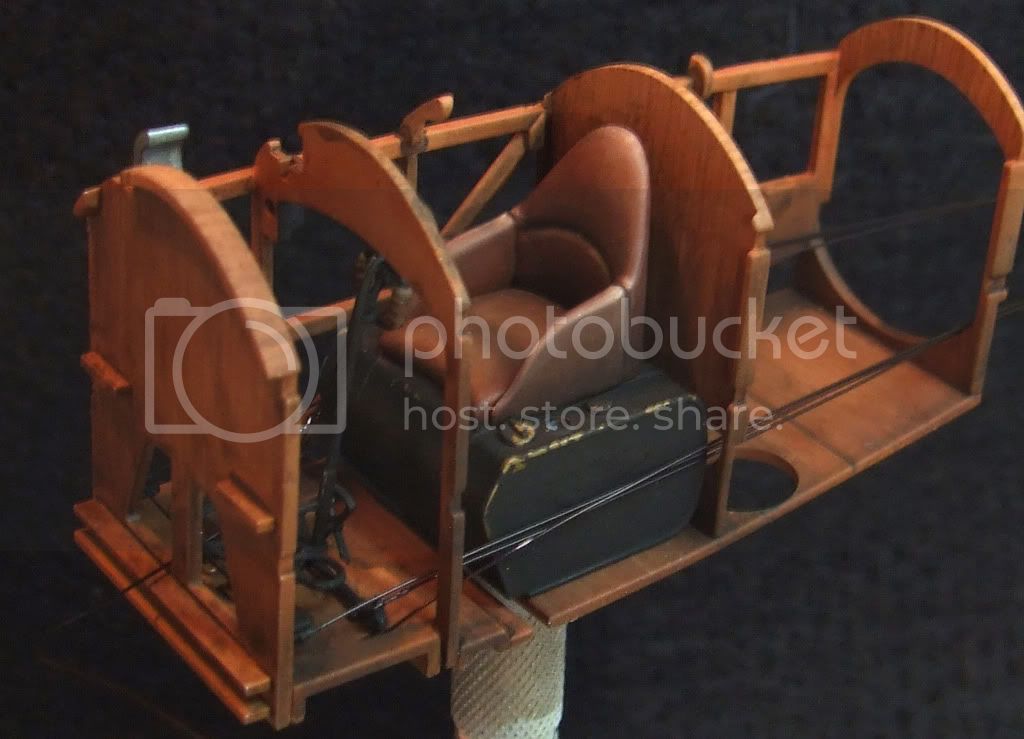
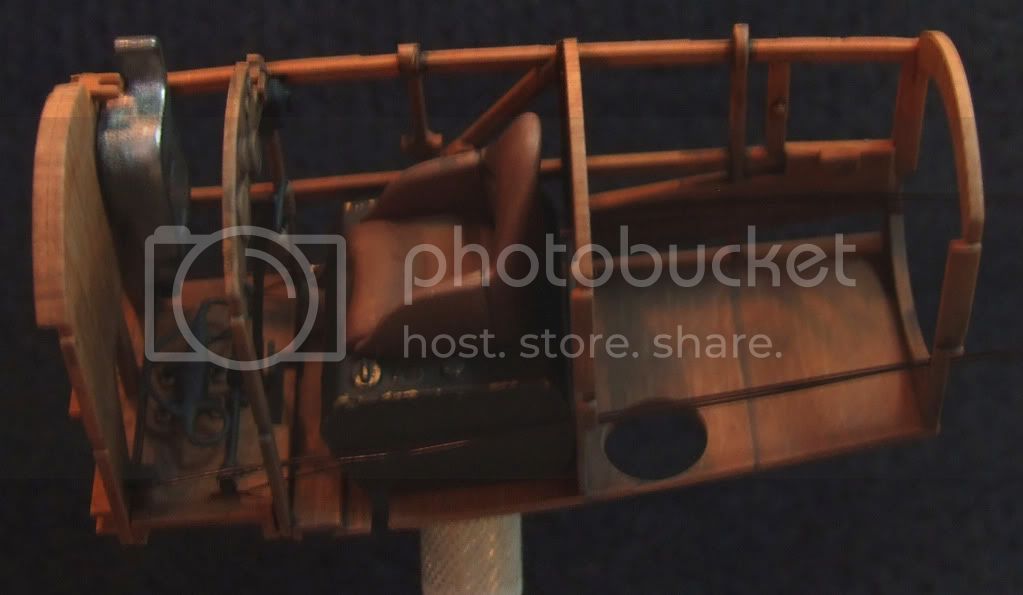
CaptainA
Joined: May 14, 2007
KitMaker: 3,117 posts
AeroScale: 2,270 posts
Posted: Thursday, December 17, 2009 - 01:46 PM UTC
Interior looks great.
thegirl
Joined: January 19, 2008
KitMaker: 6,743 posts
AeroScale: 6,151 posts
Posted: Friday, December 18, 2009 - 02:27 AM UTC
Excellent jod done on the interior for the woodgrain ! Nice clean build so far . Thanks for the up-date .
FigureMad
Joined: May 09, 2006
KitMaker: 118 posts
AeroScale: 89 posts
Posted: Thursday, December 31, 2009 - 04:56 AM UTC
Thank you very much everybody for your help and comments on this one, being a total novice at this aircraft modelling, its been a very steep learning curve years of experience squeezed in to a couple of weeks.
Just a little update, I have been finishing off the cockpit and inside of the fuselage, before getting these together, absolutely no problems so far, with fit or following of the instructions, I have decided to change tack slightly on the outside of the Fuselage and will try and work with a Decal wood grain that I have found from the states from misterkit. so I would appreciate if anybody has had any experience with these decals before.
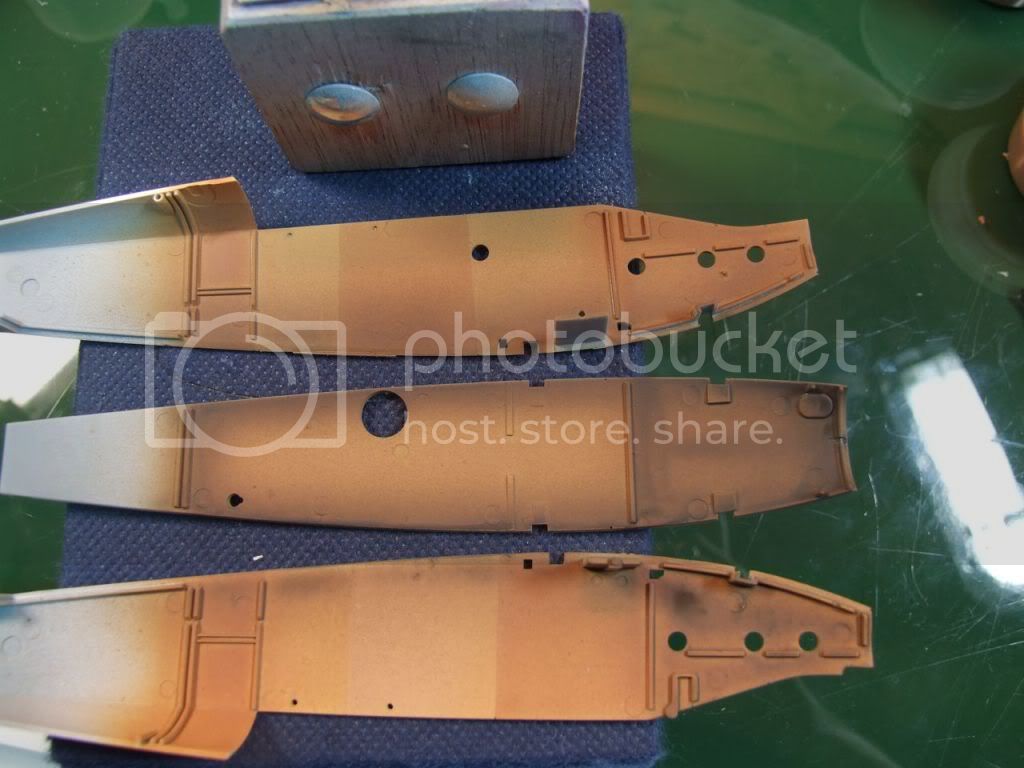
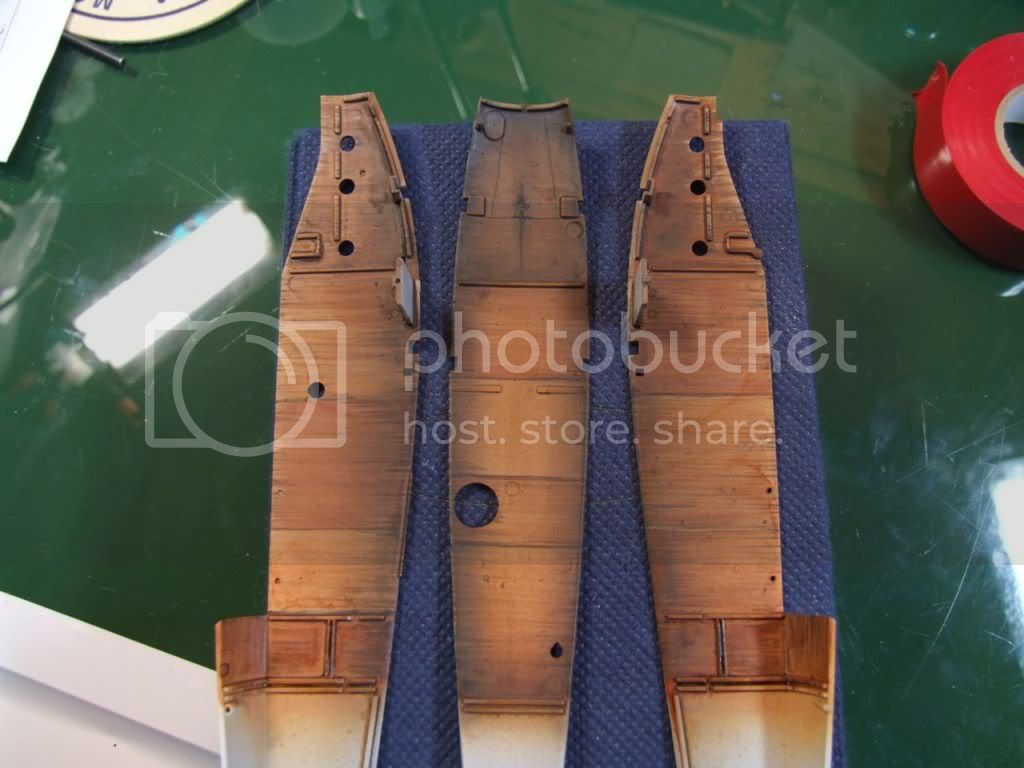
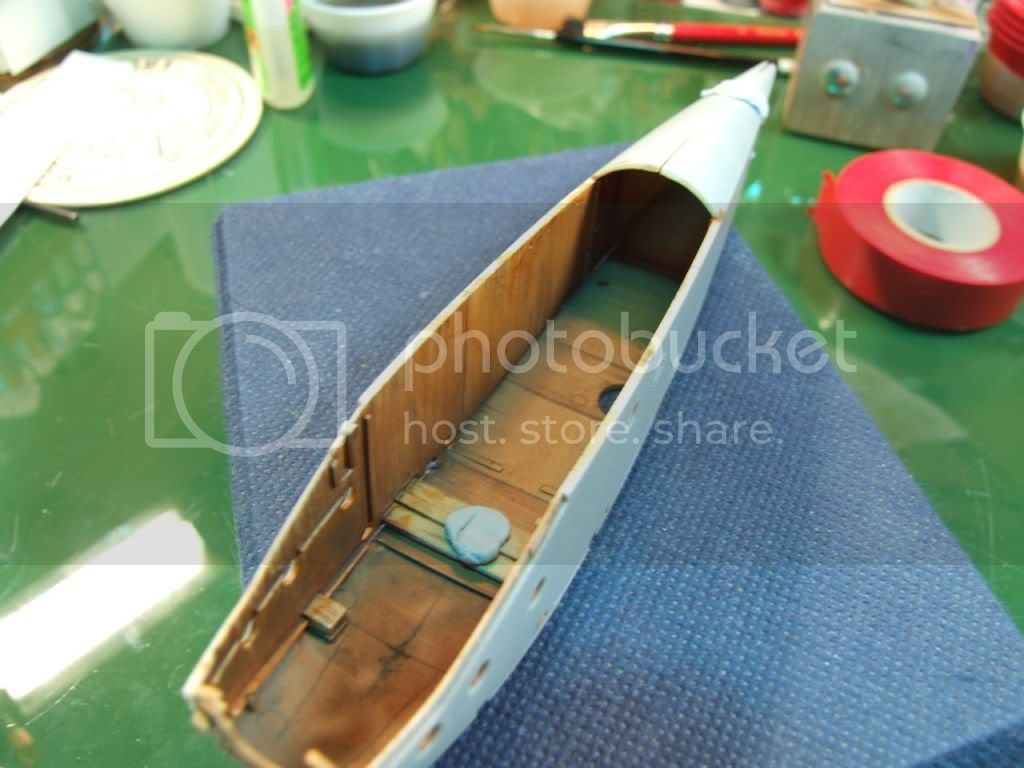
Just a little update, I have been finishing off the cockpit and inside of the fuselage, before getting these together, absolutely no problems so far, with fit or following of the instructions, I have decided to change tack slightly on the outside of the Fuselage and will try and work with a Decal wood grain that I have found from the states from misterkit. so I would appreciate if anybody has had any experience with these decals before.
Mgunns
Joined: December 12, 2008
KitMaker: 1,423 posts
AeroScale: 1,319 posts
Posted: Thursday, December 31, 2009 - 07:43 AM UTC
Looking good. I like your wood grain effect on the interior. I have limited experience with the Misterkit Wood Grain decal. It worked fine for me, just don't let it fold over on itself. Keep us posted. I got this kit for Christmas from my girlfriend, and watching the builds unfold here.
Best in the new year.
Best in the new year.

wombat58

Joined: March 26, 2009
KitMaker: 366 posts
AeroScale: 309 posts
Posted: Thursday, December 31, 2009 - 07:59 AM UTC
Very nice job so far Dave, I like your wood grain. Looking forward to more up-dates.
Des.
Des.

thegirl
Joined: January 19, 2008
KitMaker: 6,743 posts
AeroScale: 6,151 posts
Posted: Thursday, December 31, 2009 - 12:29 PM UTC
Very impressive so far ! I like the weathering effect . Did you use pastels for this ?
FigureMad
Joined: May 09, 2006
KitMaker: 118 posts
AeroScale: 89 posts
Posted: Thursday, December 31, 2009 - 09:19 PM UTC
Thank you Terri, the weathering is all done in acrylics with a brush and airbrush.....
Dave
Dave
Torchy
#047
Joined: September 13, 2005
KitMaker: 2,016 posts
AeroScale: 475 posts
Posted: Friday, January 01, 2010 - 08:38 AM UTC
Looking superb Dave
Love the control wires, and the wood panels,why not try paint instead of decals on the outside?,
if the paint goes t##s up then use the decals,but your paint job so far looks good to me.
I use oils and the work time is great, dont like it wipe and try again!!!
Happy new year
Andy

Love the control wires, and the wood panels
,why not try paint instead of decals on the outside?,if the paint goes t##s up then use the decals,but your paint job so far looks good to me.
I use oils and the work time is great, dont like it wipe and try again!!!
Happy new year
Andy
wombat58
Joined: March 26, 2009
KitMaker: 366 posts
AeroScale: 309 posts
Posted: Friday, January 01, 2010 - 08:56 AM UTC
Andy has a good point. I also use oils for doing wood grain and the flexibility you have with oils is fantastic. Because of the lengthy drying time there is plenty of room to do and re-do as many times as you please. By adding different colours and using different brushes the desired effect can be achieved easily, and, like Andy said, if it all goes askew all you do is wipe it off and start again. It is important though to make sure the base coat is thoroughly dry before applying the oils.
Like all modelling techniques, it is up to the individial which one he/she uses, some work for some and others don't so whatever you decide to do I hope it works well for you.
Good luck with your build, it is looking great so far.
Des.
Current projects.
1:32 WNW Bristol F.2b
1:32 Roden SS. D.III
Like all modelling techniques, it is up to the individial which one he/she uses, some work for some and others don't so whatever you decide to do I hope it works well for you.
Good luck with your build, it is looking great so far.
Des.
Current projects.
1:32 WNW Bristol F.2b
1:32 Roden SS. D.III
 |

WEB HOSTING BY


Copyright ©2021 AeroScale and Kitmaker Network, a subsidiary of Silver Star Enterprises
All Rights Reserved. Please read our Conditions of Use and Privacy Policy.
All Rights Reserved. Please read our Conditions of Use and Privacy Policy.