Air Campaigns
Want to start or join a group build? This is where to start.
OFFICIAL: Mischievous MiGs Campaign
Merlin
Staff MemberSenior Editor
AEROSCALE
#017
_VISITCOMMUNITY
United Kingdom
Joined: June 11, 2003
KitMaker: 17,582 posts
AeroScale: 12,795 posts
Posted: Sunday, September 04, 2011 - 03:42 AM UTC
Many thanks Michal

Your kind words are much appreciated!

It certainly has been fun to build something again after quite a while, and I've also used it as a perfect excuse to try out the new Neo airbrush for real.

All the best

Rowan
SGTJKJ
#041
_VISITCOMMUNITY
Kobenhavn, Denmark
Joined: July 20, 2006
KitMaker: 10,069 posts
AeroScale: 3,788 posts
Posted: Monday, September 05, 2011 - 05:05 AM UTC
Wow! Looks fantastic, Rowan. Stunning build and great datail. That camouflage really came out nice. Is it freehand or did you mask with putty?

Looking forward to see more.
mykroft
_VISITCOMMUNITY
Ontario, Canada
Joined: November 14, 2009
KitMaker: 270 posts
AeroScale: 264 posts
Posted: Monday, September 05, 2011 - 06:53 AM UTC
Love that Digicam MiG-29 Jesper

Lap Man: That's one clean MiG-15, nicely done.

Rowan: Looks like the MiG-21's come along very nicely, did you replace the airbrakes?
Jessie_C
_VISITCOMMUNITY
British Columbia, Canada
Joined: September 03, 2009
KitMaker: 6,965 posts
AeroScale: 6,247 posts
Posted: Monday, September 05, 2011 - 07:07 AM UTC

Quoted Text

Finished. Trumpeter 1/32 PLA Mig-15.


Not to be too pedantic, but if you're dividing rabbits that's MiG 17PF (or rather a Shenyang J5A).

Very beautiful crisp build.
Siderius
_VISITCOMMUNITY
Tennessee, United States
Joined: September 20, 2005
KitMaker: 1,747 posts
AeroScale: 1,673 posts
Posted: Monday, September 05, 2011 - 07:34 AM UTC
Rowan, fantastic work on your MiG-21. Always liked that aircraft. Tell us what colors you used to paint your bird, including interior color of the cockpit. Thanks, Russell
Merlin
Staff MemberSenior Editor
AEROSCALE
#017
_VISITCOMMUNITY
United Kingdom
Joined: June 11, 2003
KitMaker: 17,582 posts
AeroScale: 12,795 posts
Posted: Monday, September 05, 2011 - 09:16 AM UTC
Hi again

Thank you everyone, you're all very kind. I'm way outside my usual "comfort zone" of WW2-ish era subjects, but I must admit I've thoroughly enjoyed building the MiG-21 so far.

@ Jesper - I used putty to mask the division between the upper and lower surfaces, but the topside camo's all freehand. I partly thought this would be a more useful test for the airbrush, but I was also just being plain lazy - it was far easier to paint freehand than worry about all the masking needed!

@ Adam - Eduard mould the airbrakes closed and include separate inserts if you want to open them. For the sake of the review I thought it was worth seeing how well they fit...

@ Russell - the painting is a bit of a mish-mash, doing my best (without going overboard) to match the FS equivalents that Eduard give with the paints I had to hand:

Topsides - LifeColor RLM 81 and 82, Wood Warm Dark Shade (from their diorama series) and LifeColor Nocciola 4 with a dash of Xtraxrylix RAF Dark Earth .
Undersides - a mix of RLM 65 and Tornado Interiors (modern Italian set).
The interior blue was matched as closely as I could to the Eduard etch colour - Citadel Hawk Turquoise, white and a dash of LifeColor's rather vivid Interior Green.

Thanks again and all the best

Rowan
Siderius
_VISITCOMMUNITY
Tennessee, United States
Joined: September 20, 2005
KitMaker: 1,747 posts
AeroScale: 1,673 posts
Posted: Monday, September 05, 2011 - 10:53 AM UTC
Thanks Rowan for your response! I am trying to put together a Sukhoi campaign and this was prompted by me buying a Trumpeter 1/72 scale Su-15 TM "Flagon". I thought it would be an interesting diversion from WW2 subjects which I normally model as well.

It seems to me that some German colors can be used to paint these Russian birds! RLM 81/82/65 or 76 seems to be the order of the day on some of these aircraft. It is close at least if not exact. Thanks again, Russell
eMan
#298
_VISITCOMMUNITY
Hong Kong S.A.R. / 繁體
Joined: August 08, 2002
KitMaker: 1,182 posts
AeroScale: 351 posts
Posted: Tuesday, September 06, 2011 - 02:00 PM UTC

Quoted Text


Quoted Text

Finished. Trumpeter 1/32 PLA Mig-15.


Not to be too pedantic, but if you're dividing rabbits that's MiG 17PF (or rather a Shenyang J5A).

Very beautiful crisp build.


Thanks for your correction.
Blueheeler
_VISITCOMMUNITY
New South Wales, Australia
Joined: March 18, 2008
KitMaker: 347 posts
AeroScale: 223 posts
Posted: Thursday, September 08, 2011 - 02:09 PM UTC
Just about done with my entry, just the a quick wash and some missiles left.


More soon, hopefully....

Nick.
Siderius
_VISITCOMMUNITY
Tennessee, United States
Joined: September 20, 2005
KitMaker: 1,747 posts
AeroScale: 1,673 posts
Posted: Thursday, September 08, 2011 - 02:19 PM UTC
Very nice work there Nick. MiG 23/27 I believe. What scale and what kit please? Also what colors did you use on your bird? A nice, nice job and I enjoyed looking. Russell
oraora
_VISITCOMMUNITY
Kuching, Malaysia
Joined: June 19, 2002
KitMaker: 216 posts
AeroScale: 128 posts
Posted: Thursday, September 08, 2011 - 03:22 PM UTC
Seems like there's a number of great looking builts. I just joined this campaign.

I'm going to use an Italeri 1/72nd Mig-29A to represent a RMAF Mig-29N. I have yet to start but hopefully I could finished it in time. I just need to look for an inflight refuelling probe or try to scratch built it. If no IR probe could be found or the scratch built is unsucessful, I'll just have to settle for the scheme just after delivery in 1995.
SmashedGlass
_VISITCOMMUNITY
Florida, United States
Joined: October 26, 2006
KitMaker: 105 posts
AeroScale: 62 posts
Posted: Thursday, September 15, 2011 - 05:20 PM UTC
PART V! For VICTORY!(?)

Small update, sorry for the wait (if anyone actually WAS waiting....)
but life got in the way for a bit.

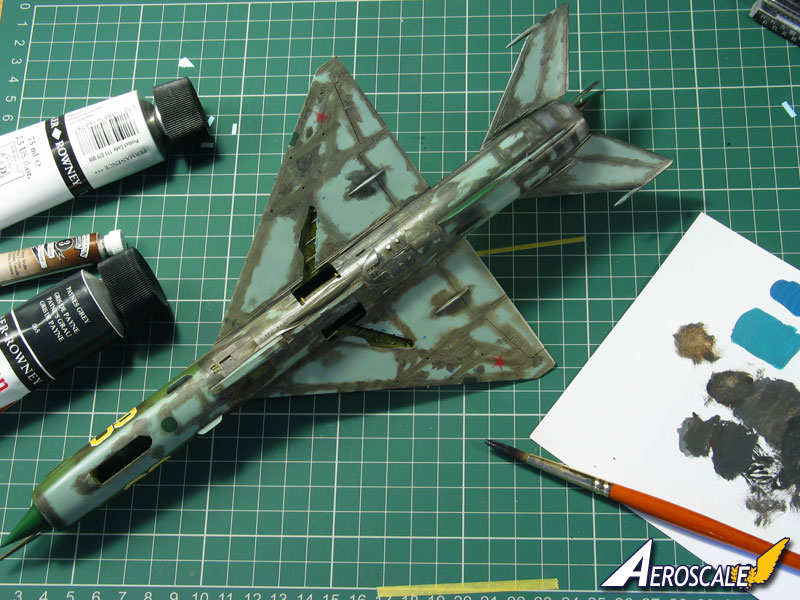
About all that has happened since the last post was one million billion rivets, and then the attachment of zee
tailplanes.


(sorry, PB saved it sideways like that; don't know how to rotate it from PB )

I was worried about them being overly visible later in the build, so I went ahead and gave the whole bird
a light sanding with some very very fine wet-or-dry. Now, I'm worried they may completely disappear under
primer + paint. We shall see; I may need to lightly go over some of them between the primer and the camo
layers. The rivets have been highlighted with an alcohol marker and then the excess removed with....
you guessed it, rubbing alcohol, in order to make them more visible for the pics.

If this works out, next time I may use a black alky marker and see if that will work as a sort of
'pre-shade' for zee rivets.

Until later this week (hopefully),
Tchűβ!
Buckeye198
_VISITCOMMUNITY
Ohio, United States
Joined: May 02, 2010
KitMaker: 596 posts
AeroScale: 197 posts
Posted: Thursday, September 15, 2011 - 06:59 PM UTC
Ooooooh...rivets... I tell you what, if those rivets pop out through the final camo, that will be a very impressive sight! Hope to see the final product soon! (Well I guess we don't have too much longer to see a final product, do we? )
SGTJKJ
#041
_VISITCOMMUNITY
Kobenhavn, Denmark
Joined: July 20, 2006
KitMaker: 10,069 posts
AeroScale: 3,788 posts
Posted: Friday, September 16, 2011 - 12:54 AM UTC
Impressive rivets, Eric. Looks great. Hope they will be visible after the paint.

Great freehand painting, Rowan!
oraora
_VISITCOMMUNITY
Kuching, Malaysia
Joined: June 19, 2002
KitMaker: 216 posts
AeroScale: 128 posts
Posted: Sunday, September 18, 2011 - 05:54 AM UTC
These are some of my in progress pics of my Italeri 1/72nd Mig-29A converted to a RMAF Mig-29N

The assembled plane


The scratch-built IR probe (not 100% accurate though)


Test fit of the IR Probe. The 3 small antennas infront of the windscreen and 2 small antennas below were later removed.


Airbrushed black panel lines and primary grey colour.


green camo airbrushed.


I'll try to complete it on time...
Red4
_VISITCOMMUNITY
California, United States
Joined: April 01, 2002
KitMaker: 4,287 posts
AeroScale: 1,164 posts
Posted: Monday, September 19, 2011 - 02:05 AM UTC
Looking good everybody. You got just shy of two week to finish....see you at the finish line. Don't forget to post a pic in the gallery too. Thanks, "Q"
alpha_tango
_VISITCOMMUNITY
Germany
Joined: September 07, 2005
KitMaker: 5,609 posts
AeroScale: 5,231 posts
Posted: Monday, September 19, 2011 - 04:59 AM UTC
Hi all

this is my MiG-21MF (1/48 Eduard) it is done, but I plan to add some armament later (I have kind of a burn out at the moment as I spent the whole past week finishing it for our IPMS Show in Berlin). Sadly one of the static dischargers got lost in transit


(sorry for the bad pic, I forgot my camera there and now had to take the picture with the mobile)

all the best

Steffen
Littorio
_VISITCOMMUNITY
England - South East, United Kingdom
Joined: September 15, 2004
KitMaker: 4,728 posts
AeroScale: 1,351 posts
Posted: Monday, September 19, 2011 - 04:26 PM UTC
Sorry guy's but mine will be a none finisher, only have one and half days left this month when I'm not working so the Mig will have to stay in its hanger for the time being. It'll be finished before the years out and I'll post a pic then, but no chance for the campaign.

Some great builds and it's been fun.
SmashedGlass
_VISITCOMMUNITY
Florida, United States
Joined: October 26, 2006
KitMaker: 105 posts
AeroScale: 62 posts
Posted: Wednesday, September 21, 2011 - 10:08 AM UTC
PART SIX! sExY SIX!

Well, would've made another post earlier, but a snafu took the wind out my sails for a bit, and I had assuage my hurt by.... hurting myself on an old Airfix kit lol.

Had her all sealed up and ready for spray; but while concocting the pilots rear view mirror atop the canopy, I realized......
I FORGOT TO ADD A FRIKKIN GUNSIGHT.
So after a few days of stewing (and bashing about on some other old plastic)
I came back and popped the canopy back off, luckily without damage to anything.

Here we have Monsieur Gunsight, as well as the wind deflector for the poor soul who occupies the back seat... Thought I may as well make that while I have the top off, even though pictures show these planes with OR without one.


And here is the rather innocuous little bit of plastic that is the mirror, what caused me to realize I had forgotten said little gunsight.


So she'll be getting sealed back up, possibly re-masked with Bare Metal Foil this time, and hopefully have primer on tomorrow morning.
Blueheeler
_VISITCOMMUNITY
New South Wales, Australia
Joined: March 18, 2008
KitMaker: 347 posts
AeroScale: 223 posts
Posted: Thursday, September 22, 2011 - 02:07 PM UTC
Completed.


Cheers,
Nick.
Buckeye198
_VISITCOMMUNITY
Ohio, United States
Joined: May 02, 2010
KitMaker: 596 posts
AeroScale: 197 posts
Posted: Thursday, September 22, 2011 - 05:31 PM UTC
Nice work! Looking forward to seeing every last MiG completed in a week...
Merlin
Staff MemberSenior Editor
AEROSCALE
#017
_VISITCOMMUNITY
United Kingdom
Joined: June 11, 2003
KitMaker: 17,582 posts
AeroScale: 12,795 posts
Posted: Friday, September 23, 2011 - 11:46 PM UTC
Hi again

Not much of an update other than one of those classic "Dohh!" moments...


Eduard mention painting the nose ring Dark Iron in the instructions, so I completely missed that it should be camouflaged for the colour scheme I've done! So - time for careful repaint later...

All the best

Rowan
doubtingthomas
_VISITCOMMUNITY
Wisconsin, United States
Joined: March 17, 2009
KitMaker: 156 posts
AeroScale: 153 posts
Posted: Saturday, September 24, 2011 - 08:16 AM UTC
Hello comrades-

> Lap Man, nice clean job on your MiG
> Erik, your UTI is going to look fantastic!
> Merlin - Ditto for your SMT. I'm the kind of bum that would just live with the intake ring color as-is (but then again, I'm also the kind of bum that would ruin mine trying to fix it)

My entry is in the gallery...
MPM 1:72 MiG-9 - the original operational jet-powered MiG. Hopefully you will find it an interesting comparison to all of its progeny in the gallery.

The kit is a dog, but I knew what I was getting into with a first-generation MPM kit, so I don't hold that against them. Much reworking was required for the exhaust area, in particular. I had to make an intake cover because the intake is primitive and I needed more space for nose weight. There was also the usual Dremel tool fun grinding down the inside so that the cockpit parts would fit.

Last photo was taken by Gerald (Hawkeye) Voigt:

Thanks for a good campaign - I'll be watching the rest of the finishes!

Regards-
Tom
Merlin
Staff MemberSenior Editor
AEROSCALE
#017
_VISITCOMMUNITY
United Kingdom
Joined: June 11, 2003
KitMaker: 17,582 posts
AeroScale: 12,795 posts
Posted: Saturday, September 24, 2011 - 10:44 PM UTC
Hi again

More of a proper update - the mucky bit! X8-


All messed up with nice dollop of oil paint gunge. The weathering could well be a bit overdone - I never can really tell quite what the result will be at this stage - but I'm aiming for a bit of a "cold-war weary" look.

All the best

Rowan
Buckeye198
_VISITCOMMUNITY
Ohio, United States
Joined: May 02, 2010
KitMaker: 596 posts
AeroScale: 197 posts
Posted: Sunday, September 25, 2011 - 05:11 AM UTC
Hey Rowan...I like what you're showing us! Now please no one roll your eyes at me, but what exactly are you doing to weather your bird? It looks pretty simple, but I've never done anything like it. Is there an article or a feature on the forums you could point me towards for help? Thanks in advance, and keep up the great work!