

Paul,
Your F6F-3 is really coming along quite well. I noticed when I looked at your wiring that each cylinder only has a single sparkplug wire. Not a big deal once the cowl is on.
I'm really looking forward to your wing folding conversion.
Joel
Air Campaigns
Want to start or join a group build? This is where to start.
Want to start or join a group build? This is where to start.
Hosted by Frederick Boucher, Michael Satin
OFFICIAL: Grumman Campaign
Joel_W

Joined: December 04, 2010
KitMaker: 11,666 posts
AeroScale: 7,410 posts
Posted: Friday, August 22, 2014 - 11:30 AM UTC


PeeJay74

#363
Joined: January 08, 2014
KitMaker: 425 posts
AeroScale: 401 posts

Posted: Friday, August 22, 2014 - 02:43 PM UTC
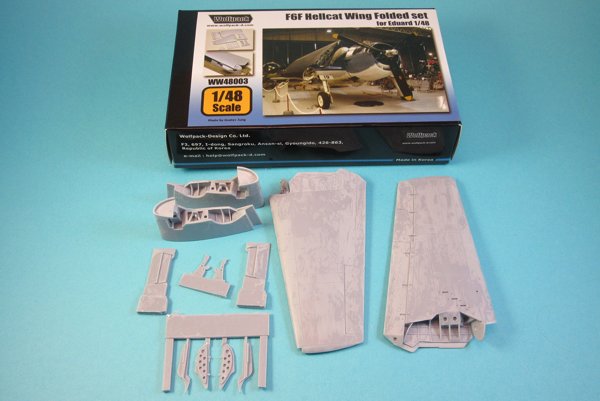
Resin wings all cleaned up. The resin is crisply detailed, but removing the pour stubs from the wingtips was a total pain. I had to use a razor saw to cut away the majority, then take a dremel to sand down the remainer, and finally wet sand with flex-i-files to shape them properly.
A note for anyone else who decides to get themselves a set by Wolfpack, the set is labeled as "F6F Hellcat wing folded set for Eduard 1/48". It should be labeled F6F-3, the panel lines do not match the F6F-5 kit. I guess you could re-scribe them if you really want an Eduard F6F-5 with folded wings.
Joel_W
Joined: December 04, 2010
KitMaker: 11,666 posts
AeroScale: 7,410 posts
Posted: Saturday, August 23, 2014 - 10:37 AM UTC
Paul,
Really an impressive start to your folding wings conversion. Those wing panels really look quite nice.
Joel
Really an impressive start to your folding wings conversion. Those wing panels really look quite nice.
Joel
Joel_W
Joined: December 04, 2010
KitMaker: 11,666 posts
AeroScale: 7,410 posts
Posted: Saturday, August 23, 2014 - 10:43 AM UTC
Ok guys,
I bit the bullet as those flaperons were really becoming an personal issue with me. So I decided to go ahead and cut off the mount brackets. Looked at the instructions again, and a lucky break, for the closed position you just cut them off and glue the flaperons to the wings. So I cut them off. Wasn't thrilled with the fit as they're not meant to be with the flaps in the down position, so I glued them carefully at a angle to the flap brackets. Will fill in with thick CA glue as the last step. Need to re-sand, polish, and re-paint some of the red. Here's what one side looks like.
Joel

Joel_W
Joined: December 04, 2010
KitMaker: 11,666 posts
AeroScale: 7,410 posts
Posted: Monday, August 25, 2014 - 07:10 AM UTC
Work has continued at my usual snail's pace, but I'm slowly getting there. Today's update is the finished base upper coat of FS36440 Lite Gull Gray, that is a mixture of Tamiya's FX-20 Medium Gray and FX-2 Flat White. The consensus of opinion is a 1:1 mix, but from previous experience I found that color to be way too light. Instead I use a 10:1 mix for the base coat.


I've been tracking my Sprue Brother's order, and it should be arriving today. I ordered Mr. Color's Tan for the radar nose, then I'll do the black framing around the windshield. That should bring me up to glossing for decaling once I finish all the gear doors and both cockpit ladders.
Joel


I've been tracking my Sprue Brother's order, and it should be arriving today. I ordered Mr. Color's Tan for the radar nose, then I'll do the black framing around the windshield. That should bring me up to glossing for decaling once I finish all the gear doors and both cockpit ladders.
Joel

b17-peter
#392

Joined: January 09, 2013
KitMaker: 696 posts
AeroScale: 608 posts

Posted: Tuesday, August 26, 2014 - 08:07 AM UTC
Hi everybody,
the latest developments on my Hawkeye...

Cheers Peter
Peter
the latest developments on my Hawkeye...
Cheers
PeterJoel_W
Joined: December 04, 2010
KitMaker: 11,666 posts
AeroScale: 7,410 posts
Posted: Wednesday, August 27, 2014 - 01:02 AM UTC
Peter,
Your Hawkeye is really looking good. That's some gloos finish you applied. What did you use, and how did you apply it?
Joel
Your Hawkeye is really looking good. That's some gloos finish you applied. What did you use, and how did you apply it?
Joel
b17-peter
#392
Joined: January 09, 2013
KitMaker: 696 posts
AeroScale: 608 posts
Posted: Thursday, August 28, 2014 - 08:34 AM UTC
Hi Joel,
thx a lot, it's going well indeed. The color is just Gunze's 315 (FS 16440). This evening I added another bunch of decals.
Cheers Pete
thx a lot, it's going well indeed. The color is just Gunze's 315 (FS 16440). This evening I added another bunch of decals.
Cheers Pete
Joel_W
Joined: December 04, 2010
KitMaker: 11,666 posts
AeroScale: 7,410 posts
Posted: Saturday, August 30, 2014 - 02:04 AM UTC
Just updated my build thread in the Cold War Forum. I finished painting the radome, wing and fuselage walks, flaps/flaperons, slats, and the anti glare panel. Here's the link:
A-6E

A-6E


Nito74

Joined: March 04, 2008
KitMaker: 5,386 posts
AeroScale: 635 posts
Posted: Saturday, August 30, 2014 - 07:45 AM UTC
Update

b17-peter
#392
Joined: January 09, 2013
KitMaker: 696 posts
AeroScale: 608 posts
Posted: Saturday, August 30, 2014 - 10:49 AM UTC
Hi,
here's the latest update on my Grumman Hawkeye. Forgot to paint three windows on the starboard side, so I'll still have a little fun
Then the radome and landing gear doors...and of course the props. As I use the 8-blade-airscrews, I only had decals for the frontside of the propellertips. The backside I must paint...
Otherwise the building went straightforward so far without any fitting issues. Great little kit

Cheers everybody
Pete
here's the latest update on my Grumman Hawkeye. Forgot to paint three windows on the starboard side, so I'll still have a little fun
Then the radome and landing gear doors...and of course the props. As I use the 8-blade-airscrews, I only had decals for the frontside of the propellertips. The backside I must paint...
Otherwise the building went straightforward so far without any fitting issues. Great little kit
Cheers everybody
Pete
PeeJay74
#363
Joined: January 08, 2014
KitMaker: 425 posts
AeroScale: 401 posts
Posted: Saturday, August 30, 2014 - 02:40 PM UTC
1/48 Eduard F6F-3 + Wolfpack wing fold
I did the majority of the priming today and started adding the wings. The fit of the resin wing roots to fuselage isn't as perfect as the Eduard plastic wings, but it wasn't anything a little thick CA in the gaps couldn't fix. The landing gear is a perfect fit, and extremely sturdy. Wolfpack made sure the legs have multiple solid points of contact with the wings. It is as well designed as the original Eduard parts. I am giving it an overnight to let the CA cure in the wing roots. The fit of the gear is so good I only bothered to press fit mine until I'm completely ready to paint.
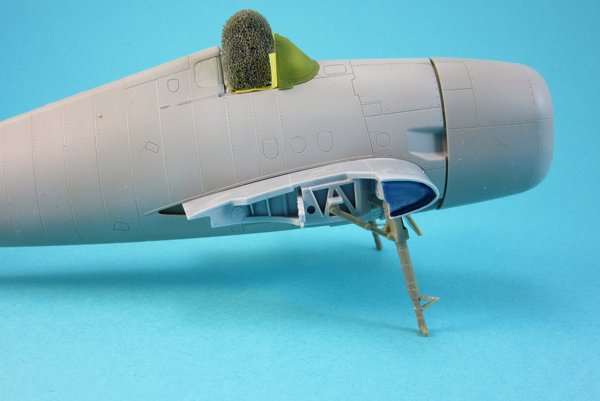
I am pretty much done with the major construction steps at this point. I will add the main wings at the very end to make painting/weathering easier.
I did the majority of the priming today and started adding the wings. The fit of the resin wing roots to fuselage isn't as perfect as the Eduard plastic wings, but it wasn't anything a little thick CA in the gaps couldn't fix. The landing gear is a perfect fit, and extremely sturdy. Wolfpack made sure the legs have multiple solid points of contact with the wings. It is as well designed as the original Eduard parts. I am giving it an overnight to let the CA cure in the wing roots. The fit of the gear is so good I only bothered to press fit mine until I'm completely ready to paint.
I am pretty much done with the major construction steps at this point. I will add the main wings at the very end to make painting/weathering easier.

scribbles101

Joined: May 25, 2013
KitMaker: 137 posts
AeroScale: 103 posts
Posted: Saturday, August 30, 2014 - 10:44 PM UTC
Ok, so I finally got the rigging done - it is not perfect but it is close enough to real thing, getting the thread to keep its tension was a real plain but I feel that the result was worth the work

Also, hellbent - in response to your question, (I know, took a while ) I used Humbrol 11 for the silver, 15 for the blue and 19 for the red, all brushed straight on over white plastikote primer applied from a rattle can.
Just the decals to go now, pics of the finished product coming soon
cheers
Also, hellbent - in response to your question, (I know, took a while
) I used Humbrol 11 for the silver, 15 for the blue and 19 for the red, all brushed straight on over white plastikote primer applied from a rattle can. Just the decals to go now, pics of the finished product coming soon
cheers
Joel_W
Joined: December 04, 2010
KitMaker: 11,666 posts
AeroScale: 7,410 posts
Posted: Sunday, August 31, 2014 - 01:22 AM UTC
Peter,
Your Hawkeye is looking great. Looking forward to seeing your finished update pictures.
Paul,
I'm really impressed at the quality and fit of those resin AM parts. If the outer wing panels fit anywhere as precisely as the wing/body section, it should be a walk in the park for you.
Simon,
Very nicely done, as you're in the home stretch now. As far as the rigging goes, Jessica did a small tutorial on rigging with EZ line, home made fittings, that would have made your efforts so much easier.
Joel

goodn8
Joined: October 12, 2008
KitMaker: 709 posts
AeroScale: 651 posts
Posted: Sunday, August 31, 2014 - 02:20 AM UTC
Peter: You are fast and the Hawkeye turns out to be a nice one  It's really a "great" kit - mine is still waitig for progress...
Joel: Your A-6E developed to a real beauty so far with the different colours, the flaps and the walks P.S. very much like your display/mounting stand
Simon: What a colourful ugly bird - well done painting and rigging!
Paul: Very nice detailed, looking foreward to see the folded wings attached. P.S. seen your Eleanor - looks great!
I'm sanding and painting the wheels - but not on my Hawkeye, as real life (and german officials) force me to change my very worn tires on my real car.
It's really a "great" kit - mine is still waitig for progress... Joel: Your A-6E developed to a real beauty so far with the different colours, the flaps and the walks
P.S. very much like your display/mounting stand Simon: What a colourful ugly bird - well done painting and rigging!
Paul: Very nice detailed, looking foreward to see the folded wings attached. P.S. seen your Eleanor - looks great!
I'm sanding and painting the wheels - but not on my Hawkeye, as real life (and german officials) force me to change my very worn tires on my real car.


tinbanger

Joined: February 04, 2008
KitMaker: 2,507 posts
AeroScale: 1,814 posts

Posted: Sunday, August 31, 2014 - 06:54 AM UTC
Here is an update on my F6F-5:-

I was away for work related training this past week so worked on the AC in the hotel room at night, first time I have done this in a hotel room!
I was away for work related training this past week so worked on the AC in the hotel room at night, first time I have done this in a hotel room!
PeeJay74
#363
Joined: January 08, 2014
KitMaker: 425 posts
AeroScale: 401 posts
Posted: Sunday, August 31, 2014 - 07:35 AM UTC
Looking good Richard. Out of curiosity, did the seam line along the belly give you any trouble? I'm going to have to sand mine down and clean it up. It's showing a shadow through the primer.
tinbanger
Joined: February 04, 2008
KitMaker: 2,507 posts
AeroScale: 1,814 posts
Posted: Sunday, August 31, 2014 - 07:57 AM UTC
Quoted Text
Looking good Richard. Out of curiosity, did the seam line along the belly give you any trouble? I'm going to have to sand mine down and clean it up. It's showing a shadow through the primer.
Hi Paul.
Here is a photo I just took of my model, I have not done any clean up yet:-

How dose this compare to yours?
PeeJay74
#363
Joined: January 08, 2014
KitMaker: 425 posts
AeroScale: 401 posts
Posted: Sunday, August 31, 2014 - 12:16 PM UTC
It looks about the same, maybe a little better then mine was. I should have spent more time on it I guess. I'm going to sand it down tomorrow and re-prime it.
scribbles101
Joined: May 25, 2013
KitMaker: 137 posts
AeroScale: 103 posts
Posted: Sunday, August 31, 2014 - 10:56 PM UTC
Joel, thanks for telling me about the rigging tutorial, I really should have looked around for something like that before I started on the rigging....oh well, what's done is done
Anyway, here are some pictures of the finished product:


So there it is, one little duck to add to the campaign gallery! Some of you may have noticed that the wing floats were altered after I finished painting the model and before I did the rigging, this is because I realised that I had had a small brain fart and stuck them on the wrong wings, just had the very carefully remove them and swap them over. I meant to put that in the last update but hey I have the memory of a goldfish
Overall, this little kit is not too bad, the moulds are starting to show their age and there are some serious flash problems on some of the parts but with a little work all the parts can be made to fit quite nicely and the end result looks pretty good.
Any way, your builds are all looking really fantastic and I will continue to follow this campaign with interest, looking forward to seeing the end result of all these builds!
cheers!
Anyway, here are some pictures of the finished product:
So there it is, one little duck to add to the campaign gallery! Some of you may have noticed that the wing floats were altered after I finished painting the model and before I did the rigging, this is because I realised that I had had a small brain fart and stuck them on the wrong wings, just had the very carefully remove them and swap them over. I meant to put that in the last update but hey I have the memory of a goldfish
Overall, this little kit is not too bad, the moulds are starting to show their age and there are some serious flash problems on some of the parts but with a little work all the parts can be made to fit quite nicely and the end result looks pretty good.
Any way, your builds are all looking really fantastic and I will continue to follow this campaign with interest, looking forward to seeing the end result of all these builds!
cheers!
Joel_W
Joined: December 04, 2010
KitMaker: 11,666 posts
AeroScale: 7,410 posts
Posted: Monday, September 01, 2014 - 01:16 AM UTC
Simon,
Congratulations on finishing your Duck. A very sound OOB build.
I just checked and there is indeed a Grumman Campaign gallery up and running, so please post the min of two pictures to qualify for your ribbon.
With so much time left in the campaign, will you be building another Grumman aircraft? Either way, I hope that you continue to be active in this thread.
Joel
Joel_W
Joined: December 04, 2010
KitMaker: 11,666 posts
AeroScale: 7,410 posts
Posted: Monday, September 01, 2014 - 01:21 AM UTC
Paul,
If you're using liquid glue ( use Extra Thin), I've found that it does cause a slight trench along seam lines, that often require additional work to full remove the seam. I like to use thinned Green stuff as it's very easy to work into those shallow seams, and feathers out very well. I seal it with GS Mr. Primer Sealer 1,000.
Joel
MichaelSatin

Joined: January 19, 2008
KitMaker: 3,909 posts
AeroScale: 2,904 posts
Posted: Monday, September 01, 2014 - 01:48 AM UTC
Very nice work out there!
For everyone's information, here's a link to the gallery. You need to post photos of your completed build there to qualify for a ribbon.
Michael
For everyone's information, here's a link to the gallery. You need to post photos of your completed build there to qualify for a ribbon.
Michael
Joel_W
Joined: December 04, 2010
KitMaker: 11,666 posts
AeroScale: 7,410 posts
Posted: Monday, September 01, 2014 - 01:56 AM UTC
Quoted Text
Very nice work out there!
For everyone's information, here's a link to the gallery. You need to post photos of your completed build there to qualify for a ribbon.
Michael
Michael,
Thanks for the link to the gallery. I'm sure that it will be a big help for those not use navigating it, as the gallery is a rather complex site.
Joel
PeeJay74
#363
Joined: January 08, 2014
KitMaker: 425 posts
AeroScale: 401 posts
Posted: Monday, September 01, 2014 - 05:04 AM UTC
Quoted Text
If you're using liquid glue ( use Extra Thin), I've found that it does cause a slight trench along seam lines, that often require additional work to full remove the seam.
I am using a Tenax clone lately. I think my error was I didn't take more time cleaning it up properly after I joined the fuselage. I brushed some Mr. Surfacer 500 on the line and sanded it down after it dried, trying to speed along to priming. I should have sanded more and relied on Mr. Surfacer less.
I took a Flex-i-file to it today and reworked the entire bottom, the seam is completely gone now. I did take out some of the rivet detail along the centerline but not much I could do to avoid that. Re-scribing is an art form, but I am soldiering through my screw up and replacing some of the more important detail.
 |

WEB HOSTING BY


Copyright ©2021 AeroScale and Kitmaker Network, a subsidiary of Silver Star Enterprises
All Rights Reserved. Please read our Conditions of Use and Privacy Policy.
All Rights Reserved. Please read our Conditions of Use and Privacy Policy.