

Eetu,
Some nice handiwork there!
Gaz
Air Campaigns
Want to start or join a group build? This is where to start.
Want to start or join a group build? This is where to start.
Hosted by Frederick Boucher, Michael Satin
OFFICIAL: Dive Bomber Campaign

GazzaS

#424

Joined: April 23, 2015
KitMaker: 4,648 posts
AeroScale: 1,938 posts

Posted: Wednesday, August 17, 2016 - 10:29 AM UTC
SGTJKJ

#041

Joined: July 20, 2006
KitMaker: 10,069 posts
AeroScale: 3,788 posts

Posted: Wednesday, August 17, 2016 - 07:06 PM UTC
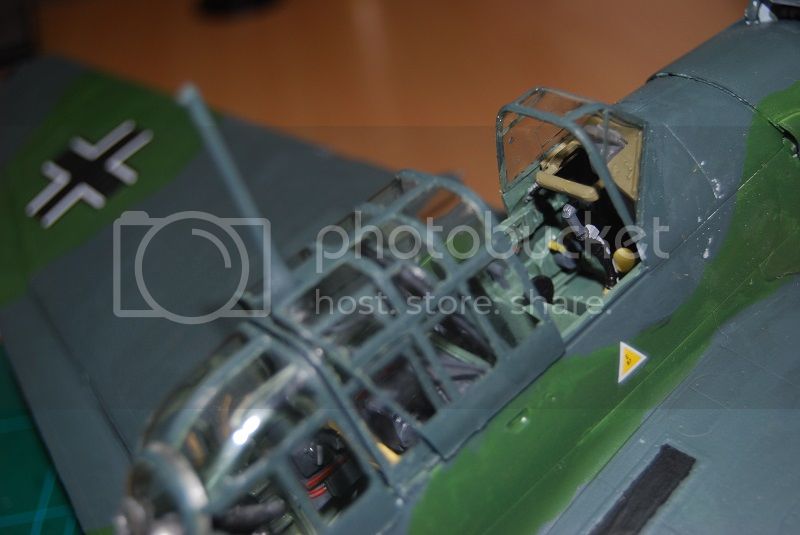
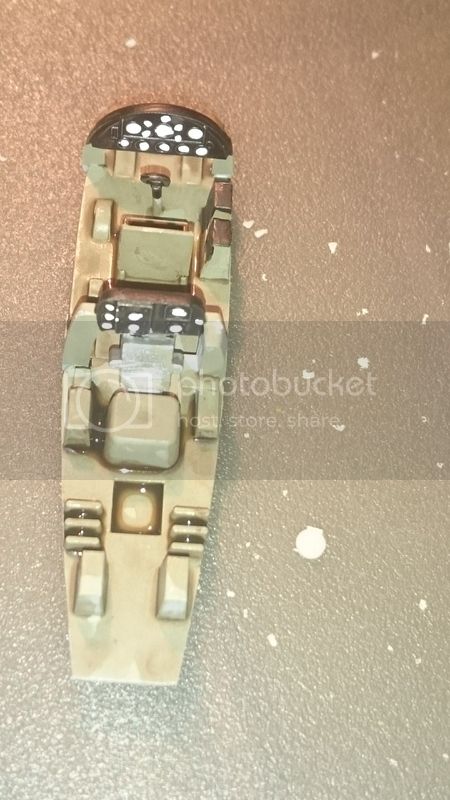
Very nice work, Eetu! You have picked up the speed on this build. Really nice cockpit.
Looking forward to see more
Looking forward to see more


Emeritus

Joined: March 30, 2004
KitMaker: 2,845 posts
AeroScale: 1,564 posts

Posted: Thursday, August 18, 2016 - 05:10 AM UTC
Thanks! Good to hear you're liking it so far.
And yeah, picking up the pace is pretty much a must now if I'm to get this one done before the campaign's end.
And yeah, picking up the pace is pretty much a must now if I'm to get this one done before the campaign's end.

c4willy
#305

Joined: February 01, 2006
KitMaker: 1,673 posts
AeroScale: 1,517 posts

Posted: Friday, August 19, 2016 - 02:58 PM UTC
Eetu awesome work as per usual! Look forward to seeing the next steps in your build.
Emeritus
Joined: March 30, 2004
KitMaker: 2,845 posts
AeroScale: 1,564 posts
Posted: Saturday, August 20, 2016 - 02:25 AM UTC
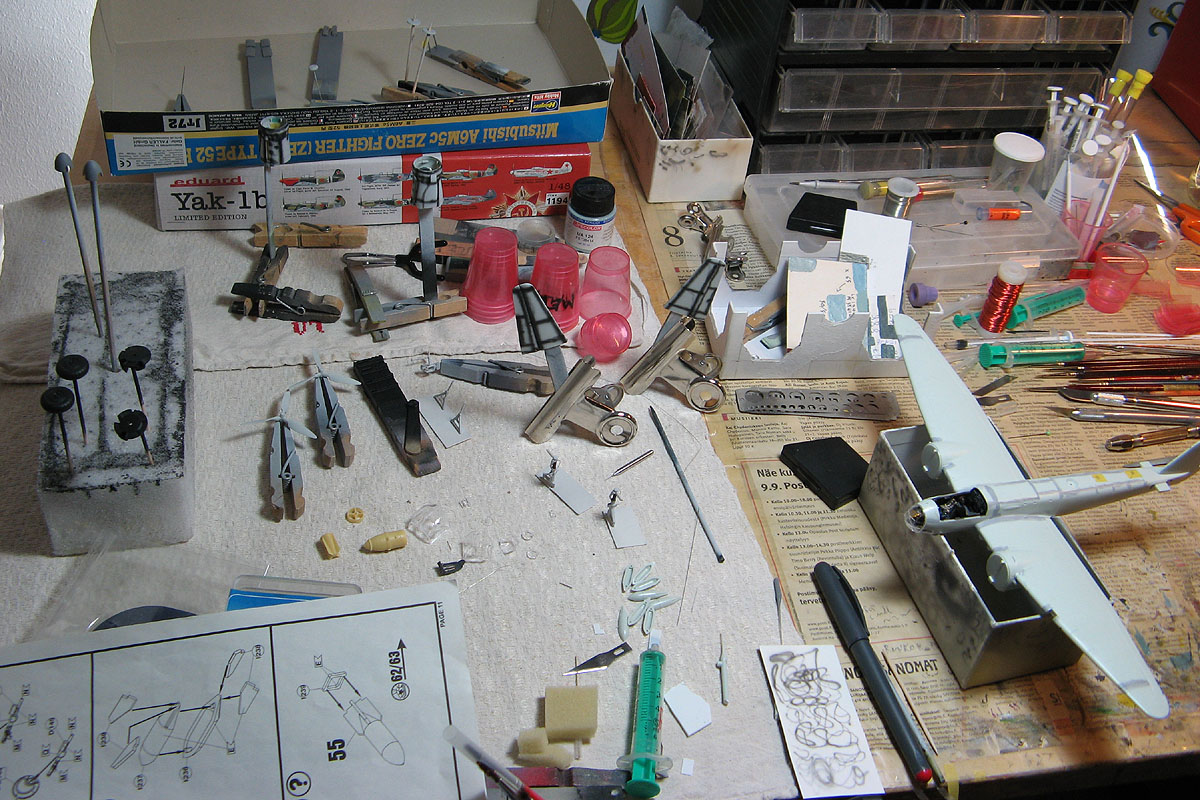
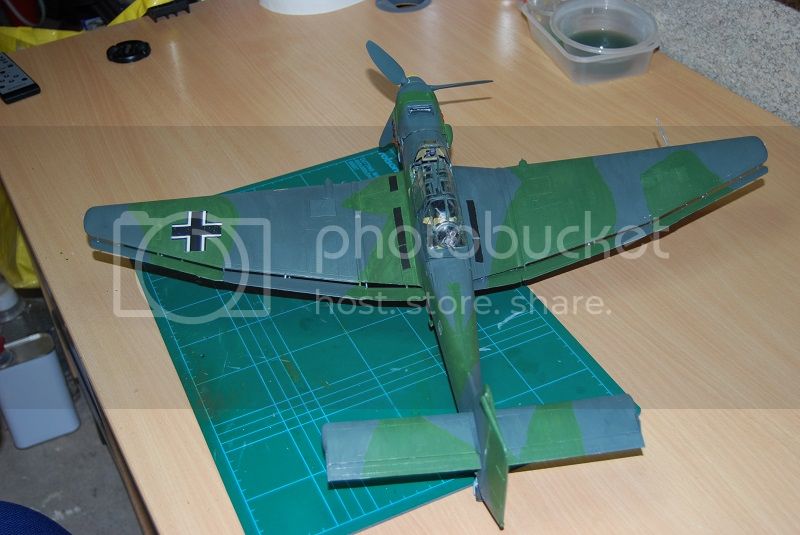
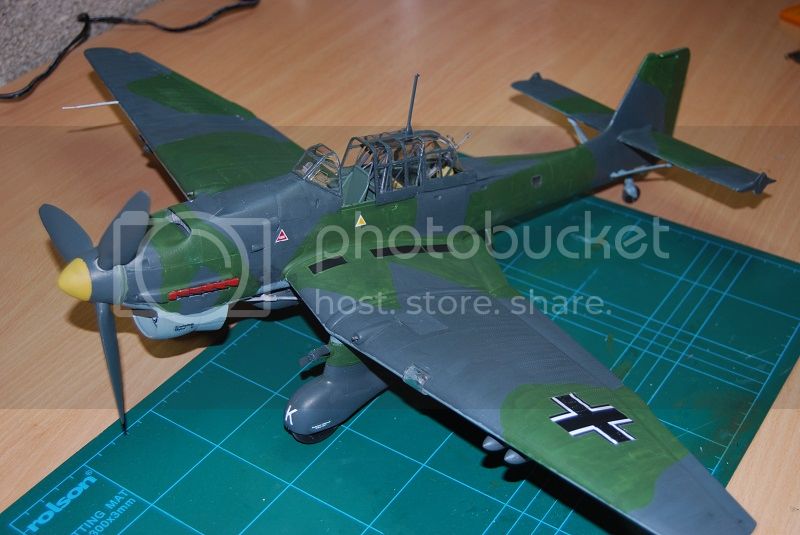
Update time. Getting pretty close to priming stage soon.
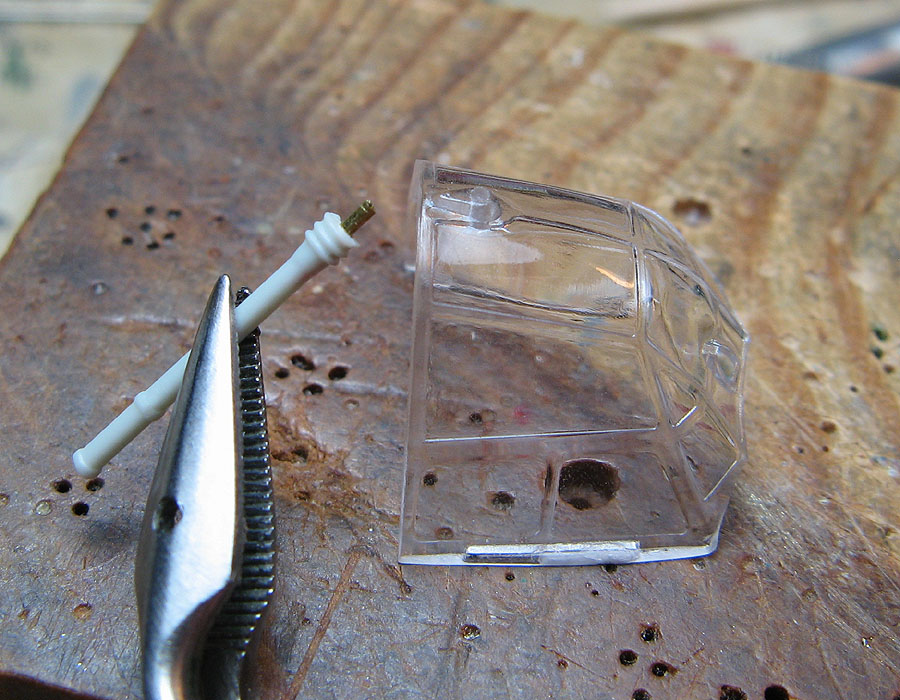
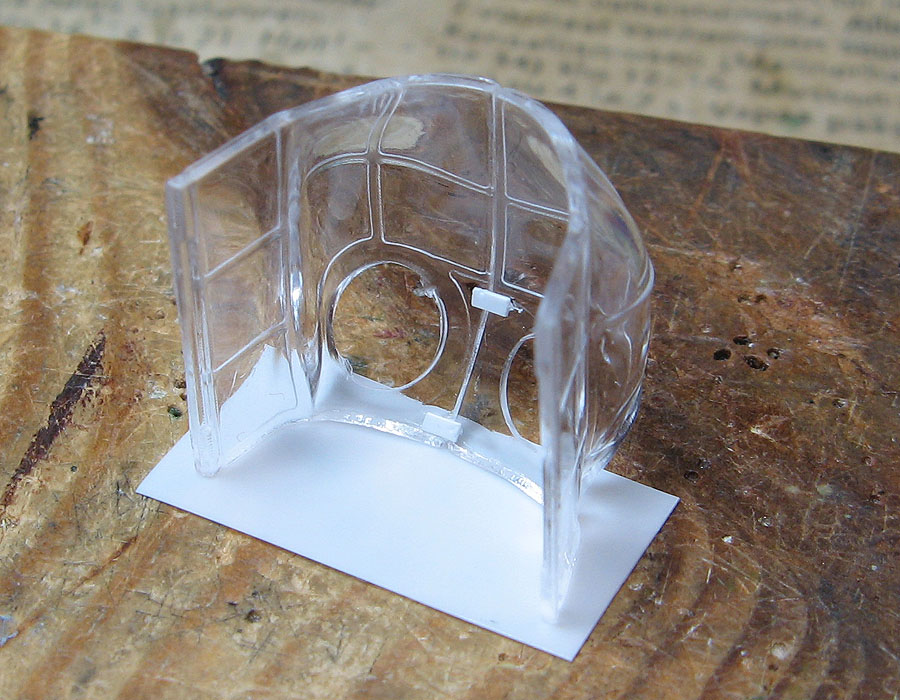
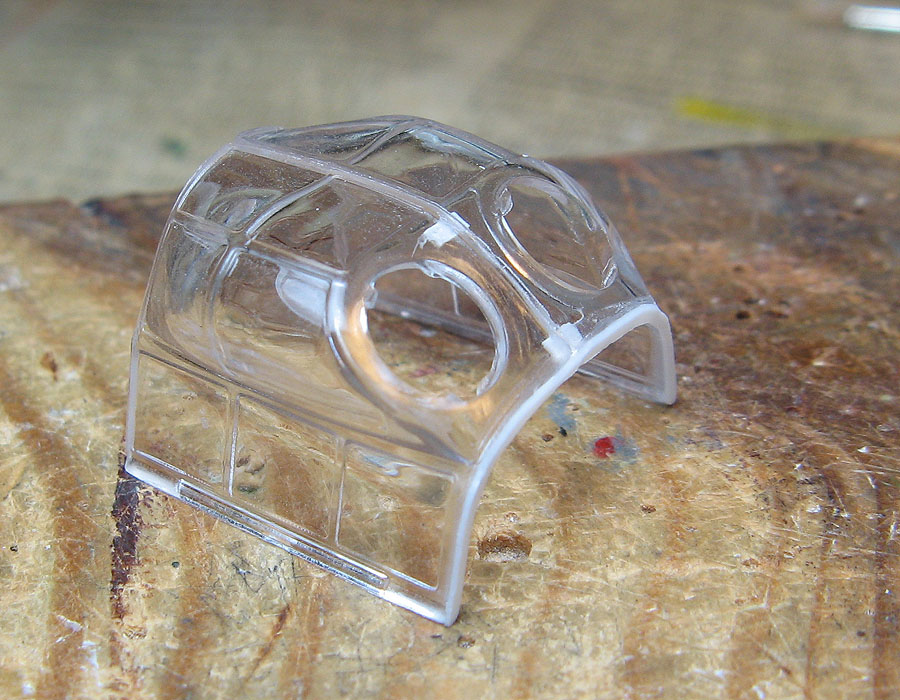
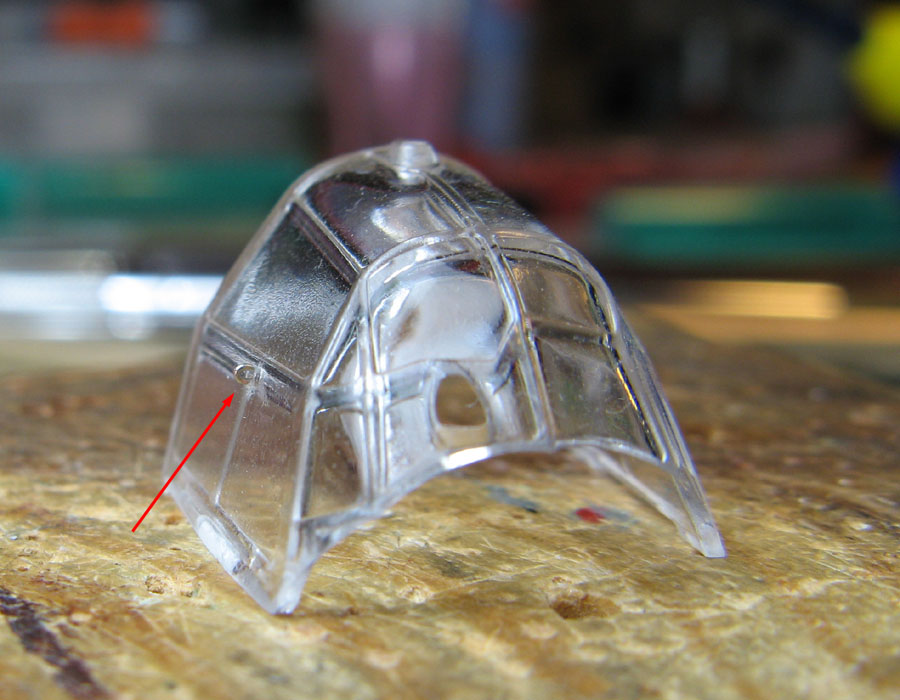
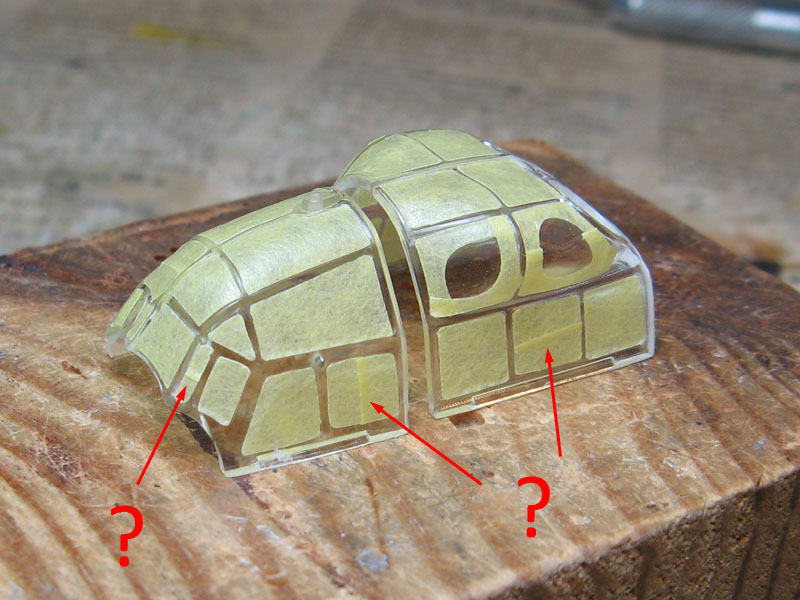
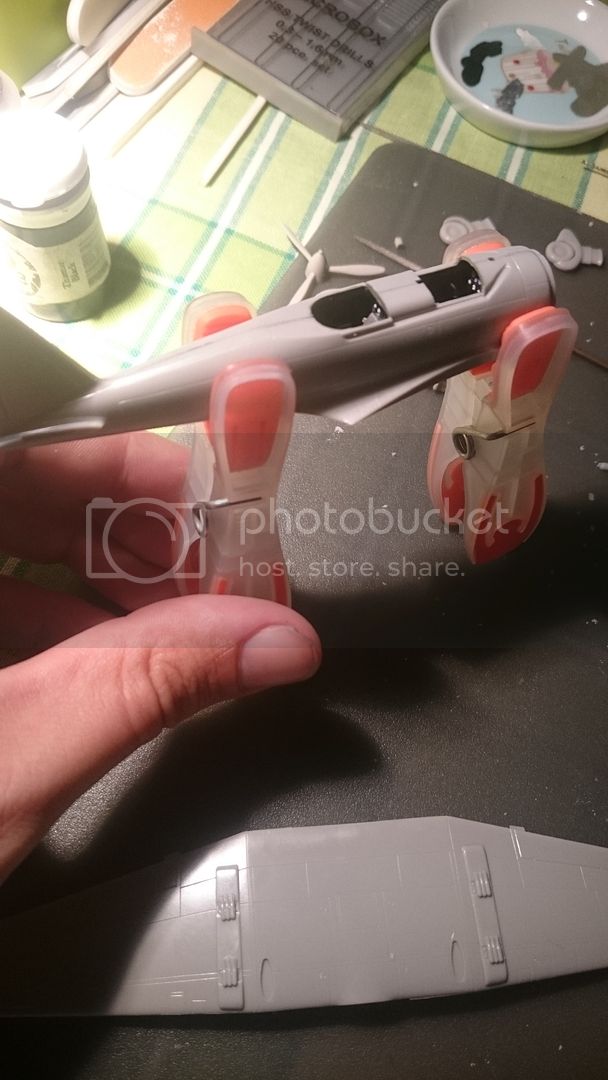
I started working on the transparencies.
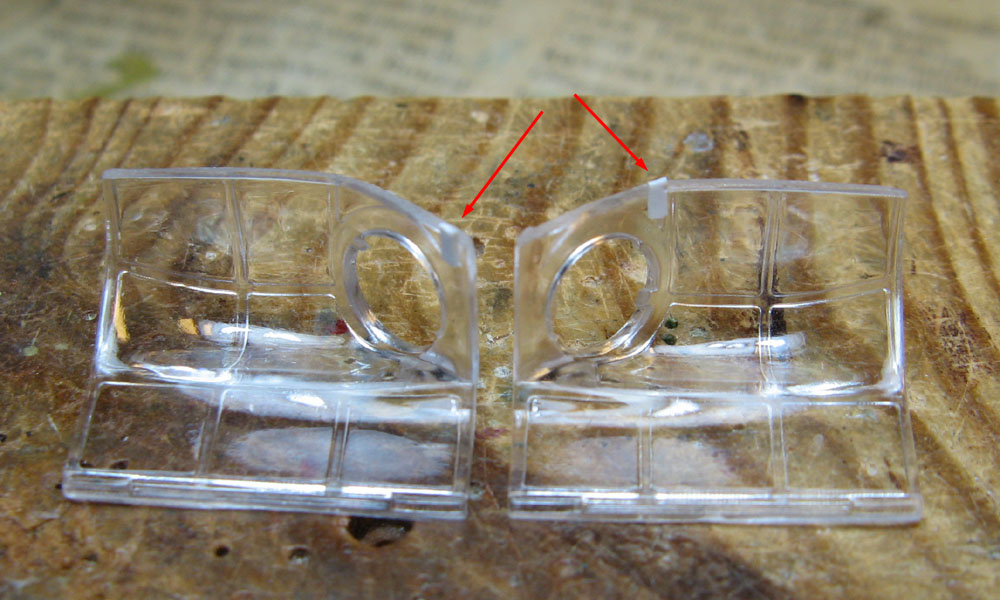
The rear part of the canopy comes molded in two halves due to the bulges. There was no locators on the middle seam, so I glued in pieces of styrene sheet. Hopefully those won't be too visible on the finished model.
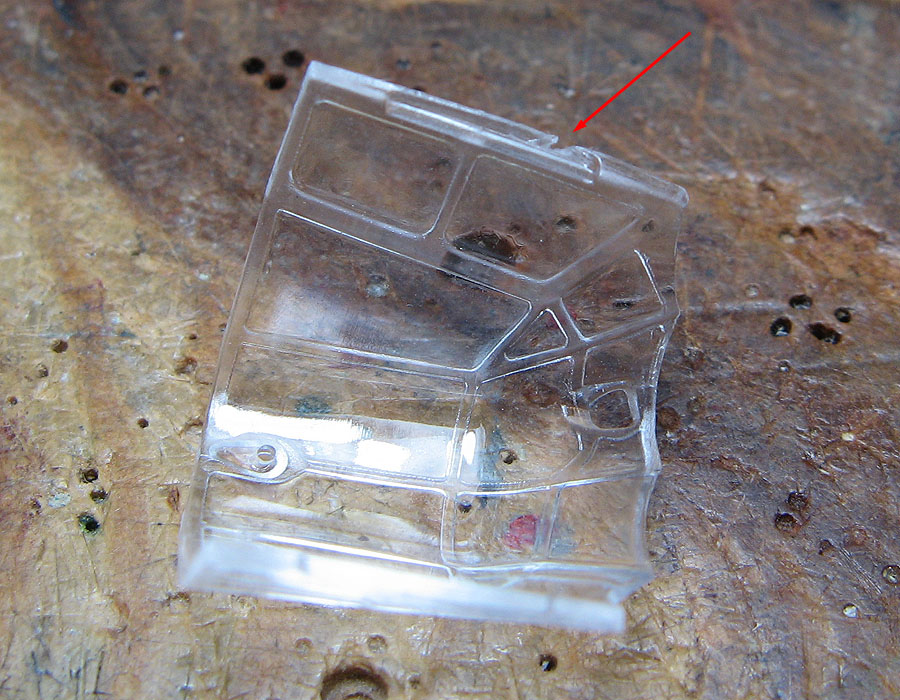
Both the rear and front pieces have locators along the bottom edge, and the ones on both sides of the front canopy piece are right where the sprue gates connect to the part. I wasn't 100% careful when cutting it off and managed to damage the other side. Oh well, nothing that a little styrene strip won't fix.
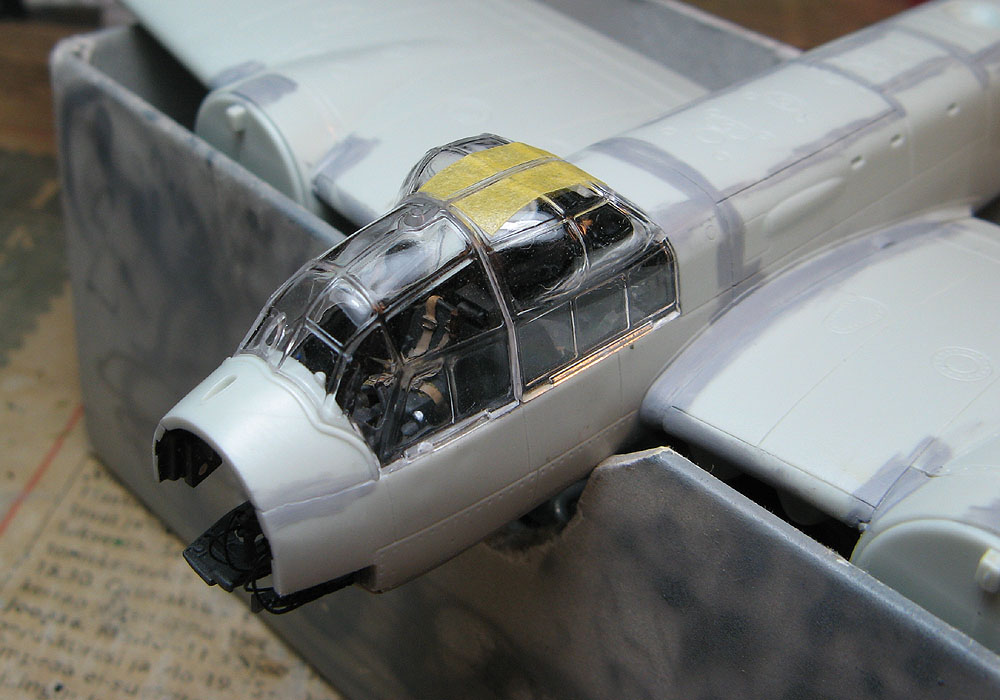
Canopy being test fitted. Everything seems OK. (and yes, if you're wondering about the pilot's seat, it's indeed missing - I managed to knock it off while handling the model, it'll glued back in before gluing the canopy in place)
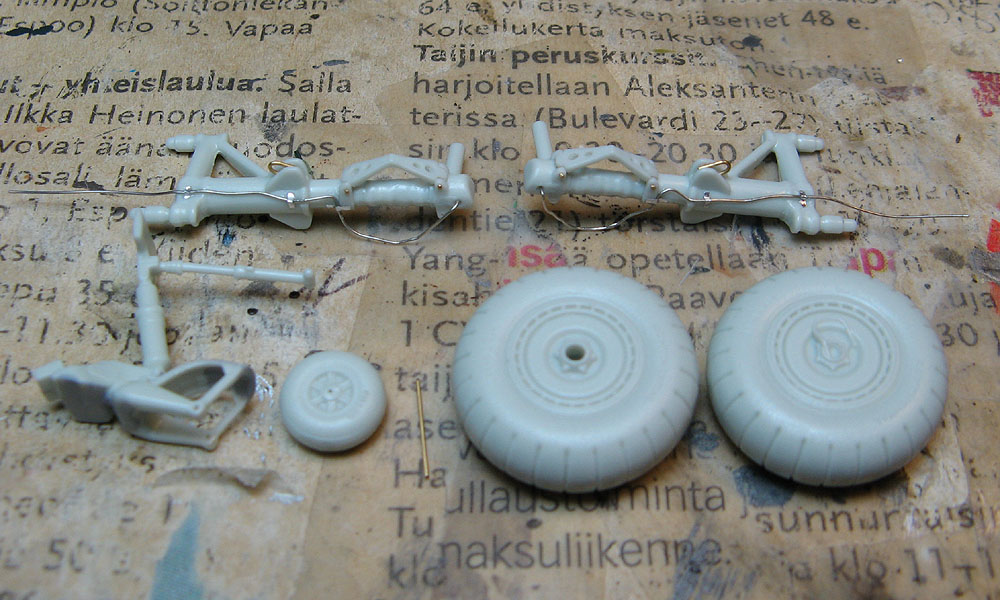
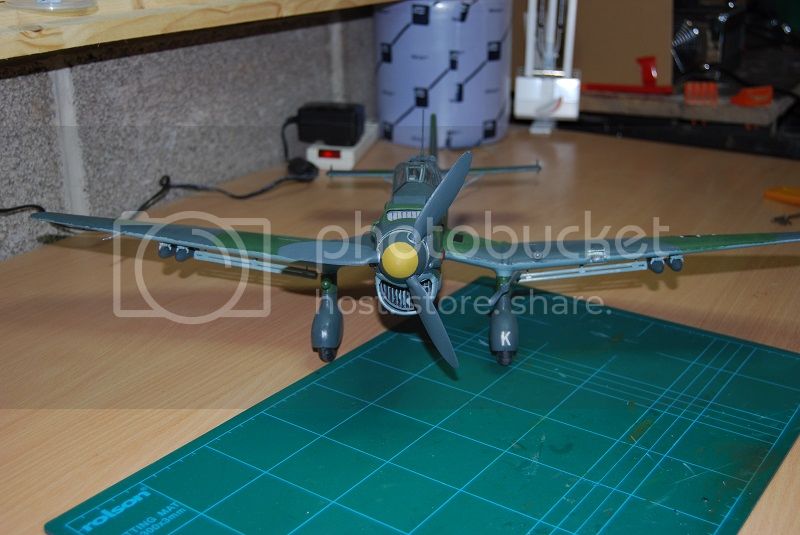
Undercarriage done and ready for priming. The tail gear built to allow the wheel to be attached later, as described in my earlier post. I detailed the main landing gear by adding brake lines and their mounting clips (made from thin aluminum sheet), drilling lightening holes in the oleo scissors, adding brass wire pins to the oleo hinges, and making towing mounts from brass wire. A special mention must go to the wheels, which are some of the nicest kit-supplied wheels I've seen.
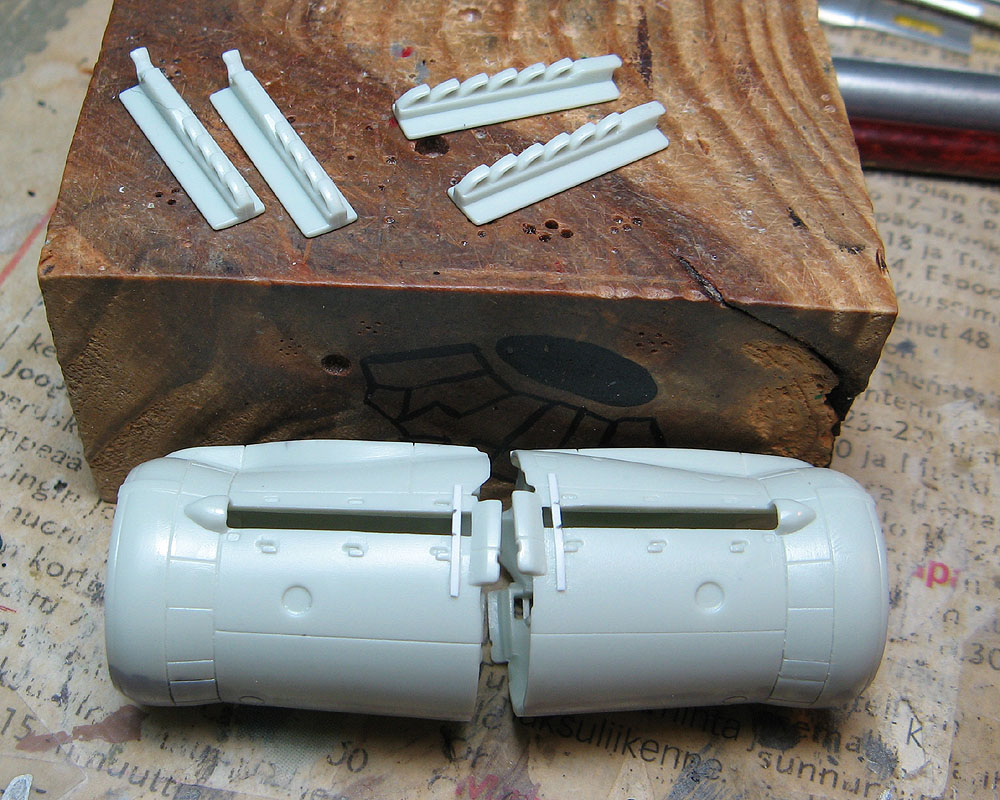
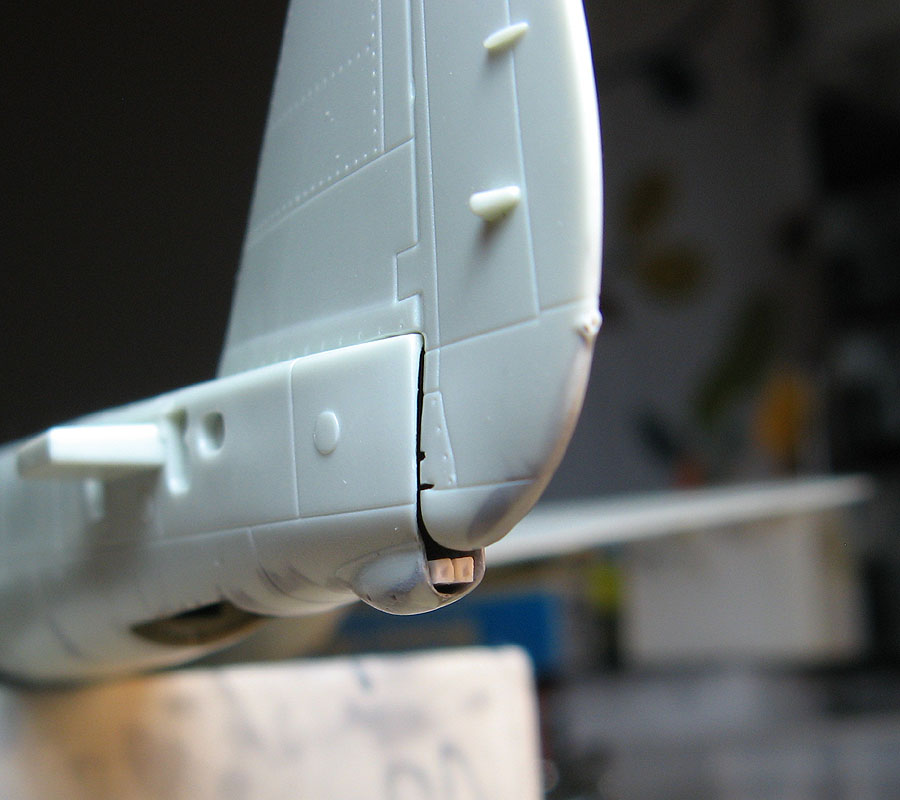
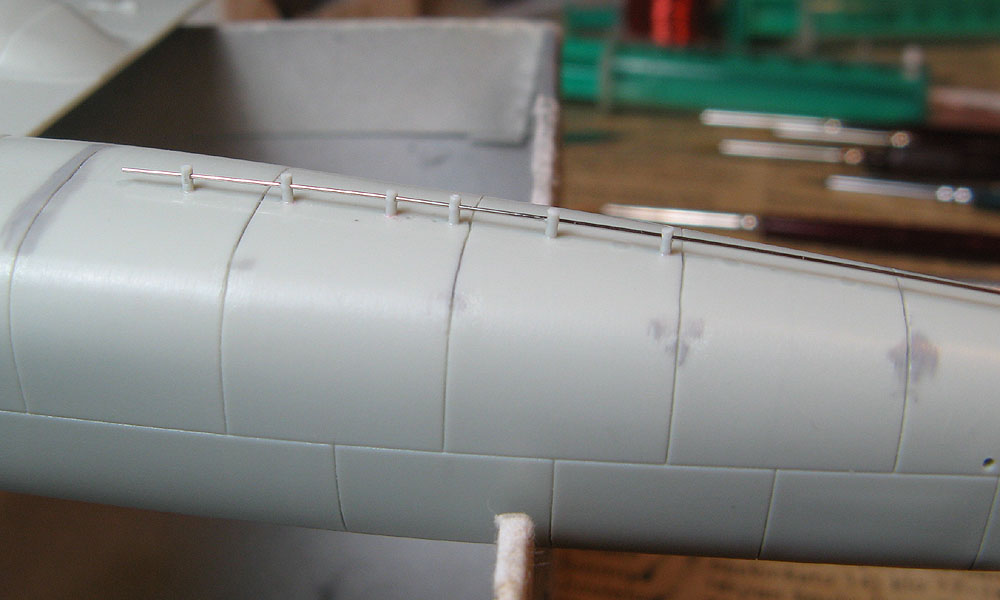
Moving back to the engine nacelles, I replaced the pieces going over the exhaust slots (who knows what those are for?) with styrene strip. Ends moulded to the nacelles, middle part to the exhaust = not looking that convincing.
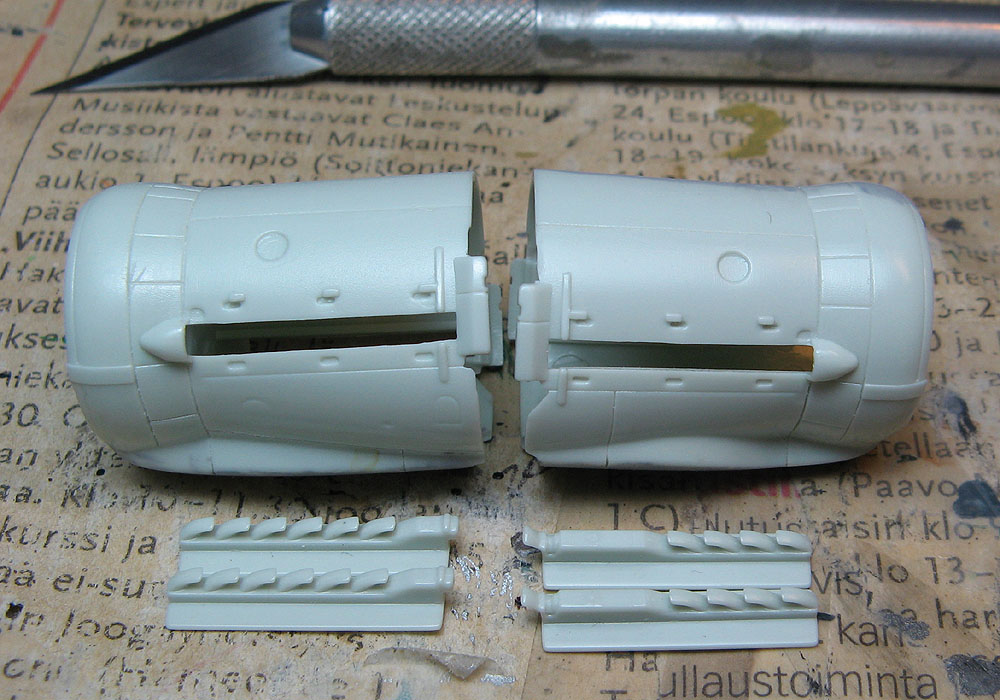
Much better!
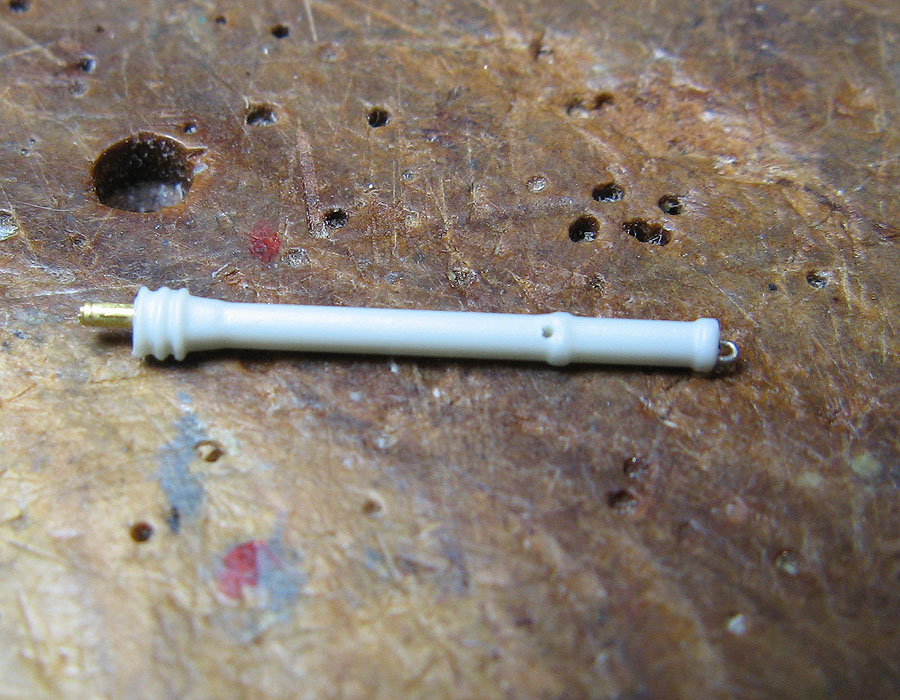
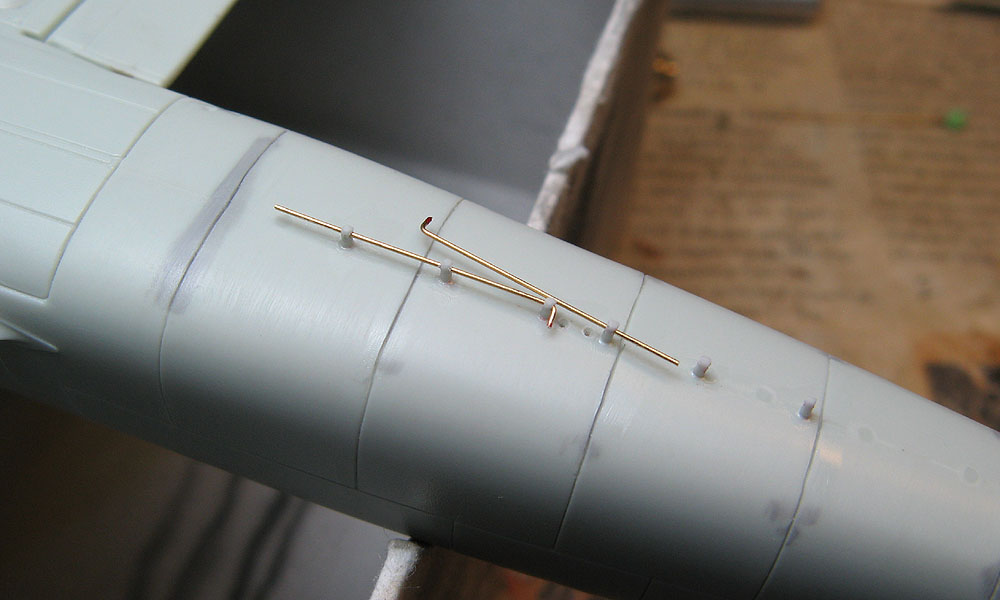
The thin mounting pin on the antenna mast didn't look like it would be good for much else than acting as a locator.
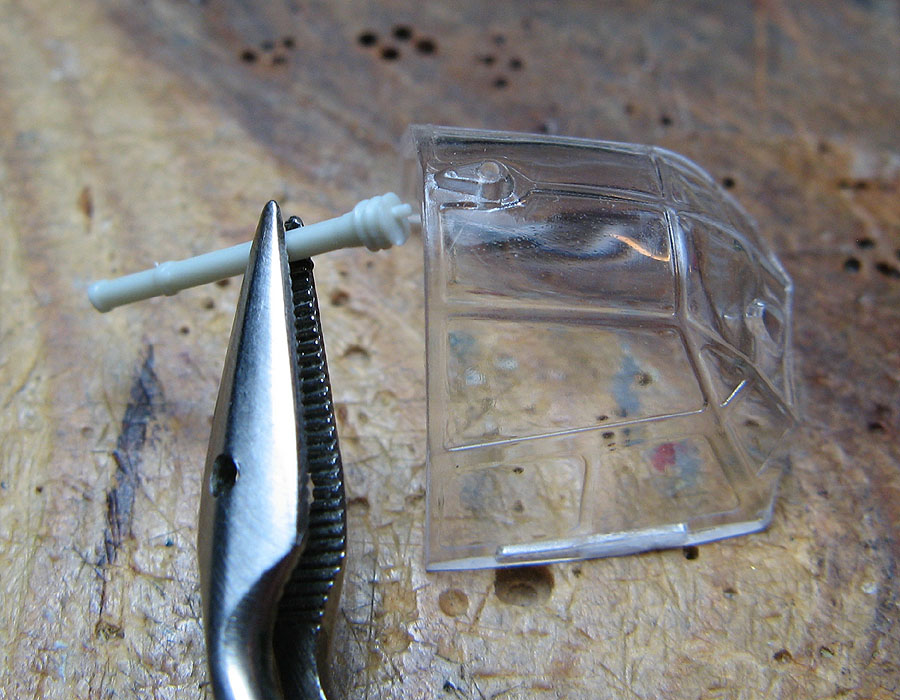
So the obvious thing to do was to replace it with something sturdier. To make sure it wouldn't be breaking, I used a combination of 0.3mm steel wire and 0.6mm brass tube to make a telescoping mounting pin. The brass tube goes into the wider base part of the antenna, while the steel wire inside it goes a bit further into the main part of the antenna.

I started working on the transparencies.
The rear part of the canopy comes molded in two halves due to the bulges. There was no locators on the middle seam, so I glued in pieces of styrene sheet. Hopefully those won't be too visible on the finished model.
Both the rear and front pieces have locators along the bottom edge, and the ones on both sides of the front canopy piece are right where the sprue gates connect to the part. I wasn't 100% careful when cutting it off and managed to damage the other side. Oh well, nothing that a little styrene strip won't fix.
Canopy being test fitted. Everything seems OK. (and yes, if you're wondering about the pilot's seat, it's indeed missing - I managed to knock it off while handling the model, it'll glued back in before gluing the canopy in place)
Undercarriage done and ready for priming. The tail gear built to allow the wheel to be attached later, as described in my earlier post. I detailed the main landing gear by adding brake lines and their mounting clips (made from thin aluminum sheet), drilling lightening holes in the oleo scissors, adding brass wire pins to the oleo hinges, and making towing mounts from brass wire. A special mention must go to the wheels, which are some of the nicest kit-supplied wheels I've seen.
Moving back to the engine nacelles, I replaced the pieces going over the exhaust slots (who knows what those are for?) with styrene strip. Ends moulded to the nacelles, middle part to the exhaust = not looking that convincing.
Much better!
The thin mounting pin on the antenna mast didn't look like it would be good for much else than acting as a locator.
So the obvious thing to do was to replace it with something sturdier. To make sure it wouldn't be breaking, I used a combination of 0.3mm steel wire and 0.6mm brass tube to make a telescoping mounting pin. The brass tube goes into the wider base part of the antenna, while the steel wire inside it goes a bit further into the main part of the antenna.
Emeritus
Joined: March 30, 2004
KitMaker: 2,845 posts
AeroScale: 1,564 posts
Posted: Monday, August 22, 2016 - 02:25 AM UTC
Tail attached after gluing in the scratchbuilt fuel dump pipes (kit didn't have them).
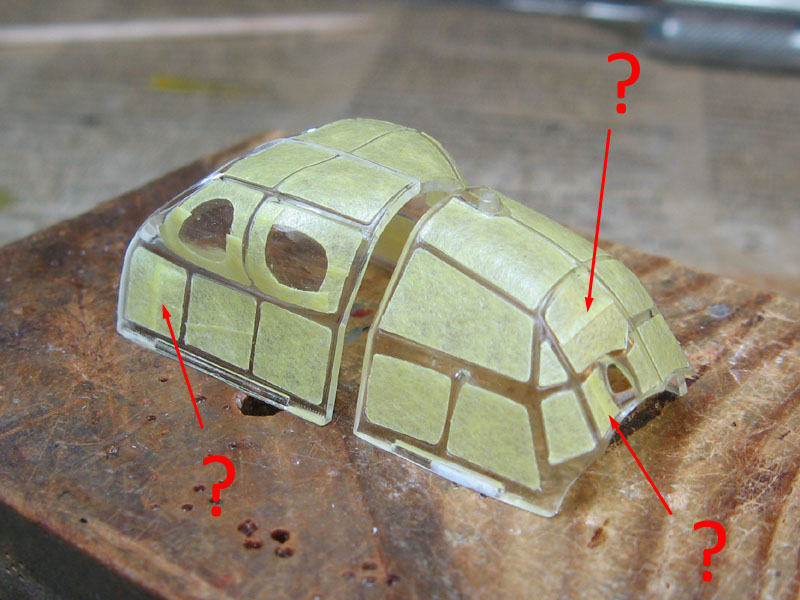
On further test fitting, I noticed there would be a slight gap between the front and rear main canopy sections. Time to bring out the styrene sheet again!
Instead of trying to pre-cut a piece, it's much easier to glue in a bigger piece, let the cement dry and then trim to size. To Minimize the chances of white styrene being visible in the finished model, I chose to glue the shim to the rear of the back canopy portion.
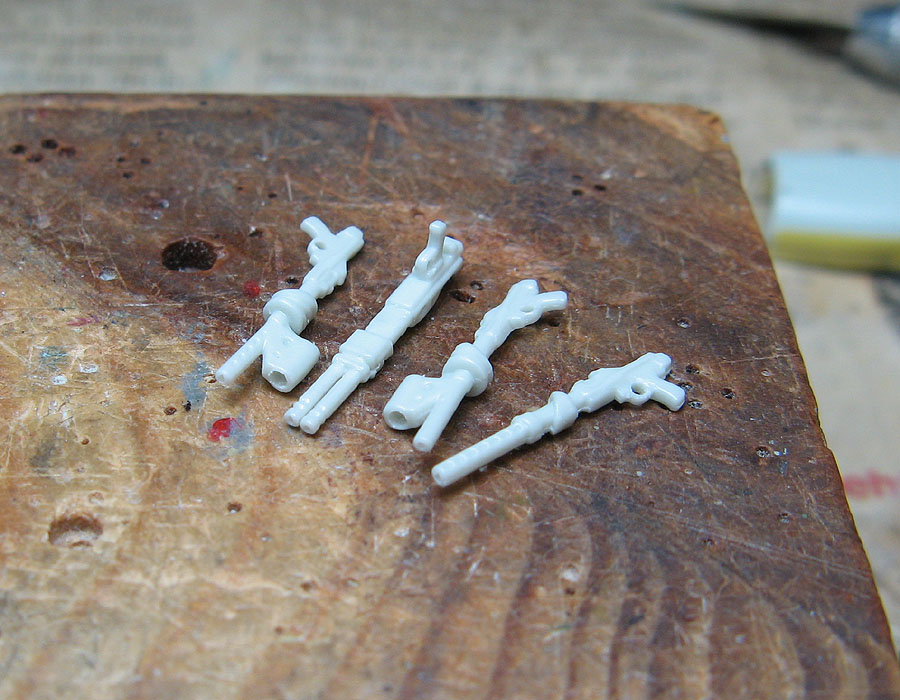
Machine guns about ready for painting - trigger guards, sight shrouds, and barrel ends drilled out. I think I'll be adding a PE ring sight to the front MG.
The fun part came when I realized I have the fuselage pretty much closed up, when I need to have at least the rear one of the two antenna wires going to the fuselage so that I could get it tight when attaching the wires.
The clear-molded insulator parts are already glued in from the inside, and the holes in them are too small for using the insert-stick-tied-to-wire trick, and inserting the wires from inside is just an impossibility.
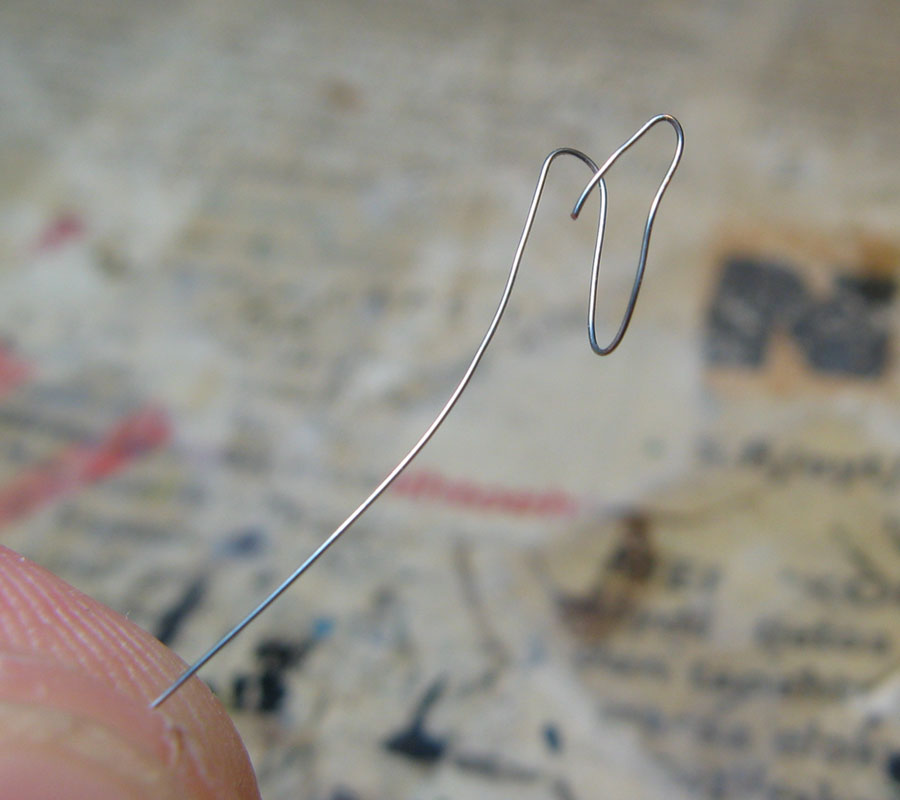
Then I got an idea I thought was just stupid enough to work: Insert wires -> use a piece of wire with end bent into hooks to fish out the ends of the wires through the hole in the tail gear bay's front bulkhead.
Bingo!
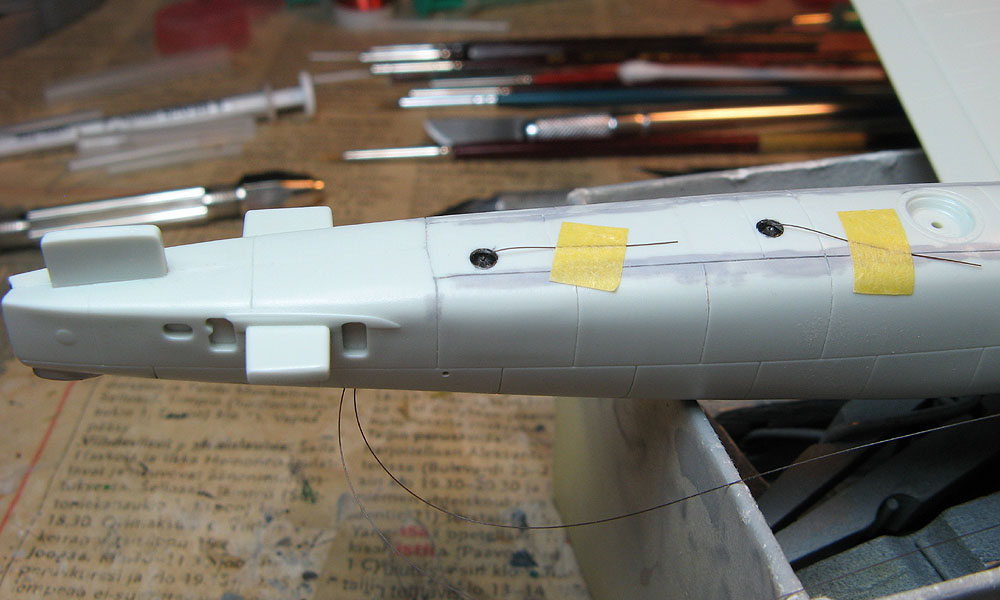
To make sure they won't be going anywhere, I tied a couple of knots to both ends.
I promise this was the last or penultimate update before getting out the primer.
On further test fitting, I noticed there would be a slight gap between the front and rear main canopy sections. Time to bring out the styrene sheet again!
Instead of trying to pre-cut a piece, it's much easier to glue in a bigger piece, let the cement dry and then trim to size. To Minimize the chances of white styrene being visible in the finished model, I chose to glue the shim to the rear of the back canopy portion.
Machine guns about ready for painting - trigger guards, sight shrouds, and barrel ends drilled out. I think I'll be adding a PE ring sight to the front MG.
The fun part came when I realized I have the fuselage pretty much closed up, when I need to have at least the rear one of the two antenna wires going to the fuselage so that I could get it tight when attaching the wires.
The clear-molded insulator parts are already glued in from the inside, and the holes in them are too small for using the insert-stick-tied-to-wire trick, and inserting the wires from inside is just an impossibility.
Then I got an idea I thought was just stupid enough to work: Insert wires -> use a piece of wire with end bent into hooks to fish out the ends of the wires through the hole in the tail gear bay's front bulkhead.
Bingo!
To make sure they won't be going anywhere, I tied a couple of knots to both ends.
I promise this was the last or penultimate update before getting out the primer.
GazzaS
#424
Joined: April 23, 2015
KitMaker: 4,648 posts
AeroScale: 1,938 posts
Posted: Monday, August 22, 2016 - 04:14 AM UTC
Eetu,
Wow! That is some serious, but awesomely inspirational modifying! I'm going to reference your build for my future builds.
Thank you!
Gaz
Wow! That is some serious, but awesomely inspirational modifying! I'm going to reference your build for my future builds.
Thank you!
Gaz
Emeritus
Joined: March 30, 2004
KitMaker: 2,845 posts
AeroScale: 1,564 posts
Posted: Tuesday, August 23, 2016 - 10:56 PM UTC
Good to hear there's been something in my updates that might be useful for others as well.
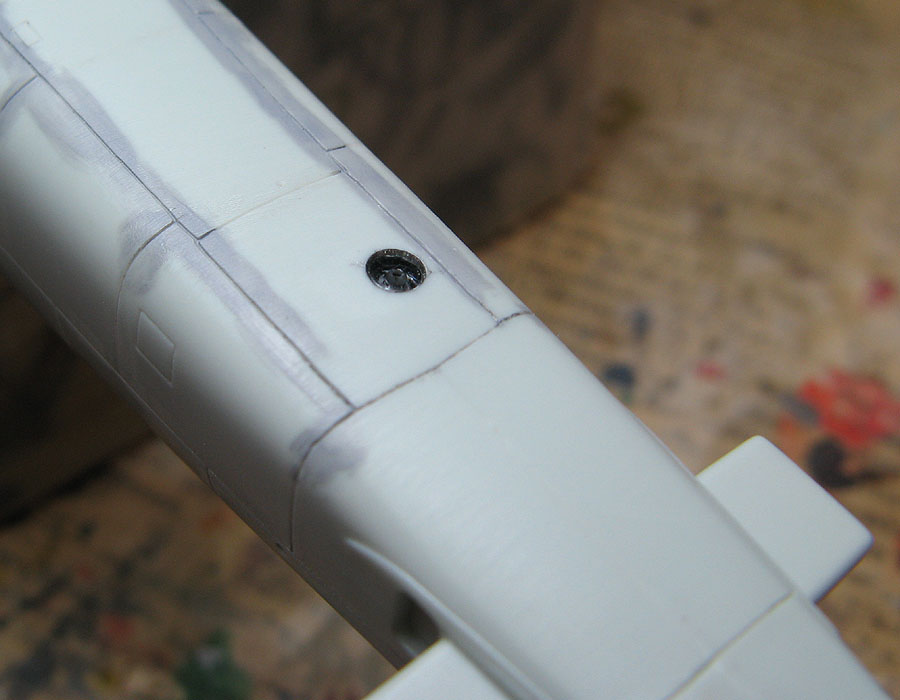
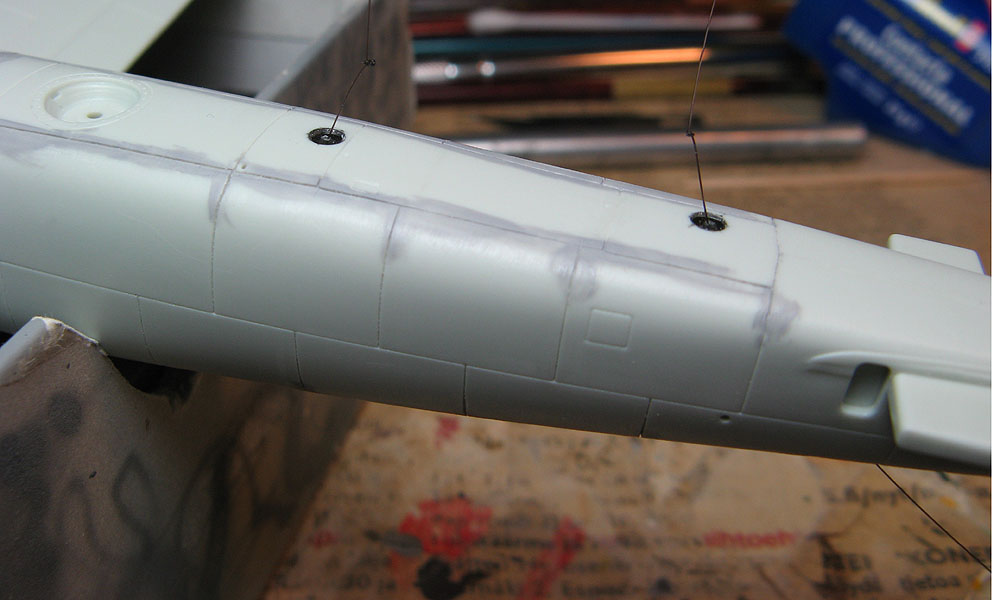
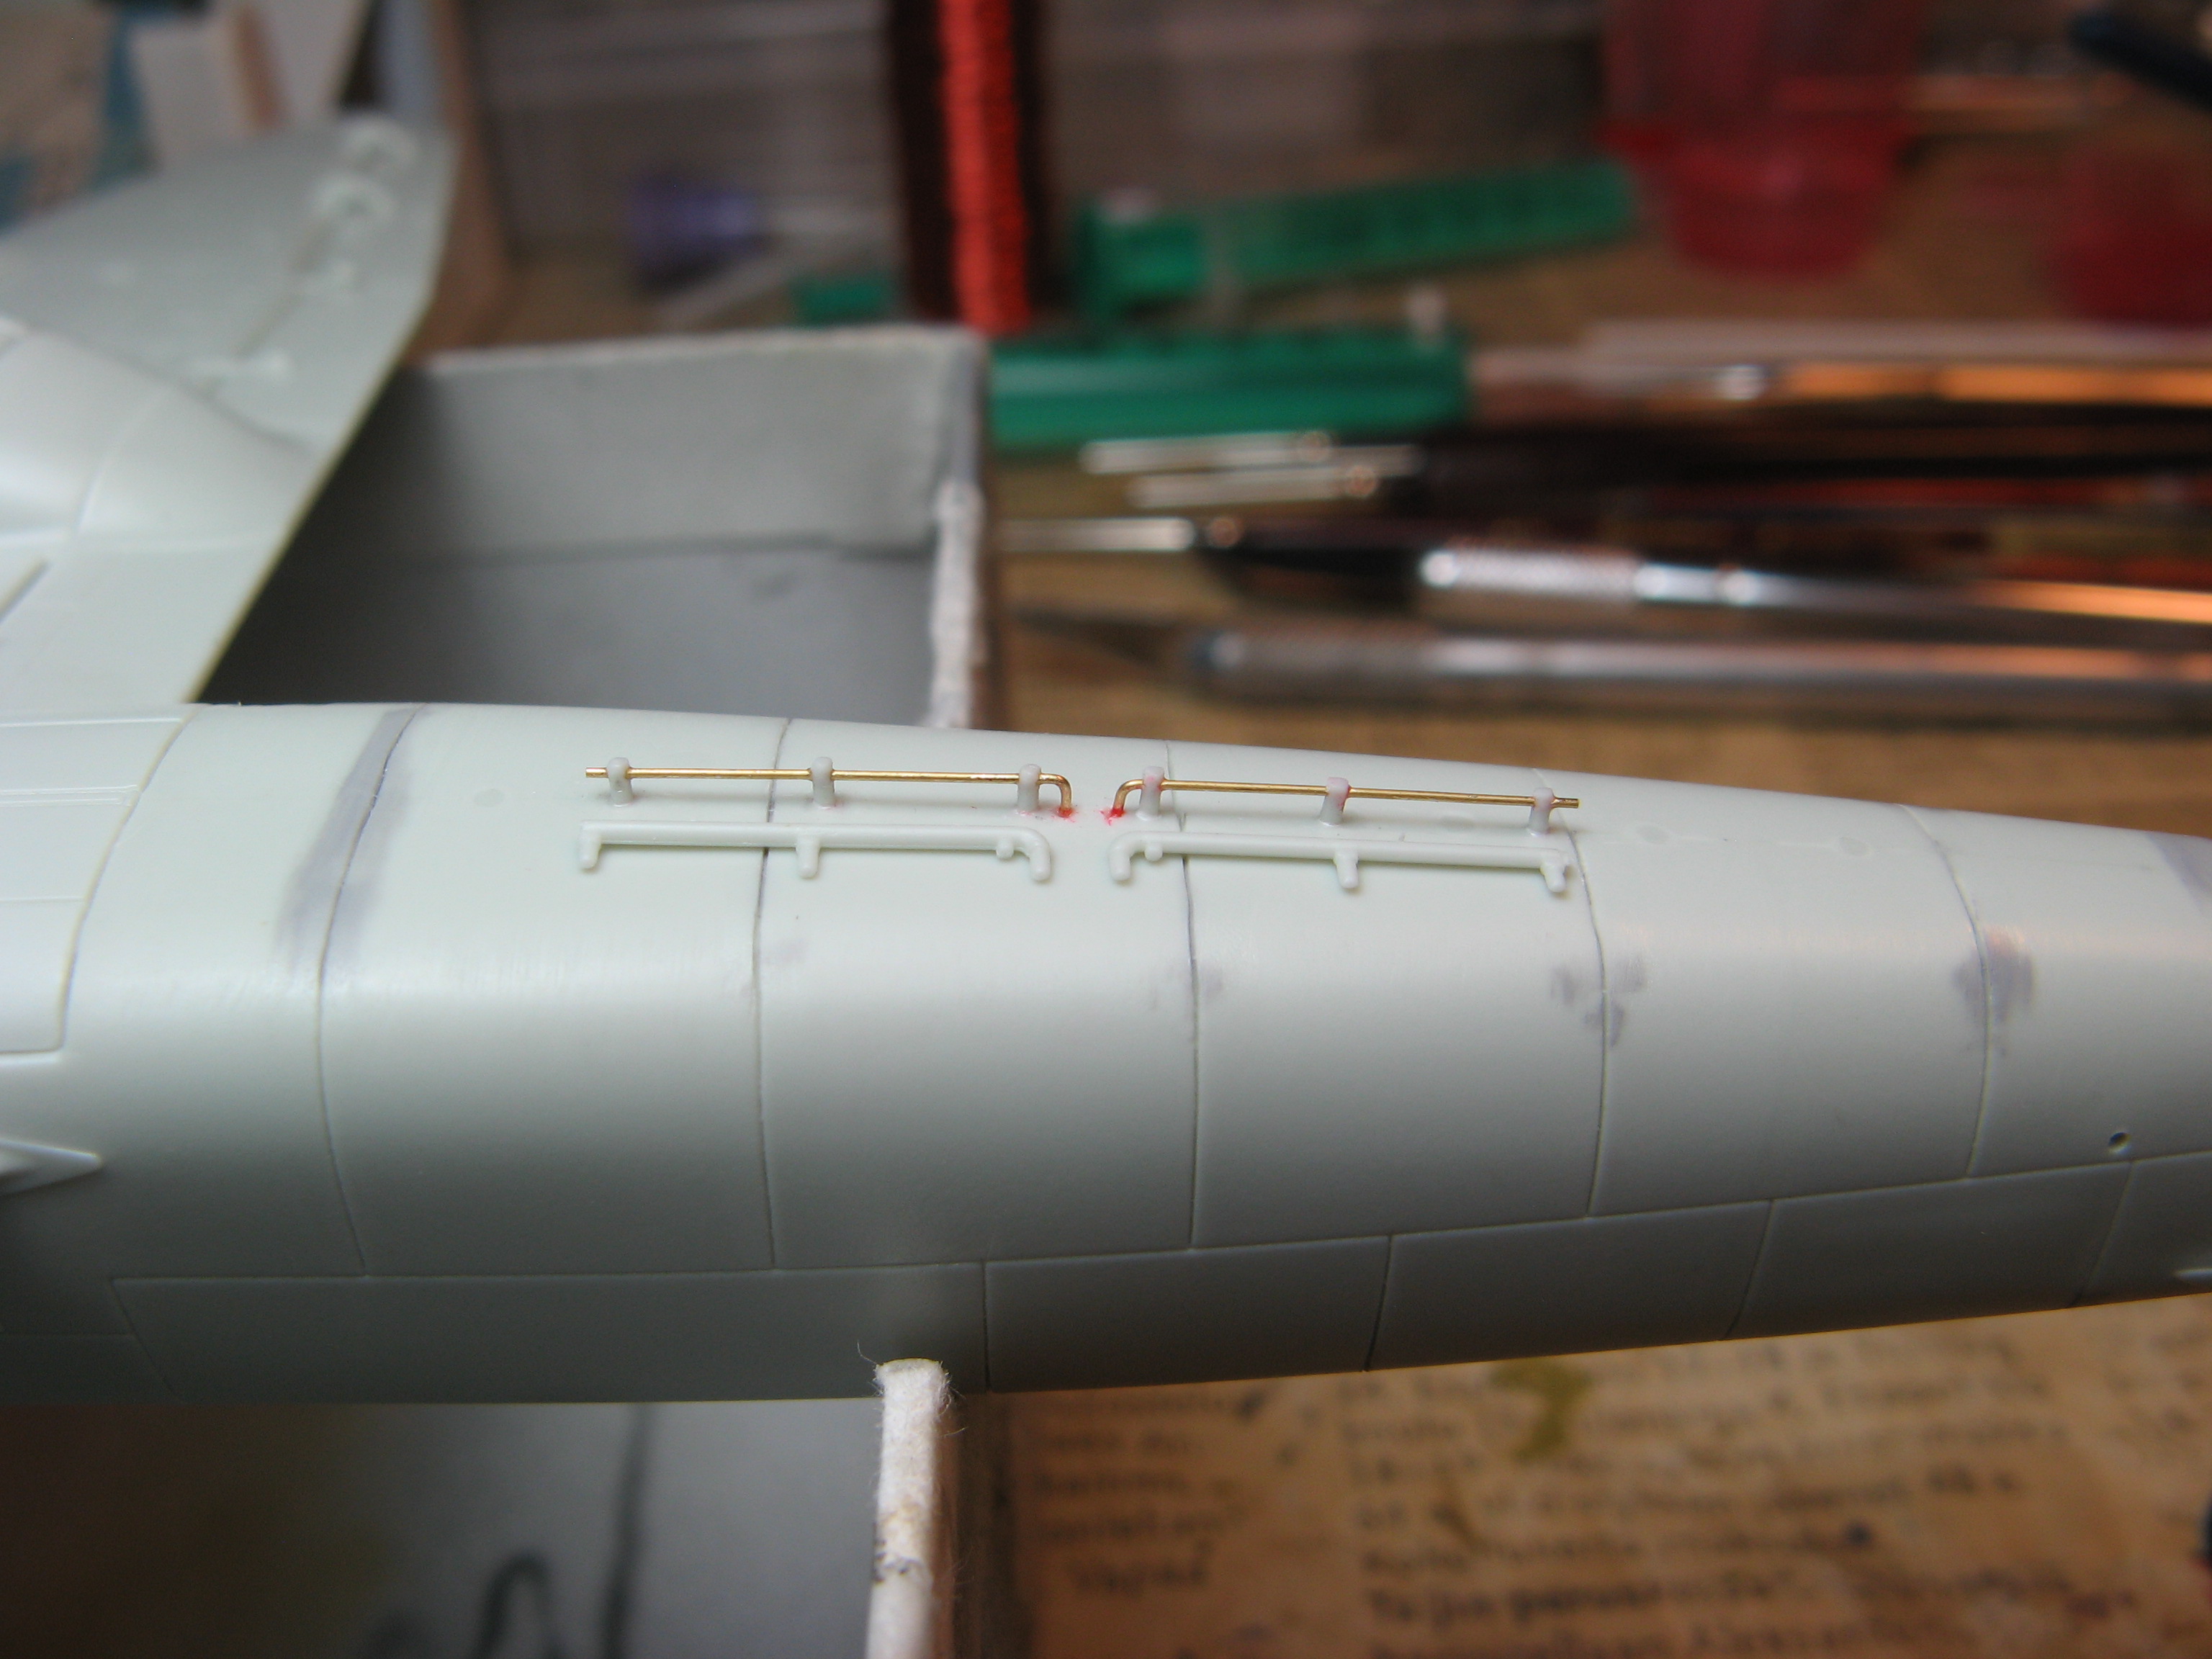
I guess this could be the last update before priming: antenna wire mounts added. Not sure if these are 100% accurate though, as I couldn't find suitable closeups with the wires installed. The hole in the antenna mast near the top is for the support wires running to the sides of the main canopy.
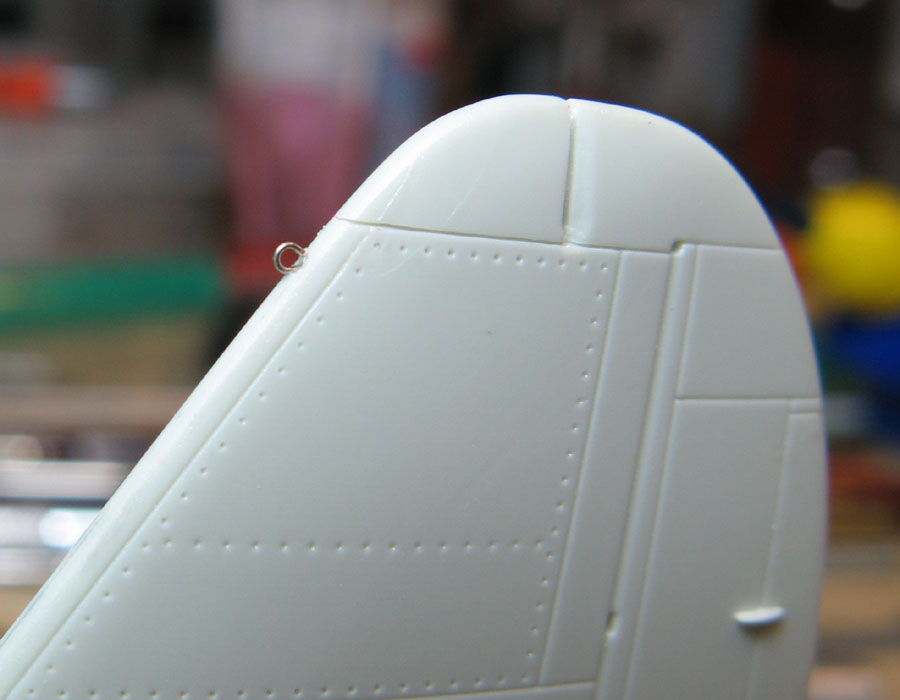
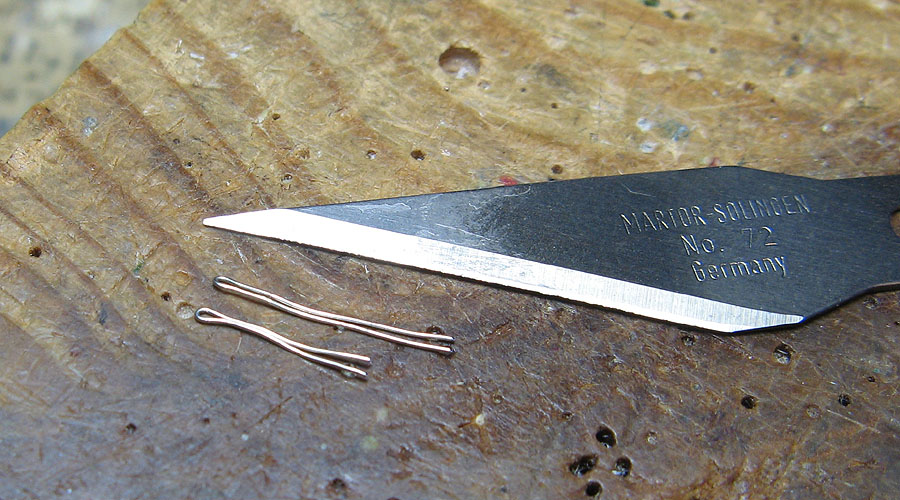
For the support wire mounts on the canopy, I used the same method as for the antenna wire mounts: metal wire loops glued to holes.
I guess this could be the last update before priming: antenna wire mounts added. Not sure if these are 100% accurate though, as I couldn't find suitable closeups with the wires installed. The hole in the antenna mast near the top is for the support wires running to the sides of the main canopy.
For the support wire mounts on the canopy, I used the same method as for the antenna wire mounts: metal wire loops glued to holes.
Emeritus
Joined: March 30, 2004
KitMaker: 2,845 posts
AeroScale: 1,564 posts
Posted: Friday, August 26, 2016 - 07:18 PM UTC
Before moving onto to priming, the last addition to the airframe were the scratchbuilt "towel rack" antennas of the FuBl 1 instrument landing system to replace the somewhat clunky kit parts.
I could have just glued in styrene rod to the holes I drilled earlier, cut notches to the ends and glue in the wire, but I went for the little more fiddly but more realistic method of insering the wire through holes drilled in the antenna posts. Because it wouldn't have been possible to drill the holes with the posts in situ, put the prepared posts in place the locator holes without glue, ran a length of wire in the holes to get the posts at the correct positiions, the applied liquid cement to attach the posts in place. Then I removed the wire and installed the actual antenna wires.
Posts glued in place, locator wire still in place, posts yet to be sanded to final length:
Antenna wires being fitted in place:
And done! Kit parts included in pic for comparison. I know which I prefer.
Then it's time to prime the airframe and get going with painting. Pretty much every other part has gotten its primer coat already.
GazzaS
#424
Joined: April 23, 2015
KitMaker: 4,648 posts
AeroScale: 1,938 posts
Posted: Saturday, August 27, 2016 - 02:28 AM UTC
Eetu,
That's just inspiring!
Gaz
That's just inspiring!
Gaz
Emeritus
Joined: March 30, 2004
KitMaker: 2,845 posts
AeroScale: 1,564 posts
Posted: Saturday, August 27, 2016 - 05:48 AM UTC
Thanks! Though I'm not sure I'd call this that special, at least compared to your metal work on your B-29. Doing a NMF with foil, let alone shaping a one-piece nose section like that.
But anyway, my build's coming along. Primer's now on. I masked off the transparencies completely, sprayed on the primer, then applied the Eduard masks I bought for the kit.

These things are such a time saver! For planes with complex canopies, they're worth every cent, IMO.
But... my one nitpick with them is their weird tendency of there being a handful of pieces that are too big and need to be cut in half (or in some cases split in four) so they can be applied so the extra material overlaps in the middle.
I haven't figured any pattern to this phenomenon, except that the too big pieces almost exlusively tend to be the simplest shapes on their sheet. It's puzzling how a simple rectangle can end up too big, while at the same time much more complex shapes are precisely the right shape and size. Oh well, fortunately it's almost always the simplest pieces that need attention, as they're the easiest to fix.
And at this point with only four days remaining and my entry just entering the painting stage, I think I need to call out for those running the campaign and humbly inquire about the possibility of an extension? I feel I might not be able to make it in time. Stupid me, slacking off the most of the summer...
Though I'm not sure I'd call this that special, at least compared to your metal work on your B-29. Doing a NMF with foil, let alone shaping a one-piece nose section like that. But anyway, my build's coming along. Primer's now on. I masked off the transparencies completely, sprayed on the primer, then applied the Eduard masks I bought for the kit.
These things are such a time saver!
For planes with complex canopies, they're worth every cent, IMO.But... my one nitpick with them is their weird tendency of there being a handful of pieces that are too big and need to be cut in half (or in some cases split in four) so they can be applied so the extra material overlaps in the middle.
I haven't figured any pattern to this phenomenon, except that the too big pieces almost exlusively tend to be the simplest shapes on their sheet. It's puzzling how a simple rectangle can end up too big, while at the same time much more complex shapes are precisely the right shape and size. Oh well, fortunately it's almost always the simplest pieces that need attention, as they're the easiest to fix.
And at this point with only four days remaining and my entry just entering the painting stage, I think I need to call out for those running the campaign and humbly inquire about the possibility of an extension? I feel I might not be able to make it in time. Stupid me, slacking off the most of the summer...
GazzaS
#424
Joined: April 23, 2015
KitMaker: 4,648 posts
AeroScale: 1,938 posts
Posted: Saturday, August 27, 2016 - 06:23 AM UTC
I was about go stomping about shouting "more time, more time!" When I realized I'm not in this campaign.
All of those aerials that are on some planes has always befuddled me. I've been content to leave them off, or as they came with the kit, because I've never han idea what to do with them. Your solutions will be very useful.
Thanks for the foil compliments. Foiling isn't hard. Building the greenhouse...it's a learning experience for sure. I still have no idea whether it'll end up in success or failure.
Gaz

Serlone

Joined: February 23, 2011
KitMaker: 74 posts
AeroScale: 5 posts

Posted: Sunday, August 28, 2016 - 10:13 PM UTC
i kinda might have forgotten that i entered this campaign, so there is nothing else to do, then to challenge myself and see if i can churn something out in three evenings.
pics wil follow
pics wil follow

bm4247

Joined: December 29, 2014
KitMaker: 88 posts
AeroScale: 26 posts

Posted: Sunday, August 28, 2016 - 11:31 PM UTC
I had some time management issues with this one. Had to cram it all into a short space of time and am having to post it as complete due to me going away on business for a couple of days.
The old Airfix kit was a bit of a challenge and I spent a bit of time on the cockpit and engine. I was in such a rush I did not remember to take some progress shots. I think I learned bits an pieces on this campaign so thanks for having me. Some good builds going on.
Things I will have to do in the future.
1. Take my time and more importantly give myself time.
2. Learn to mask canopies and not paint by shaky hand.
3. Learn to mask camouflage and not paint by shaky hand.
4. Dont waste time painting what wont be seen when the model is complete.
5. Find time to research the subject.
Ihad real issues with the decals. As it is an old kit bought second hand the decals split and fell to pieces. No time to source others so I have to declare my model done. Perhaps awaiting painting after repairs.
Here are my start and end pictures.
Thanks for running the campaign.
Brian
Serlone
Joined: February 23, 2011
KitMaker: 74 posts
AeroScale: 5 posts
Posted: Monday, August 29, 2016 - 01:53 AM UTC
ok i made some progress, got the cockpit together and hastely painted, got the wings, landing gear, engine cowling and prop together.
and managed to get the fuselage closed up.
will have to dow some painting tomorrow
and managed to get the fuselage closed up.
will have to dow some painting tomorrow


Emeritus
Joined: March 30, 2004
KitMaker: 2,845 posts
AeroScale: 1,564 posts
Posted: Monday, August 29, 2016 - 05:35 AM UTC
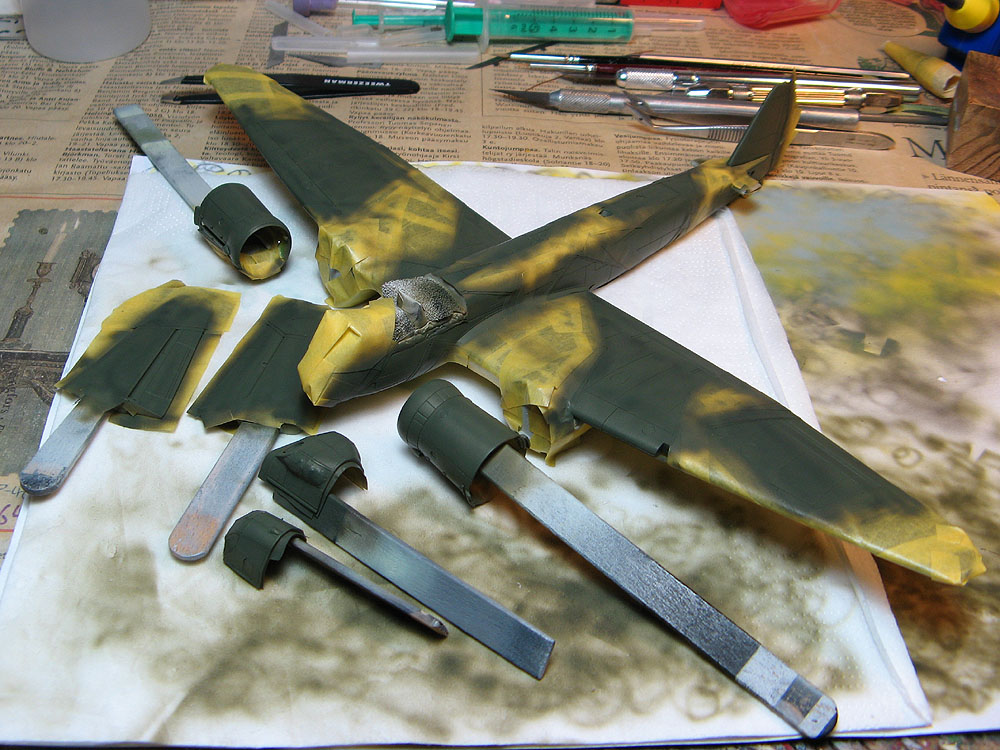
Preshading's on:
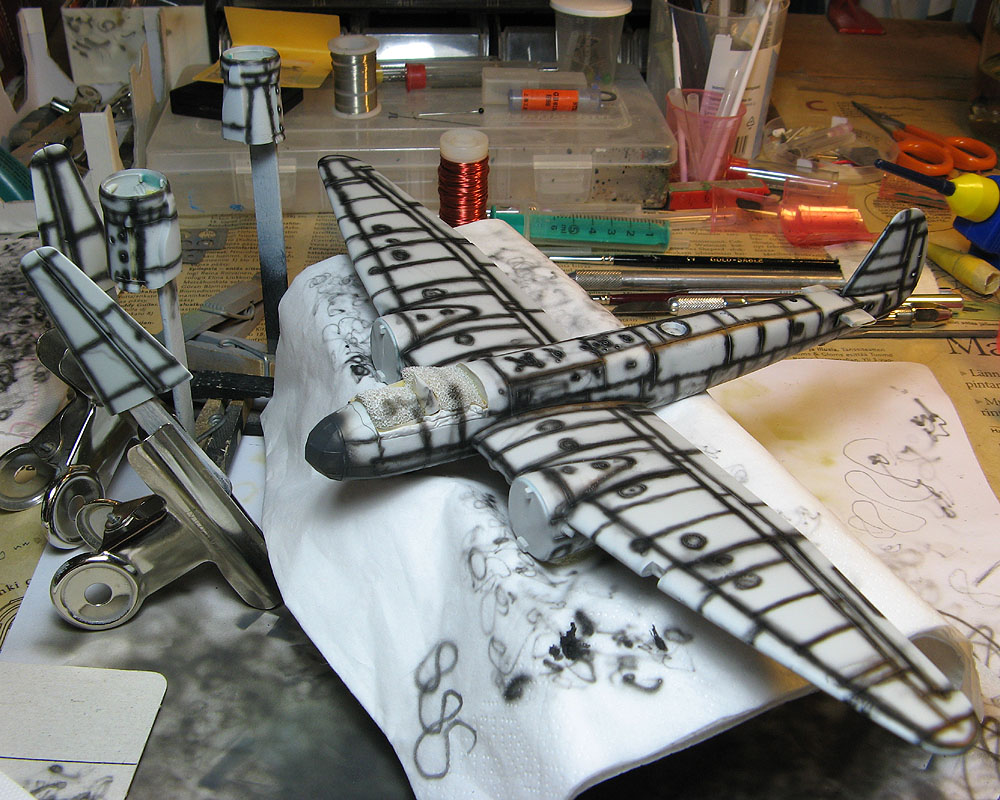

The sguiggly lines / mottling type stuff is something I saw used in someone's build. It's supposed to add some subtle variation to the top coat.
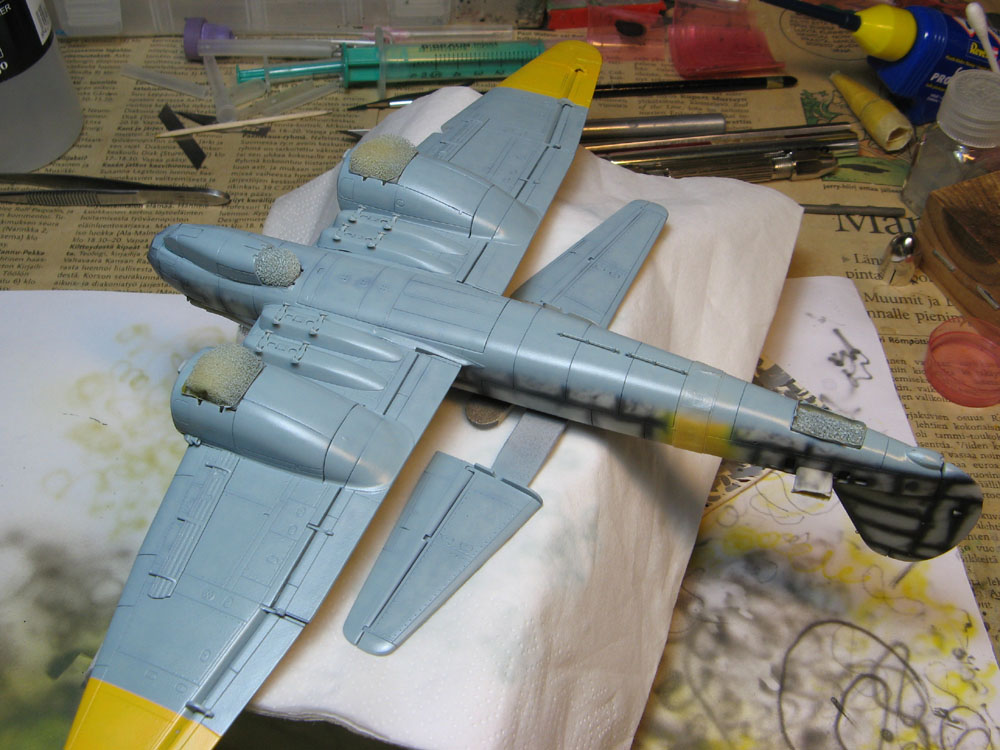
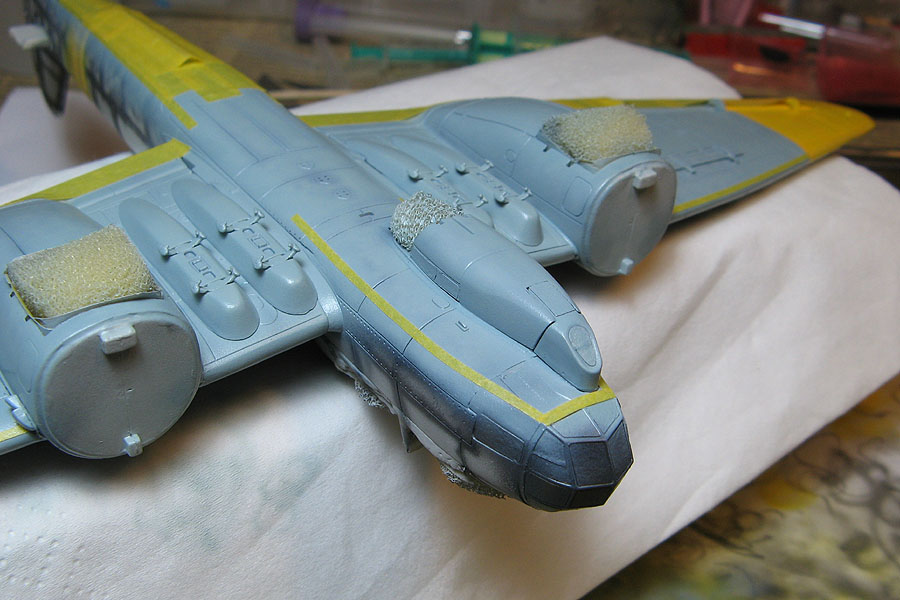
At the moment I've painted the yellow eastern front markings on the fuselage, wings and cowlings, as well as the light blue on the undersides. Next it's time for more masking and painting the RLM 70/71 splinter camo.
Any word on the possible extention?
Seems I'm not the only one who could sure use some more time.
The sguiggly lines / mottling type stuff is something I saw used in someone's build. It's supposed to add some subtle variation to the top coat.
At the moment I've painted the yellow eastern front markings on the fuselage, wings and cowlings, as well as the light blue on the undersides. Next it's time for more masking and painting the RLM 70/71 splinter camo.
Any word on the possible extention?
Seems I'm not the only one who could sure use some more time.

EHAM0624
Joined: January 27, 2014
KitMaker: 200 posts
AeroScale: 85 posts
Posted: Tuesday, August 30, 2016 - 02:43 AM UTC
extention, yes please
I also have a Stuka in progress
I also have a Stuka in progress
MichaelSatin


Joined: January 19, 2008
KitMaker: 3,909 posts
AeroScale: 2,904 posts
Posted: Tuesday, August 30, 2016 - 05:05 PM UTC
OK, there is just too much great stuff here too close to finishing to let it drop. I'm granting a one month extension to wrap things up. But that's it everyone, so better get cracking!
Michael
Michael
Emeritus
Joined: March 30, 2004
KitMaker: 2,845 posts
AeroScale: 1,564 posts
Posted: Tuesday, August 30, 2016 - 11:03 PM UTC
Awesome!
I thought I was making good progress on my entry, but as usual, masking and painting just always takes more time than an anticipated (I think it's one of those "One does not simply" things about modeling! ); I would have had no chance of making it within the original deadline.
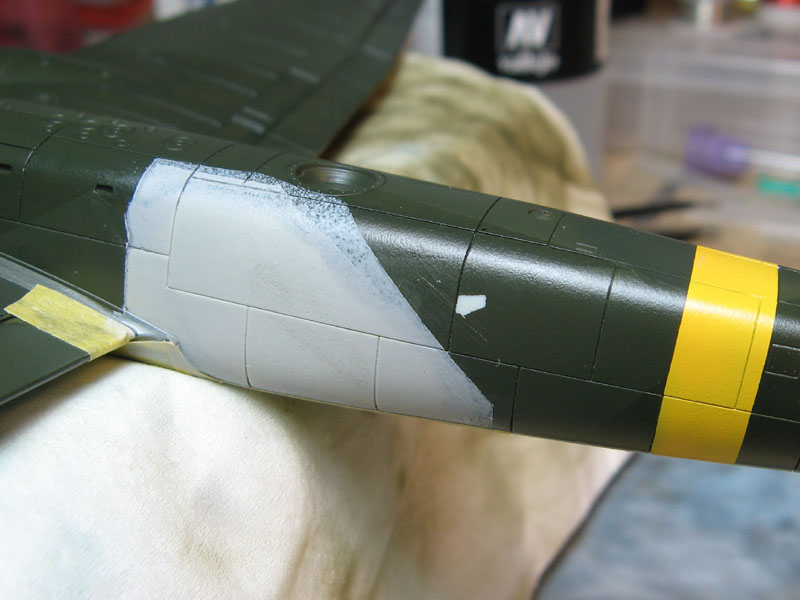
Underside RLM65 sprayed on. I feel the Xtracrylix 65 is a tad too dark (or should "full-looking") when used on its own, so I did my usual thing of mixing it 50/50 with RLM 76 of the same brand, toning it down slightly.
Start of the masking job. Painting instructions of both the Techmod decal sheet and the Hasegawa kit I have in my stash illustrated the color demarcation line to extend to the nose transparency, but pictures of the particular plane I'm building clearly showed ofterwise, so I followed those instead.
Painting done, masks to be removed:
And of course, what's a build without at least one of those mandatory glitches... Looks like a bit of sanding, and repainting is in order.
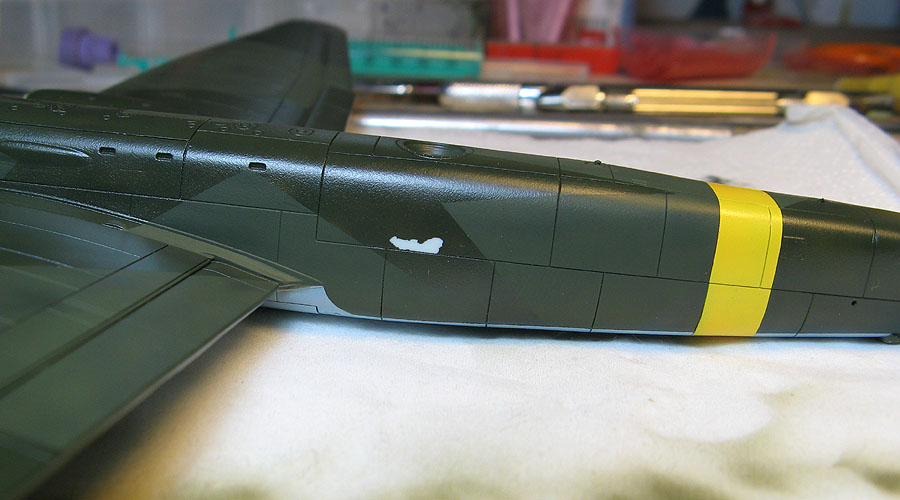
And if you're wondering, the exterior paints are all Xtracrylix, the difference in sheen is just from the light coat of Future I like to spray on before masking. Makes it much more resistant to accidental chippings and scuffing from handling.
When I get this fixed and a few other minor paint nicks & scratches, it's time for Future coating and decaling.
I thought I was making good progress on my entry, but as usual, masking and painting just always takes more time than an anticipated (I think it's one of those "One does not simply" things about modeling!
); I would have had no chance of making it within the original deadline.Underside RLM65 sprayed on. I feel the Xtracrylix 65 is a tad too dark (or should "full-looking") when used on its own, so I did my usual thing of mixing it 50/50 with RLM 76 of the same brand, toning it down slightly.
Start of the masking job. Painting instructions of both the Techmod decal sheet and the Hasegawa kit I have in my stash illustrated the color demarcation line to extend to the nose transparency, but pictures of the particular plane I'm building clearly showed ofterwise, so I followed those instead.
Painting done, masks to be removed:
And of course, what's a build without at least one of those mandatory glitches... Looks like a bit of sanding, and repainting is in order.
And if you're wondering, the exterior paints are all Xtracrylix, the difference in sheen is just from the light coat of Future I like to spray on before masking. Makes it much more resistant to accidental chippings and scuffing from handling.
When I get this fixed and a few other minor paint nicks & scratches, it's time for Future coating and decaling.
Emeritus
Joined: March 30, 2004
KitMaker: 2,845 posts
AeroScale: 1,564 posts
Posted: Wednesday, August 31, 2016 - 10:41 PM UTC
Yeah, anyone who doesn't love this [numerous vitriolic, non-family friendly expressions] raise their hand! 
Guess where we're now? Looking like this...
Initially I mask around the paint chip and try to sand the edges down the edges of the surrounding paint while minimizing the amount of touch-up work needed. Make the mistake of trying to brush-paint Mr. Surfacer to blend the two areas together. Now of course when it's a pretty delicate and crucial situation and when I'm particularly in no mood for anything like this, Mr. Surfacer doesn't want to behave and level off nicely, instead clumping up and leaving huge ugly brush marks (I can tell it has some sort of primitive consciousness and senses these things).
Oh well, I think and clean up the Mr. Surfacer mess with Gunzes thinner, blending the paint edges somewhat and also enlarging the hole in the paint job. Then I proceed to mask off the area and prime the area with the same spray can primer I used earlier. Two coats later the surface looks pretty good and I leave it to dry.
Then of course I have to be impatient and start looking at the finish too soon. Looked pretty good, though not perfect, still probably sufficient since that's where the overpainted German register code letters and numbers will go. Then I notice a few of the panel lines have some slight paint buildup in them and make the mistake of starting to scribe them open, all while the primer's still somewhat soft. Yep, another disaster.
Well well, it's back to scrubbing off the primer with Gunze thinner. Now the area is like in the picture above. Just marvelous. That's what you get for trying to take shortcuts and are impatient. Now I'll let that thing dry properly and look at it again tomorrow.
GazzaS
#424
Joined: April 23, 2015
KitMaker: 4,648 posts
AeroScale: 1,938 posts
Posted: Wednesday, August 31, 2016 - 10:52 PM UTC
Eetu,
What a disaster! I hate paint lift-off! Whenever it happens, I imagine the same scenario you're going through. I try to keep tape only on the edges and use paper for thearas inside the tape boundary to reduce the chances.
Gaz
What a disaster! I hate paint lift-off! Whenever it happens, I imagine the same scenario you're going through. I try to keep tape only on the edges and use paper for thearas inside the tape boundary to reduce the chances.
Gaz
Emeritus
Joined: March 30, 2004
KitMaker: 2,845 posts
AeroScale: 1,564 posts
Posted: Thursday, September 01, 2016 - 10:41 PM UTC
Yeah, I know. And painting with acrylics it's even worse since they're often hard if not nigh impossible to sand nicely. Fortunately Xtracrylicx is from the better end of the sandability spectrum, drying harder than Vallejo for example, but then I think it's the primer I used which doesn't hold as well to the plastic as some others using harder thinner.
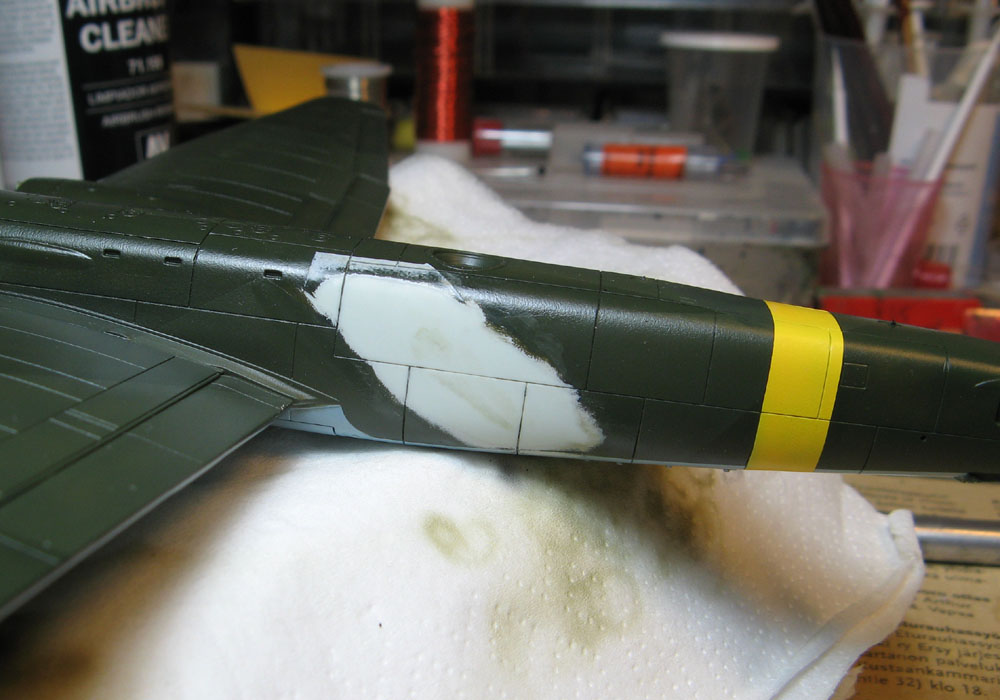
The chipped area looks like this at the moment...
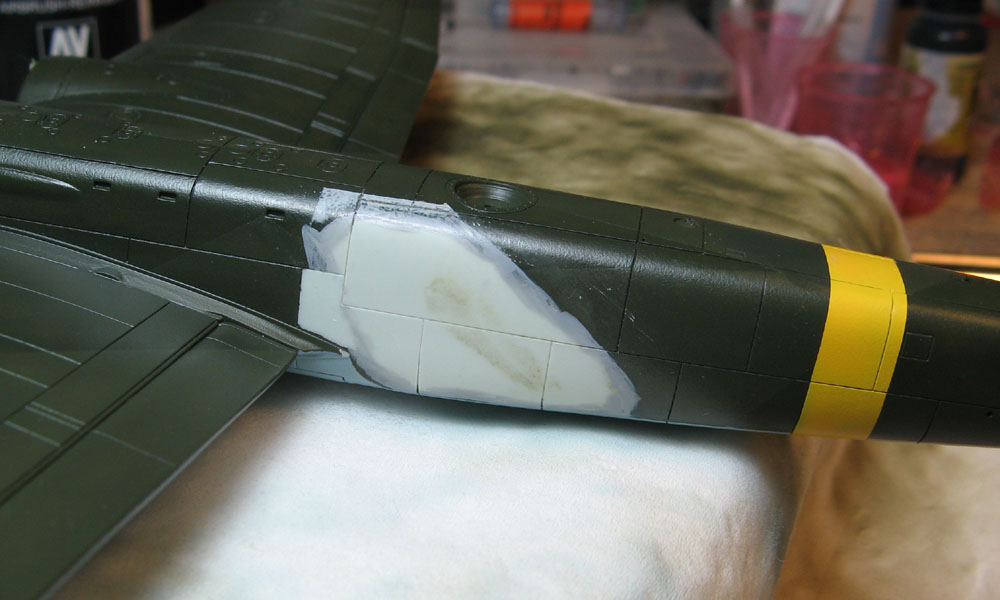
I feel I've gotten the paint edges feathered pretty well, except for that part in the front above the back end of the wing root fairing. I just couldn't get that sanded right, it just got chipped away instead of feathering properly. Getting near to the panel's edges, I just gave up and scraped off the paint from the rest of the panel, like on the Boulton Paul Defiant I built last year (same kind of case, paint lifts with tape and my supposedly fast fix attempts ended up taking way more than doing it properly the first time). Fingers crossed it'll work now.
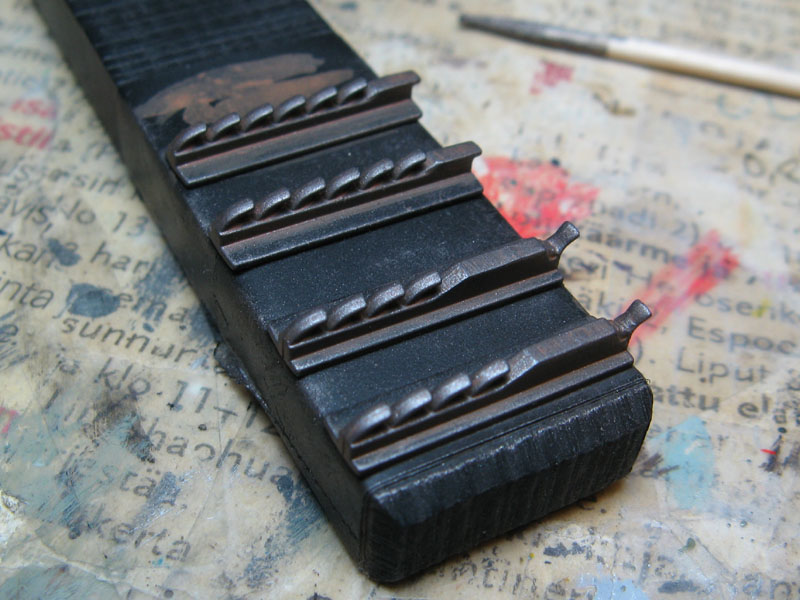
And for something that didn't fight me all the way: the exhausts are painted and ready to install in the nacelles. I didn't paint them particurly dark, so airbrushing the exhaust stains later won't end up covering the whole paint job.
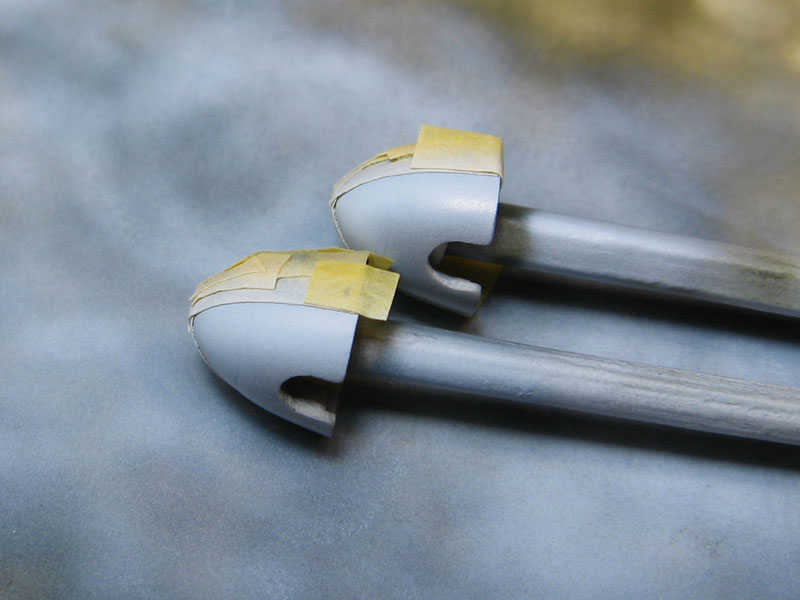
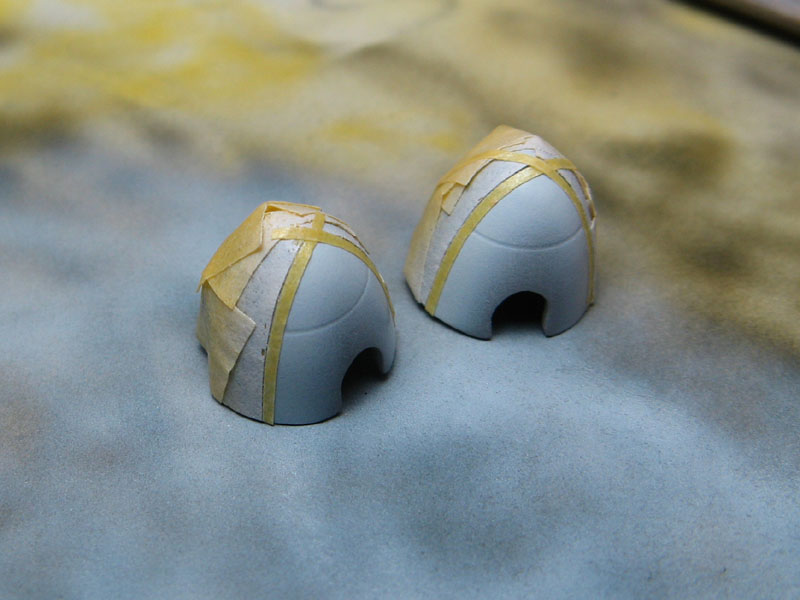
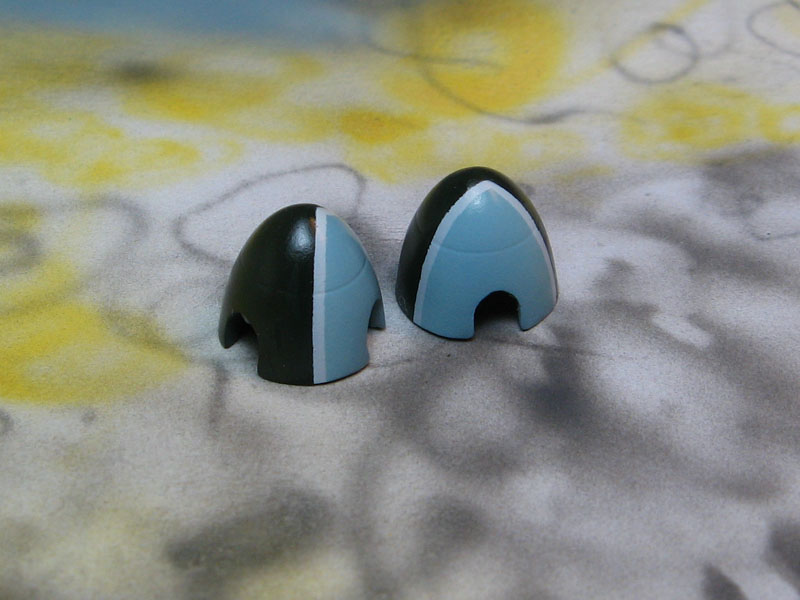
I also got the spinner painted. The Techmod decal sheet I got has the white segment edge stripes on it, but I chose to paint them on instead.
The chipped area looks like this at the moment...
I feel I've gotten the paint edges feathered pretty well, except for that part in the front above the back end of the wing root fairing. I just couldn't get that sanded right, it just got chipped away instead of feathering properly. Getting near to the panel's edges, I just gave up and scraped off the paint from the rest of the panel, like on the Boulton Paul Defiant I built last year (same kind of case, paint lifts with tape and my supposedly fast fix attempts ended up taking way more than doing it properly the first time). Fingers crossed it'll work now.
And for something that didn't fight me all the way: the exhausts are painted and ready to install in the nacelles. I didn't paint them particurly dark, so airbrushing the exhaust stains later won't end up covering the whole paint job.
I also got the spinner painted. The Techmod decal sheet I got has the white segment edge stripes on it, but I chose to paint them on instead.
Emeritus
Joined: March 30, 2004
KitMaker: 2,845 posts
AeroScale: 1,564 posts
Posted: Friday, September 02, 2016 - 12:35 AM UTC
Hey look, even more paint chipping off!
This is the last time I'm using this particular spray primer for exteriors, it just doesn't stick to styrene reliably enough. And I'm sure the model wasn't greasy or anything, as I wiped it with Vallejo's airbrush cleaner prior to priming.
I guess I probably should strip/scrape that whole panel (considering that's a smaller one), but I'm getting way too tired of this already, so I'll just slap a couple of coats Mr. Surfacer on the chip and hope it A) levels out the edges psassably enough, and B) doesn't start chipping again, as I'll still need to do some masking over this area to replicate the overpainted German markings.
GazzaS
#424
Joined: April 23, 2015
KitMaker: 4,648 posts
AeroScale: 1,938 posts
Posted: Friday, September 02, 2016 - 02:45 AM UTC
Eetu,
Another disaster! I feel for you. Hiwever, those spinners look great.
Gaz
Another disaster! I feel for you. Hiwever, those spinners look great.
Gaz
c4willy
#305
Joined: February 01, 2006
KitMaker: 1,673 posts
AeroScale: 1,517 posts
Posted: Friday, September 02, 2016 - 02:23 PM UTC
Eetu that seriously sucks! I have had a similar paint separation on the tail of my SB2C-4 which I have not as yet repaired but I will very soon. Gonna have too we only have so long to finish our builds!
My modelling of late has been rather lacklustre just couldn't get into the groove, really not feeling it at all. A major slump which has now hopefully passed, I've been making progress on the SB2C-4 and she's now been decaled and is standing on her own feet. Air Brakes are on and it looks rather more complete than it was. Still have a few touch ups here and there, as well as panel lines to wash and weathering to apply. Here are some progress pics to show you where I'm at with it.


I may try the filter applied by Thomas to his delightfully tubby Wildcat, or I may just leave her looking like she's not long arrived in theatre, still trying to get a handle on where I'm going with the weathering.
My modelling of late has been rather lacklustre just couldn't get into the groove, really not feeling it at all. A major slump which has now hopefully passed, I've been making progress on the SB2C-4 and she's now been decaled and is standing on her own feet. Air Brakes are on and it looks rather more complete than it was. Still have a few touch ups here and there, as well as panel lines to wash and weathering to apply. Here are some progress pics to show you where I'm at with it.
I may try the filter applied by Thomas to his delightfully tubby Wildcat, or I may just leave her looking like she's not long arrived in theatre, still trying to get a handle on where I'm going with the weathering.
 |

WEB HOSTING BY


Copyright ©2021 AeroScale and Kitmaker Network, a subsidiary of Silver Star Enterprises
All Rights Reserved. Please read our Conditions of Use and Privacy Policy.
All Rights Reserved. Please read our Conditions of Use and Privacy Policy.