_GOTOBOTTOM
Pre-Flight Check
Constructive critique of your finished or in-progress photos.
Eduard 1/48 Bf 110C risen from the ashes
kahunaminor
_VISITCOMMUNITY
New South Wales, Australia
Joined: April 06, 2008
KitMaker: 151 posts
AeroScale: 141 posts
Posted: Wednesday, June 08, 2016 - 09:47 AM UTC
Welcome,
I started this build when it was first released in 2007/08 and then shelved it for whatever reason. It has languished on my shelf of procrastination since then and when I finished the Defiant, I vowed to do one of the kits that lay languishing. I decided to do this one, as it was amongst the oldest kits there and I felt in a good place to be able to tackle it:


Pulling the kit out, I took stock. I had almost completed the construction as the cockpit was finished and installed, the wings were on and the Quickboost engine had been installed into the starboard nacelle:


The RLM 02 I had used for the cockpit back then was the Vallejo Air grey/green and it really looked too dark then and still does now but it was staying. I had decided to close the forward gun bay and the nose had been cemented into shape and roughly sanded. The engine nacelles had been attached and the well known gap addressed with filler (I think it was Vallejo acrylic filler) as well as the gaps on the underside wing joins. All in all it looked a bit rough and ready and probably reflected where I was, mindset wise, in 2007. The canopy had been taped over, the gaps taped and the kit put onto the shelf:


I set about tidying up the seams, removing the steps created by hasty gluing and alignment on the wings and getting rid of all the basic errors.
I finished off the MLG bays with the remaining kit pieces, Eduard PE and some styrene. I then completed the lower gear assemblies, fitted the brake lines and shot Aeromaster RLM 02 on all the interior surfaces except the cockpit. It is much lighter than the Vallejo Air and a better representation IMHO:


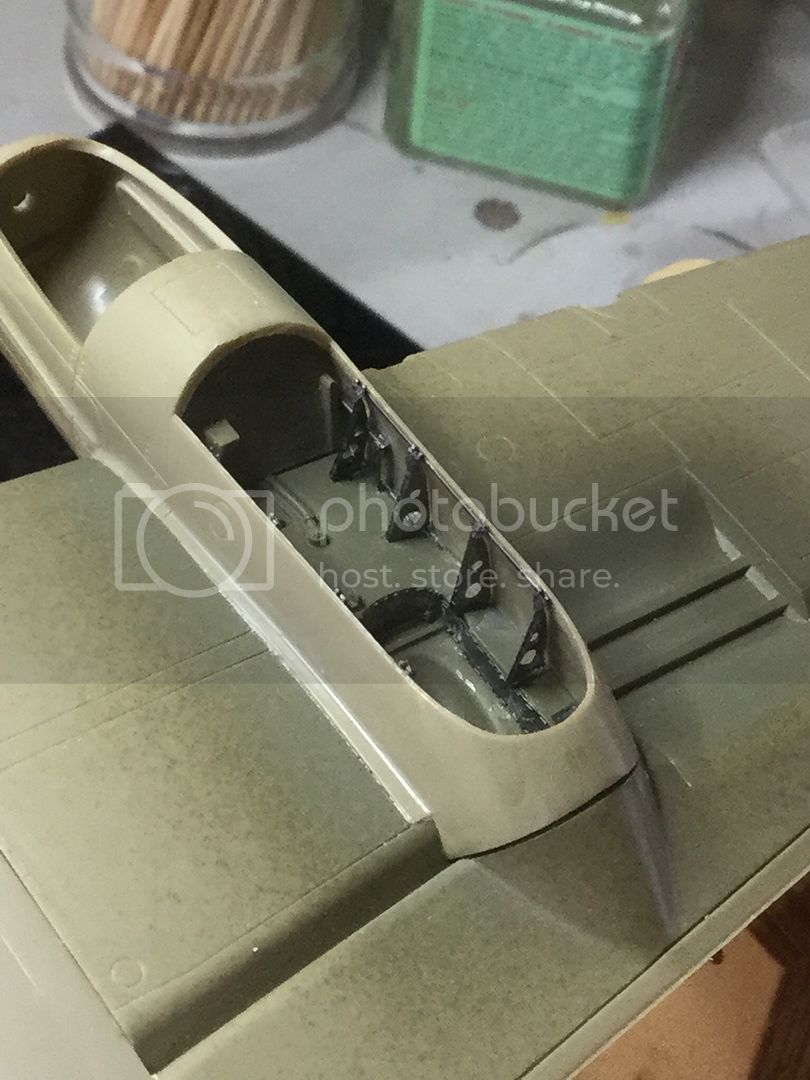
The engine nacelles were cleaned up and the lower inlet pieces fitted. The majority of the piece sits on panel lines except the curved section at front which is smooth. So out with the sanding sticks and Mr Surfacer. The exposed engine had a little more detail added with some more piping to go:


The position lights on each wingtip were removed and the location defined. I will add some CMK position lights later on. The kit wheels are incorrect for a C model, so the Aerocast AM wheels had been partially painted and marked P and S. They have now been masked and the brass details added, awaiting a coat of black:


The MG15 was assembled from kit parts, PE, resin and a lot of luck. Naturally after this photo the rear gun sight was flung to the far corners of the earth and a replacement has been sourced. Which allowed me to put it on the correct, forward, position.


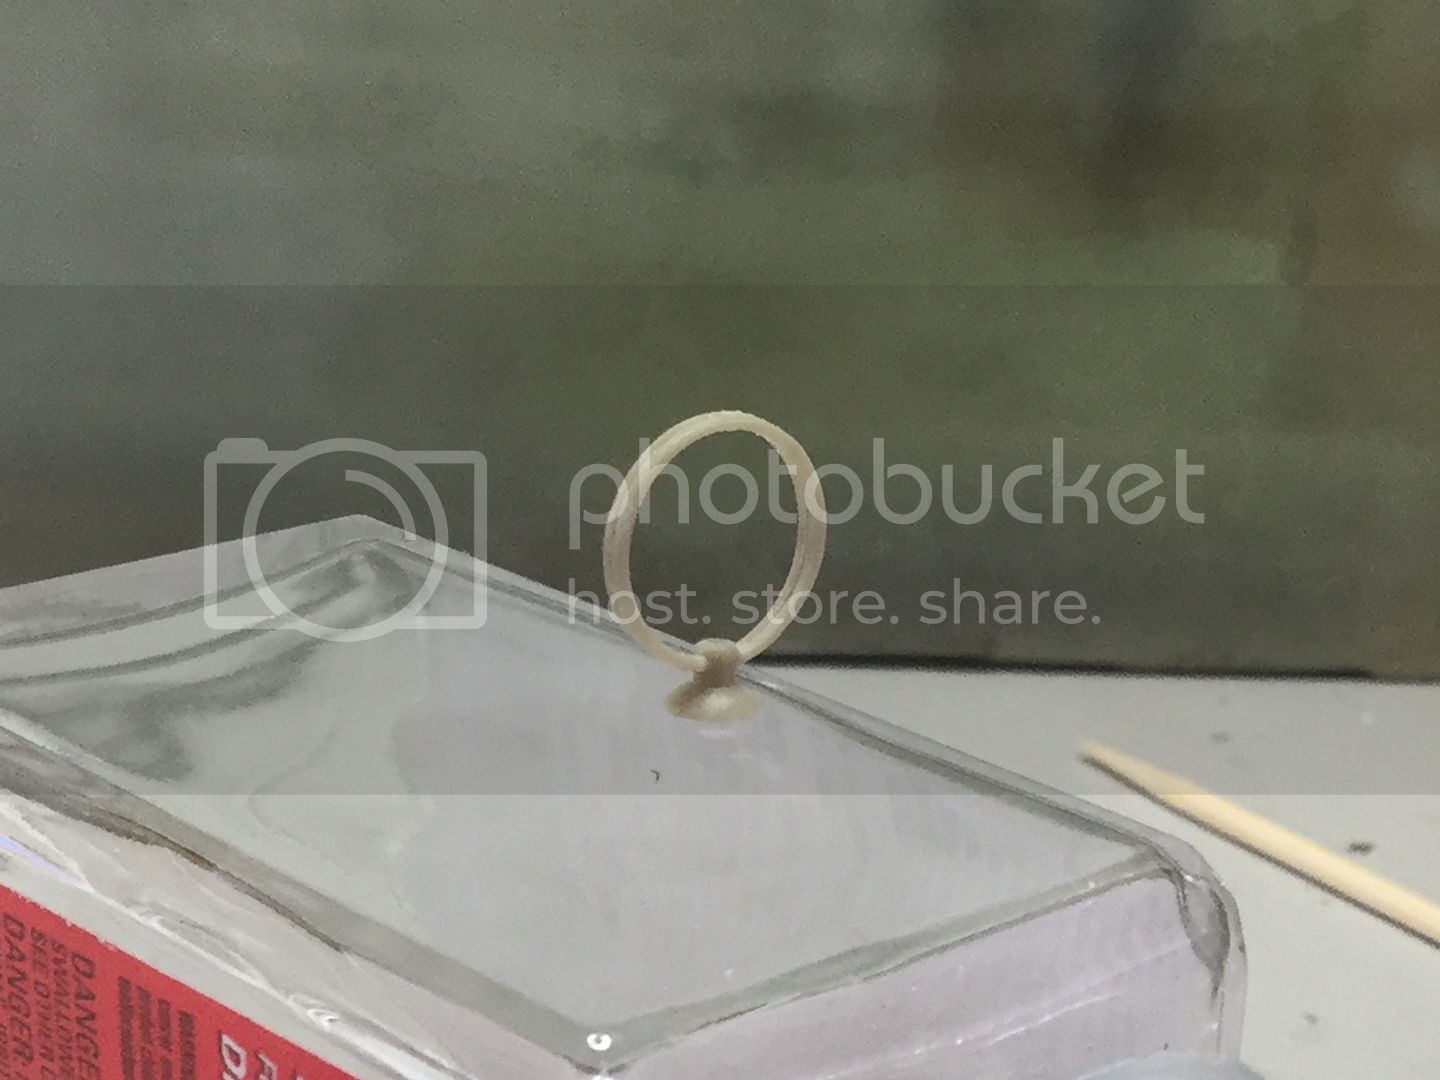
The DF antenna is made of two loops but produced as a single part. Judicious use of an RB ultra fine saw and a lot of luck resulted in an equal split down the middle to crate the two rings:


The rear stabilisers have been added and the whole frame given a general tidy up to bring it to a point where I am almost happy to move on. There is some re-scribing to be done and rivets to be replaced before I commit to paint:


I am still to settle on a scheme but I am leaning to the night fighter scheme (L1+DH) from the kit or one of Falck's early birds from the AM Techmod decals. The canopy sections have been dunked in Pledge (Future) and are drying and the PE details for the closed section of the canopy are being assembled. 
Thanks for checking in.
GazzaS
#424
_VISITCOMMUNITY
Queensland, Australia
Joined: April 23, 2015
KitMaker: 4,648 posts
AeroScale: 1,938 posts
Posted: Wednesday, June 08, 2016 - 12:16 PM UTC
Nice to see you getting on to a hangar queen, Kent. I'll be glad to watch.

Gaz
AussieReg
Staff MemberAssociate Editor
AUTOMODELER
#007
_VISITCOMMUNITY
Victoria, Australia
Joined: June 09, 2009
KitMaker: 8,156 posts
AeroScale: 3,756 posts
Posted: Wednesday, June 08, 2016 - 07:14 PM UTC
I will be following along as well Kent, looking good so far and as Gaz said, good to see a Hangar Queen hit the bench.

I have the Royal Class boxing sitting close to the top of the stash so I will be looking out for all if the tips I can find here.

Cheers, D
kahunaminor
_VISITCOMMUNITY
New South Wales, Australia
Joined: April 06, 2008
KitMaker: 151 posts
AeroScale: 141 posts
Posted: Thursday, June 09, 2016 - 12:38 PM UTC
Thanks guys,

Hopefully I will find the easier way to build this kit, I also have a few more in the stash.

Regards,
Kevlar06
_VISITCOMMUNITY
Washington, United States
Joined: March 15, 2009
KitMaker: 3,670 posts
AeroScale: 833 posts
Posted: Friday, June 10, 2016 - 08:40 AM UTC
Kent, this looks great so far. I had this kit for several years after it came out and finally traded it-- I just had too many kits in the stash-- but I feel your pain-- lately I've been pulling out some of my older kits and forcing myself to getting on with the builds-- I'm working on the 1/200 AMT Man in Space kit I bought 12 years ago, and the Revell 1/110 "Everything is Go" Mercury Atlas set I bought in a LHS close out in 1972!! I figured before I do the newer kits I should finish the older ones first!
VR Russ
alpha_tango
_VISITCOMMUNITY
Germany
Joined: September 07, 2005
KitMaker: 5,609 posts
AeroScale: 5,231 posts
Posted: Friday, June 10, 2016 - 12:43 PM UTC
Very nice build!

reminds me that I have some in the stash too ...

I like how clean you built wings and nacelles!

all the best

Steffen
kahunaminor
_VISITCOMMUNITY
New South Wales, Australia
Joined: April 06, 2008
KitMaker: 151 posts
AeroScale: 141 posts
Posted: Sunday, June 12, 2016 - 06:02 AM UTC
Thanks Russ,

It got shelved because I wasn't in a good place mentally to build it, like so many others I started and didn't finish around that time. It is a great kit and a testament to Eduard's ability despite some fit issues. I am looking forward to completing it and the C6, D, E, F, G2 and G4 plus Royal Class boxing that awaits!

Regards,
kahunaminor
_VISITCOMMUNITY
New South Wales, Australia
Joined: April 06, 2008
KitMaker: 151 posts
AeroScale: 141 posts
Posted: Sunday, June 12, 2016 - 06:04 AM UTC

Quoted Text

Very nice build!

reminds me that I have some in the stash too ...

I like how clean you built wings and nacelles!

all the best

Steffen


Thanks Steffen,
I read somewhere when it first came out that if you thin the wing area under the nacelle joins, it allows the unit to sit better. I think I can do better on the next one. Surely you would have room on your bench to squeeze another project into a corner?

Regards,
kahunaminor
_VISITCOMMUNITY
New South Wales, Australia
Joined: April 06, 2008
KitMaker: 151 posts
AeroScale: 141 posts
Posted: Wednesday, June 15, 2016 - 12:24 PM UTC
Welcome back,
Well there has been a lot going on but not much to show for it. The past couple of weeks has seen me continue to tidy up seams and prepare for painting. I also dipped and masked all the canopies both inside and out:


The PE parts that go underneath the central canopy have been painted and attached. I did this as I intend to attach the central and forward canopy pieces prior to painting, masking the voids with tape. Once the exterior marks come off they will be very noticeable:


I also had a go at filling the void behind the landing light. I inserted the end of a cut off plastic stem from a cotton bud. It gave a nice circular look and then painted the end chrome silver. The cover was then cemented into place. Not entirely happy with the look but at least there is now something behind the glass:


At least I have settled upon a scheme:


And with the central and forward canopies on, you can just make out the leather crash pad on the gun sight:


Thanks for looking.
GazzaS
#424
_VISITCOMMUNITY
Queensland, Australia
Joined: April 23, 2015
KitMaker: 4,648 posts
AeroScale: 1,938 posts
Posted: Wednesday, June 15, 2016 - 02:51 PM UTC
Kent,
Glad to see you moving ahead with so many great details.

Gaz
Removed by original poster on 06/22/16 - 00:08:44 (GMT).
kahunaminor
_VISITCOMMUNITY
New South Wales, Australia
Joined: April 06, 2008
KitMaker: 151 posts
AeroScale: 141 posts
Posted: Tuesday, June 21, 2016 - 05:15 AM UTC
Hello again,
 
I have been working on a lot of little items, wheels, MG, props and spinners:


I enjoy these detail work type of items.
 
Regards,
kahunaminor
_VISITCOMMUNITY
New South Wales, Australia
Joined: April 06, 2008
KitMaker: 151 posts
AeroScale: 141 posts
Posted: Tuesday, June 21, 2016 - 05:18 AM UTC
What I was actually doing was avoiding the final filling, sanding, riveting and scribing. Once I had done the peripheries there was nothing but to dive in head first! Having completed those tasks it was time to mask up and lay the first underside coat of Aeromaster RLM65:


And with paint on:


I had a central seam reappear on me so I had to do some remedial work with Tamiya Extra Thin and some clamps on the fuselage sides which fixed the seam. I also missed a seam on the port nacelle. I have a few more touch ups to do such as the rear of the nacelles so I took the opportunity to let it dry before I will retouch the paint shortly:


Regards,
GazzaS
#424
_VISITCOMMUNITY
Queensland, Australia
Joined: April 23, 2015
KitMaker: 4,648 posts
AeroScale: 1,938 posts
Posted: Tuesday, June 21, 2016 - 07:22 AM UTC
Hi Kent,
It's looking sweet! All of those little details really set this build apart.

Gaz
kahunaminor
_VISITCOMMUNITY
New South Wales, Australia
Joined: April 06, 2008
KitMaker: 151 posts
AeroScale: 141 posts
Posted: Tuesday, June 21, 2016 - 11:06 AM UTC
Thanks Gaz,

Details are my good and bad pursuits, sometimes too much detail is not enough!

Regards,
kahunaminor
_VISITCOMMUNITY
New South Wales, Australia
Joined: April 06, 2008
KitMaker: 151 posts
AeroScale: 141 posts
Posted: Thursday, June 23, 2016 - 10:52 AM UTC
The undersides were masked in preparation for the first camouflage colour, Aeromaster RLM 70:


I roughly drew the camouflage pattern on the upper surfaces with pencil and marked the areas to be painted with an 'X'. Once this has dried, I will more carefully mask for the Humbrol RLM71:


This is not the scheme I am doing but I use the pattern and mark the areas that will need retouching with RLM 70:


Regards,
GazzaS
#424
_VISITCOMMUNITY
Queensland, Australia
Joined: April 23, 2015
KitMaker: 4,648 posts
AeroScale: 1,938 posts
Posted: Thursday, June 23, 2016 - 12:53 PM UTC
Such a cool looking plane! On that scheme, what color is the band around the lower half of the antenna mast? It looks unusual.

Cheers,

Gaz
kahunaminor
_VISITCOMMUNITY
New South Wales, Australia
Joined: April 06, 2008
KitMaker: 151 posts
AeroScale: 141 posts
Posted: Thursday, June 23, 2016 - 01:14 PM UTC
Thanks Gaz,

I may do that one in future (if I can still see it!). The base of the antenna is natural wood. From memory the entire thing is wood (often used in WWII by everyone) and just the top section painted.

Regards,
alpha_tango
_VISITCOMMUNITY
Germany
Joined: September 07, 2005
KitMaker: 5,609 posts
AeroScale: 5,231 posts
Posted: Thursday, June 23, 2016 - 05:44 PM UTC
that was my second published model here on aeroscale... many many moons ago

great job and keep going

cheers

Steffen
GazzaS
#424
_VISITCOMMUNITY
Queensland, Australia
Joined: April 23, 2015
KitMaker: 4,648 posts
AeroScale: 1,938 posts
Posted: Friday, June 24, 2016 - 05:33 AM UTC
Kent,
Thanks for the information. I guess it makes sense. It's just one of those little construction details that rarely gets mentioned.

I knew that the fairing for the late-war Morane mast was wood, but being late war, I always just assumed wood to be used when aluminum was in short supply.

Gaz
kahunaminor
_VISITCOMMUNITY
New South Wales, Australia
Joined: April 06, 2008
KitMaker: 151 posts
AeroScale: 141 posts
Posted: Sunday, June 26, 2016 - 11:13 AM UTC
No worries Gaz,

Bitterly cold so not much work, despite copious amounts of "loft insulation". I have touched up the RLM 70 areas and awaiting the paint to cure before masking. Out of interest, I did conduct a little colour experiment for RLM colours 70 and 71. I used Aeromaster, Modelmaster, and Humbrol enamels. The difference speaks for itself. L to R: H71; AM70; MM70; MM71; AM70; MM70:


The Aires exhausts got a coat of Gunze Burnt Iron 76:


AussieReg
Staff MemberAssociate Editor
AUTOMODELER
#007
_VISITCOMMUNITY
Victoria, Australia
Joined: June 09, 2009
KitMaker: 8,156 posts
AeroScale: 3,756 posts
Posted: Sunday, June 26, 2016 - 12:31 PM UTC

Quoted Text

Out of interest, I did conduct a little colour experiment for RLM colours 70 and 71. I used Aeromaster, Modelmaster, and Humbrol enamels. The difference speaks for itself.


I dare say the same variations were true on the original 1:1 aircraft with paint from different sources, so if anybody looks at your model and says "that RLM is wrong" you can freely admit that they are right and you are wrong, but you are right and they are wrong.

Bottom line, your build is looking great and you are enjoying it, and I am enjoying watching it progress.

Cheers, D
kahunaminor
_VISITCOMMUNITY
New South Wales, Australia
Joined: April 06, 2008
KitMaker: 151 posts
AeroScale: 141 posts
Posted: Monday, June 27, 2016 - 10:35 AM UTC
To paraphrase one of the long remembered quotes from the iconic TV show "The Brady Bunch", "Masking! Masking! Masking!" Ready for some RLM 71:


Thanks for checking in,


kahunaminor
_VISITCOMMUNITY
New South Wales, Australia
Joined: April 06, 2008
KitMaker: 151 posts
AeroScale: 141 posts
Posted: Wednesday, June 29, 2016 - 06:49 AM UTC
Houston, we have camouflage! Not sure why but the RLM 71 dried darker in some areas. Possibly due to the fact I touched up the rear area with a different batch? Who knows, who cares:


The MLG had pins inserted and holes drilled to add a better strength and alignment. Happy with the end result. Still have a wash to go but I will gloss coat the entire build and then add the washes. Heretic, aren't I?:


The engine still needs some work but after the gloss coat and decals:


Thanks for looking.
AussieReg
Staff MemberAssociate Editor
AUTOMODELER
#007
_VISITCOMMUNITY
Victoria, Australia
Joined: June 09, 2009
KitMaker: 8,156 posts
AeroScale: 3,756 posts
Posted: Wednesday, June 29, 2016 - 12:25 PM UTC
Lovely looking splinter camo, and the varied shades just add to the effect.

Cheers, D
 _GOTOTOP