

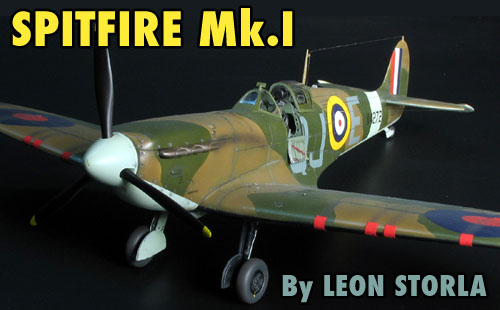
1⁄35Spitfire Mk.I
6
Comments
Introduction
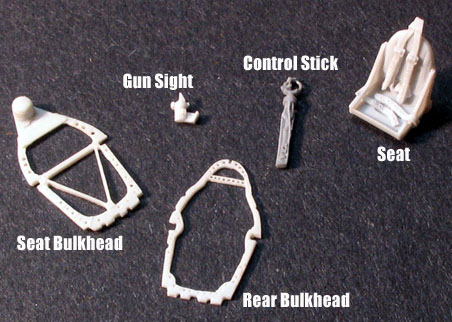
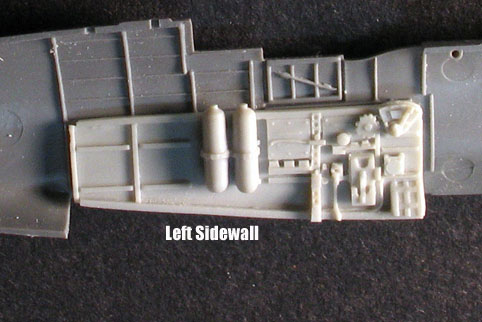
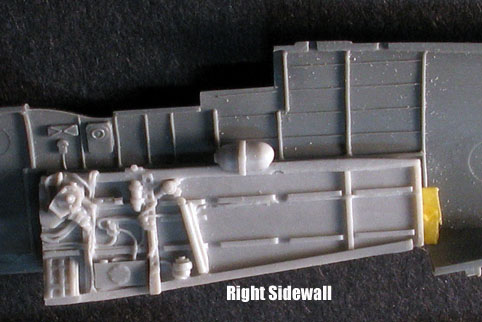
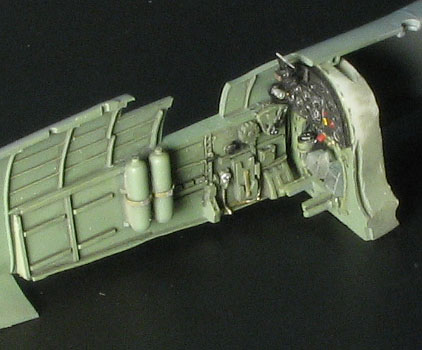
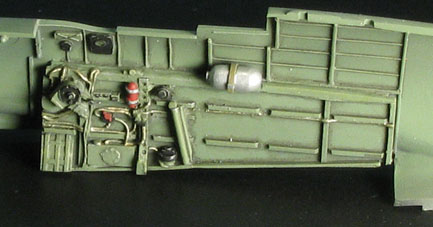
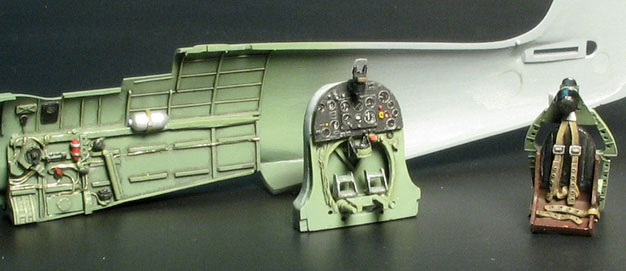
Here is my 1/48 Tamiya MK.I Spitfire. It was a very enjoyable kit and allowed me to try out quite a few new techniques. While the kit is great as is, I saw the Cutting Edge Spitfire I/II Super detailed cockpit set in the hobby shop and decided to add it to my build. I had read about how nice it was in various features online, and decided it was worth the extra money. The set replaces all of the Tamiya cockpit parts and fits over the details on the lower half of the fuselage sidewalls. One really nice feature of the set is that the sidewall pieces just snap over the existing Tamiya details, so no grinding of original sidewall detail is required. I have included pictures showing the parts before painting so you can see what you get in the Cutting Edge set.Building
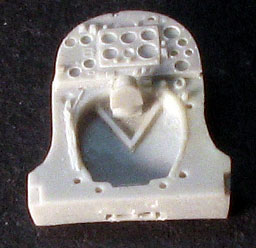
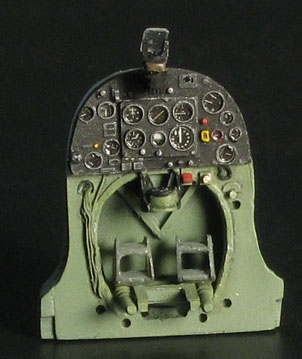
The instrument panel can be done be drybrushing the very nice details/needles, etc. on the resin or the details can be sanded away and an acetate panel can be painted and sandwiched between pieces. I decided to go with the sandwiched method; I think the instruments come out looking really sharp that way and for me it is a much easer way of getting nice looking details. However, I did drybrush the raised details on the panel and used drops of future in each of the instruments to represent glass.After getting the various cockpit parts cleaned up, I painted them with Polly Scale British Interior Gray Green, followed by a clear coat of future and then a wash with Polly Scale Grimy Black. Then the various details were picked out with Tamiya acrylics, a coat of Polly Scale flat was applied, and some chipping was done with a silver colored pencil. At this point in time, after learning a little more, I think I have some incorrect colors in the cockpit, but I beg your forgiveness on that.
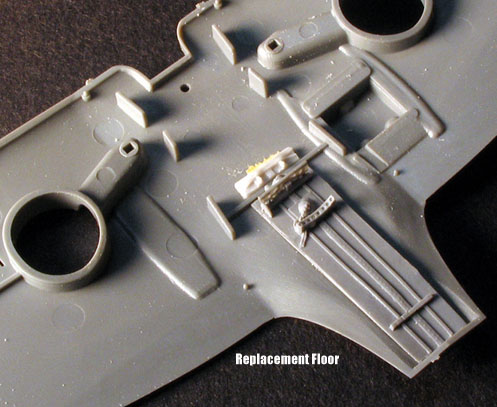
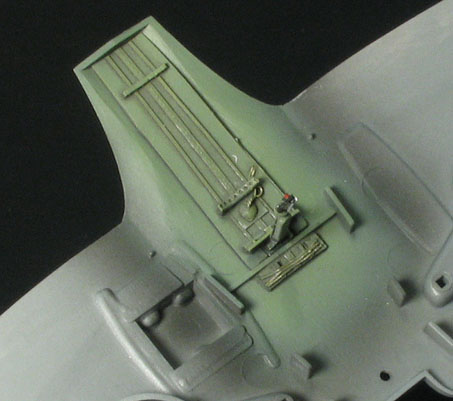
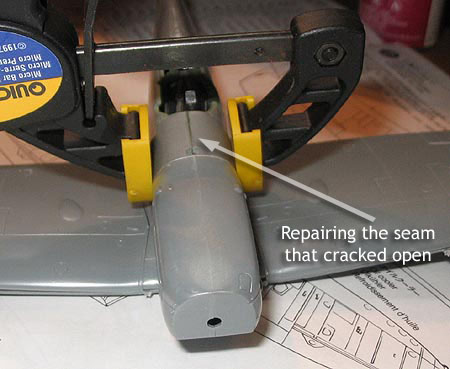
One small caution with the cockpit set is that although the sidewall pieces snap-on over the existing sidewall, there is quite a bit of sanding of extra resin that will be necessary. I thought I had it all taken care of about 3 different times, but kept discovering through dry-fitting that I needed to take a little more. My mistakes even lead to a very frustrating moment - After finishing with the cockpit, I glued the fuselage halves together and cleaned up seams, panel lines, etc. (For me, the most hated part of modeling) It appeared that everything fit fine. Then I went to test fit the wings and the fuselage seam cracked open. Apparently I had not gotten rid of all of the resin pour stub that I needed to, so I took it apart and sanded even more away, cursed awhile, and redid the fuselage seam; it finally seemed to do the trick.
About the Author


Comments
That is a great looking Spitfire build there Leon and a nice feature article.
You are really turning out some quality work on your models such as this and your Frank for the duel campaign. etc.. etc...
Keep up the great work !!
Wayne
DEC 08, 2006 - 05:30 AM

Thanks Wayne. I really appreciate it. The spit was an incredibly enjoyable build.
Leon
DEC 08, 2006 - 06:18 AM
Nice build feature. Well done, Leon.
QQ: Those red jobs that are over the gun ports (which I assume are there to ascertain whether they were fired or not?)... are those decals or they painted on?
Then... I'm sure I read somewhere that some of the early Mk.I's used a twin blade wooden prop? Is this correct? And if so when did they change to the three blade variable pitch prop?
Sorry about all the ignorant questions... all these great models are piquing (sp?) my interest in wingy things :-)
Rudi
DEC 08, 2006 - 12:47 PM

The first 77 Spitfires had two-blade props, but, if they survived, would have been re-fitted with three-bladed. There are a few points, for anyone contemplating the Tamiya Mk.I, "as is." The crowbar, on the door, did not exist, during 1940, and, at least, part of 1941; it was introduced on the Mk.V production line, and could be black, green, silver, but not red (that seems to have been a post-war innovation.) There should be IFF aerials, running from just aft of the radio hatch (but both sides) out to the tip of each tailplane; these were introduced in 1939. Ditch part no. A17, allegedly the radio. We suspect that Tamiya measured a Mk.I, which lives near here, and didn't realise that the radio, being a modern 7/20 channel set, isn't right for a Battle of Britain machine. The control box sat in the front left-hand corner, just under the front-left quadrant of the windscreen. Part no A19 is not the oxygen bottles, but the compressed air bottles; the oxygen bottle was set on the opposite side, just under the fixed glass. Both of these seem to have been corrected, on the detail set, but the oxygen bottle should be black. Very early seats, being metal, were green, but, later, they were made of a compressed resin mixture, and were a brick-red. Two-bar rudder pedals did not exist, before, at least, August, 1940. They were tested, then, and retro-fitted, on recommendation from, I believe, Bob Stanford-Tuck. Only late Mk.Is had the "automatic" retraction system; early a/c had the pump-handle fitting. The Tamiya kit is missing the armour plate, behind the seat; early fittings were unpainted steel, later they were cockpit green. Early Spitfires, built by Supermarine had a different shade, of green, from the normal shade, in the cockpit; it was a rather sickly shade, not very different from the Sky, used underneath. The red patches, over the gun muzzles, served a dual purpose; they kept dirt, and the cold out, as well as indicating that the guns were loaded, and cocked. Some groundcrew would dope pieces of newspaper over the shell ejection ports, as well.
All of this is not meant to be a criticism of this superb build, please understand that; I hope that you'll treat it as additional information.
Edgar
DEC 08, 2006 - 02:32 PM

After W.W.II international agreements stipulated that safety equipment be painted red. As the crowbar was there to help the pilot to extricate himself if trapped or if the canopy jammed when jettisoned it was considered to be an item of safety equipment. Therefore it had to be painted red. Museum exhibits and restorations often have red crowbars and it may well be still a legal requirement on flying examples.
 Black stencilling is also frequently seen and non authentic. During W.W.II the crowbar was either natural metal or painted the same colour as the door and the stencilling invariably red.

 Door on a Mk II Spitfire. No crowbar.

DEC 08, 2006 - 06:59 PM
Wow Antoni and Edgar. Thanks for the extra info. Definitely received as good extra info and not criticism. I will store the info given for future builds. Thanks!
Rudi, My red pieces are actually red painted pieces of tamiya tape.
Thanks again guys. I really appreciate the comments and extra info.
Leon
DEC 08, 2006 - 08:51 PM
Copyright ©2021 by Leon Storla. Images also by copyright holder unless otherwise noted. The views and opinions expressed herein are solely the views and opinions of the authors and/or contributors to this Web site and do not necessarily represent the views and/or opinions of AeroScale, KitMaker Network, or Silver Star Enterrpises. Images also by copyright holder unless otherwise noted. Opinions expressed are those of the author(s) and not necessarily those of AeroScale. All rights reserved. Originally published on: 2006-12-08 00:00:00. Unique Reads: 8591

WEB HOSTING BY


Copyright ©2021 AeroScale and Kitmaker Network, a subsidiary of Silver Star Enterprises
All Rights Reserved. Please read our Conditions of Use and Privacy Policy.
All Rights Reserved. Please read our Conditions of Use and Privacy Policy.