

1⁄32Silver Wings Hawker Hart Review Build
8
Comments
Fuselage Assembly
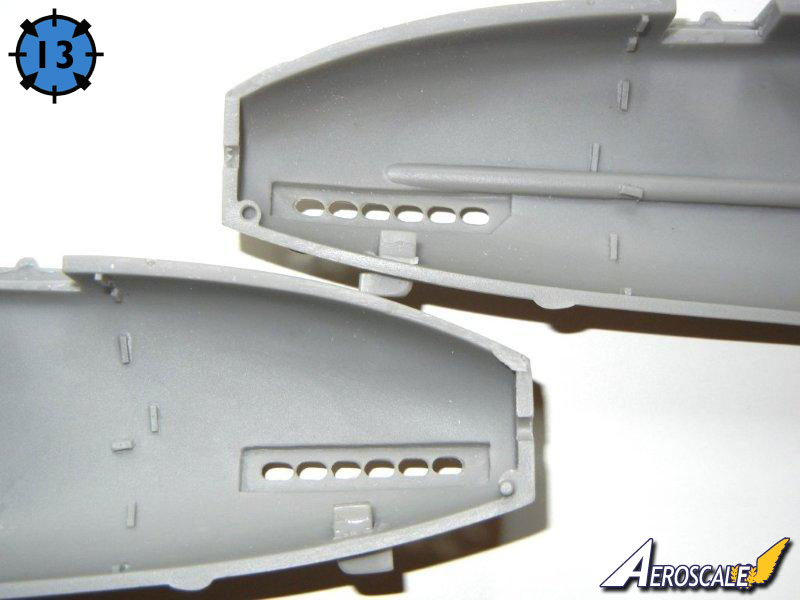
Fuselage assembly is straightforward and should not present any issues. My sample did have some slight warping inward on the bottom of the fuselage around the cutout for the bomb aimer. Fortunately, being resin, simply pouring some hot water on it and then bending back into shape worked fine. If at the end of the previous step, your cockpit subassembly ended up with a slight twist, you should still be able to fit it correctly in the fuselage following the directions below.■ Install the exhausts into the fuselage, note that they are handed so that each goes into its proper place. (see photo 13).
■ Test fit the air intakes (L shaped parts that go on top of the fuselage), but do not glue them into position.
■ Attach the MG breech assembly to the fuselage side, and attach the PE charging handle and attach the ammo drums (photo 14) Although not noted in the instructions, each ammo drum should have a PE handle (PE20) installed.
■ Install the firewall bulkhead to one fuselage half, and test fit the opposite half to ensure proper alignment.
■ At this point you can test fit your assembled cockpit into the fuselage. You may see that it fits so well that you can simply glue the fuselage together and it will be in the proper position. However, if it does not fit well, then separate the fuselage halves, and attach the cockpit to one side, using the locator tabs provided. Let set, and then attach to the opposite side, while gluing the fuselage together. You may need to prod or poke it with a toothpick to get it into the proper position.
■ Once the fuselage glue has set, you can clean up any seams by sanding. My sample had a bit of a seam along the bottom (top was perfect), however the superglue I used to join the fuselage filled it nicely. Once complete, you can attach the air intakes; PE hand holds (PE8); and the MG barrel. You may wish to use one of the fine Master brass barrels instead of the supplied part for a crisper look.
■ The kit provides PE fabric stitching, which I have attached to my model. However, you may wish to skip this step as I have only seen one photo (of a museum airframe) where it appears you can see this stitching. However, should you wish to add it, you can use the provided stitching, which should look very nice after a coat of primer. As an alternative, both Archer transfers and HGW offer alternative, easy to use, stitching as well.
■ You can attach the sliding bomb-aimers door to the bottom of the fuselage in either the open or closed position.
■ Attach the tailskid and rudder post cap at this point.
■ At this point, using the resin part of the gun sight tube, I marked the locations for two holes for the attachment points and drilled them out. After a successful test fit, I removed the tube and attached the PE beads and sight. I then set this part aside until final assembly. You can attach it at this point, as getting it in with the wing in place might be tricky, but I was more concerned about damaging it when fitting the heavy upper wing.
■ I cut out the windscreen PE and acetate part and bent the PE part into the correct shape. Note that the tabs on the lower side panels should be angled downward slightly to help get a better fit. Once I was happy with the PE fit, I lightly scored the acetate piece with a hobby knife on the two lines where it needs to bend to help it bend and stay in position. I recommend dry fitting the acetate, and then when you are satisfied, attach only the PE part to the fuselage, and attach the acetate piece after final painting.
■ Lastly, you can attach the film window on the starboard side (or you can wait until after final painting) and the pilots headrest behind the seat. Do not attach the venturi tube, gun sight mechanism or windscreen at this point, as they may be damaged when attaching the other major airframe components.
Landing Gear
The landing gear, although it looks delicate, is surprisingly strong which it must be as the completed model weighs about 250 grams (or just over ½ lb). As the instructions are not clear on how to assemble the components, I consulted my references and discovered that the main struts attach at the front of the axel tube, and the supporting struts attach at the upper-rear of the axel tube.■ First, make sure that your axel tube has any cooper wire sticking out of the ends removed, so that it is flush with the resin wheel attachment point.
■ Using a #66 (.033) drill bit, drill out the main gear strut attachment points on both sides of the fuselage. Test fit your main gear struts (do not trim any of the copper wire from the top side as it will give added strength to the gear assembly). Next, using the same drill bit, widen the outermost slot on the front edge on each side of the axel tube, making sure to keep the holes aligned. Test fit the axel tube to the test fitted main gear struts.
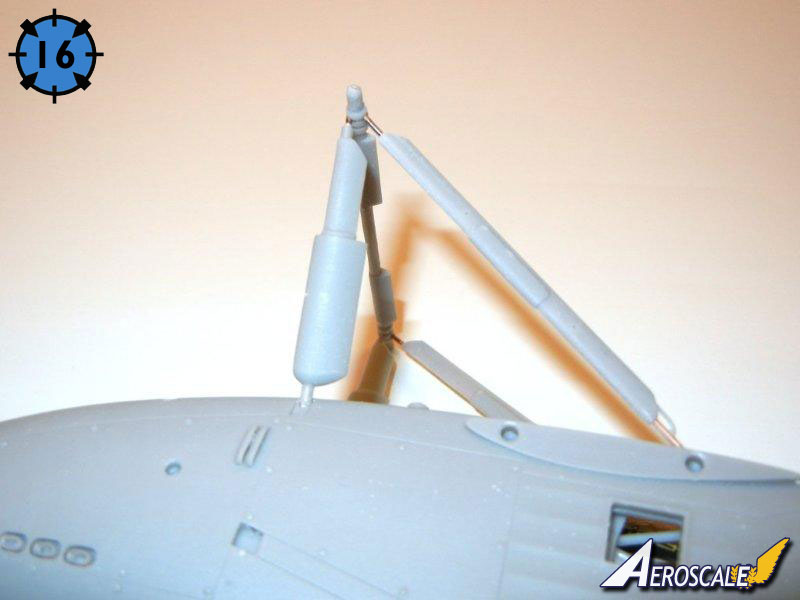
■ On the bottom of the fuselage, there are two indentations that appear to be for the ends of the support struts. Unfortunately, these indents will not allow the supporting strut to fit properly. Again, using the #66 drill bit, drill a hole 4mm in front of the indent and at an angle towards the test fitted main gear strut and axel tube. Test fit the support strut and repeat for the opposite side (see photo 15) and be sure the brake lines are on the side facing away from the fuselage.
■ If everything fits and is aligned correctly, you can glue the landing gear in place. See photo 16.
■ Test fit the main wheels and admire your work (photo 17 and 18).


About the Author


FROM: GEORGIA, UNITED STATES
I've been modeling on and off for over 40 years. My primary interests are WW1, Interwar and WW2 aircraft, although I do build an occasional WW2 armour kit. I used to build 1/32 kits back in the 80's, but switched to 1/48 in the early 90's when all the nice new kits started showing up. I've sinc...
Comments


Nice to see some "Tweeners" being released. Nice too to see a two seater.
Do they do a Fury or a Demon?
Cheers,
Hugh
AUG 16, 2011 - 01:16 AM

Hi everyone. Thanks to Rowan for inviting me to post this "build guide"/review here.
I wanted to see if I could get some feedback on what your thoughts are on this type of review. Is it too long, too short, too detailed, not detailed enough etc. Is there any benefit to you, the reader, in seeing the build without paint, or would you prefer to see it painted?
This is the first review of this type I have done, so please let me know how I can improve it - don't be shy - I am a big boy and can take harsh criticism if necessary!
Thanks!
Doug
AUG 17, 2011 - 09:03 AM

Hi again
I always used to read Model Aircraft Preview, and found their "nothing to hide behind" style really useful in judging a kit - often more so than a finely finished model that often said more about the skills of the builder than the quality of the kit.
We've seriously considered running reviews in this style on Aeroscale in the past, so I'd also be very interested in seeing readers' feedback on it and whether it's something you'd like to see us do regularly for standard releases.
All the best
Rowan
AUG 17, 2011 - 10:41 AM

Doug and Rowan,
I found this review very informative and probably just a tad too long although for the subject in question it may be right. I think without seeing this done on another subject, never having seen the magazine in question, it is hard to judge.
The one question I have is what do you do with the made up kit now as you can not get inside to paint the interior? Myself I would not want to do this type of review but yes I did find it helpful.
AUG 17, 2011 - 11:47 AM
Hi Luciano
Probably the reason more people aren't prepared to do a review like this is that the kit truly is "sacrificed" for the sake of showing how well it fits together (or otherwise). It sort of goes against every modelling instinct - a really tough decision to make, especially with a limited edition resin kit like this one!
All the best
Rowan
AUG 17, 2011 - 11:59 AM

Building it with out painting and filling is helpful, and shows how the kit really is, and how much work is needed correcting seam lines and whatnot.
I have done the same type of review myself with a HobbyBoss F-16D Fighting Falcon , and although I did enjoy building it this way, it's not something I would like to do on a regular basis, unless I had two of the same kits and one could be "sacrificed" (but how often is that going to happen ).
Andy
AUG 18, 2011 - 02:56 AM
Nice review Andy!
@ Luciano - this kit will likely never see paint, as it has served its purpose as a review kit. I actually think it looks pretty good as is, but I just need to figure out where to put it
@ Hugh - Montex did a 1/32 Fury which was mastered by the owner of Silver Wings before he started his own company. Ali @ A2Zee Models is now is the vendor for this kit and sells it with upgraded metal struts and proper 43 squadron decals. No one does a Demon that I know of, so if you really want one, you'll need to convert the Hart to get one
Regarding reviews, I personally find it easiest to do the non-paint (and non-rigged for biplanes) reviews as I can get it done much faster when I don't need to plan painting/filling/decaling etc into the mix. And as some of you mentioned, the benefit is the reader gets to see how the kit is without anything "hidden" by filler and paint.
As I was given this kit to review, and I have my own copy in the stash, I thought this review would be a good way to get to learn about the kit, and provide a useful review at the same time. I think doing the review kit this way will help me do a better job building my own Hart kit
I'm currently working on the same type of review for the Silver Wings Gloster Gladiator, and I'll submit it for posting once it is complete.
Thanks for your comments (and for anyone else that wants to provide feedback!!) and to the emailed comments I received as well.
Cheers,
Doug
AUG 18, 2011 - 09:35 AM
Copyright ©2021 by Doug Nelson. Images also by copyright holder unless otherwise noted. The views and opinions expressed herein are solely the views and opinions of the authors and/or contributors to this Web site and do not necessarily represent the views and/or opinions of AeroScale, KitMaker Network, or Silver Star Enterrpises. Images also by copyright holder unless otherwise noted. Opinions expressed are those of the author(s) and not necessarily those of AeroScale. All rights reserved. Originally published on: 2011-08-11 00:00:00. Unique Reads: 11932

WEB HOSTING BY


Copyright ©2021 AeroScale and Kitmaker Network, a subsidiary of Silver Star Enterprises
All Rights Reserved. Please read our Conditions of Use and Privacy Policy.
All Rights Reserved. Please read our Conditions of Use and Privacy Policy.