

1⁄35Storm Warning
16
Comments
Positioning the stripes
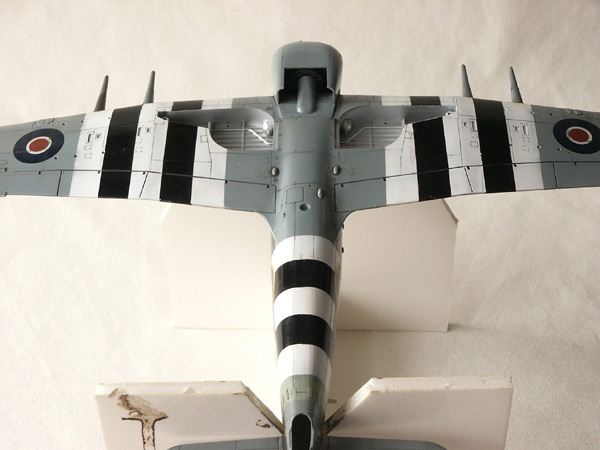
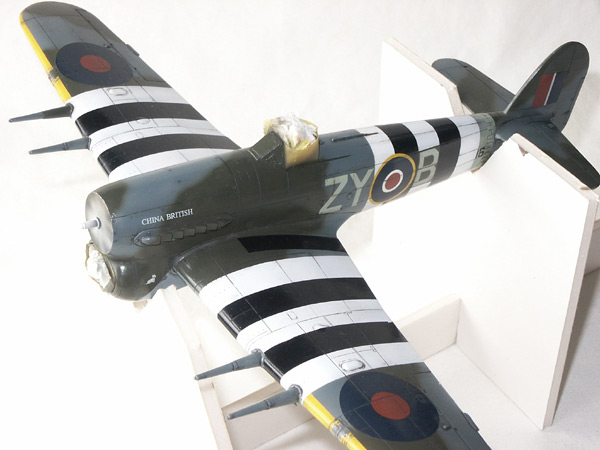
I have separated this part of the decalling process because I had to devise a way of position each stripe with accuracy and make sure it was straight. The method I used had to take into account the fact that the larger the decal the more surface tension it has. Meaning the harder it is to move it once in position. It is possible, by liberal use of water, but I wanted to avoid any problems.I started on the underside; where mistakes would be easier to hide. I first of all cut a thin piece of Tamiya masking tape, long enough to go around the wing cord. This was roughly positioned and lightly applied. I then used the dividers to get the spacing, pulling up and replacing the tape as I checked the position, around the wing. I checked and re-checked and when I was happy I applied the decal.
This method worked well but care was needed, in all it took me 4 evenings work, up to a couple of hours at each sitting, but the effort, I believe, was worth it. There are 4 points to look out for one, as already mentioned, is the decal that goes around the fuselage roundels. Because the thin area makes them difficult to handle. Although I only had a fight with the port side one, I would recommend they be cut in half, at the thinnest point. Then apply them as two separate pieces.
The decals overlap where they join, but this is not a real problem on the wings. Just keep the overlap at the trailing edge and trim, when dry. The fuselage is a little different. The joins need to be dealt with before the decals are completely dry. The rear one can be but jointed at the top, so there is only an overlap at the bottom. Cut through both decals in the middle of the overlap, using a new scalpel blade. Remove the top piece then, gently, peal back the decal until you can remove the piece of the first decal, underneath. Lay the pealed back decal back down. This is a very delicate operation, and not for the faint hearted. If you have any doubts leave well alone. If you leave the first decal too long you wont be able to remove the piece. The roundel determines the location of the front one, so you may have to trim top and bottom. If there happens to be a gap, cover it with paint. If you are at all unsure about doing this then leave the overlap. If the decals are well snuggled down then a couple more coats of Klear may hide the overlap anyway.
The other 2 problems were minor; the cut out in the wing stripes, to clear the gun faring, were too small. I simply cut them a little larger. Lastly, the small piece of decal on the undercarriage door was way too small, so I masked and sprayed those areas. The obvious question is wouldnt it have been easier to have masked and sprayed the black? Probably, maybe Im just a masochist, but I wanted to try and just bring the learning curve down a little more. Id be interested to know what you think, was it worth it?


About the Author


FROM: ENGLAND - SOUTH WEST, UNITED KINGDOM
Hi, my name is Mal Mayfield and I have been modelling seriously for about 25 years. My main interest is 1/48 scale second world war. I build all types and all combatants. I have built 1/35 scale "targets" and 1/72 scale modern aircraft, plus a couple of cars. I have also dabbled with figure painting...
Comments
Thanks guys, I enjoyed doing it. Watch out for "Storm Bringers" as this article isn't complete without it. You will be amazed at how much I can write about 8 little plastic rockets :-)
Mal
JAN 31, 2005 - 09:34 AM


Nope, mine has the ID stripes under the wings, before D-Day. I'd say 1943ish...
I've got my bombs to paint (because everyone should know RCAF Typhies never carrier rockets) and some touch ups to make, but for that I need a new paintbrush, the one I normally use is KIA...
FEB 01, 2005 - 12:36 PM

That Typhoon is well cool! You should do a dio for it! the article also very good!
cheers
Philip
FEB 02, 2005 - 10:30 AM
Great article mal, realy good job, clear and that plane's a nice one!
Ollie, must agree, thats a nice typhoon!
Frank
FEB 02, 2005 - 10:49 AM
You know what's the best part of that Typhoon Frank?
It's going to be RCAF!
FEB 02, 2005 - 01:10 PM
Thanks Philip, I gave up on dioramas, they take far to much time I would never get any models built :-) I have been thinking of doing a few bases, for photographic purposes. I will actually be doing a small dio when I complete my N1K1 Kyofu float plane. I think that float planes should be shown on water, as land planes are shown on the ground. This will be fun because it will be the first time I have tried depicting water. I'm thinking a ground crewman or maybe a "sloppo" sitting on the wing and fishing :-)
Mal
FEB 03, 2005 - 08:03 AM

Mal, Great article of one of my favorite aircraft. It is especially apt as I am currently researching RAF tactical air power of the period. A wonderful subjects. Great work
Ross
FEB 04, 2005 - 12:17 AM
Copyright ©2021 by Mal Mayfield. Images also by copyright holder unless otherwise noted. The views and opinions expressed herein are solely the views and opinions of the authors and/or contributors to this Web site and do not necessarily represent the views and/or opinions of AeroScale, KitMaker Network, or Silver Star Enterrpises. Images also by copyright holder unless otherwise noted. Opinions expressed are those of the author(s) and not necessarily those of AeroScale. All rights reserved. Originally published on: 2005-01-30 00:00:00. Unique Reads: 16876

WEB HOSTING BY


Copyright ©2021 AeroScale and Kitmaker Network, a subsidiary of Silver Star Enterprises
All Rights Reserved. Please read our Conditions of Use and Privacy Policy.
All Rights Reserved. Please read our Conditions of Use and Privacy Policy.