

1⁄35Storm Warning
16
Comments
Weathering
The residue of the setting solution was removed from the model using clean water and a rag. The Mr Softer, being white, seemed to leave more of a mark than clear setting solutions do. This was not a problem and the model was cleaned in a matter of minutes. A dry rag was used to help the drying process.I made sure there were no bits hanging around on the surface, by using a tack rag, then applied two more brushed coats of Klear. These coats help level out the surface with the decals, preventing the washes building up against them. The Klear also protects the decals from the weathering process.
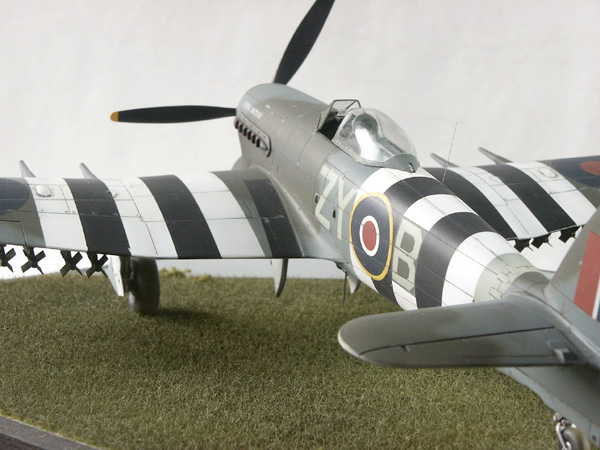
A wash consisting of artist oil paint and white spirit was applied (see my article HERE) for an explanation of the process). I also used the wash on the invasion stripes. Although it could be argued that these would be clean, due to them being applied recently. I left them free of any wash at first, but they just didnt look right. I lightened the wash, slightly, on the invasion stripes, I think they look much better for it.
I know, from talking to my mate at work that used to paint full size aircraft at RAF Finningly, that they weathered pretty fast. Also white would show up any dirt in no time. You will also see that I have included cordite staining, to suggest that this aircraft has already been active while carrying the stripes. In fact there probably arent many targets left.
I used very small amounts of neat Davy Grey oil paint to simulate oil and dirt streaks. These were placed with the point of a toothpick, to the edges of inspection panels, then dragged back with a finger or cotton bud. Dont overdo this, you dont want it to look like its leaking like a sieve. But its a nice affect that adds a little realism and shows that the aircraft is in use.
The wash is allowed to dry for a few days, then the matt coat is applied. I am currently using Humbrol Matt Coat, which gives a nice finish. Dont forget to wash and matt coat all the dangly bits as well.
Once the matt coat is dry I add a little paint chipping using a silver pencil. This needs to be done sparingly and in the appropriate places. Wing leading edges, around access panels, particularly around those that are opened regularly, such as engine and gun/ammo access panels. The fasteners would also have paint worn off them. I also chip along the odd panel line and or junction. The tip of the spinner would lose paint. Also pictures of Typhoons show the front third of the rivets, on the lower canopy rail to be missing paint. I re-sharpened the silver pencil and add a few dots to represent this.
Cordite and engine exhaust was added using tyre black, more a dark grey. For the cannon I aimed the spray directly at the muzzle, this gave a more realistic affect than streaking cordite stains back along the wing. This is true for guns that extend somewhat from the wing, unlike Spitfire guns that are fully contained in the wings and cordite did streak back along the wings.


About the Author


FROM: ENGLAND - SOUTH WEST, UNITED KINGDOM
Hi, my name is Mal Mayfield and I have been modelling seriously for about 25 years. My main interest is 1/48 scale second world war. I build all types and all combatants. I have built 1/35 scale "targets" and 1/72 scale modern aircraft, plus a couple of cars. I have also dabbled with figure painting...
Comments
Thanks guys, I enjoyed doing it. Watch out for "Storm Bringers" as this article isn't complete without it. You will be amazed at how much I can write about 8 little plastic rockets :-)
Mal
JAN 31, 2005 - 09:34 AM


Nope, mine has the ID stripes under the wings, before D-Day. I'd say 1943ish...
I've got my bombs to paint (because everyone should know RCAF Typhies never carrier rockets) and some touch ups to make, but for that I need a new paintbrush, the one I normally use is KIA...
FEB 01, 2005 - 12:36 PM

That Typhoon is well cool! You should do a dio for it! the article also very good!
cheers
Philip
FEB 02, 2005 - 10:30 AM

Great article mal, realy good job, clear and that plane's a nice one!
Ollie, must agree, thats a nice typhoon!
Frank
FEB 02, 2005 - 10:49 AM
You know what's the best part of that Typhoon Frank?
It's going to be RCAF!
FEB 02, 2005 - 01:10 PM
Thanks Philip, I gave up on dioramas, they take far to much time I would never get any models built :-) I have been thinking of doing a few bases, for photographic purposes. I will actually be doing a small dio when I complete my N1K1 Kyofu float plane. I think that float planes should be shown on water, as land planes are shown on the ground. This will be fun because it will be the first time I have tried depicting water. I'm thinking a ground crewman or maybe a "sloppo" sitting on the wing and fishing :-)
Mal
FEB 03, 2005 - 08:03 AM

Mal, Great article of one of my favorite aircraft. It is especially apt as I am currently researching RAF tactical air power of the period. A wonderful subjects. Great work
Ross
FEB 04, 2005 - 12:17 AM
Copyright ©2021 by Mal Mayfield. Images also by copyright holder unless otherwise noted. The views and opinions expressed herein are solely the views and opinions of the authors and/or contributors to this Web site and do not necessarily represent the views and/or opinions of AeroScale, KitMaker Network, or Silver Star Enterrpises. Images also by copyright holder unless otherwise noted. Opinions expressed are those of the author(s) and not necessarily those of AeroScale. All rights reserved. Originally published on: 2005-01-30 00:00:00. Unique Reads: 16876

WEB HOSTING BY


Copyright ©2021 AeroScale and Kitmaker Network, a subsidiary of Silver Star Enterprises
All Rights Reserved. Please read our Conditions of Use and Privacy Policy.
All Rights Reserved. Please read our Conditions of Use and Privacy Policy.