1⁄35French Rescue Goose
15
Comments

Summary
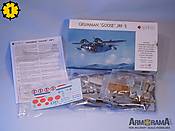
Usually you buy a kit because you like the subject... and so do I. But with Signifer's 1/48 Grumman JRF Goose it was the contrary! I'm not particulary a fan of this floatplane but when I saw the kit for the first time, I knew I had to get one (picture 1). The level of detail is simply amazing and the kit can be considered a "masterpiece". It's almost to good to be built...If you want toget an idea for yourself, just take a look at the review .
History
The Grumman G21 "Goose" amphibian was designed originally in 1936. Two engines, entirely built in metal, its design was based on the famous J2F1 "Duck". The first flight was in 1937.The JRF5 was the most produced version with 190 machines. Total production was 367 planes from 1937 to 1946. The "Goose" flew with the USAAC, the US NAVY, the RCAF and the RAF during World War Two. France, Japan and Portugal also used it after 1945. Today, thanks to the rigorous anti corrosion process used by Grumman, about twenty of them are still flying.
Cleaning the parts
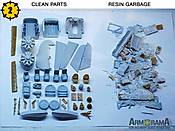
Before starting to build the kit, you must be warned! Apart from the fuselage halves and the wings, almost all the parts are made of resin. Signifer was an all-resin manufacturer and the Goose is their first step into the world of short run, thanks to MPM's help with the plastic parts. But the resin tradition is still strong as you can see in picture 2. Once the parts are cleaned, there is almost as much resin junk as kit parts! A well ventilated workroom and mask are strongely recommended!Pandora's box
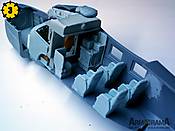
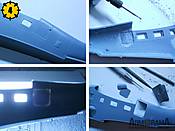
Once the fastidious cleaning work was done, I was like a little child with plenty of little toys! All I wanted to do was to put the parts in place to see how the interior of the plane would look like... I think this is called "test fitting the parts" (picture 3). By doing this, you can realize the level of detail of the kit... and also the work that will be necessary to fit all these things together.At this time I decided to open the side door so the passenger's cabin would be visible. Doing that was like opening Pandora's Box - but more on that later. I decided to use the following technique: first I deepened the panel lines around the door. Then I thinned the plastic with my Dremel until I could see through it and finally cut the door (picture4). This allowed me to keep the details of the door and gave the fuselage opening a more realistic look, the thickness being more in scale. The inside of the door was scratchbuilded later.
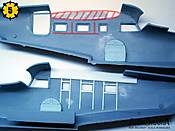
As I test fitted the fuselage and the wings to see how the cabine would look like through the door I noticed a "hole" would have been visible that would have allowed you to look inside the wings!? Surely not a design of the real plane. I talked about opening Pandora's Box previously and here we are! I had to close that "hole" using spare plastic and while I was in the mood, I replaced the interior framing and used the new one made of Evergreen to glue the windows (see red areas on picture 5).
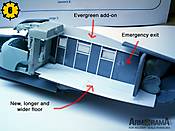
Another "Pandora's Box effect" was the cabin's floor... the kit's part was too short! This would not have been visible with the door closed, but since I decided to open it I suppose I had to accept all the consequences. Using the original floor as template I made a new one using Styrene and evergreen. I also noticed on reference material that there was an emergency exit that was visible right in front of the door! Right: another "Pandora's box effect" (picture 6)
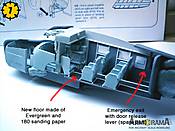
I test fitted the seats and radio rack inside the cabin to see if enough space was available after all this scratchbuilding... fortunately there was! You can also see on picture 7 that I used sanding paper to reproduce the non-slip coating of the floor - a fast and realistic solution!
Comments
Simply stunning! I cant wait to see what you build next. Congrats on a job well done!
OCT 15, 2005 - 05:52 AM
Hi all!
Thanks Dave, Rob and tapper...
My next build? A Tamiya 1/48 Schwimmwagen... my first vehicle since I build the whole Matchbox armor line more than 20 years ago! Maybe I will switch to armor now?
Jean-Luc
OCT 15, 2005 - 11:40 PM
Hi Jean-Luc,
The Goose! I tend to like floaty-boaty wingy-thingies and the Goose and the Duck are two of my favorites ,
Thanks for this article. Both the model and article are very enjoyable. You did a fabulous job on this bird
OCT 28, 2005 - 11:48 AM
thats one pandoras box that was worth opening! the tape on the tyres is a neat looking idea, and how did you get that drill into that cocktail stick?
if you switch to armour ill miss my sparring partner! (although i have a tamiya 250 halftrack, and a railway "tank" from revell!)
OCT 29, 2005 - 01:07 AM
Thanks Fred and Rick!
Phil, I first drilled a hole in the cocktail stick using my Dremel then put the drill in it wich I secured with CA glue... voilą!
I seize the opportunity of this message to say that Signifer added a link to my review and feature of the Goose on their website. Maybe this will help Armorama to have more French readers...
Jean-Luc
OCT 30, 2005 - 08:38 PM
Great plane and great review! I immediately ordered it through Hobbyeasy in Hongkong (which by the wauy is a GREAT webstore and cheap!! Thanks Jean Luc!
NOV 11, 2005 - 08:46 AM
Hi Michiel!
Thanks for your kind words! I wish M. Meissonier (owner of Signifer) could read such posts! :-)
Jean-Luc
NOV 11, 2005 - 09:55 AM
Awesome! Congratulations Jean-Luc!
It's great to know Signifer recognize the superb work you're showing here.
All the best
Rowan
NOV 11, 2005 - 10:02 AM
Wow thats one fantastic kit you made there Jean-Luc. Back when i was building planes, the part i dreaded most was to place both halves of the fuselage and many a times given up on a model at that point.
Fantastic tutorial and one for the bookmarks.
NOV 11, 2005 - 10:17 AM
A superb model and review. A good couple of pointers there for the inexpierienced builders amongst us (me included). Ted absolutely GENIUS with the tyres, i wouldn't have thought of that in a thousand years.
Thank you Ted and Rowan.
Andy
NOV 11, 2005 - 10:34 AM
Copyright ©2021 by Jean-Luc Formery. Images also by copyright holder unless otherwise noted. The views and opinions expressed herein are solely the views and opinions of the authors and/or contributors to this Web site and do not necessarily represent the views and/or opinions of AeroScale, KitMaker Network, or Silver Star Enterrpises. Images also by copyright holder unless otherwise noted. Opinions expressed are those of the author(s) and not necessarily those of AeroScale. All rights reserved. Originally published on: 2005-10-15 00:00:00. Unique Reads: 19248


