

1⁄35F14A Tomcat - PART TWO
Painting the Black Box Cockpit for Effect
Introduction
Painting cockpits is a topic that I have read about on numerous occasions
from lots of people, but I still get asked how I do it. I do not do much
different from that which I have read before, but I thought that this might be a
good thing to get more explicit about. So, here I am.
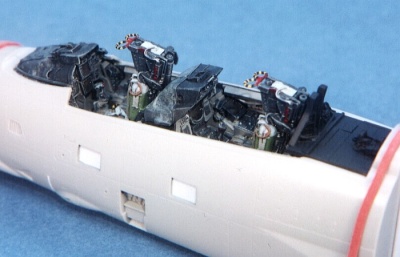
This posting is "part two" to my last posting, "Tomcat Cockpit", where I
discussed the integration of the Black Box cockpit set into the Hasegawa F-14
Tomcat. In that posting, I left off with the cockpit completely cleaned up and
ready to be glued into the model. All it lacked was paint.
While what I write here is going to specifically relate to the Tomcat cockpit
and the Black Box cockpit set, the general procedures I discuss relate to almost
any cockpit in almost any aircraft or era. In spite of significant differences
in the aircraft structure, as far as modeling is concerned, the only thing
really different between the cockpits of an F-14 Tomcat, A6M "Zero", Me 410 "Hornisse",
or B-25 Mitchell are the colors you use on the various surfaces. The application
of those colors, whatever they are, is mostly the same.
Additionally, what I write here is specific to the way I do cockpit painting. I
make no bones about being right or wrong here. Every modeler has there own
tricks and styles. No tricks or styles are wrong as long as the modeler is happy
with the outcome of their labors. While I am always looking to improve my
abilities, I am satisfied with the results I get using the procedures I am going
to outline here.
This story re-published with the permission of the David W. Aungst.
About the Author


All Rights Reserved. Please read our Conditions of Use and Privacy Policy.