

1⁄48The Dübendorf Brothers
27
Comments
Making the silicone molds
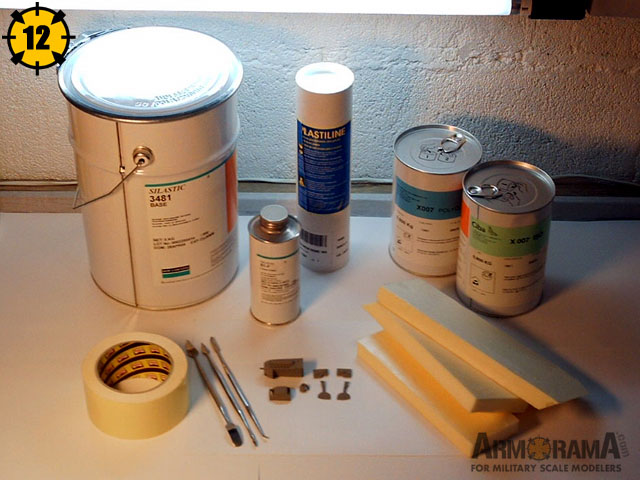
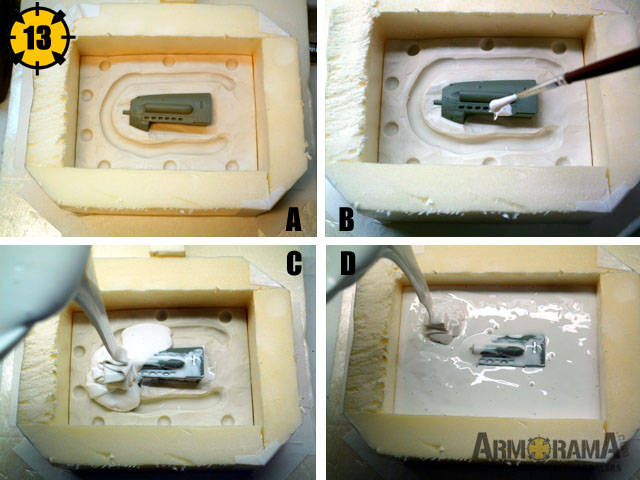
Some materials are necessary to make silicone molds and cast resin. Here is a basic list: silicone with curing agent, plastiline, two component epoxy resin, double sided tape, styrofoam, sculpting tools and, of course, the parts to be molded (picture 12). A digital kitchen scale can prove useful when you use silicone and resin as it allows you to mix the components very precisely.I decided to make the main part's mold in two pieces. It is important to plan ahead when you work with silicone and resin as all decisions will have a direct impact on the final product's quality. I first used pieces of styrofoam secured with double side tape to make a small box (picture 13A). This is a pretty straightforward and fast method, much more easy than making a box out of wood. The bottom of the box is made of plastiline and the part to be molded is half embedded inside. The holes were made to allow the two halves of the mold to go together precisely later. The trench around the part is to prevent resin flow between the mold. Once the box was finished, I mixed some silicone using my digital kitchen scale and applied some on the part using a small brush (picture 13B). This is to avoid bubbles forming at the most inappropriate places. Then the remaining silicone was poured in until nothing was visible anymore (picture 13CD). The double side tape acted like a hermetic seal and no silicone escaped. Now the big wait began and at least 24 hours were necessary to let the liquid mass become solid.
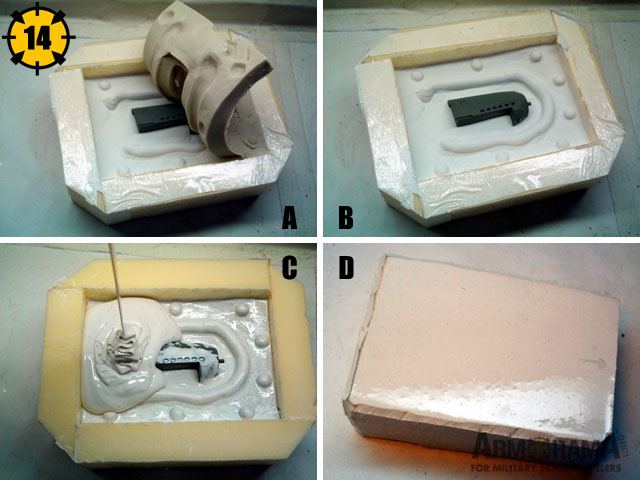
The day after, I took away the plastiline (picture 14A) and a nice negative form appeared (picture 14B). I applied some varnish (on the silicone only) and poured the second half of the mold (picture 14C) until, once again, everything disappeared. After another 24 hour curing period I broke the styrofoam box and the final result was a big silicone block (picture 14D). Now you would think is the time to free the part to see if the whole process was successful? The answer is NO! Before doing this, it is always necessary to make a solid hull (in this case plaster) around the mold (picture 15AB). Without it, the molds would not remain together while pouring the resin and it would end in a big mess! The final result can be seen in picture 15C. You can also see the pouring hole cut out of the silicone with an X-acto knife. Again, I used my digital kitchen scale to mix the resin components precisely (picture 15D).
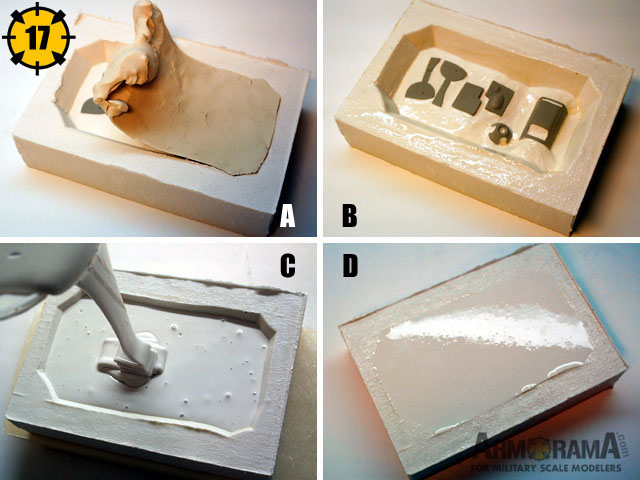
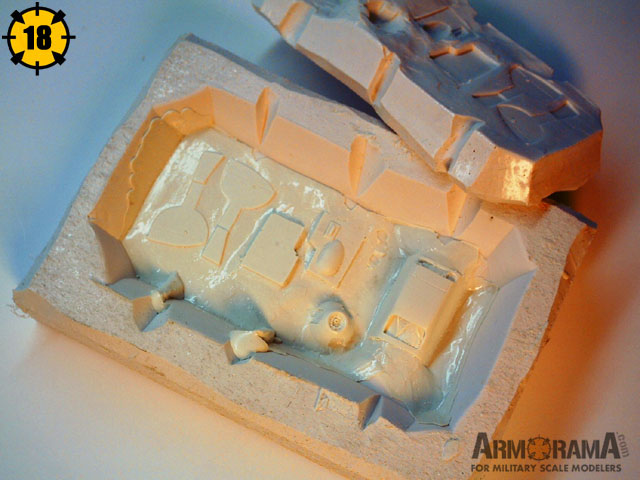
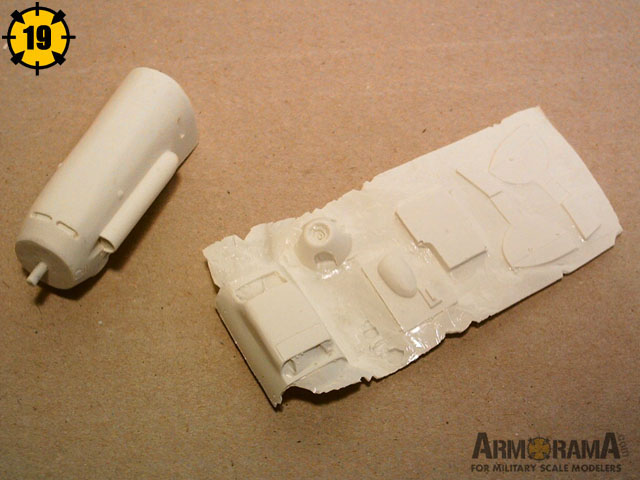
For the detail parts I used almost the same technique as the main part (picture 16 and 17) with the difference that the resin can be poured directly in the form from the top, the second silicone part acting like a cover (picture 18). The result is a resin wafer including all the detail parts altogether. This technique is only effective for small parts of course. In picture 19 you can see the resulting resin parts in their rough state and now it is possible to go into mass production! (Picture 20)


About the Author


FROM: MOSELLE, FRANCE
I'm mainly interested in WW2 aircraft and I build them in 1/48 scale.
Comments

Hi again Chuck!
After all, the good thing about that is that Armorama gets some publicity on other sites!
Jean-Luc
MAY 04, 2006 - 03:07 AM
But I know now!
Recently I sent two copies to a guy named Floyd S. Werner Jr. He signed up here and asked for two resin sets. As he was new, I thought it was a nice welcome gift... it's a small world sometimes...
Jean-Luc
MAY 04, 2006 - 03:22 AM

"No good deed, goes unpunished" :-)
Two nice fellows Floyd S. Werner Jr. and YOU !!!
MAY 04, 2006 - 03:26 AM

Excellent review and work jean-Luc. The history of the aircraft was as fascinating as the build itself.
You make casting resin sound so easy with your step by step instructions. One day i might have a go myself :-) .
Thanks and well done.
Andy (++)
MAY 05, 2006 - 01:04 AM

Hi Jean-Luc
Fantastic bit of work!!! I've forwarded the feature article to my small club, as we have two air race buffs in the crowd.
Frank
MAY 05, 2006 - 02:11 AM

Very impressive Jean-Luc! Totally out of my realm except for the info on Udet. Through and through very impressive! The characature head on the squatting image was Udets's self or should I say "elf" portrait.
MAY 05, 2006 - 04:56 AM

I just want to bump this
... and I did a little sawing and test fitting and I think jean-Luc's set will fit the Hasegawa kit with a bit of sanding and filling. Not sure about the Werner's Wings edition (this is a bit smaller than J-L's original set)
cheers
Steffen
NOV 10, 2009 - 09:11 PM
Copyright ©2021 by Jean-Luc Formery. Images also by copyright holder unless otherwise noted. The views and opinions expressed herein are solely the views and opinions of the authors and/or contributors to this Web site and do not necessarily represent the views and/or opinions of AeroScale, KitMaker Network, or Silver Star Enterrpises. Images also by copyright holder unless otherwise noted. Opinions expressed are those of the author(s) and not necessarily those of AeroScale. All rights reserved. Originally published on: 2006-05-01 00:00:00. Unique Reads: 44556

WEB HOSTING BY


Copyright ©2021 AeroScale and Kitmaker Network, a subsidiary of Silver Star Enterprises
All Rights Reserved. Please read our Conditions of Use and Privacy Policy.
All Rights Reserved. Please read our Conditions of Use and Privacy Policy.