_GOTOBOTTOM
Early Aviation
Discuss World War I and the early years of aviation thru 1934.
1/32 Roden Pfalz D.III the build.
JackFlash
_VISITCOMMUNITY
Colorado, United States
Joined: January 25, 2004
KitMaker: 11,669 posts
AeroScale: 11,011 posts
Posted: Thursday, July 19, 2007 - 09:25 AM UTC


http://www.roden.eu

THIS KIT
Roden has sent to me an example of their Pfalz D.III for review. Since there has been an in-the-box preview and some discussion about the build concerns of one modeler, I will focus on the items that will help avoid pit falls. No one wants $50-60.00 USD kit to be a disappointment. These areas are:
1. historical accuracy
2. detailing
3. fit.

The aim of the single kit work up or build for review is not to rip apart a kit. The focus should be to explain or answer questions about building the kit. This is to help the average builder understand things like, the difference between a Pfalz D.III and a Pfalz D.IIIa. Or in most cases the equipment in an open cockpit aircraft rhat is is foreign to the average model builder. Today, most modelers want to know, what is the tried and true method to be successful with a biplane kit. If your going to invest in a kit that costs as much as current kits do, your going to want to avoid pitfalls that will make your kit unattractive after its completed. In truth a half built kit is a disappointment.

First, cracking the box I have to echo the statement "Impressive". This issue of the Roden all plastic kit is impressive! Fine molded detail will give you a good represenation of the Pfalz D.III. As most of you know WWI aviatin subjects are my specialty. The good people at Roden contacted me after I posted images of my efforts on their Sopwith 1 1/2 Strutter.

Most of you will be pleased to note that the wings in my kit were taped to a larger section of cardboard. This appears to be Roden's current practice for this kit. I have to give it to Roden that they listen to their clients. . . modelers. Most impressive.

THE ORIGINAL AIRCRAFT
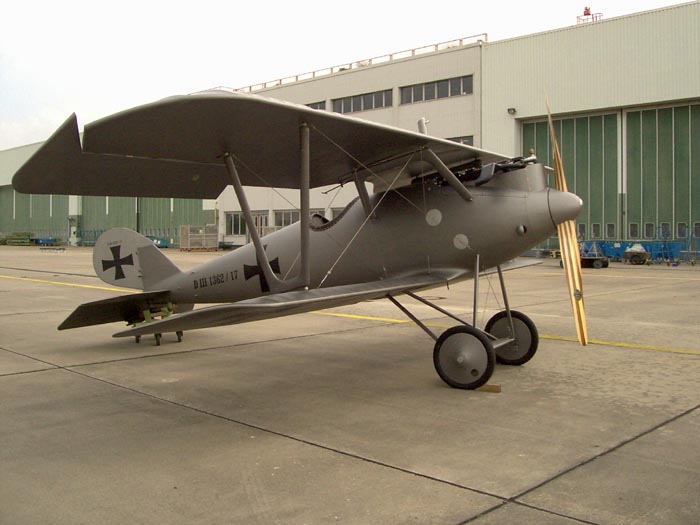
The shark-like profile of the Pfalz D.III appeared on the Western Front in late summer / early autumn 1917. Manufactured by the Pfalz Werke in Bavaria the first examples of the early production types were evidently saddled with the obsolete Mercedes D.III 170hp inline six. Conversely the Albatros Werke fighters had been using the Mercedes D.IIIa 170hp motor since the beginning of 1917 and were now having their D.Va types installed with a D IIIaü 180hp. Several concerns arose as the Pfalz D.III began its service life.

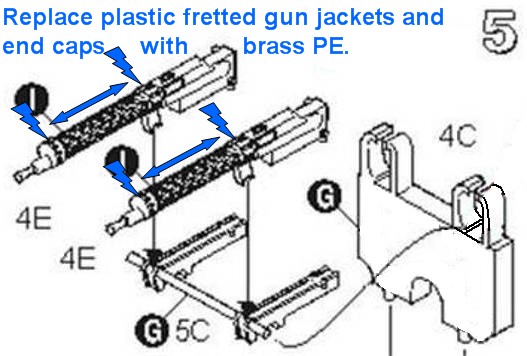
First, the guns could not be accessed in-flight to clear jambs as they were buried beneath the forward turtle deck ahead of the cockpit and the access panels were impractical to remove in-flight to clear stoppages.

Second, the tail surface was minimal in area for operational use.

Thirdly, as mentioned previously the type was underpowered with its Mercedes D IIIa 170hp.
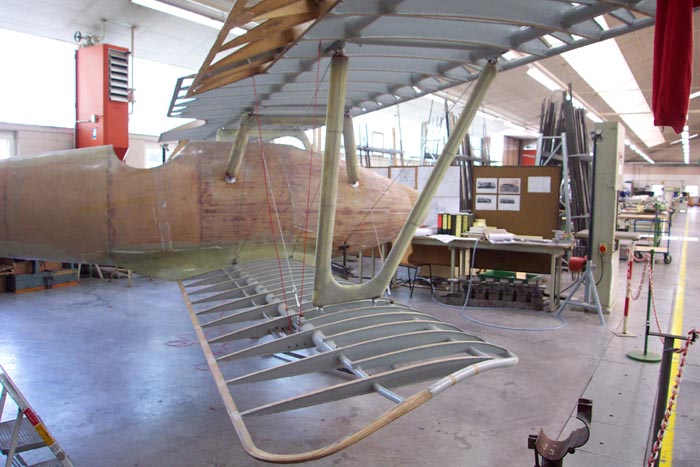
Finally ‘greenwood’ or woods that had not been fully cured were used in the Pfalz D.III manufacture. After some machines arrived at the front it was noticed in the Jasta 20 & 64w field reports say that the tail unit would develop a definite twist to the left or right. This has been directly related to the progressively poor handling qualities of the Pfalz D.IIIa &IIIa.


EARLIER KITS
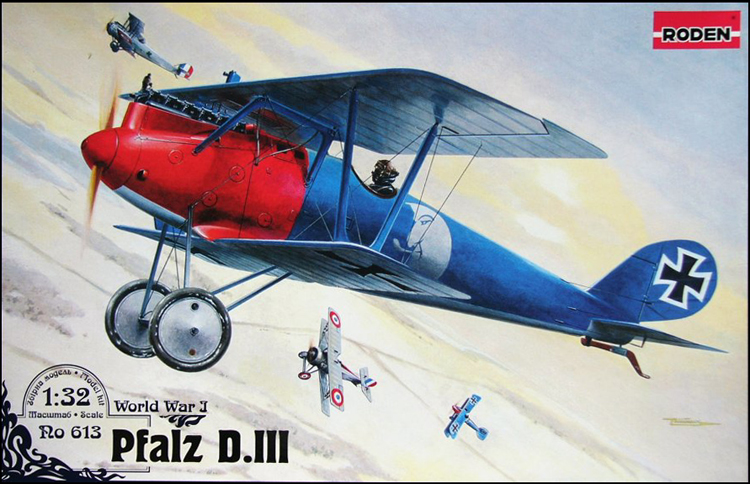
For years the only plastic kit of the Pfalz D.III / IIIa was the old Aurora 1/48 kit of the late 1950's. In the sixties there was the Renwal Aero-skin 1/72 injected kit. In the seventies it was a vacuform kit from Warbirds in 1/72. In the eighties it was the 1/72 Meikraft slush mold injected kit. Then the nineties saw a limited 1/24 release and Eduard finally releasing their 1/48 scale kit. As early as 1998 you couldn’t throw a paint tin in a hobby shop without hitting some author doing a build up review of the 1/48 ‘Bird of Prey’ for a magazine, club newsletter or internet posting. Now as interest in WWI aviation is rising so are the scales in which people are building. Roden is known for highly detailed tight fitting kits and it was no real surprise to most WWI aviation modeling fans that Roden has just released their version of this famous machine. This is the review will focus on the all plastic "Trojan Horse", Roden’s 1/32 kit #613.
Merlin
Staff MemberSenior Editor
AEROSCALE
#017
_VISITCOMMUNITY
United Kingdom
Joined: June 11, 2003
KitMaker: 17,582 posts
AeroScale: 12,795 posts
Posted: Thursday, July 19, 2007 - 09:40 AM UTC
Nice one Stephen!

I'm really looking forward to seeing you tackle this beauty! It's great to hear that Roden have responded so quickly to concerns about the wing-tips being damaged in transit - full marks there.

I've still not seen this kit on the shelves in the UK... we're getting left far behind!

All the best

Rowan
TreadHead
_VISITCOMMUNITY
Colorado, United States
Joined: January 12, 2002
KitMaker: 5,000 posts
AeroScale: 370 posts
Posted: Thursday, July 19, 2007 - 12:49 PM UTC
Howdy Stephen

I am looking forward to your review as well since your write-ups are such excellent 'reads'
I was just looking at this kit on Evilbay and almost bid on it, but was leaning more towards the Albatros in the same scale......guess I'll just watch your review and make my decision later.....

thx again for taking the time.

Tread.
TedMamere
_VISITCOMMUNITY
Moselle, France
Joined: May 15, 2005
KitMaker: 5,653 posts
AeroScale: 4,347 posts
Posted: Thursday, July 19, 2007 - 06:24 PM UTC
Hi Stephen!

I too will follow this build with interest as I'm sure I will learn tons of things about the Pfalz!

Jean-Luc
JackFlash
_VISITCOMMUNITY
Colorado, United States
Joined: January 25, 2004
KitMaker: 11,669 posts
AeroScale: 11,011 posts
Posted: Saturday, July 21, 2007 - 07:27 AM UTC
Greetings Rowan, Gordon and Jean-Luc!
I have reserved a couple of lounge chairs just for you both. Please everyone, feel feel free to chime in with questions. As has been noted in the "in-rhe-box review" by Aeroscale member "CaptainA" ". . . This is a well-engineered kit. The sprue containing the engine parts is the same sprue contained in the Albatross D.III kit. When I built that kit, the engine went together well and resulted in a fine representation of the Mercedes Engine. . . "

The real engine was a Mercedes (Daimler) D.IIIa 175hp (F-1466 ) and these went into producrion around 1 Feb 1917 for the Albatros D.III. Just a bit of clartification here. Engine manufactures were assigned letters to denote their parentage. "D" for Daimler parent firm for Mercedes. For airframe designations "D" meant single seat biplane fighter. Later in 1918 all fighters became known as "D" types.

The engine used flat topped pistons and can be recognized by:

Rocker Arm Position ( 4 Z )-- the overhead cam rocker arms come out of the middle of the camshaft bearing boxes.

Water Pump Location ( 2 Z )-- the water pump is above the crankshaft on the jackshaft that goes from the crankshaft up to the camshaft ( between and above the magnetos.)

Air Pump (24 G )-- the fuel pressurization air pump is a single cylinder model mounted at the front of the engine on top of the camshaft above and infront of #1 cylinder. There were several types used of different profiles.

Crankcase Shape -- the crankcase has a smooth, tapering profile from the main body forward to the front main bearing.
It is rated at 175 hp.

The immediate visual difference in the early Mercedes D.III 160hp / D.IIIa 175hp (F-1466 )and its progeny the D.IIIaü 180hp (1466a) are in the rocker boxes above the cylinder jacket heads. On the early Mercedes D.III and D.IIIa motors the rocker springs ( 4 Z ) are centered on the sides of the rocker box covers. On the D.IIIaü motor the box covers are moved back so the rocker arms and springs are located on the forward leading edge of the same covers. The rest is below the cowling and not readily visible. The Mercedes D.III160hp was outclassed by 1917. In 1918 the Mercedes D.IIIaü 180hp was the standard engine in the Pfalz D.IIIa, Albatros late built D.V and all D.Va types starting in late 1917 and then the Fokker D.VII through 1918. Many, many Mercedes D. III and IIIa type motors were rebuilt to the D.IIIaü specs at the airparks as the war progressed. That is why some captured examples had motors with the i.d. designation of D.III 160hp cast into their crankcases. This has caused the misconception that the standard 160hp and 170 hp were used in 1918 at a time when they had become obsolete. Often these were referred to as “160hp over-compressed engines.”

Now lets build the kit motor.

Step 1a-b.) Begins with modifying the rear supports on the kit engine halves (10 & 11 Z.) I did the font ones as well. They recommend cutting back their tips by 1mm each of the four supports. Because of the fuselage’s high collar cowling around the cylinders not much of this fine little engine is seen. The Pfalz D.III types began with the Mercedes 175hp D.IIIa and all of the variations and were generally known by the company as type F-1466.

1c.) The upper portions of the original aircraft engine cylinder’s are covered by water jackets these are the color of black/blued gun metal. This kit shows the water fillers / vent caps ( 7 Z X 2 ), oil cycling tube ( 3 Z ) and the sparkplug support tube ( 6 Z ) for the pilot’s right side of the engine.
JackFlash
_VISITCOMMUNITY
Colorado, United States
Joined: January 25, 2004
KitMaker: 11,669 posts
AeroScale: 11,011 posts
Posted: Saturday, July 21, 2007 - 08:35 AM UTC
Step 2.) Primarily this water pump on the Mercedes (Daimler) D. IIIa is located directly behind the cylinders on the tower ( 2 Z ) and check your references for routing of the external plumbing. I added fine wire painted ( black or white) to simulate spark plug wires. The air pump (24 G not 21) is added to the front. The twin spark magnetos ( 8 Z X 2) are attached to the base of the tower ( 2 Z ). The other sparkplug support tube ( 6 Z ) the carburetor support with manifolds (1 Z ) and twin carburetors (5 Z ). The front of the crankshaft / propeller spindle ( 9 Z should read G 1 ) is to be trapped between the engine halves ( 10 & 11 Z ) with a small bit of petroleum jelly or graphite for lubrication. It won’t hurt to apply a bit of sanding film to the rim of the retainer of this part.
TreadHead
_VISITCOMMUNITY
Colorado, United States
Joined: January 12, 2002
KitMaker: 5,000 posts
AeroScale: 370 posts
Posted: Monday, July 23, 2007 - 09:48 AM UTC
Howdy Stephen,

Absolutely superb posting there sir, very informative and just the kind of great stuff you usually provide us all.

Even though a lounge chair has not been saved for me {alas }, I don't mind standing....your threads are worth the sore back.

Looking forward to more...............

Tread.
JackFlash
_VISITCOMMUNITY
Colorado, United States
Joined: January 25, 2004
KitMaker: 11,669 posts
AeroScale: 11,011 posts
Posted: Tuesday, July 24, 2007 - 03:12 AM UTC
No need to stand good Tread. . . always room for more. The engine goes together well. The sparkplug stems are delicate and can easily be damaged ( they are only plastic.) a little work today and then a photo shoot. I have had time to work on the engine supports. No real surprises. The forward "ring" is a bit snug. more later.
cohiba
_VISITCOMMUNITY
Wellington, New Zealand
Joined: March 19, 2007
KitMaker: 42 posts
AeroScale: 20 posts
Posted: Tuesday, July 24, 2007 - 07:28 PM UTC
Hi Stephen,

It's possibly a little late for your build but I found that 9Z (generic Merc D.III prop shaft) should really read G1 (specific Pfalz prop shaft). Ironically the drawing of 9Z/G1 in the instructions does show G1, they've just described it incorrectly.

Anyway. I hope this helps.

Cheers
Richard
JackFlash
_VISITCOMMUNITY
Colorado, United States
Joined: January 25, 2004
KitMaker: 11,669 posts
AeroScale: 11,011 posts
Posted: Wednesday, July 25, 2007 - 06:27 AM UTC

Quoted Text

Hi Stephen,
It's possibly a little late for your build but I found that 9Z (generic Merc D.III prop shaft) should really read G1 (specific Pfalz prop shaft). Ironically the drawing of 9Z/G1 in the instructions does show G1, they've just described it incorrectly. Anyway. I hope this helps. Cheers Richard


Greetings Richard.
You are of course correct. 9Z was the Albatros prop shaft (from the first issue of this kit motor.) G1 is the Pfalz specific item. No worries, any helpful contribution is good for all of us.
JackFlash
_VISITCOMMUNITY
Colorado, United States
Joined: January 25, 2004
KitMaker: 11,669 posts
AeroScale: 11,011 posts
Posted: Wednesday, July 25, 2007 - 07:14 AM UTC


NOTE!!! It is Roden's intent for you to build the next step around the motor.

Step 3.) The exact placement of the engine bearer shelves ( 14 & 15 F ) in the fuselage formers (1,4,6 &11 F) is easy to deal with. Remember that the second former (4 F ) is angled forward at the bottom. Also the third former (6 F ) is angled slightly backward at the bottom. You can add eight R&R model detail nuts & bolts from ‘Grandt Line’ to represent the motor mount items that would be apparent on the top face of the motor mount flanges. The fuselage formers the shelves come together here is a subassembly. Note that the first former (1 F ) needs to be opened up by cutting a small notch inside the ring. It is a tight fit. Check your references.

One bit of caution here. You will probably want to open up the notched in the fuselage formers (1,4,6 &11 F) to insure the correct vertical sit of the engine. Bear in mind that the centerline should run from the prop shaft to the tail.
JackFlash
_VISITCOMMUNITY
Colorado, United States
Joined: January 25, 2004
KitMaker: 11,669 posts
AeroScale: 11,011 posts
Posted: Saturday, July 28, 2007 - 08:54 AM UTC
Here is an image that I will be refering to throughout the build.
JackFlash
_VISITCOMMUNITY
Colorado, United States
Joined: January 25, 2004
KitMaker: 11,669 posts
AeroScale: 11,011 posts
Posted: Saturday, July 28, 2007 - 12:09 PM UTC
The above image is Pfalz D.III 4184/17 flown by Unteroffizier (Corporal) Hegeler of Jasta 15, when he was brought down by Lt. A.Cowper of 24 sqdn RFC on 26 Feb. 1918. Given the British Capture number G.141. After undergoing complete evaluations it was displayed with other captured aircraft in the “Agriculture Hall” in Islington. All of which had half of their coverings removed to display internal structures to the public for the price of 1 penny. Proceeds went to the RAF Hospital Fund.

Note this was previously idenitfied in one source as as 8033/17. This is known to be incorrect.

Note the attitude of the semi round fuselage formers ( identified in the kit as 1,4,6 &11 F ) Their relationship to the cabane strut tie - in points helps you get your parts lined up per the original.
JackFlash
_VISITCOMMUNITY
Colorado, United States
Joined: January 25, 2004
KitMaker: 11,669 posts
AeroScale: 11,011 posts
Posted: Sunday, July 29, 2007 - 09:36 AM UTC
While we are in the area of Step 3, here are some aspects of the fuselage formers you may want to be aware of. Note in this diagram how the the rocker box covers have been moved back.
JackFlash
_VISITCOMMUNITY
Colorado, United States
Joined: January 25, 2004
KitMaker: 11,669 posts
AeroScale: 11,011 posts
Posted: Sunday, July 29, 2007 - 01:28 PM UTC


Step 4.)We start with the fuselage former ( 9 F ) at the mid-section of the cockpit. Add the fuel tank pressure, hand pump ( 17 G ) and the auxiliary throttle advance lever. ( 10 G ). Please note the installation of fuselage former 9 F is inclined back about 2 degrees at the top. To the cockpit flooring (8 F ) add cables and a control column lock ( 2 G ) can be added to the control column base ( 14 G ) Note also that the rotating throttle on the control yoke head ( 24 G ) should be on the pilot's left. see the inset image. The machine gun triggers are in the middle of this yoke. Also add the rudder control bar (5 F ). The aileron actuation bar assembly (5 & 25 G ) connect to the bottom of the control column ( 14 G ) under the flooring. In the image here I only have two lines on the lower end of the control column ( 14 G ). To be accurate there should be four.
JackFlash
_VISITCOMMUNITY
Colorado, United States
Joined: January 25, 2004
KitMaker: 11,669 posts
AeroScale: 11,011 posts
Posted: Monday, July 30, 2007 - 01:00 PM UTC
Greetings. During some dry fitting I have come across some interesting items for better assembly.

To get the fuselage to close up later you will have to clip off the decompression handle on the upper rear tower of the engine. On the Albatros D types this was exposed and the handle was usually solid metal. On the Pfalz D. types this decompression bell was shrouded by a shell shaped covering. The handle was wood and unscrewed. See item A in the list in the image immeditely below.


Thats the handle sticking up on the top of the Jack tower ( 2 Z ).

JackFlash
_VISITCOMMUNITY
Colorado, United States
Joined: January 25, 2004
KitMaker: 11,669 posts
AeroScale: 11,011 posts
Posted: Monday, July 30, 2007 - 01:21 PM UTC
Step 5.) Next the cockpit flooring (8 F ) and the ammunition box ( 4 C )and machine gun braces ( 5 C ) sit on is the top of the main fuel tank ( 6, 23 G ). This brings all of the previous sub assemblies together. Don’t be afraid to open up the slots on the fuselage former slightly to accept the fuel tank locator stubs. Also I had to cut down the spout (6 G ) by about 1/8 of an inch to get the assembly to seat well in the fuselage half during a dry fit. If you do not do this it will throw your fuselage out of alignment with your lower wing later.


JackFlash
_VISITCOMMUNITY
Colorado, United States
Joined: January 25, 2004
KitMaker: 11,669 posts
AeroScale: 11,011 posts
Posted: Tuesday, July 31, 2007 - 10:32 AM UTC
Now I will let you in on the scope of this review. The arrival of the kit is not a coincidence. Tom Harrison of Tom's Modelworks has produced a set of brass photoetch for the kit. Part of Poland is in the early throws of its PE production. I am told we won't see it for about 2-3 months.

I am going to open up this kit's engine compartment. Since there is not a complete firewall to act a a bulkhead I must detail all of the exposed areas. Because this kit is easy to build with careful considerations. Here is what I have to do to add some details. The fuselage needs to have;

1. Solid plastic Spandau guns and their mountings altered

2. Plumbing pipes and wiring added.

3. rudder and elevator cable ports added.

I will NOT open up the fuselage as a cutaway in this instance. It will take up too much time. I will stick to the available engine access cowling and ports. I hope to present this build as a moderately modified version of the kit. For thos of you that will only build the kit OOB I will add notations that will help you work with just the plastic kit items.

A minor correction to fuselage half 2 C is the access cowling above the gun breeches. The part is scribed with two ports and these ports need to be erased. The ports are only on 1 C for the real aircraft. On 2 C the access panel is solid.

If you want to start on some internal detailing of the fuselage halves this might help.
JackFlash
_VISITCOMMUNITY
Colorado, United States
Joined: January 25, 2004
KitMaker: 11,669 posts
AeroScale: 11,011 posts
Posted: Sunday, August 05, 2007 - 04:52 AM UTC
Greetings all;

As we continue with our build and my photos are being developed I thought you might appreciate some images of a recent replica built by a new company in Germany.

The initial roll out took place in early 2005. The rudder cross is slightly out of position but the over-all finish can thoroughly be appreciated.

Arron Weaver of Over the Front fame is quoted as saying.
". . .Pfalz is in business again for several years now. Their business is as a contractor of components to Airbus and other clients. They supplied the metal conduit tubing for the electrical, fire safety, hydraulic, and other systems for the new Airbus 380.

Sorry, no more new series-built Pfalz D.III/IIIas from the parent company. It is meant as an historical object to show the company's proud past. . ."
JackFlash
_VISITCOMMUNITY
Colorado, United States
Joined: January 25, 2004
KitMaker: 11,669 posts
AeroScale: 11,011 posts
Posted: Sunday, August 05, 2007 - 05:00 AM UTC
Here is a bit of fun showing the bird under construction. The white primer on the wing structure was for protection. This was built as a static display and does not fly.
JackFlash
_VISITCOMMUNITY
Colorado, United States
Joined: January 25, 2004
KitMaker: 11,669 posts
AeroScale: 11,011 posts
Posted: Sunday, August 05, 2007 - 05:07 AM UTC
Historian Achim Engels (of Fokker Team Schoerndorf fame) comments next.

". . .Those of you who are a little bit familiar with the original design of the plane will quickly see that there are many descrepancies between the original Pfalz D.III and this dummy repro.

But it is obviously that the staff at PFW did not intent to come up with a correct Repro of that plane. It also appears to be obvious that the budget provided by the company for this projekt was limited as well.

Taking these facts into consideration the dummy is a very good replication of the outer shape of this most elegant airplane.

The design of the structure was made by Hans-Jürgen Vogt and Peter Müller. They drew up plans at home after hours. The build itself was carried out at the apprentice workshop.

The cross is indeed positioned too far below and Hans-Jürgen Vogt told me that it will be repainted later.

Concerning the choice of the body color he said, that there was no source about the actual color used available. The Company requested a paint manufacturer with a research in their archive files and they came up with an aviation paint called "Graualuminium" (gray aluminum). The fact that it appears that dark could be attributed to the wheather on the day the photograph was taken.

Hans-Jürgen Vogt sent me some other images which I have posted above. It looks quite good in sunny daylight. He also pointed out that the original colore tone could not have been as light as white since you can see the cross borders on historic photographs quite well.

One should photograph the dummy repro with contemporary photographic methods to see how it appears then.

Enjoy! Achim"

In this image the rudder cross is now repositioned correctly.
JackFlash
_VISITCOMMUNITY
Colorado, United States
Joined: January 25, 2004
KitMaker: 11,669 posts
AeroScale: 11,011 posts
Posted: Sunday, August 05, 2007 - 05:17 AM UTC

From another historian;
". . .Concerning the (lack of) guns and their access ports: I want to point out, that the first produced DIII’s did not bury any guns. Please refer the Windsock Data File #107 on page 8 picture 12 and 14 and the related explanation regarding the DIII 1366/17.

The DIII replica of the PFW ( the replica above) is marked with 1362/17, earlier than the pictured DIII in the Date File #107. The rectangular gun access panels only appeared on aeroplanes of the second production batch, from DIII 4000-4190/17.

These informations are based on investigations on all accessable pictures of the Windsock Data Files #7 and #107. . ."

And finally from Aaron Weaver again;
". . .Another reality in current Germany is not putting any armament on aircraft. On the D.VII in the Deutsches Museum for example... defanged. Perhaps this is also the reason Herr Vogt, usw have not put these on the replica. Maybe it was a company requirement.

Perhaps that is the reason they didn't on the replica... Political correctness rather than accuracy."
JackFlash
_VISITCOMMUNITY
Colorado, United States
Joined: January 25, 2004
KitMaker: 11,669 posts
AeroScale: 11,011 posts
Posted: Sunday, August 05, 2007 - 05:47 AM UTC
Now back to the kit build.

Since I am opening up the engine compartment and there is only half of a fire wall. I will need to build a small bit of detail into the kit. such as the gun jackets.


I will aslo have to simulate the cowling arttachment points and that means adding a lip to the opening for the engine cylinders.
FUTURE
_VISITCOMMUNITY
New South Wales, Australia
Joined: June 05, 2002
KitMaker: 61 posts
AeroScale: 56 posts
Posted: Sunday, August 05, 2007 - 09:04 AM UTC
Here is a quick scan of Toms 32nd Pfalz DIII PE for Rodens kit...


Kitboy
_VISITCOMMUNITY
Gelderland, Netherlands
Joined: July 20, 2006
KitMaker: 258 posts
AeroScale: 256 posts
Posted: Tuesday, August 07, 2007 - 05:16 AM UTC
Nice article to read, but sure I must stay away from buying it. I simply do not have enough room to store 1/32 scale kits. Lucklily the 1/48 market gives me plenty of challenge.

Greetings, Nico
 _GOTOTOP