Early Aviation
Discuss World War I and the early years of aviation thru 1934.
Discuss World War I and the early years of aviation thru 1934.
Hosted by Jim Starkweather
PE Machine Guns 101

JackFlash

Joined: January 25, 2004
KitMaker: 11,669 posts
AeroScale: 11,011 posts

Posted: Thursday, July 31, 2008 - 07:21 AM UTC
Here is the most recent set on the Fokker D.VII Weekend kit.


JackFlash

Joined: January 25, 2004
KitMaker: 11,669 posts
AeroScale: 11,011 posts

Posted: Tuesday, August 05, 2008 - 03:54 AM UTC
Quoted Text
After work tonight I have scheduled more PE for coming projects I will do the 1/48 Eduard Spandau set. I have wanted to finish this thread for a looonngg time. I finally got my desk cleared of several pending projects, household and financial paper work. Hopefully things proceed smoothly.
About a year ago Eduard began using a softer base metal. The base metal is encased in a dull white metal and results in an item that is easy to work with. The finished result is what the industry terms as silver nickel. Which I have on good authority is neither.
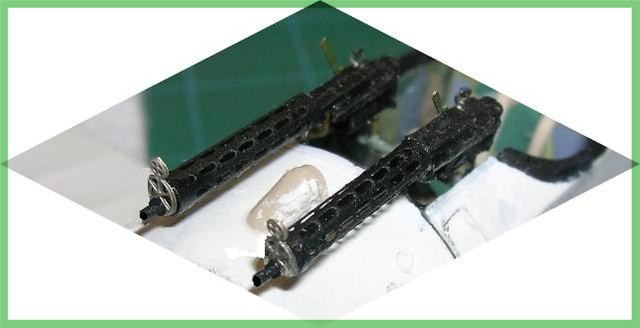
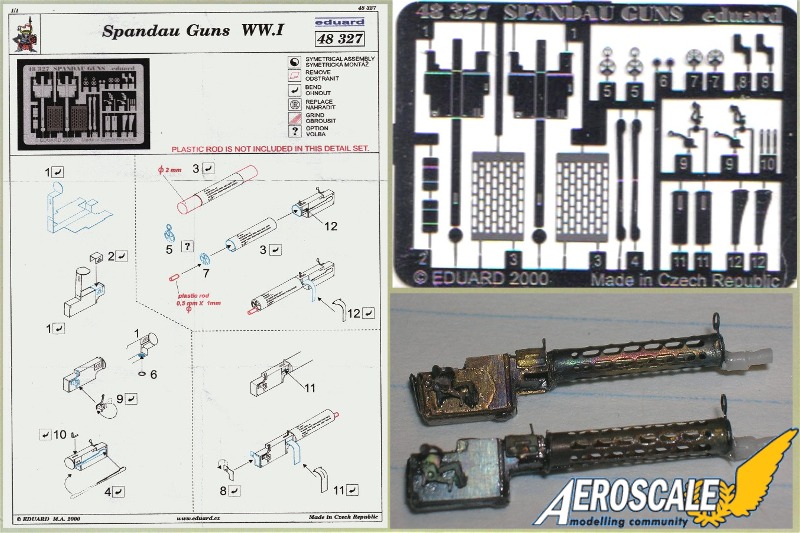
Here is the Eduard PE Spandau set from last year. The first images at the top are the bare annealed brass superglued together. The next four are the same guns with just one coat of black. I will apply another coating of black before attaching to a model aircraft of the German persuasion.
Simple things to remember here all eatch details go on the outside of the kit gun. Using a lighter to soften this is ok. The silver nickel in this case is only a top coating. The base metal is brass. Work slowly and use two types of superglue. quick setting and gel. So you can either snap the breeches shut or take time adjusting all the kit external facades to line them up correctly.

JackFlash

Joined: January 25, 2004
KitMaker: 11,669 posts
AeroScale: 11,011 posts

Posted: Tuesday, September 16, 2008 - 11:24 AM UTC
Here they are installed on a Fok. D.VIIF (Thats why the guns are raised.)


JackFlash

Joined: January 25, 2004
KitMaker: 11,669 posts
AeroScale: 11,011 posts

Posted: Saturday, December 20, 2008 - 03:48 PM UTC
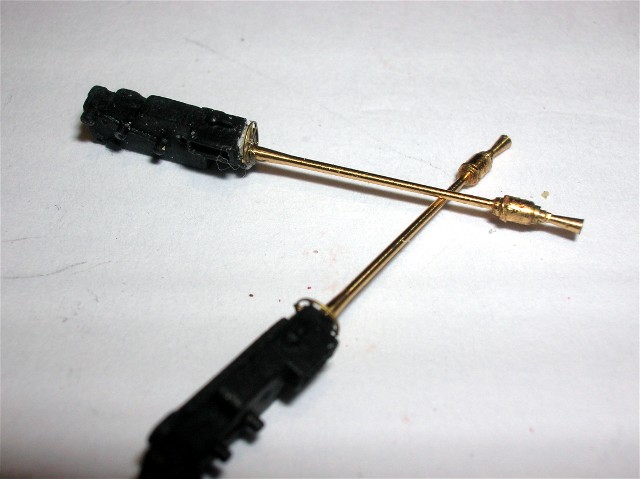
Shhhh! . . . Here is a preview of some parts and pieces that "might" be available in the future.


JackFlash

Joined: January 25, 2004
KitMaker: 11,669 posts
AeroScale: 11,011 posts

Posted: Saturday, December 20, 2008 - 04:04 PM UTC
Here are the Roden Breeches and the mystery gun barrels and the Tom's Model works fretted jackets.
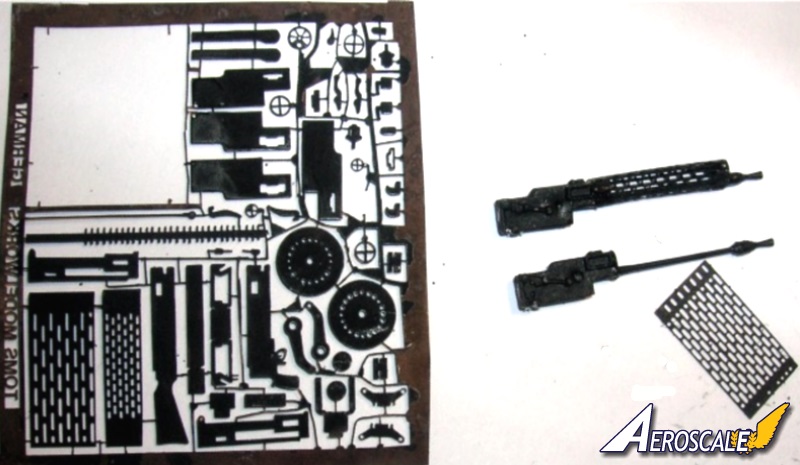
Just a bit of help. Here are a couple of tips on the subject. Rough up the back sides with sand paper. Then put the fret back in the bag. They come in clear zip loc or taped envelopes. Cut them from the fret while their still in the bag. Cut a corner notch out of the bag and let it slide out on a white sheet. Use a toothpick with tape wrapped around the tip - sticky side out to handle parts. Apply glue (semi thick gel) to the surface and place piece down. When dry pull toothpick away by rolling the tip off the attached PE.

Just a bit of help. Here are a couple of tips on the subject. Rough up the back sides with sand paper. Then put the fret back in the bag. They come in clear zip loc or taped envelopes. Cut them from the fret while their still in the bag. Cut a corner notch out of the bag and let it slide out on a white sheet. Use a toothpick with tape wrapped around the tip - sticky side out to handle parts. Apply glue (semi thick gel) to the surface and place piece down. When dry pull toothpick away by rolling the tip off the attached PE.

JackFlash

Joined: January 25, 2004
KitMaker: 11,669 posts
AeroScale: 11,011 posts

Posted: Saturday, December 20, 2008 - 04:08 PM UTC
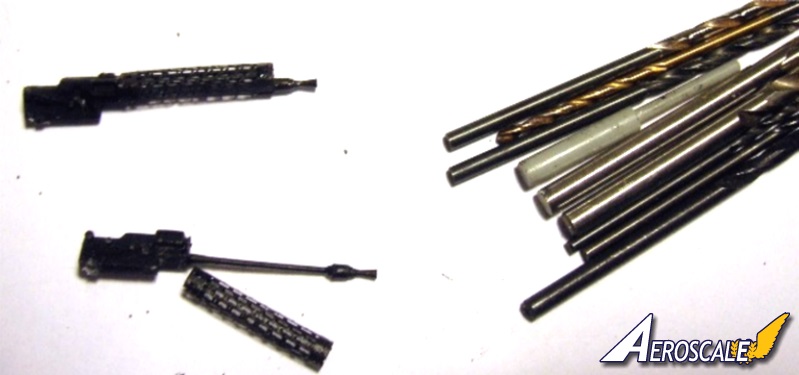
Here is a bit of fun and the reveal of a secret. Use drill bits as rollers for the gun jacktets.

guitarlute101

Joined: December 18, 2006
KitMaker: 1,121 posts
AeroScale: 1,063 posts

Posted: Saturday, December 20, 2008 - 04:29 PM UTC
Excellent, Stephen. That's exactly how I do it.
Mark
thegirl

Joined: January 19, 2008
KitMaker: 6,743 posts
AeroScale: 6,151 posts

Posted: Saturday, December 20, 2008 - 05:58 PM UTC
Same here . I find it to be the easiest way and having the different diameters helps with smaller items . Don't have to go out and buy tools already ib hand !
mgtaylor

Joined: July 20, 2006
KitMaker: 59 posts
AeroScale: 56 posts

Posted: Sunday, December 21, 2008 - 10:39 AM UTC
Not fair Lawson !!
Com'on ! Tell us how much the brass Spandau barrels are ? When are they coming ?
Yours Mike
Com'on ! Tell us how much the brass Spandau barrels are ? When are they coming ?
Yours Mike

JackFlash

Joined: January 25, 2004
KitMaker: 11,669 posts
AeroScale: 11,011 posts

Posted: Sunday, December 21, 2008 - 12:31 PM UTC
Seasons Greetings Mike, if I could - I would. 


Rittersbach

Joined: August 16, 2007
KitMaker: 83 posts
AeroScale: 80 posts

Posted: Sunday, December 28, 2008 - 03:00 AM UTC
As Stephen says "A bit of fun"......As said previously in this thread, this is a much better way to make machine guns....unlike the old days when we had to whittle them from a bar of soap.
Those were the days. Staying up until the wee hours of the morning with bloodshot eyes carving all those little vents into the side of the gun with a sharp piece of glass.
Can you tell I am in a humorous mood this morning.
Another good reference for the spandau is Mark Miller's illustrations.
here.
Those were the days. Staying up until the wee hours of the morning with bloodshot eyes carving all those little vents into the side of the gun with a sharp piece of glass.
Can you tell I am in a humorous mood this morning.
Another good reference for the spandau is Mark Miller's illustrations.
here.

JackFlash

Joined: January 25, 2004
KitMaker: 11,669 posts
AeroScale: 11,011 posts

Posted: Wednesday, September 09, 2009 - 12:39 PM UTC
Here are some general tutorial images on PE gun subjects.


JackFlash

Joined: January 25, 2004
KitMaker: 11,669 posts
AeroScale: 11,011 posts

Posted: Wednesday, September 09, 2009 - 12:41 PM UTC
Here is a collage of the new Eduard Spandau PE applications.

mgtaylor

Joined: July 20, 2006
KitMaker: 59 posts
AeroScale: 56 posts

Posted: Wednesday, September 16, 2009 - 09:42 AM UTC
I need to sit down one weekend like one of or friends here with an Armory of Rolled PE Mgs and Make one for myself with the Huge number of WWI kits I have piled on the stack.
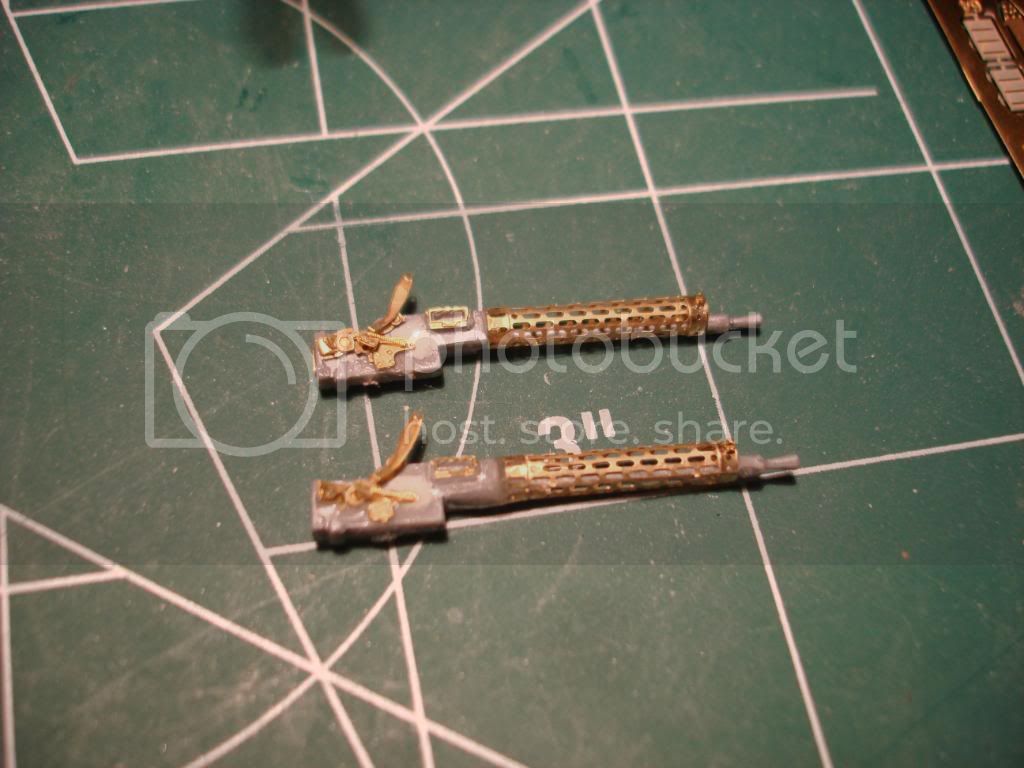
In anticipation of this need I spluged on a specialized PE Tool specifily for bending PE Tubes. Of course it can be doen with out but it is nice to have all the pieces together whcih makes the Whole previously intimaditng job GO ONE..TWO...THREE your done with consistently excellent results.
Here is my latest creation for a Roden ALb build. It is 32nd scale and uses Polish PART PE which I was determined to try since it has Oh I dont remember it felt like about 16 individual parts to the spring /bolt assembly/. the Refenece photo of the DVII posted earlier is all you will need to figure out the chinesse instruction puzzle diagram. The thing I think which distingushes PARTs assembly is the representation of the SPring !
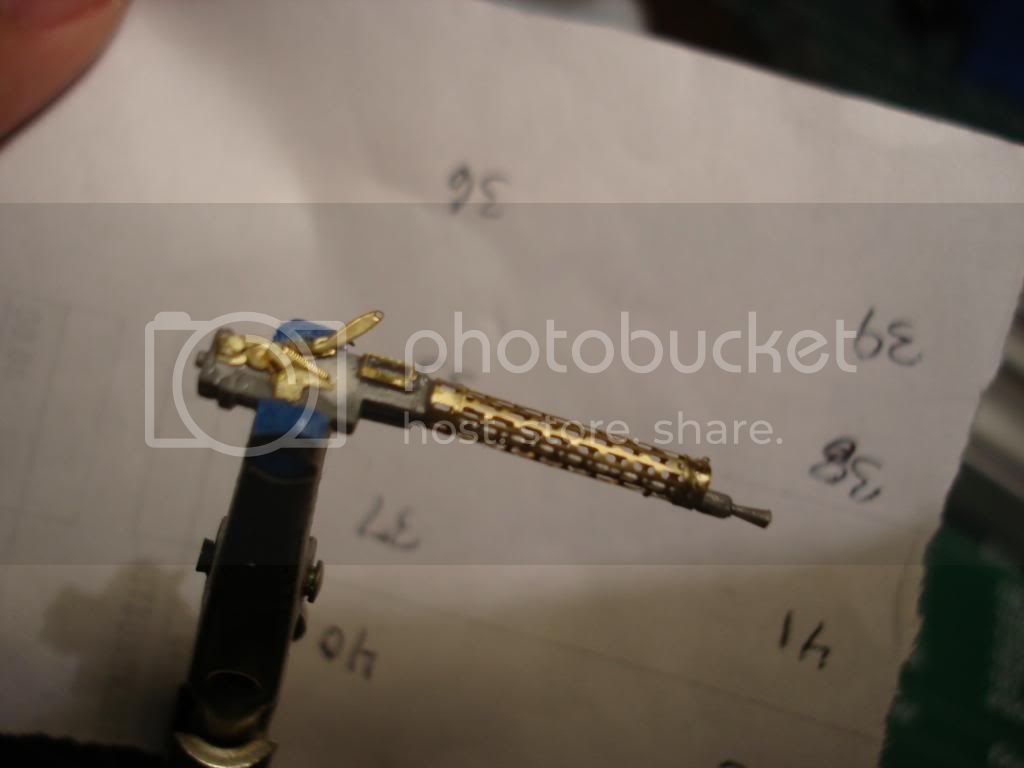
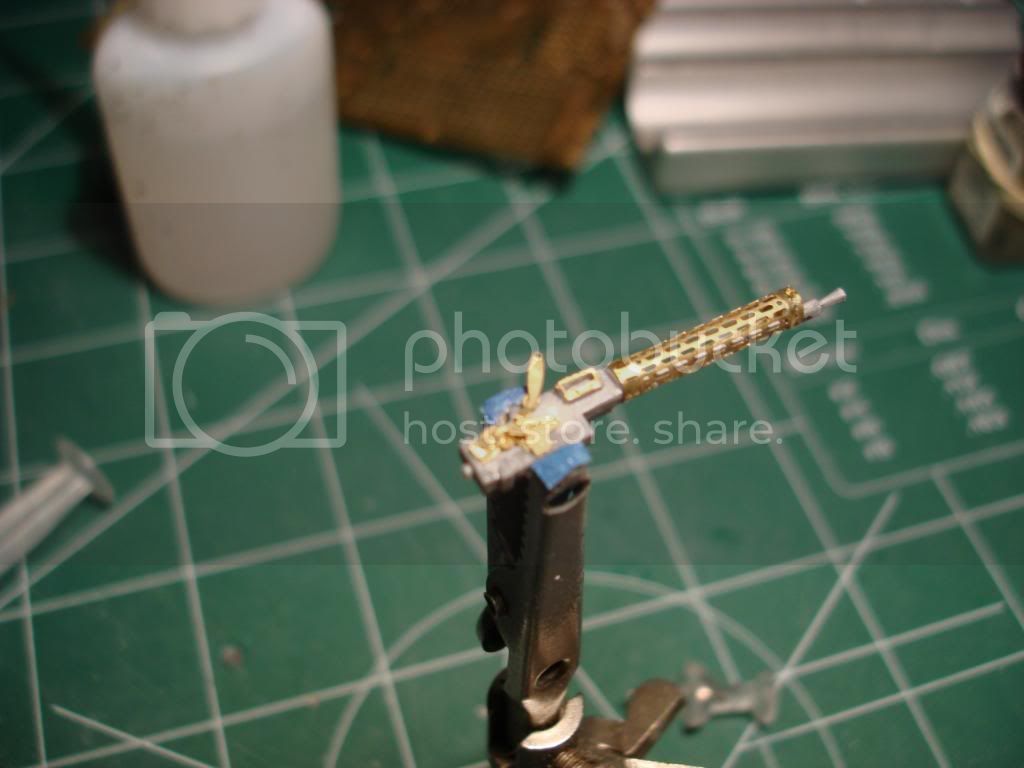
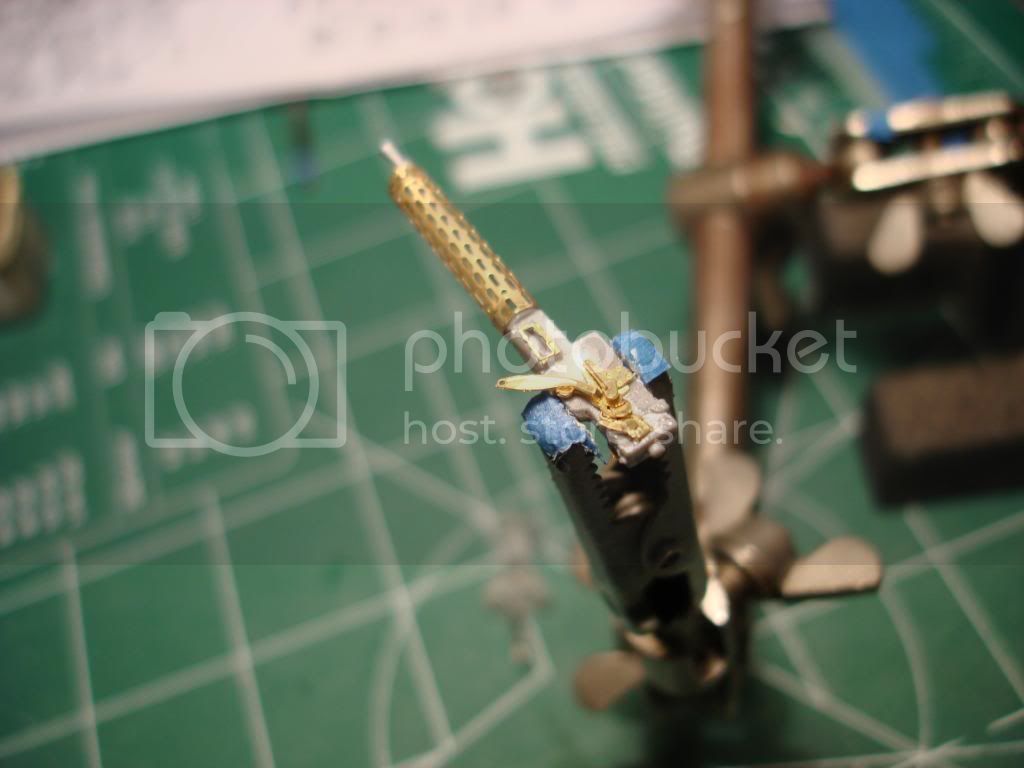
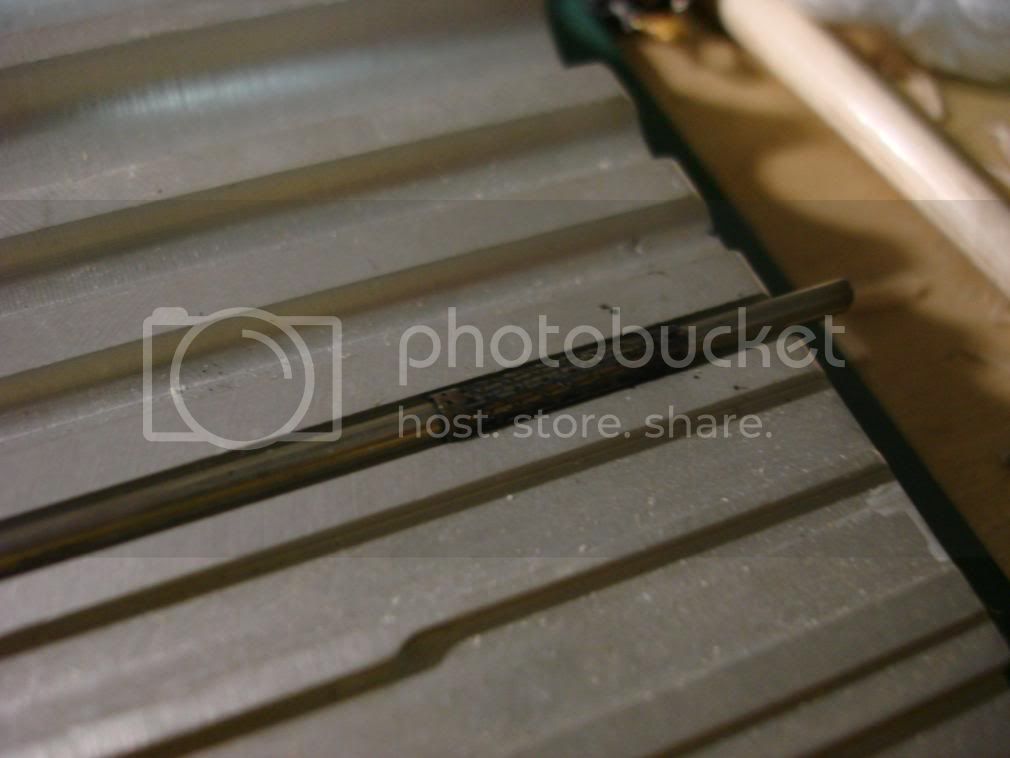
I also once posted for stephen a step by step on using this PE bending Tool.
In anticipation of this need I spluged on a specialized PE Tool specifily for bending PE Tubes. Of course it can be doen with out but it is nice to have all the pieces together whcih makes the Whole previously intimaditng job GO ONE..TWO...THREE your done with consistently excellent results.
Here is my latest creation for a Roden ALb build. It is 32nd scale and uses Polish PART PE which I was determined to try since it has Oh I dont remember it felt like about 16 individual parts to the spring /bolt assembly/. the Refenece photo of the DVII posted earlier is all you will need to figure out the chinesse instruction puzzle diagram. The thing I think which distingushes PARTs assembly is the representation of the SPring !


I also once posted for stephen a step by step on using this PE bending Tool.
mgtaylor

Joined: July 20, 2006
KitMaker: 59 posts
AeroScale: 56 posts

Posted: Wednesday, September 16, 2009 - 09:45 AM UTC




JackFlash

Joined: January 25, 2004
KitMaker: 11,669 posts
AeroScale: 11,011 posts

Posted: Wednesday, September 16, 2009 - 11:22 AM UTC
Thats the ticket Mike. Looking good.
mgtaylor

Joined: July 20, 2006
KitMaker: 59 posts
AeroScale: 56 posts

Posted: Wednesday, September 16, 2009 - 06:04 PM UTC
Dear Steph.
I am thinking there are others more experienced with PE that I who may be able to answer this one ?
I am wondering really if Annealing (heating the PE and allowing it to cool naturally) is really nessesary or not ?
1. It Does make those Mg Jackets like fold or roll Like soft Butter. Problem IS they stay that way and the least little bump after contruction and they do deform right away.
2. The softness helps level the seam along the bottom of the cooling jacket. But Iam wondering IF it is really so nessesary with today's PE and how well for instance this PE Rolling Tool works ?
Yours mIke

JackFlash

Joined: January 25, 2004
KitMaker: 11,669 posts
AeroScale: 11,011 posts

Posted: Thursday, September 17, 2009 - 05:35 AM UTC
A. it depends on the metal and its thickness. All brass items (nickel coated or not) except for Tomsmodelworks need to be annealed. Tom's is so thin it never seems to need heat applied.
Now the new type of PE is made of a metal that is either a thin brass and nickel or it seem it is "silver nickel". The silver nickel types are easy to work with straight off the fret. The newer molds from Eduard (Fokker D.VII) all seem to have the silver nickel type. The Reissued Roland for instance has the older brass with a nickel coating.
Now the new type of PE is made of a metal that is either a thin brass and nickel or it seem it is "silver nickel". The silver nickel types are easy to work with straight off the fret. The newer molds from Eduard (Fokker D.VII) all seem to have the silver nickel type. The Reissued Roland for instance has the older brass with a nickel coating.
bill_c

Joined: January 09, 2008
KitMaker: 10,553 posts
AeroScale: 1,198 posts

Posted: Thursday, September 17, 2009 - 06:04 AM UTC
Anyone in the States still carrying the Toms PE guns?

JackFlash

Joined: January 25, 2004
KitMaker: 11,669 posts
AeroScale: 11,011 posts

Posted: Thursday, September 17, 2009 - 06:22 AM UTC
Squadron may have some.
thegirl

Joined: January 19, 2008
KitMaker: 6,743 posts
AeroScale: 6,151 posts

Posted: Thursday, September 17, 2009 - 01:11 PM UTC
Roll models , might still have some . What scale ?
And no Bill , you can't have any of my either
And no Bill , you can't have any of my either

bill_c

Joined: January 09, 2008
KitMaker: 10,553 posts
AeroScale: 1,198 posts

Posted: Friday, September 18, 2009 - 05:58 AM UTC
Quoted Text
Roll models , might still have some . What scale ?
1/32nd. My hands are too old and too big for smaller, LOL!
Quoted Text
And no Bill , you can't have any of my either
Aw, you're such a spoil sport!!!
Louis

Joined: May 21, 2006
KitMaker: 472 posts
AeroScale: 471 posts

Posted: Friday, September 18, 2009 - 07:34 AM UTC
Quoted Text
1. Pass the brass over an open flame til rehot -BRIEFLY-.
2. Plunge the piece into water. This actually makes the piece more plyable.
Hi Stephen,
I thought that to cool down metal fast (with water) made it more solid and more difficult to bend.
It is case for steel, does it differ for brass?
I let cool down my pieces of brass slowly.
Louis

JackFlash

Joined: January 25, 2004
KitMaker: 11,669 posts
AeroScale: 11,011 posts

Posted: Friday, September 18, 2009 - 07:03 PM UTC
Quoted Text
Quoted Text
1. Pass the brass over an open flame til rehot -BRIEFLY-.
2. Plunge the piece into water. This actually makes the piece more plyable.
Hi Stephen,
I thought that to cool down metal fast (with water) made it more solid and more difficult to bend. It is case for steel, does it differ for brass? I let cool down my pieces of brass slowly.
Louis
As you say there is a difference. Plain brass or brass that is covered in nickel "vs" steel or harder white metal. The reason model companies cover their PE in nickel is that it makes them look more uniform especially when they use metals that tarnish easy. Burning off the nickel is the most efective way of making the part plyable. Then when ready heat it and put it in water so it will stay firm then paint it. I should have been more detailed in my original statement.
CaptainA

Joined: May 14, 2007
KitMaker: 3,117 posts
AeroScale: 2,270 posts

Posted: Monday, September 28, 2009 - 01:44 PM UTC
After going through some boxes of old PE sets, I finally found my 1/32 Tom's MW German Machine Gun fret. To my dismay, the jackets do not fit the Wingnut Wings Parabellum. The jackets are shorter than the barrel. Obi-wan, what shall we do?
 |


