_GOTOBOTTOM
World War II: USA
Aircraft of the United States in WWII.
Hosted by Rowan Baylis
Tamiya P-47 Bubbletop
lampie
#029
_VISITCOMMUNITY
England - East Midlands, United Kingdom
Joined: December 23, 2005
KitMaker: 6,249 posts
AeroScale: 3,270 posts
Posted: Monday, August 20, 2007 - 11:53 AM UTC
Hi All!
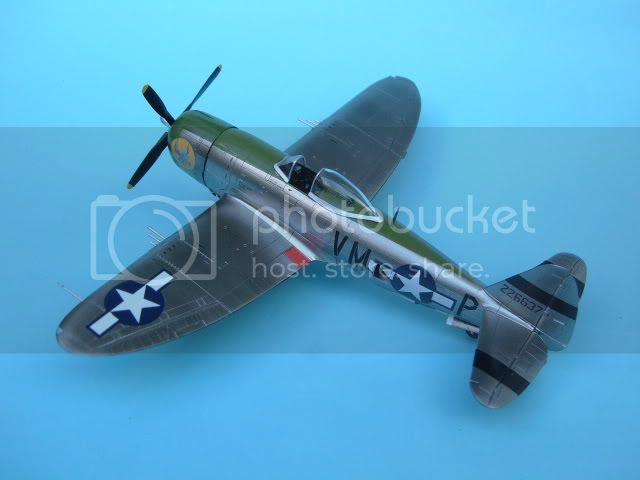
This will be my build thread for my Rumble In The East Asian Sky entry.
Its the Tamiya P-47 Bubbletop.
As some of you may know,(or have guessed!), Im a big fan of Thunderbolts and the Tamiya P47's are my favourite kits. There is a huge choice in AM decals for P-47's and the Tamiya kits are IMHO the best on the market.
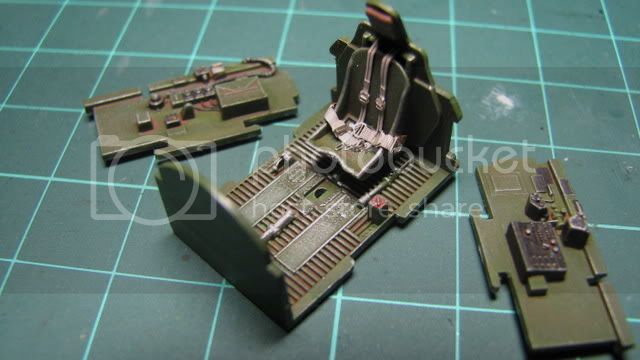
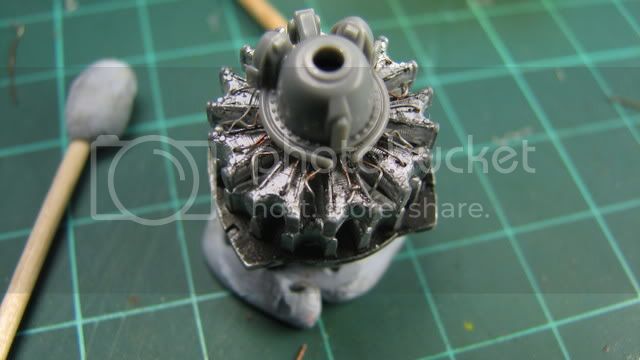
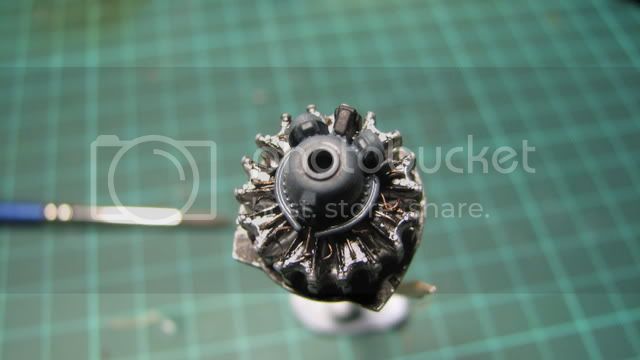
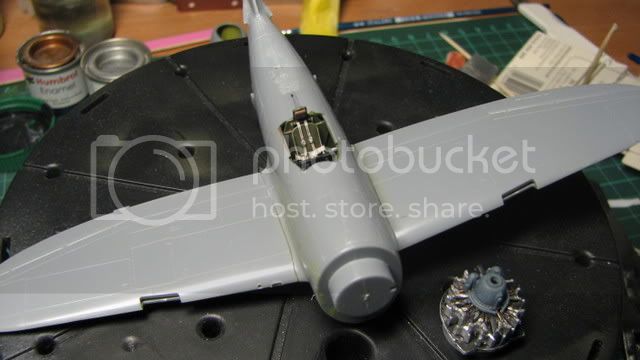
Ive made a start on the cockpit. The way the sprues are moulded makes it very easy to paint this while the parts are still attached. Im using pre painted Eduard seatbelts for the first time and I might even attempt wiring the engine on this build as well.
I recently purchased a "hold and fold" and it certainly made dealing with the tiny photoetch a lot easier.
Heres a progress photo to start the build thread off.

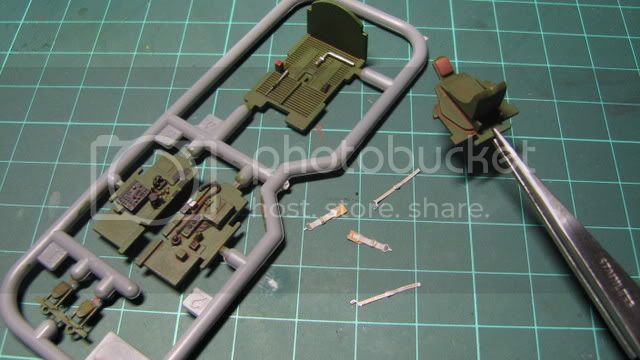
The base colour is Humbrol 117,with the detail painted in black and silver.Ive given the cockpit a wash of dark brown.Next step will be some drybrushing.
As with all my builds, Im going to be trying some new ideas/techniques.
Nige
betheyn
Staff MemberSenior Editor
AEROSCALE
#019
_VISITCOMMUNITY
England - South East, United Kingdom
Joined: October 14, 2004
KitMaker: 4,560 posts
AeroScale: 2,225 posts
Posted: Monday, August 20, 2007 - 11:58 AM UTC
Great start Nige.
1/72nd P.E is tiny, are you planning on adding any other A.M bits to the cockpit ?
Yes you definitely have a thing for P-47s, even though I have built more of them then you strangely .
Andy
lampie
#029
_VISITCOMMUNITY
England - East Midlands, United Kingdom
Joined: December 23, 2005
KitMaker: 6,249 posts
AeroScale: 3,270 posts
Posted: Tuesday, August 21, 2007 - 10:08 AM UTC
End of play today and the cockpits almost finished.
This Eduard pre painted PE is great stuff!


Andy,,if I could build a 1:48th P-47 in 3 days I reckon I could clear my stash in about 2 months,, It takes me about 3 days to do a cockpit for one of mine LOL.
Nige
Tomcat31
#042
_VISITCOMMUNITY
England - North East, United Kingdom
Joined: November 18, 2006
KitMaker: 2,828 posts
AeroScale: 1,720 posts
Posted: Tuesday, August 21, 2007 - 10:27 AM UTC
Hang about aren't those the same photos of the cockpit from the Down low campaign?

Sorry de ja vu moment there, Joking aside looking good as always and looking forward to seeing which techniques you try on this one
lampie
#029
_VISITCOMMUNITY
England - East Midlands, United Kingdom
Joined: December 23, 2005
KitMaker: 6,249 posts
AeroScale: 3,270 posts
Posted: Tuesday, August 21, 2007 - 10:45 AM UTC
Cheers Allen.
The PE is the only extra Im going to be using in the cockpit.
Im toying with the idea of adding some wires on the back of the instrument panel if I can find a decent photo reference.Pretty sure Im going to have a blast at wiring the engine, and I might try some wiring in the wheel wells too.
All depends what mood Im in when I step up to the bench,,LOL
Nige
Tomcat31
#042
_VISITCOMMUNITY
England - North East, United Kingdom
Joined: November 18, 2006
KitMaker: 2,828 posts
AeroScale: 1,720 posts
Posted: Tuesday, August 21, 2007 - 08:32 PM UTC
Sounds cool, have you ever thought of starting a P-47 IPMS SIG?
SGTJKJ
#041
_VISITCOMMUNITY
Kobenhavn, Denmark
Joined: July 20, 2006
KitMaker: 10,069 posts
AeroScale: 3,788 posts
Posted: Tuesday, August 21, 2007 - 09:54 PM UTC
Looks good so far, Nige

As already mentioned the 1/72 PE is tiny, but adds a lot to the cockpit none the less.

Looking forward to see more
lampie
#029
_VISITCOMMUNITY
England - East Midlands, United Kingdom
Joined: December 23, 2005
KitMaker: 6,249 posts
AeroScale: 3,270 posts
Posted: Wednesday, August 22, 2007 - 01:01 AM UTC
Cockpit tub is finished and ready to be installed.
The gunsight and joystick will be added at the end of the build incase they get damaged by masking etc.
I added some wiring to the back of the panel with 5amp fuse wire.


A P-47 SIG?,,nice idea Allen. Its about time there was one.
Nige
lampie
#029
_VISITCOMMUNITY
England - East Midlands, United Kingdom
Joined: December 23, 2005
KitMaker: 6,249 posts
AeroScale: 3,270 posts
Posted: Sunday, August 26, 2007 - 10:38 AM UTC
Latest installment of my madness,,
Ive wired the engine using 5A fuse wire to simulate the ignition harness.
36 seperate 0.03mm holes and about 4 hours later,,,

Although I had prepainted the wire most of the paint rubbed off while I was wrestling with it trying to get it into the holes so I'll touch it up.The reduction gear casing is just resting in place so I can get an idea of how its going to look.
Im going for a lie down now...my brain hurts
Nige
lampie
#029
_VISITCOMMUNITY
England - East Midlands, United Kingdom
Joined: December 23, 2005
KitMaker: 6,249 posts
AeroScale: 3,270 posts
Posted: Thursday, August 30, 2007 - 09:17 AM UTC
The fusalage is together and Im making a start on cleaning up the seams on the underside.Modelling time has been scarce as Ive been away for a few days but I got back today and Ive managed to finish the engine block.

The photos dont really do it justice and a lot of it will be hidden of course. I keep forgetting when I see the photo that its actually only the size of my thumb nail,,LOL

Nige
betheyn
Staff MemberSenior Editor
AEROSCALE
#019
_VISITCOMMUNITY
England - South East, United Kingdom
Joined: October 14, 2004
KitMaker: 4,560 posts
AeroScale: 2,225 posts
Posted: Thursday, August 30, 2007 - 09:23 AM UTC
Looks really good Nige. Makes the engine block look a lot busier.

Quoted Text

a lot of it will be hidden of course


But we will know its there and thats what counts .
Andy
Wad_ware
_VISITCOMMUNITY
Illinois, United States
Joined: September 09, 2002
KitMaker: 537 posts
AeroScale: 437 posts
Posted: Thursday, August 30, 2007 - 01:17 PM UTC
Hey Nige
It's been a while since I've been able to take some serious browsing time here on the site. The start of your P-47 looks great as all your kits do
Detailing on the cockpit is excellent. The wired up engine looks great too, especially for doing in on the small scale P-47.
Wiring on 1/48th gets tricky enough for me. I would need magnification power of the Hubble telescope to wire up a dinky engine like that
Very nice work and good modeling as always,
Wayne
csch
_VISITCOMMUNITY
Buenos Aires, Argentina
Joined: December 27, 2002
KitMaker: 1,941 posts
AeroScale: 1,040 posts
Posted: Thursday, August 30, 2007 - 02:33 PM UTC
Hi Nigel:

That cockpit is looking really very well. I love those prepainted PE seat belts. Kepp on posting !
lampie
#029
_VISITCOMMUNITY
England - East Midlands, United Kingdom
Joined: December 23, 2005
KitMaker: 6,249 posts
AeroScale: 3,270 posts
Posted: Tuesday, September 04, 2007 - 07:42 AM UTC
Thanks for the comments guys.
Its good to see you posting again Wayne!
Time for a progress report.
Fusalage and wings are on and its starting to look like a P-47.

What almost looks like gaps in the wing roots is actually where the wash from the wheel wells has leaked through,,honest!

I added some wires to the wheel wells.
This P-47 will be without any ordnance or drop tanks, so Ive filled the mounting hole for the drop tank with plastic card.
Im having to be very precise with the seam lines as this will be a NMF, so after the usual sanding Im going over any joins with a polishing stick.
Next stage will be to finish assembling the wings and tail.Then Im going to prime the whole airframe in black. Hopefully there wont be much to address after this and I can break out the Alclad soon.
Nige
lampie
#029
_VISITCOMMUNITY
England - East Midlands, United Kingdom
Joined: December 23, 2005
KitMaker: 6,249 posts
AeroScale: 3,270 posts
Posted: Wednesday, September 05, 2007 - 07:13 AM UTC
I finished priming the Jug earlier.


On my last nmf build I found that the black primer (Tamiya Gloss Black),not only showed up any imperfections in the same way a nmf will,but also worked well for highlighting the panel lines.Unlike the last time I tried this,I will be adding an oil wash this time.
Just a couple of small areas need addressing and I can move on.
Nige
lampie
#029
_VISITCOMMUNITY
England - East Midlands, United Kingdom
Joined: December 23, 2005
KitMaker: 6,249 posts
AeroScale: 3,270 posts
Posted: Thursday, September 06, 2007 - 09:15 AM UTC
Onwards and upwards.
The Jug has now recieved its main coat of Alclad. Ive used polished aluminium for this.Next step will be to mask and spray some of the panels in various different shades of aluminium and stainless steel.


Nige
Merlin
Staff MemberSenior Editor
AEROSCALE
#017
_VISITCOMMUNITY
United Kingdom
Joined: June 11, 2003
KitMaker: 17,582 posts
AeroScale: 12,795 posts
Posted: Thursday, September 06, 2007 - 09:37 AM UTC
Hi Nige

It's looking superb! To echo what the others have said, I had to double-check the scale when I saw what you've done with the cockpit and engine! Great work!

All the best

Rowan
lampie
#029
_VISITCOMMUNITY
England - East Midlands, United Kingdom
Joined: December 23, 2005
KitMaker: 6,249 posts
AeroScale: 3,270 posts
Posted: Thursday, September 06, 2007 - 10:33 AM UTC
Thanks Rowan.

Quoted Text

I had to double-check the scale when I saw what you've done with the cockpit and engine!


I dont know about double checking the scale,,Im double checking my sanity for even attempting it!
Nige
lampie
#029
_VISITCOMMUNITY
England - East Midlands, United Kingdom
Joined: December 23, 2005
KitMaker: 6,249 posts
AeroScale: 3,270 posts
Posted: Monday, September 10, 2007 - 07:38 AM UTC
A minor disaster the other day.
Id spotted an area that needed cleaning up,so I sanded it smooth and repainted black primer and polished aluminium Alclad. For some reason, the polished aluminium came out in white patches in a couple of areas.
At first I thought about starting over, but before I got out the black primer again, I thought Id try overspraying the whole airframe in Alclad Aluminium.
Thankfully,,this worked out fine, and I think I prefer the overall look to that of Polished Aluminium.
Ive painted a few panels in White Aluminium to give it a more natural look.

At the moment Im debating adding some panels in Dark Aluminium. The last thing I want is a Checkerboard look on the airframe.Maybe just some more panels in White Aluminium?
What do people think?
Once Im happy with the NMF, I'll Klear everything before painting on the anti-glare panel in Olive Drab, and the blue ID stripes on the wings and tail.
Nige
sgtreef
_VISITCOMMUNITY
Oklahoma, United States
Joined: March 01, 2002
KitMaker: 6,043 posts
AeroScale: 80 posts
Posted: Monday, September 10, 2007 - 12:58 PM UTC
Can't say about the different colors of aluminum but looking Killer so far to me.

Those pre-painted PE parts look Killer also.

So when you paint do you shoot one side then the other after it dries?

I have read that Finger prints will show in Final coat.

Thanks yes I am a Noob at Alclad
lampie
#029
_VISITCOMMUNITY
England - East Midlands, United Kingdom
Joined: December 23, 2005
KitMaker: 6,249 posts
AeroScale: 3,270 posts
Posted: Tuesday, September 11, 2007 - 06:46 AM UTC

Quoted Text

Can't say about the different colors of aluminum but looking Killer so far to me.

Those pre-painted PE parts look Killer also.

So when you paint do you shoot one side then the other after it dries?

I have read that Finger prints will show in Final coat.

Thanks yes I am a Noob at Alclad


Hi Jeff.
"Killer",,I think thats a good way to describe the pre painted PE belts myself Its the first time Ive used them and they certainly justify the extra work and expense.
As for the mystical Alclad.
Firstly,,I would suggest you disregard all the horror stories you may have heard about it. I used it for the first time a year or so ago and I read up on it until I was blue in the face. I actually find it very easy to use. I spray it at a low pressure,(less than 10 psi), and gradually mist it on in thin coats.
The first time I used it I only used a single colour (polished aluminium) sprayed over a base coat of gloss black Tamiya acrylic. Although very happy with the result,I wished Id been a bit more adventurous and sprayed some panels in different colours, as Im doing with this build.
Heres a pic.

As you an see on the build Im doing at the moment, spraying different panels in other shades of Alclad really adds to the effect. Also on the first nmf P-47,I didnt give the model a wash to bring out the panel lines and detail. I'll be doing it on this build as a year further down the line Im starting to get panel line washes that Im happier with.
Hope this helps and if you want to know anything more about mine and other peoples Alclad experiences just post a thread on the site and you should find the answers to all your questions.

Nothing further to show on the build as yet as Ive spent today masking and spraying a few more panels in White Aluminium. Very time consuming but certainly worth the effort.
Nige
sgtreef
_VISITCOMMUNITY
Oklahoma, United States
Joined: March 01, 2002
KitMaker: 6,043 posts
AeroScale: 80 posts
Posted: Tuesday, September 11, 2007 - 11:59 AM UTC
First Thanks Nigel for taking the time to reply in Full.

Much appreciated from somebody that has never used Alclad neither.

I have Purchased 3 different types of aluminum Regular ,White and Dura.

Plus their Black Primer so I might be asking a few Questions in about a week or so.


One for now would be do you have to have a totally polished surface to apply.

Thanks again.

And great job on that Baby

Cheers
Jeff

lampie
#029
_VISITCOMMUNITY
England - East Midlands, United Kingdom
Joined: December 23, 2005
KitMaker: 6,249 posts
AeroScale: 3,270 posts
Posted: Tuesday, September 11, 2007 - 08:37 PM UTC
Hi Jeff.
Personally I dont polish the surface.I do however, finish the seam lines off with a polishing stick as a NMF will show ANY imperfections up like beacons
As for primer,,I use Tamiya Gloss Black acrylic and it does me fine
Nige
Tomcat31
#042
_VISITCOMMUNITY
England - North East, United Kingdom
Joined: November 18, 2006
KitMaker: 2,828 posts
AeroScale: 1,720 posts
Posted: Tuesday, September 11, 2007 - 09:06 PM UTC
I must admit when i used either their own black base or an acrylic for when using the polished aluminium or chrome it's always gone really funny and seperated on the acrylic base and took nearly three weeks to dry when I used thier black base. I could just have been me though i normally use Humbrol's 21 gloss black.
sgtreef
_VISITCOMMUNITY
Oklahoma, United States
Joined: March 01, 2002
KitMaker: 6,043 posts
AeroScale: 80 posts
Posted: Tuesday, September 11, 2007 - 11:04 PM UTC
Thanks again to Both.

Strange indeed as you say 3 weeks to dry must shoot that on some scrap plastic and see.
 _GOTOTOP