

Greetings Miguel,
I believe that was member RAGIII who was kind enough to show us this. He used artist's gesso if memory serves.
Early Aviation
Discuss World War I and the early years of aviation thru 1934.
Discuss World War I and the early years of aviation thru 1934.
Hosted by Jim Starkweather
Roden 1:48 SE 5a some build notes.

JackFlash

Joined: January 25, 2004
KitMaker: 11,669 posts
AeroScale: 11,011 posts
Posted: Tuesday, July 15, 2008 - 11:36 PM UTC

mpalao

Joined: June 19, 2005
KitMaker: 243 posts
AeroScale: 70 posts
Posted: Wednesday, July 16, 2008 - 01:51 AM UTC
Thanks Stephen, great effect. I will try to find these paints.
Best regards.
Best regards.
JackFlash
Joined: January 25, 2004
KitMaker: 11,669 posts
AeroScale: 11,011 posts
Posted: Wednesday, August 06, 2008 - 10:13 PM UTC
Greetings all;
As we continue with these kits (The Roden SE5a Viper and Hispano Suiza in 1/48) we come to the need for rigging. At the lower wing root you will not two pairs of flying wires (traveling from wing root to top wing near the upper ends of the interplane struts. I am using what I term the "Cats Cradle" method for rigging. That is drilling holes through the wing to areas adjacent to the nearby struts. To keep the wires / rigging parallel the joing of two Part of Poland turnbuckles allow for some adjustment before securing the lines in the upper wing.
As we continue with these kits (The Roden SE5a Viper and Hispano Suiza in 1/48) we come to the need for rigging. At the lower wing root you will not two pairs of flying wires (traveling from wing root to top wing near the upper ends of the interplane struts. I am using what I term the "Cats Cradle" method for rigging. That is drilling holes through the wing to areas adjacent to the nearby struts. To keep the wires / rigging parallel the joing of two Part of Poland turnbuckles allow for some adjustment before securing the lines in the upper wing.
JackFlash
Joined: January 25, 2004
KitMaker: 11,669 posts
AeroScale: 11,011 posts
Posted: Wednesday, August 06, 2008 - 10:16 PM UTC
Note the pilot's rights side cabane struts (your left looking at the image) need to be brought in at the top wing by about 1/32 of an inch. Looking at it head long - from the nose to tail you can see this. This is also what makes the top wing a bit of a tight fit
JackFlash
Joined: January 25, 2004
KitMaker: 11,669 posts
AeroScale: 11,011 posts
Posted: Wednesday, August 06, 2008 - 10:19 PM UTC
We focus on the kit instrument panel with slight modifications can be made to look quite decent.
Removed by original poster on 07/05/11 - 13:52:14 (GMT).
JackFlash
Joined: January 25, 2004
KitMaker: 11,669 posts
AeroScale: 11,011 posts
Posted: Wednesday, August 06, 2008 - 10:27 PM UTC
This is the result. Note just being careful with this kind of rigging pays dividends BUT with take the better part of an evening to do just on wing bay. So note this accordingly.


MerlinV

Joined: November 26, 2006
KitMaker: 608 posts
AeroScale: 602 posts

Posted: Thursday, August 07, 2008 - 12:04 AM UTC
The rigging looks very fine Stephen. Those Part Etched turnbuckles must have been a real bear to handle.
The whole lot is looking very much like an SE5a.
Cheers,
Hugh
The whole lot is looking very much like an SE5a.
Cheers,
Hugh

CaptainA
Joined: May 14, 2007
KitMaker: 3,117 posts
AeroScale: 2,270 posts
Posted: Thursday, August 07, 2008 - 02:02 AM UTC
It does look quite decent.

JackFlash
Joined: January 25, 2004
KitMaker: 11,669 posts
AeroScale: 11,011 posts
Posted: Thursday, August 07, 2008 - 10:08 PM UTC
Thanks Hugh & Carl!
Now this is not done yet but here it is 24 hours later. Typically with British aircraft kit of this era you have to put on the cockades first before you can finish the aileron actuation control horns and adding the cables. The elevator and rudder control horns and then a touch up of the rigging anchors and underwing fuel tank details and other fittings with black. Then all coloured areas need some touch up as well. Then all the pulley inspection decals well be edged in the wing surface colours the glazed over. Then the Lewis gun & Foster mount.


Now this is not done yet but here it is 24 hours later. Typically with British aircraft kit of this era you have to put on the cockades first before you can finish the aileron actuation control horns and adding the cables. The elevator and rudder control horns and then a touch up of the rigging anchors and underwing fuel tank details and other fittings with black. Then all coloured areas need some touch up as well. Then all the pulley inspection decals well be edged in the wing surface colours the glazed over. Then the Lewis gun & Foster mount.
MerlinV
Joined: November 26, 2006
KitMaker: 608 posts
AeroScale: 602 posts
Posted: Friday, August 08, 2008 - 12:25 AM UTC
Ooh, Them Dekkles is pretty thick there isn't they. You can see the edges of 'em.
The only dissapointing thing about Roden kits.
Aside from that, I really like your tonal variation there Stephen.
Cheers,
Hugh
The only dissapointing thing about Roden kits.
Aside from that, I really like your tonal variation there Stephen.
Cheers,
Hugh
JackFlash
Joined: January 25, 2004
KitMaker: 11,669 posts
AeroScale: 11,011 posts
Posted: Friday, August 08, 2008 - 10:15 PM UTC
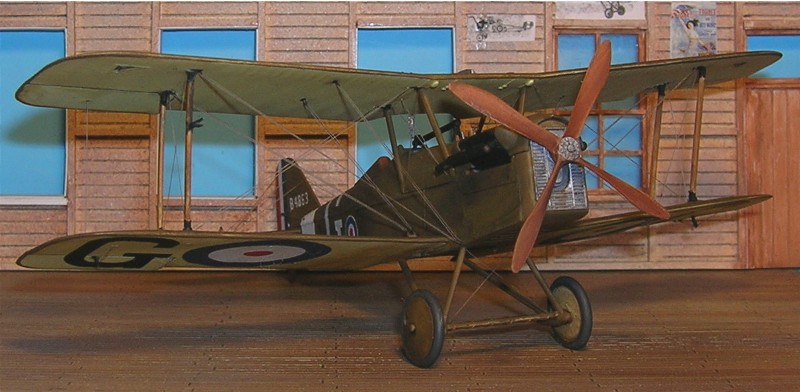
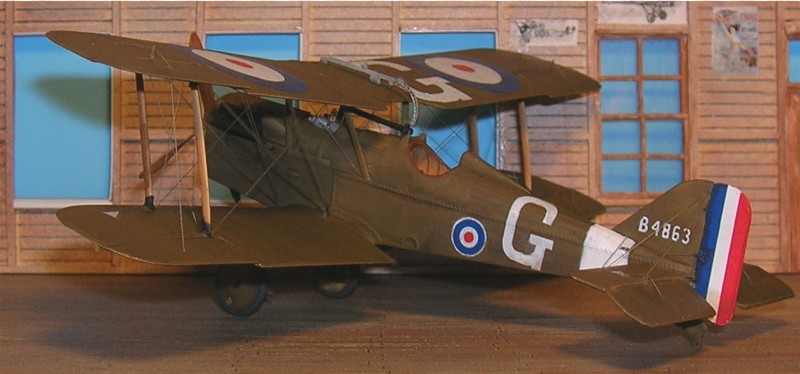
Even though I went with a slightly altered serial from the kit version for my "storyline" here is the real deal on D 6859. The S.E.5 File by Sturtivant and Page lists the following details for D6859
You may want to cast an eye to Above The Trenches by Shores, Franks, Guest which, under Alec S. Cunningham-Reid lists four destroyed and one out of control while flying D6859 To make this accurate we would simply apply the 85 RAF sqdn insignia. (That comes in the kit anyway for D6856.)
Quoted Text
"(Viper) At 1 AAP Coventry 11.5.18, alloted to EF; Arr Rec Pk 23.5.18; 1 AI and on to 85 Sqdn 25.5.18; KB destroyed on the ground Kruiseke 12.30 16.6.18; 2-str crashed E of Bailleul 06.45 17.6.18; 2-str crashed E of Menin, shared B7870 04.50 18.6.18 (all Lt A Cunningham-Reid); Landed on rough ground trying to avoid other machines 8.7.18 (2/Lt Wn Marshall OK); Rep Pk 1 ASD 10.7.18; SOC 12.7.18 NWR"
You may want to cast an eye to Above The Trenches by Shores, Franks, Guest which, under Alec S. Cunningham-Reid lists four destroyed and one out of control while flying D6859 To make this accurate we would simply apply the 85 RAF sqdn insignia. (That comes in the kit anyway for D6856.)
MerlinV
Joined: November 26, 2006
KitMaker: 608 posts
AeroScale: 602 posts
Posted: Saturday, August 09, 2008 - 01:58 AM UTC
Oh yes, nicely done Stephen.
There's that consistancy I have been talking about.
I hope to see a lot more Alied stuff from you.
Cheers,
Hugh
There's that consistancy I have been talking about.
I hope to see a lot more Alied stuff from you.
Cheers,
Hugh
JackFlash
Joined: January 25, 2004
KitMaker: 11,669 posts
AeroScale: 11,011 posts
Posted: Saturday, August 09, 2008 - 03:05 AM UTC
Quoted Text
The rigging looks very fine Stephen. Those Part Etched turnbuckles must have been a real bear to handle. The whole lot is looking very much like an SE5a.
Cheers, Hugh
Greetings Hugh the trick is to keep one turnbuckle attached to the fret. When you are ready - then separate the whole affair and slide it into place.
JackFlash
Joined: January 25, 2004
KitMaker: 11,669 posts
AeroScale: 11,011 posts
Posted: Wednesday, August 13, 2008 - 02:31 AM UTC
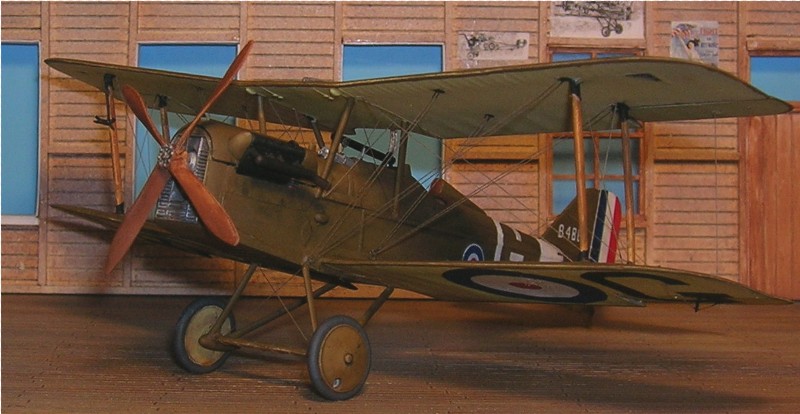
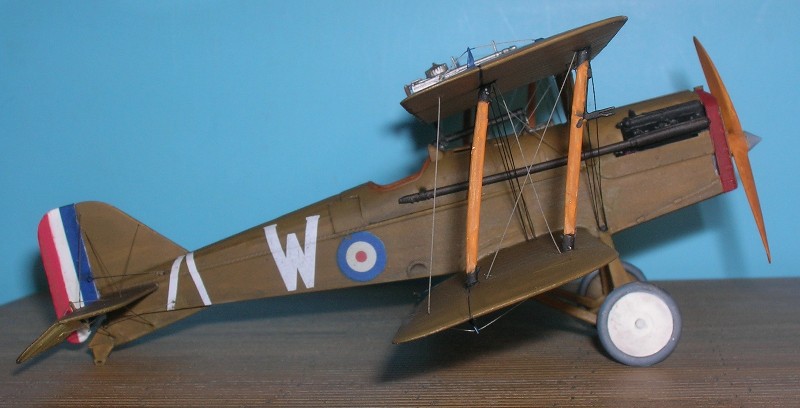
Have been banging away at the 1/48 Roden SE 5a with the Hispano-Suiza characteristics. One thing they don't tell you is that if you do Capt. McCudden's B 4863 that it has bulged cockpit sides. Many of those found in 56 RFC had these. I will duplicate that on this build and the best method I have found for applying Roden's decals.
Having discussed this at length with the good people at Roden, I have discovered the problems they face. Roden would love to have a better situation in this arena BUT they are limited by their government's rules and regulations concerning business operations. They can't even contract with anyone outside Russia to do work for them without paying extremely high taxes. Thus they would have to pass that cost on to us.
Having discussed this at length with the good people at Roden, I have discovered the problems they face. Roden would love to have a better situation in this arena BUT they are limited by their government's rules and regulations concerning business operations. They can't even contract with anyone outside Russia to do work for them without paying extremely high taxes. Thus they would have to pass that cost on to us.
JackFlash
Joined: January 25, 2004
KitMaker: 11,669 posts
AeroScale: 11,011 posts
Posted: Thursday, August 14, 2008 - 01:47 PM UTC
The decals are all kit supplied items for B4863 as flown by 57 victory ace James McCudden of 56 RFC during Sept. - Nov. 1917. He was one of the pilots involved in the Sept. 23 combat that led to Ltn. Werner Voss being brought down. The machine carried a dumbell for the unit insignia at that time. The broad white band was added just weeks later to replace it.
In 1910, James McCudden joined his father in the Royal Engineers as a 15 year old bugler. By the time war was declared, he was an aircraft mechanic with 3 Squadron in the Royal Flying Corps. One of three brothers to serve with the RFC, he saw combat in France as an observer and gunner before returning to England for flight training in 1916. His talents as a pilot were so extraordinary that he became an instructor within days of receiving his aviator's certificate. By the beginning of April 1918, 22 year old James McCudden was the most decorated pilot in the Royal Air Force. Sadly, he was killed three months later when his aircraft stalled after take off and crashed to the ground.


In 1910, James McCudden joined his father in the Royal Engineers as a 15 year old bugler. By the time war was declared, he was an aircraft mechanic with 3 Squadron in the Royal Flying Corps. One of three brothers to serve with the RFC, he saw combat in France as an observer and gunner before returning to England for flight training in 1916. His talents as a pilot were so extraordinary that he became an instructor within days of receiving his aviator's certificate. By the beginning of April 1918, 22 year old James McCudden was the most decorated pilot in the Royal Air Force. Sadly, he was killed three months later when his aircraft stalled after take off and crashed to the ground.
JackFlash
Joined: January 25, 2004
KitMaker: 11,669 posts
AeroScale: 11,011 posts
Posted: Wednesday, August 20, 2008 - 02:25 PM UTC
Now here are a couple of questions.
A. How many license builders were there for the SE 5a type in 1917 - 1918?
B. Which one(s) does the Roden mold represent?
A. How many license builders were there for the SE 5a type in 1917 - 1918?
B. Which one(s) does the Roden mold represent?
JackFlash
Joined: January 25, 2004
KitMaker: 11,669 posts
AeroScale: 11,011 posts
Posted: Thursday, August 28, 2008 - 04:54 PM UTC
Here is the Roden 1/48 SE 5a Hispano Suiza kit #419 preview. Done back in 2005 I put up some images to replace some missing items.
Click Here.
Click Here.

thegirl

Joined: January 19, 2008
KitMaker: 6,743 posts
AeroScale: 6,151 posts
Posted: Sunday, September 14, 2008 - 03:43 PM UTC
How are you coming along with the progress Stephen . I'm starting to catch the Se5a fever !
JackFlash
Joined: January 25, 2004
KitMaker: 11,669 posts
AeroScale: 11,011 posts
Posted: Sunday, September 14, 2008 - 04:33 PM UTC
On the four 1/48 scale kits I finished two of these. Two more in progress. Then there is the 1/32 kit, a whole different story.

RAGIII
Joined: June 19, 2007
KitMaker: 604 posts
AeroScale: 600 posts
Posted: Sunday, September 21, 2008 - 11:40 AM UTC
Stephen,
I really like your builds! The color chosen for the PC 10 works! Any comments on how you did the bulge in McCuddens bird?
RAGIII
I really like your builds! The color chosen for the PC 10 works! Any comments on how you did the bulge in McCuddens bird?
RAGIII
JackFlash
Joined: January 25, 2004
KitMaker: 11,669 posts
AeroScale: 11,011 posts
Posted: Sunday, September 21, 2008 - 01:52 PM UTC
Greetings Rick;
I went with the cyano glue build up. I laid down a bit of accerator and let i dry. (Just where I wanted the bulge to be.) Then I put down some thicker cyano over the dried area. in this scale it is only slightly apparant, but I did two applications to each side then a bit of sanding (but not much). Just a clean uop really and it was done. You can go inside of the cockpit decking and grind a bit out. But again you will not need much.
The other method would be to use filler putty.
JackFlash
Joined: January 25, 2004
KitMaker: 11,669 posts
AeroScale: 11,011 posts
Posted: Saturday, September 27, 2008 - 05:37 PM UTC
Ok the good thing is that I finished two 1/48 kits. With two more in progress (both Vipers) . Now I find that I have inherited another new 1/48 kit with a Hispano - Suiza. This may just have to be done in RFC 40 sqn's multi colour camouflage. work work work. . . 
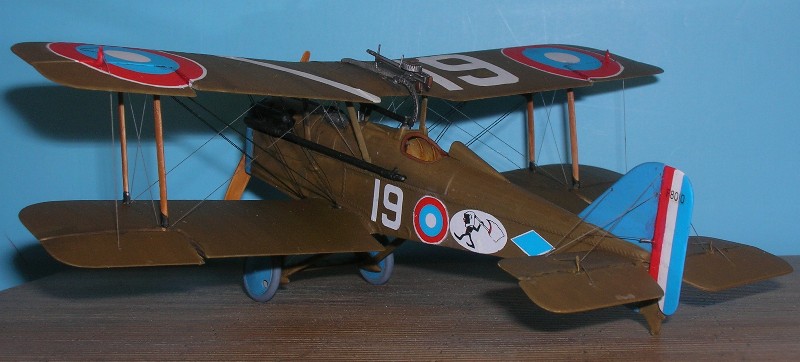
Specifically this leads into a subject we will explore later in depth but to give you an idea of what has been termed as "Field expedient camouflage."
". . .Ground attack"trench strafing" as it was then calledwas by 1917 one of the principal activities of the Royal Flying Corps (later RAF). Fighter aircraft would attack German trench lines, machinegun posts, artillery batteries, and communications from near ground level with machinguns and up to four twenty-pound Cooper fragmentation bombs per aircraft. Such attacks could be devastating, particularly against troops caught retreating or deploying. Strafing by Bristol fighters and Camels single-handedly routed and destroyed a Turkish army surprised in a defile in Palestine. All-out attacks by British fighters helped to slow and then isolate Ludendorff's storm troopers, contributing materially to the containment of Germany's last, great offensive of spring and summer 1918 and the subsequent Allied victory.
But such operations were not without their costs, costs that were often severe. At low level, aircraft faced intense ground fire from scores of densely packed prepared positions. Hundreds of infantry rifles and machingunsin some cases even field gunswould join the 37-mm automatic cannon ("flaming onions") and larger caliber flak guns whenever fighters ventured over the lines. While the Germans were quick to develop armored warplanes for low-level missionsthe two-seater Junkers, Albatros, and AEG J-typesBritain lagged behind in this regard. The first British armored airplane, the Sopwith Salamander, was just entering production when the war ended. Nor was ground fire the only danger. Ground-attack airplanes were vulnerable to fighter attack. The British airman's attention had to stay focused on his targets and on the dangerous proximity of the ground. His enemy invariably held the dual advantages of surprise and height. Losses were often heavy, particularly in the desperate spring of 1918, when every available man and plane was hurled against the advancing Germans. . ."

". . .These methods made the airplane's markings less conspicuous, but they did little to break up the outline, the critical recognition feature for the ground gunner. Accordingly, some pilots followed the French lead and applied multicolored disruptive patterns to their aircraft. In some cases (viz. the SE5a shown here), actual French paint may have been applied. . ."
Text and image courtesy of Chandelle.
Specifically this leads into a subject we will explore later in depth but to give you an idea of what has been termed as "Field expedient camouflage."
". . .Ground attack"trench strafing" as it was then calledwas by 1917 one of the principal activities of the Royal Flying Corps (later RAF). Fighter aircraft would attack German trench lines, machinegun posts, artillery batteries, and communications from near ground level with machinguns and up to four twenty-pound Cooper fragmentation bombs per aircraft. Such attacks could be devastating, particularly against troops caught retreating or deploying. Strafing by Bristol fighters and Camels single-handedly routed and destroyed a Turkish army surprised in a defile in Palestine. All-out attacks by British fighters helped to slow and then isolate Ludendorff's storm troopers, contributing materially to the containment of Germany's last, great offensive of spring and summer 1918 and the subsequent Allied victory.
But such operations were not without their costs, costs that were often severe. At low level, aircraft faced intense ground fire from scores of densely packed prepared positions. Hundreds of infantry rifles and machingunsin some cases even field gunswould join the 37-mm automatic cannon ("flaming onions") and larger caliber flak guns whenever fighters ventured over the lines. While the Germans were quick to develop armored warplanes for low-level missionsthe two-seater Junkers, Albatros, and AEG J-typesBritain lagged behind in this regard. The first British armored airplane, the Sopwith Salamander, was just entering production when the war ended. Nor was ground fire the only danger. Ground-attack airplanes were vulnerable to fighter attack. The British airman's attention had to stay focused on his targets and on the dangerous proximity of the ground. His enemy invariably held the dual advantages of surprise and height. Losses were often heavy, particularly in the desperate spring of 1918, when every available man and plane was hurled against the advancing Germans. . ."
". . .These methods made the airplane's markings less conspicuous, but they did little to break up the outline, the critical recognition feature for the ground gunner. Accordingly, some pilots followed the French lead and applied multicolored disruptive patterns to their aircraft. In some cases (viz. the SE5a shown here), actual French paint may have been applied. . ."
Text and image courtesy of Chandelle.
JackFlash
Joined: January 25, 2004
KitMaker: 11,669 posts
AeroScale: 11,011 posts
Posted: Friday, December 19, 2008 - 09:48 PM UTC

Here we have the old Monogram decals applied to the other. The blue of the decal seems brighter here than it really is.
JackFlash
Joined: January 25, 2004
KitMaker: 11,669 posts
AeroScale: 11,011 posts
Posted: Saturday, December 20, 2008 - 06:00 PM UTC
Here the Americal Gryphon decals go on one bird.
As a bit of a holiday treat, here is a bit of fun concerning Schweinhund C.1149 as featured on the Roden box cover. Alex Revell says that Capt. Grinnell - Milne did not overpaint the fuselage entirely red until after the hostilities.


Another modeler was kind enough to post his correspondence with Alex Revell on the subject of C .1149
". . . Stephen, I thought I would post the original message and reply from Alex that accompanied the "Unpublished" photos. As can be seen in these views the white of the roundel is overpainted showing this to be the post war all red version. As stated in my E Mail to Alex, GM states in his book that he was flying in his SE with the "Nose" painted red."
'Thanks for your mail. If you look carefully at the photo of
G-M's SE on page 390 of HITEB you'll see that the fuselage roundel has no white outline and the fin is overpainted. G-M had magnificent prints of the photos of the six SEs on pages 390 and 391, somewhere in the region of 10x6 in size. These were not snapshots, but taken by a professional photographer. I pointed out to him that I thought the whole fuselage was overpainted because of the absence of the white ring around the fuselage roundel and the lack of serial number on the fin. He said that while the war was still on he was not allowed to have the whole fuselage red, but after the armistice he had the whole fuselage and rudder overpainted. Thanks for your kind remarks about HITEB. Regards Alex '
As a bit of a holiday treat, here is a bit of fun concerning Schweinhund C.1149 as featured on the Roden box cover. Alex Revell says that Capt. Grinnell - Milne did not overpaint the fuselage entirely red until after the hostilities.
Another modeler was kind enough to post his correspondence with Alex Revell on the subject of C .1149
". . . Stephen, I thought I would post the original message and reply from Alex that accompanied the "Unpublished" photos. As can be seen in these views the white of the roundel is overpainted showing this to be the post war all red version. As stated in my E Mail to Alex, GM states in his book that he was flying in his SE with the "Nose" painted red."
'Thanks for your mail. If you look carefully at the photo of
G-M's SE on page 390 of HITEB you'll see that the fuselage roundel has no white outline and the fin is overpainted. G-M had magnificent prints of the photos of the six SEs on pages 390 and 391, somewhere in the region of 10x6 in size. These were not snapshots, but taken by a professional photographer. I pointed out to him that I thought the whole fuselage was overpainted because of the absence of the white ring around the fuselage roundel and the lack of serial number on the fin. He said that while the war was still on he was not allowed to have the whole fuselage red, but after the armistice he had the whole fuselage and rudder overpainted. Thanks for your kind remarks about HITEB. Regards Alex '
 |

WEB HOSTING BY


Copyright ©2021 AeroScale and Kitmaker Network, a subsidiary of Silver Star Enterprises
All Rights Reserved. Please read our Conditions of Use and Privacy Policy.
All Rights Reserved. Please read our Conditions of Use and Privacy Policy.