1:32 Roden GB 2008 Se5a - Stephen
Indiana, United States
Joined: May 14, 2007
KitMaker: 3,117 posts
AeroScale: 2,270 posts
Posted: Sunday, July 20, 2008 - 09:47 AM UTC
I will stop at the hardware stor on my next trip to Versachi's.
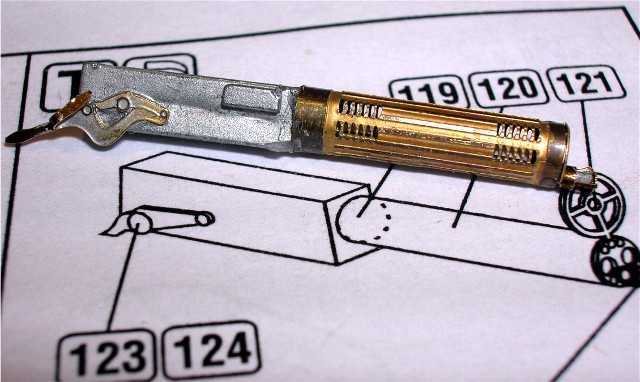
I never thought about the O-rings. Great idea

I might actually try to do that on my next Alby.
"Treat 'em Rough", Current Builds--Wingnut Rumpler
I am frequently seen with blood shot eyes from staying up past my nap time to get the right colour scheme on my latest WWI model?
Colorado, United States
Joined: January 25, 2004
KitMaker: 11,669 posts
AeroScale: 11,011 posts
Posted: Sunday, July 20, 2008 - 10:10 AM UTC
Quoted Text
I will stop at the hardware stor on my next trip to Versachi's.
I never thought about the O-rings. Great idea I might actually try to do that on my next Alby.
The smaller ones are in the maturnity bin. . .Ok I'll stop.. . .No I won't.

". . .The most important thing is to know why you build and then get the most that you can out of building." via D.D.
Colorado, United States
Joined: January 25, 2004
KitMaker: 11,669 posts
AeroScale: 11,011 posts
Posted: Saturday, August 16, 2008 - 02:29 PM UTC
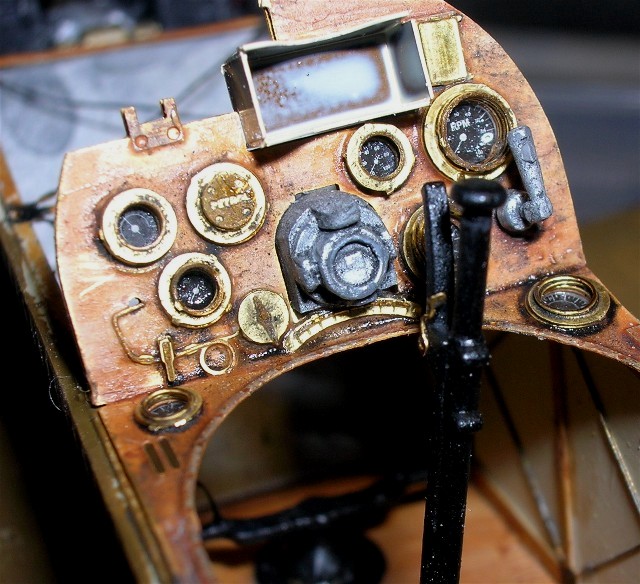
Here are some of the brass pieces added to the Part of Poland instrument panel.
". . .The most important thing is to know why you build and then get the most that you can out of building." via D.D.
Colorado, United States
Joined: January 25, 2004
KitMaker: 11,669 posts
AeroScale: 11,011 posts
Posted: Saturday, August 16, 2008 - 02:31 PM UTC
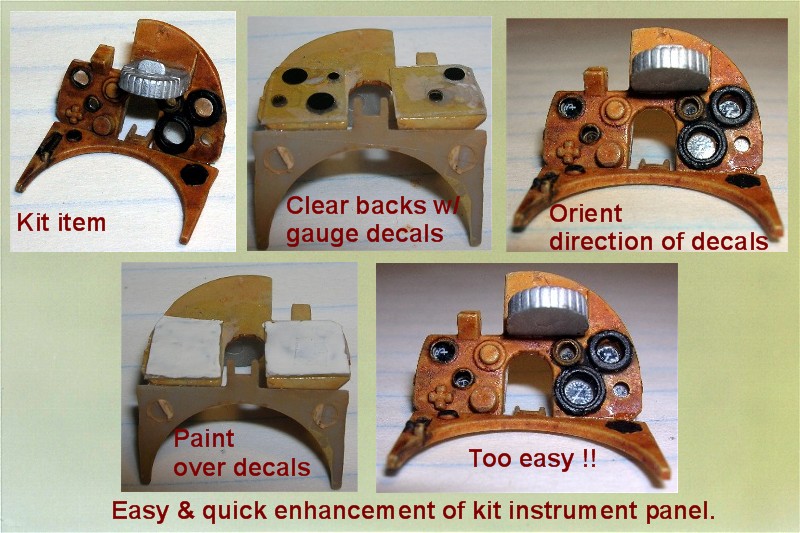
Now for those of you who don't plan on adding photoetch, here is a modification to the kit Instrument Panel.
Drill out the gauge faces carefully. You don't want to distort the molded bezels with the heat generated by a motor tool. You put the clear panels on first then add the decals attaching them behind the clear plastic by their faces. Let dry then paint the decal backs and the clear with white or black depending on the gauge details. Viola!
". . .The most important thing is to know why you build and then get the most that you can out of building." via D.D.
North Carolina, United States
Joined: June 19, 2007
KitMaker: 604 posts
AeroScale: 600 posts
Posted: Sunday, August 17, 2008 - 01:23 AM UTC
Stephen,
Nice looking panel! Thanks for sharing the technique!
RAGIII
Colorado, United States
Joined: January 25, 2004
KitMaker: 11,669 posts
AeroScale: 11,011 posts
Posted: Thursday, August 21, 2008 - 05:36 AM UTC
Thanks Rick!
While I am closing up the fuselage here is a bit for the viewers to chew on.
A. How many license builders were there for the SE 5a type in 1917 - 1918?
B. Which one(s) does the Roden mold represent?
". . .The most important thing is to know why you build and then get the most that you can out of building." via D.D.
Colorado, United States
Joined: January 25, 2004
KitMaker: 11,669 posts
AeroScale: 11,011 posts
Posted: Saturday, August 23, 2008 - 02:22 PM UTC
Mine will be in the works as it were. My chin panel in place is but closed. I will see if I can do some images later. Now that the two in-box reviews are done I can get back to my builds. Then I have to get ready for the Eduard Spad XIII. That will be in the box as well but I really want to see how that one stacks up against the old DML kit. So I may have to build it too! Busy busy busy! Not complaining I like it!
". . .The most important thing is to know why you build and then get the most that you can out of building." via D.D.
North Carolina, United States
Joined: June 17, 2006
KitMaker: 478 posts
AeroScale: 391 posts
Posted: Sunday, August 24, 2008 - 11:53 AM UTC
Stephen,
Got a Roden SE5a question for you. When you were getting ready for the PoP interior framework PE, did you scrape off all the Roden interior "structure"? Looking at your posts..........it looks like you did, but can't be sure and the PoP instructions certainly don't say. Hate to scrape, then see....OOPS........


Regards
Steve
1/350 USS San Francisco on Slipways
1/350 HMS Warspite in Research Mode
1/32 P-39D stalled
Colorado, United States
Joined: January 25, 2004
KitMaker: 11,669 posts
AeroScale: 11,011 posts
Posted: Sunday, August 24, 2008 - 02:44 PM UTC
Greetings Steve Yes scrape it down. Eliminate all interior surface detail. Also I used the Pop flooring as it came. Instead of one floor piece there should be two with a gap between them. The bottom of the fuselage is fabric and there are some needed cross members to be seen. So to do it correctly you do a false bottom to represent the fabric bottom. Then the cross members and then the two wooden foot plates.
The crucial item is the "sit" of the motor. In general the Pop items are very good. BUT! If they make a mistake that translates to their fret, They don't tell you about it. You "the modeler" have to figure it out for yourself to make everything fit.
". . .The most important thing is to know why you build and then get the most that you can out of building." via D.D.
Colorado, United States
Joined: January 25, 2004
KitMaker: 11,669 posts
AeroScale: 11,011 posts
Posted: Sunday, August 24, 2008 - 02:50 PM UTC
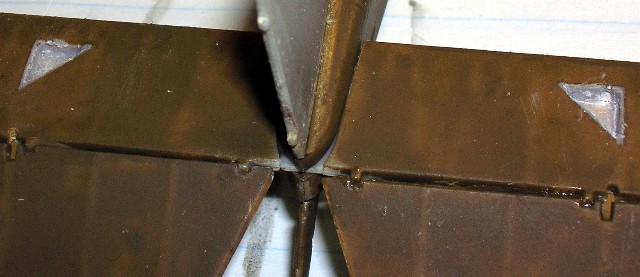
Greetings all;
I have spent a little bit of time today carving out ther pulley inspection stations. Below is Larsa's image. Mine will be done after work tonight and I have some other images to post as well. I still have one more to cut out.

". . .The most important thing is to know why you build and then get the most that you can out of building." via D.D.
West Virginia, United States
Joined: December 18, 2006
KitMaker: 1,121 posts
AeroScale: 1,063 posts
Posted: Sunday, August 24, 2008 - 03:05 PM UTC
Looking great, Stephen. That cockpit is superb!!! Makes me want to try one of these 1/32 birds.
Mark
North Carolina, United States
Joined: June 17, 2006
KitMaker: 478 posts
AeroScale: 391 posts
Posted: Monday, August 25, 2008 - 05:32 AM UTC

I assume you refer to the 1/8" too high for the engine and the PoP fret? I was planning on looking out for that one.
Cool....always enjoyed a good mystery. Not in modelling though.

Steve
1/350 USS San Francisco on Slipways
1/350 HMS Warspite in Research Mode
1/32 P-39D stalled
Colorado, United States
Joined: January 25, 2004
KitMaker: 11,669 posts
AeroScale: 11,011 posts
Posted: Monday, August 25, 2008 - 06:41 AM UTC
Part of the problem is not with the fret. I am convinced the motor is a bit too large. But there is noting we can do about that for now.
Here are some continuing build images.
". . .The most important thing is to know why you build and then get the most that you can out of building." via D.D.
Colorado, United States
Joined: January 25, 2004
KitMaker: 11,669 posts
AeroScale: 11,011 posts
Posted: Monday, August 25, 2008 - 06:46 AM UTC
The chin pan is installed.
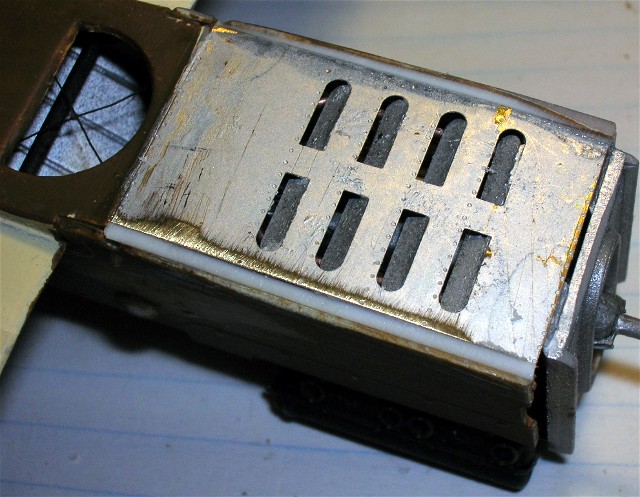
But needs a bit more filling at one edge.
". . .The most important thing is to know why you build and then get the most that you can out of building." via D.D.
Colorado, United States
Joined: January 25, 2004
KitMaker: 11,669 posts
AeroScale: 11,011 posts
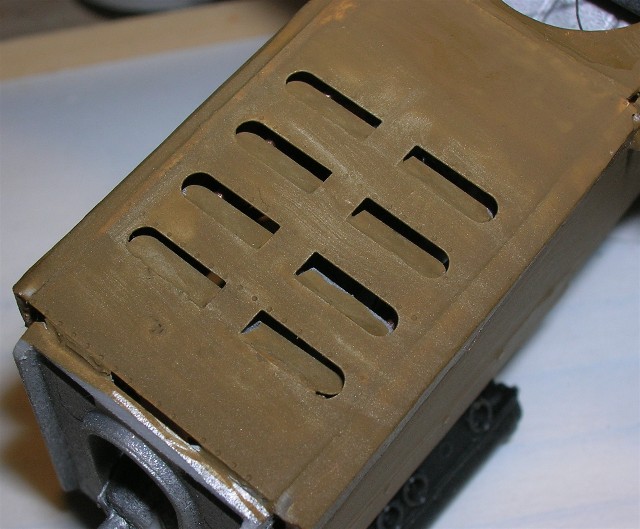
Posted: Monday, August 25, 2008 - 06:57 AM UTC
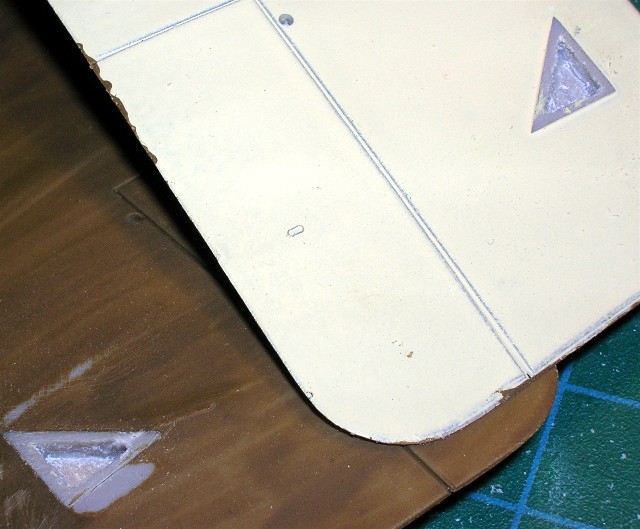
While this was done a couple of weeks ago I thought to reference the removal of the oil filler access as this was a feature usually associated with the Hispano Suiza motor. This version is of course the Wolseley Viper. The oil filler was relocated on production models.
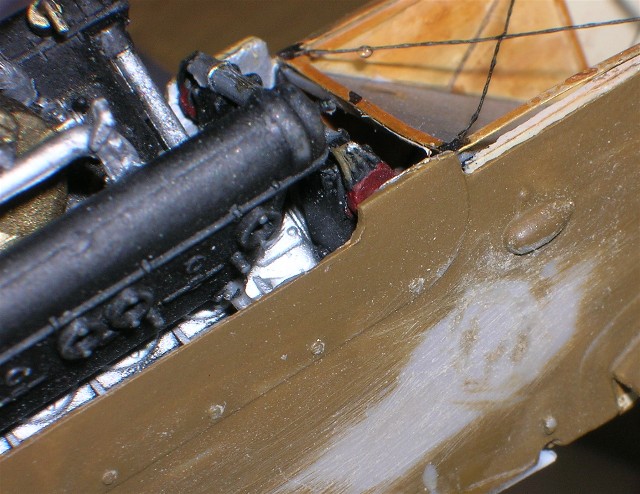
Though most experimental versions including the first Viper installations did have the diamond shaped access. Even later in the war the airframes retained for experiments in exhaust, radiator and engine modifications were the early production SE 5a airframes.
The water droplet on the rigging is evidnce to my sweat poured in to the build.
". . .The most important thing is to know why you build and then get the most that you can out of building." via D.D.
North Carolina, United States
Joined: June 17, 2006
KitMaker: 478 posts
AeroScale: 391 posts
Posted: Monday, August 25, 2008 - 11:29 AM UTC
I like the sweat...........It's usually blood on mine.
Your build is getting me a bit nervous about mine. I am building mine in separate "assemblies" to "be assembled" later. I was hoping for a kind of "Ford Model T" assembly line where everything fits. You've got me working on the fuselage PE now for a fit check.
Is that PC10?
Good update there Stephen.

Regards
Steve
1/350 USS San Francisco on Slipways
1/350 HMS Warspite in Research Mode
1/32 P-39D stalled
Colorado, United States
Joined: January 25, 2004
KitMaker: 11,669 posts
AeroScale: 11,011 posts
Posted: Monday, August 25, 2008 - 02:05 PM UTC
Never hurts to double check. I am just glad someone can benefit from my experience. In my humble opinion this is a factyory fresh version of PC10. It could change drastically in the elements after a certain amount of frontline service. PC12 by the way is a deep almost chocolate colour. From the factory, manufacturers were limited by their contracts but in the field and at repair depots it tended to be a different story.
I have two images of a Viper powered SE 5a where they painted white sun rays over the basic colour scheme but it seems more like PC12 rather than PC 10.
". . .The most important thing is to know why you build and then get the most that you can out of building." via D.D.
North Carolina, United States
Joined: June 19, 2007
KitMaker: 604 posts
AeroScale: 600 posts
Posted: Monday, August 25, 2008 - 03:08 PM UTC
Stephen,
Looking great! I wish I had taken the time on my build of this kit to utilize some aftermarket stuff. I think the PC 10 looks right on.
RAGIII
Victoria, Australia
Joined: November 26, 2006
KitMaker: 608 posts
AeroScale: 602 posts
Posted: Monday, August 25, 2008 - 03:42 PM UTC
Quoted Text
I have two images of a Viper powered SE 5a where they painted white sun rays over the basic colour scheme but it seems more like PC12 rather than PC 10.
And in some light, it looks almost black!
looks like a good "Scale" PC 10 to me Stephen.
Hmmm. I don't have the PART etch for my 1/32 SE. I do however have a lot of Evergreen strip and a few soft drink cans lying about...
Cheers,
Hugh
Colorado, United States
Joined: January 25, 2004
KitMaker: 11,669 posts
AeroScale: 11,011 posts
Posted: Monday, August 25, 2008 - 05:17 PM UTC
Here are some online references by the way.
Vintage Aviator. Memorial Flight ". . .The most important thing is to know why you build and then get the most that you can out of building." via D.D.
Colorado, United States
Joined: January 25, 2004
KitMaker: 11,669 posts
AeroScale: 11,011 posts
Posted: Tuesday, August 26, 2008 - 06:45 PM UTC
". . .The most important thing is to know why you build and then get the most that you can out of building." via D.D.
Colorado, United States
Joined: January 25, 2004
KitMaker: 11,669 posts
AeroScale: 11,011 posts
Posted: Tuesday, August 26, 2008 - 06:50 PM UTC
". . .The most important thing is to know why you build and then get the most that you can out of building." via D.D.
Alberta, Canada
Joined: January 19, 2008
KitMaker: 6,743 posts
AeroScale: 6,151 posts
Posted: Thursday, August 28, 2008 - 02:38 AM UTC
Excellent craftsmanship Stephen . I always enjoy your builds , looking forward on seeing more .

North Carolina, United States
Joined: June 17, 2006
KitMaker: 478 posts
AeroScale: 391 posts
Posted: Thursday, August 28, 2008 - 10:46 AM UTC
Excellent!!!!

I'm watching closely..........

Regards
Steve
1/350 USS San Francisco on Slipways
1/350 HMS Warspite in Research Mode
1/32 P-39D stalled
North Carolina, United States
Joined: June 19, 2007
KitMaker: 604 posts
AeroScale: 600 posts
Posted: Friday, August 29, 2008 - 11:55 AM UTC
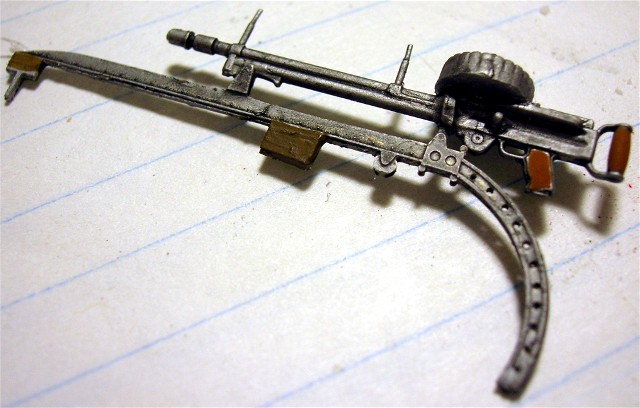
Stephen, the pe parts on the Vickers and Lewis really look great. I see you are on the same path with the inspection panels on the wings and tail that I took. Keep posting, I am impressed as always !
RAGIII