

Stephen...............ticklish question for you.....your PC10....is that a "homemade" recipe? You'll note from my build that I'm having questions about PC10.
Regards
Steve
Early Aviation
Discuss World War I and the early years of aviation thru 1934.
Discuss World War I and the early years of aviation thru 1934.
Hosted by Jim Starkweather
1:32 Roden GB 2008 Se5a - Stephen
Hatter50

Joined: June 17, 2006
KitMaker: 478 posts
AeroScale: 391 posts

Posted: Friday, December 19, 2008 - 10:44 PM UTC

JackFlash
Joined: January 25, 2004
KitMaker: 11,669 posts
AeroScale: 11,011 posts
Posted: Saturday, December 20, 2008 - 06:58 AM UTC
Greetings Steve;
As you no doubt have heard PC10 & 12 were standard British applied camouflage colours in WWI. From examples I have seen and notations from the grand British Historian Ian Huntley I have chosen Testors Model Master as a base coat for "new" PC 10. This changed after application due to intervening factors. proximity to the channel salt air, yearly climate in a given location. In service even simple sunlight tended to change the tone of the colour.
In the subsequent steps that will follow I will apply a wash or two and some dry brushing to add some depth.
Edit. . . Here is a bit more on the subject.
Consider using Testors Model Master Field Drab for a good base to PC 10. Replacement, repaired or repainted areas can go darker or lighter. Even PC 12 was used depending on what was in the unit supply huts. See the 1/48 Roden build notes thread for those variations. The percentages of iron oxide and lamp black from the manufacturer would be faily consistant. But elements like humidity, age, even the brush or liquid carries for thinning could effect the over all appearance.
When it comes to photos it would depend on lighting, orthochromatic or panchromatic films that were in use during the late war months.
The Lafayette Foundation has a fine piece of upper surface wing fabric from an American DH 4 that fits my description of PC 10 the British used in their general contract orders. Typically this is called Khaki. The Testors MM drab earth I described matches this very well.
Most replicas are very green. In the case of some AEF late war and all post war contract airframes this is reasonably accurate. They most likely ordered a green - dark blue/black OD olive colour to be applied. These are especially noted in the post war era where new machines were deliverd to the 94th & 95th Aero in Texas.
JackFlash
Joined: January 25, 2004
KitMaker: 11,669 posts
AeroScale: 11,011 posts
Posted: Saturday, December 20, 2008 - 05:07 PM UTC
To be fair this image though informative does not represent the colour of PC 10 accurately.
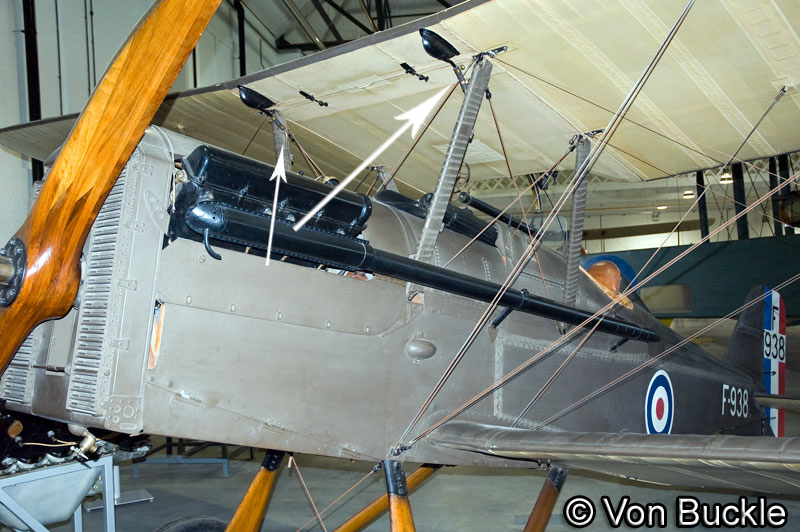
Here is the Shuttleworth SE 5a after a recent restoration job.


Here is the Shuttleworth SE 5a after a recent restoration job.
JackFlash
Joined: January 25, 2004
KitMaker: 11,669 posts
AeroScale: 11,011 posts
Posted: Saturday, December 20, 2008 - 05:39 PM UTC
As a bit of a holiday treat, here is a bit of fun concerning Schweinhund C.1149 as featured on the Roden box cover. Alex Revell says that Capt. Grinnell - Milne did not overpaint the fuselage entirely red until after the hostilities.


RAGIII
Joined: June 19, 2007
KitMaker: 604 posts
AeroScale: 600 posts
Posted: Sunday, December 21, 2008 - 03:20 AM UTC
Quoted Text
As a bit of a holiday treat, here is a bit of fun concerning Schweinhund C.1149 as featured on the Roden box cover. Alex Revell says that Capt. Grinnell - Milne did not overpaint the fuselage entirely red until after the hostilities.
stephen, I thought I would post the original message and reply from Alex that accompanied the "Unpublished" photos. As can be seen in these views the white of the roundel is overpainted showing this to be the post war all red version. As stated in my E Mail to Alex, GM states in his book that he was flying in his SE with the "Nose" painted red.
Rick,
Thanks for your mail. If you look carefully at the photo of
G-M's SE on page 390 of HITEB you'll see that the fuselage roundel has no white outline and the fin is overpainted. G-M had magnificent prints of the photos of the six SEs on pages 390 and 391, somewhere in the region of 10x6 in size. These were not snapshots, but taken by a professional photographer. I pointed out to him that I thought the whole fuselage was overpainted because of the absence of the white ring around the fuselage roundel and the lack of serial number on the fin. He said that while the war was still on he was not allowed to have the whole fuselage red, but after the armistice he had the whole fuselage and rudder overpainted.
Thanks for your kind remarks about HITEB.
Regards
Alex
Subject: GMs Wind in the wires
Alex, Sorry but I don't have anywhere near the money to offer for an autographed copy of GMs book! That being said I do have a question to ask. I recently re read my worn copy of wind in the wires. GM mentions at or about armistice time flying Schweinhund III with the "Nose" painted RED. Any thoughts on whether there was an interim red scheme with only a portion of the fuselage or nose painted red? Thanks for any input, and as I have stated before I think High in the Empty Blue is the finest WW1 history ever written!
Rick Geisler
RAGIII

thegirl

Joined: January 19, 2008
KitMaker: 6,743 posts
AeroScale: 6,151 posts
Posted: Monday, December 22, 2008 - 08:11 AM UTC
Thanks Stephen and Rick for sharing the info . At the moment I don't have enough to start Rodens 1/48 kit . Every little bit of info helps out .
How goes the build so far Stephen ?
How goes the build so far Stephen ?
JackFlash
Joined: January 25, 2004
KitMaker: 11,669 posts
AeroScale: 11,011 posts
Posted: Monday, December 22, 2008 - 09:01 AM UTC
Hello Terri!
Just waiting for a clear coat to dry. Then a but of colour for some shadows. Touch up the gun and add its gun sight. Then I add the top wing and begin the rigging.
Just waiting for a clear coat to dry. Then a but of colour for some shadows. Touch up the gun and add its gun sight. Then I add the top wing and begin the rigging.
thegirl
Joined: January 19, 2008
KitMaker: 6,743 posts
AeroScale: 6,151 posts
Posted: Wednesday, December 24, 2008 - 03:02 AM UTC
Thamks for the up date Stephen , looking forward to seeing your progress pic's on this fantastic build !
JackFlash
Joined: January 25, 2004
KitMaker: 11,669 posts
AeroScale: 11,011 posts
Posted: Thursday, December 25, 2008 - 05:03 PM UTC
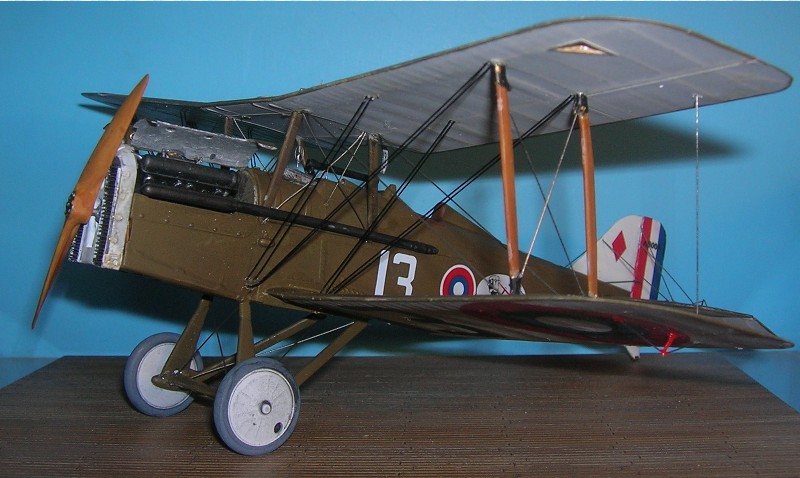
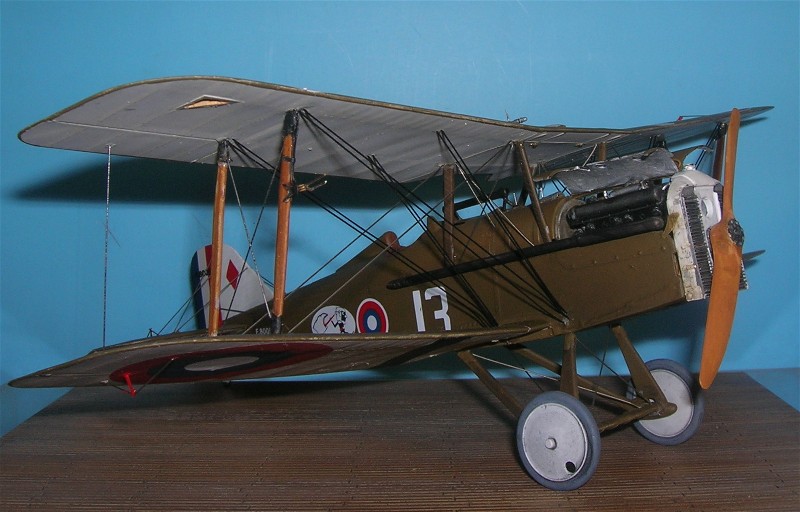
As promised some images if the undersurfaces and my attempt at CDL. As noted earlier cotton battens were attached to the wooden skeletal portions of the wing. To these were attached the wing cover / fabric and the rib tapes were attached on top of these and sewn into the cotten battens mentioned earlier.
I started with painting a bright CDL to the flying surfaces first. then laying black graphic arts tape over the ribs. Below,
Next below; Then I removed the tape and shot another light coating of CDL In this image you will see one of the lower wings and the horizontal tail unit has yet to have the CDL shot over it and you can appreciate the need to tone down dark areas a bit.
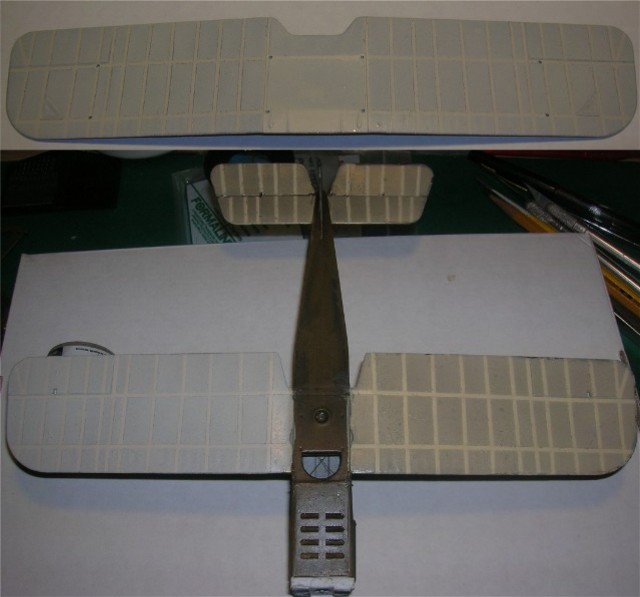
Then finally you wil see the finished surfaces flattened (no gloss) and the variations of the simulated CDL with internal shadows.
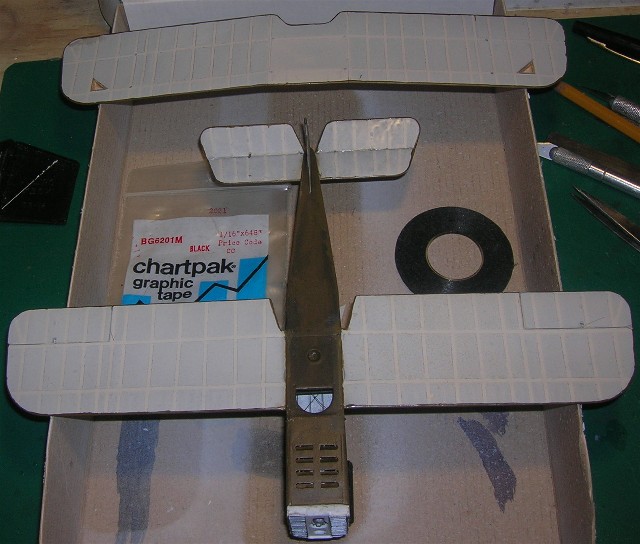
All in all about 3.5 hour job.
I started with painting a bright CDL to the flying surfaces first. then laying black graphic arts tape over the ribs. Below,
Next below; Then I removed the tape and shot another light coating of CDL In this image you will see one of the lower wings and the horizontal tail unit has yet to have the CDL shot over it and you can appreciate the need to tone down dark areas a bit.
Then finally you wil see the finished surfaces flattened (no gloss) and the variations of the simulated CDL with internal shadows.
All in all about 3.5 hour job.
thegirl
Joined: January 19, 2008
KitMaker: 6,743 posts
AeroScale: 6,151 posts
Posted: Friday, December 26, 2008 - 02:59 AM UTC
Looking really good Stephen ! Hows the art tape compared to other masking tape ? Would be nice to have a company come out with this for the rib taping for lozenge , sure would be easier . Thanks for sharing , looking forward to seeing the rest and the rigging . 
JackFlash
Joined: January 25, 2004
KitMaker: 11,669 posts
AeroScale: 11,011 posts
Posted: Friday, December 26, 2008 - 09:01 PM UTC
Quoted Text
Looking really good Stephen ! Hows the art tape compared to other masking tape ? Would be nice to have a company come out with this for the rib taping for lozenge , sure would be easier . Thanks for sharing , looking forward to seeing the rest and the rigging .
It goes down well and comes up very well with no tape / glue residue left behind. As for the lozenge strips for edging and rib tapes, I believe some are being looked at right now for production. No promises thought. You see there is a reason they haven't been done yet by anyone in a smaller scale.
thegirl
Joined: January 19, 2008
KitMaker: 6,743 posts
AeroScale: 6,151 posts
Posted: Saturday, December 27, 2008 - 01:47 AM UTC
thanks Stephen , I'm always interested in different masking mediums and methods .
Could it be trying to get the tape thin enough ( like a decal ) which is way it hasn't be done before ? Well maybe in the up coming year we will see a new product of this .
Could it be trying to get the tape thin enough ( like a decal ) which is way it hasn't be done before ? Well maybe in the up coming year we will see a new product of this .
JackFlash
Joined: January 25, 2004
KitMaker: 11,669 posts
AeroScale: 11,011 posts
Posted: Saturday, December 27, 2008 - 12:10 PM UTC
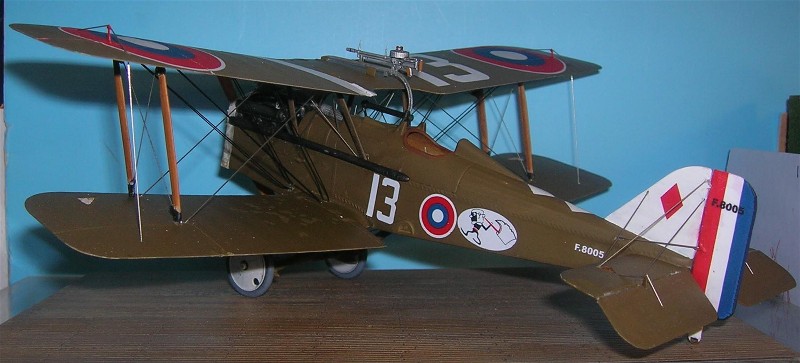
Its official!!! The top wing is mounted and the cabanes & landing gear have been rigged. Now for the interwing rigging.
JackFlash
Joined: January 25, 2004
KitMaker: 11,669 posts
AeroScale: 11,011 posts
Posted: Saturday, December 27, 2008 - 11:12 PM UTC
Well the rigging between the wings is done except for the ailerons. And they have to wait for the cockades to be applied. Looks like I have one RAFwire to move over a bit . . .

thegirl
Joined: January 19, 2008
KitMaker: 6,743 posts
AeroScale: 6,151 posts
Posted: Sunday, December 28, 2008 - 12:56 AM UTC
Looking awesome Stephen ! I really like the wood grain on the struts

MerlinV

Joined: November 26, 2006
KitMaker: 608 posts
AeroScale: 602 posts

Posted: Sunday, December 28, 2008 - 07:53 AM UTC
OK Stephen, aside from the fact that you are nearly finished and that the job is looking spectacular, I detect that your RAF wires do in fact have a flat cross section.
Inquiring minds want to know. How did you do it?
Cheers,
Hugh
Inquiring minds want to know. How did you do it?
Cheers,
Hugh
JackFlash
Joined: January 25, 2004
KitMaker: 11,669 posts
AeroScale: 11,011 posts
Posted: Sunday, December 28, 2008 - 09:07 AM UTC
Quoted Text
OK Stephen, aside from the fact that yuo are nearly finished and that the job is looking spectacular, I detect that your RAF wires do in fact have a flat cross section.
Inquiring minds want to know. How did you do it?
Cheers,
Hugh
Kevlar thread. SSShhh. . . don't tell anyone.

Hatter50
Joined: June 17, 2006
KitMaker: 478 posts
AeroScale: 391 posts
Posted: Sunday, December 28, 2008 - 09:17 AM UTC
Very Nice Stephen........
Regards
Steve
Regards
Steve

Repainted

Joined: April 04, 2006
KitMaker: 1,058 posts
AeroScale: 1,004 posts
Posted: Sunday, December 28, 2008 - 11:24 PM UTC
Kevlar, thats a new touch Stephen. It´s looks right on the pics, so I guess it´s works. The build itself is awesome.
Larsa
Larsa

Kalt

Joined: June 14, 2006
KitMaker: 222 posts
AeroScale: 219 posts

Posted: Monday, December 29, 2008 - 02:05 AM UTC
Quoted Text
Kevlar thread. SSShhh. . . don't tell anyone.
Kevlar???? where did you buy it?

JackFlash
Joined: January 25, 2004
KitMaker: 11,669 posts
AeroScale: 11,011 posts
Posted: Monday, December 29, 2008 - 06:32 AM UTC
Greetings Kalt.
By the way I found mine in a Fishing tackle Isle in a sporting goods store.
Check out . . .
Techno rigging
Here is where I first used it.
Ship Shape in Bristol fashion.
Here is the Google.
So Click Here.
By the way I found mine in a Fishing tackle Isle in a sporting goods store.
Check out . . .
Techno rigging
Here is where I first used it.
Ship Shape in Bristol fashion.
Here is the Google.
So Click Here.
Hatter50
Joined: June 17, 2006
KitMaker: 478 posts
AeroScale: 391 posts
Posted: Monday, December 29, 2008 - 09:35 AM UTC
Hey Stephen, those links dont go anywhere.........
Regards
Steve
Regards
Steve
JackFlash
Joined: January 25, 2004
KitMaker: 11,669 posts
AeroScale: 11,011 posts
Posted: Monday, December 29, 2008 - 10:56 AM UTC
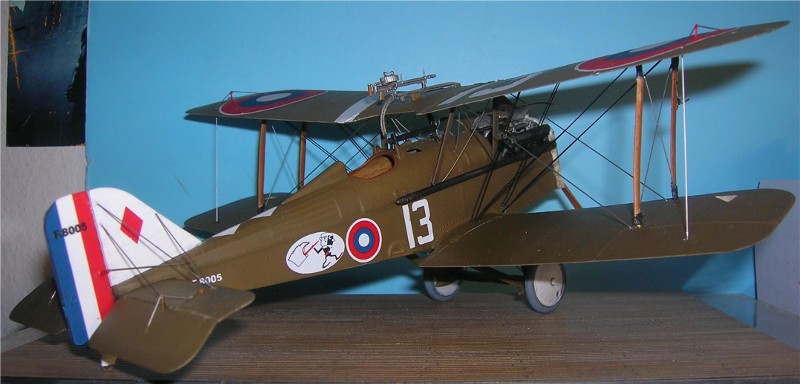
Good news is the decals are all in place. The kit I got had the older sets in them and needed a good deal of coaxing. I have gone with F.8005 Lt. Rorison's mount from 25th Aero. These need very warm water and lots of sol & set. Next more tail & aileron rigging and the Lewis gun & Foster mount.
JackFlash
Joined: January 25, 2004
KitMaker: 11,669 posts
AeroScale: 11,011 posts
Posted: Monday, December 29, 2008 - 10:59 AM UTC
Quoted Text
Hey Stephen, those links dont go anywhere......... Regards Steve
Try again. I had to remove a - " - character. Works fine fine now.
JackFlash
Joined: January 25, 2004
KitMaker: 11,669 posts
AeroScale: 11,011 posts
Posted: Monday, December 29, 2008 - 07:29 PM UTC
Stick a fork in it folks it is done! It represents the Austin built F.8005, Lt. Rorison's mount from 25th Aero late 1918. The engine is of course the 200-220hp Wolseley Viper .
That completes my pledged builds.
That completes my pledged builds.
 |

WEB HOSTING BY


Copyright ©2021 AeroScale and Kitmaker Network, a subsidiary of Silver Star Enterprises
All Rights Reserved. Please read our Conditions of Use and Privacy Policy.
All Rights Reserved. Please read our Conditions of Use and Privacy Policy.