

Hi Jon
Thanks .. you missed the point I think (or I do) .. the problem in the photo above is solved ..
The problem now: when I removed the canopy the middle part got some cracks (one is already visible in the photo) so I am thinking about replacing it .. there is not much danger in this
cheers
Steffen
World War II
Discuss WWII and the era directly before and after the war from 1935-1949.
Discuss WWII and the era directly before and after the war from 1935-1949.
Hosted by Rowan Baylis
Eduard's Grumman F6F-3 Hellcat

alpha_tango

Joined: September 07, 2005
KitMaker: 5,609 posts
AeroScale: 5,231 posts
Posted: Friday, September 26, 2008 - 08:43 AM UTC


Merlin

#017


Joined: June 11, 2003
KitMaker: 17,582 posts
AeroScale: 12,795 posts

Posted: Friday, September 26, 2008 - 09:09 PM UTC
Hi Steffen
That's really frustrating and disappointing! I feel your pain.
I've never used Gators, but I wonder whether the area effected would have cleared if you'd left it longer?...
Like Eetu, I can sort you out a spare canopy if you want.
All the best
Rowan
That's really frustrating and disappointing! I feel your pain.
I've never used Gators, but I wonder whether the area effected would have cleared if you'd left it longer?...
Like Eetu, I can sort you out a spare canopy if you want.
All the best
Rowan

alpha_tango
Joined: September 07, 2005
KitMaker: 5,609 posts
AeroScale: 5,231 posts
Posted: Friday, September 26, 2008 - 09:26 PM UTC
Hi Rowan
glad you are back ... you haven't posted in a week or so.
Gators: It is a kind of PVA/white glue and it surely has not done this .. furthermore it cured for a day or two before I added the middle part of the canopy. (This was not visible when I added the masks) I had paint creeping under masks and canopys already but I cannot imagine how it should on the inside of the windshield? (it also affected the black paint on the dash cover) .. it surely is/was my bad.
A replacement for the cracked middle section is the best solution, but I fear sending this fragile part across Europe will not work out. But thanks to both of you for your kind offer!!! ... maybe I'll take you up on this when I break the part during painting
So I have to bite the bullet and take one of the Brit combo clear parts and thus build one of the kit with open canopy.
cheers
Steffen

Emeritus

Joined: March 30, 2004
KitMaker: 2,845 posts
AeroScale: 1,564 posts

Posted: Friday, September 26, 2008 - 11:21 PM UTC
I think a film containter and some tissue would keep the canopy intact nicely in the mail, but if you got the Brit double combo already, that might be the safest choice.
Anyway, let me know if you're in need of the part.
Strange phenomenon indeed. I too have not heard of Gator glue causing such issues. (got some on the canopies of my Blenheim... *knocks on wood*)
But back to the topic of the armored glass.
I looked at the kit and indeed noticed that there's little room between the windscreen and the gunsight to fit the additional glass panel.
Somehow too little...
Then took another look at the pic I posted earlier. Another small point to nitpick about the kit? The gunsight is mounted on the instrument panel, behind the panel coaming, while the kit has a semi-circular hole on the coaming's edge, the gunsight sitting further than in reality.
Bummer, looks like another item added to my aftermarket shopping list...
(and some work to be done with styrene sheet filling the cutout)
Btw, here's another good photo showing the position of the gunsight as well as the separate armored glass: Clickety-click.
alpha_tango
Joined: September 07, 2005
KitMaker: 5,609 posts
AeroScale: 5,231 posts
Posted: Friday, September 26, 2008 - 11:29 PM UTC
Hi Eetu
well, somhow the instrument panel is missing in your picture ... I might be wrong, but IMO the gunsight is sitting very strange in that photo .. any wartime pix?
cheers
Steffen
P.:S seems this is another of those endless cursed projects .. just broke another part
well, somhow the instrument panel is missing in your picture ... I might be wrong, but IMO the gunsight is sitting very strange in that photo .. any wartime pix?
cheers
Steffen
P.:S seems this is another of those endless cursed projects .. just broke another part
Emeritus
Joined: March 30, 2004
KitMaker: 2,845 posts
AeroScale: 1,564 posts
Posted: Saturday, September 27, 2008 - 01:03 AM UTC
Here's another pic from the gallery: Click
The instrument panel's there.
But then again, it's a museum plane.
War-time photos, at least the kind where you could see the cockpit area clearly, seem to be scarce.
I found a couple, but they aren't that helpful.

A larger one, better post as a link.
Here's a few more shots of museum planes:
Minsi III
One from inside the cockpit.
Close-up from the outside
Not the best possible angles, but here's a picture from the actual manual.
Btw, check out the whole gallery here: http://www.cybermodeler.com/aircraft/f6f/f6f_pit.shtml Great stuff.
Finally, I found this (apparently) war-time cockpit photo.
No gunsight fitted though.
The instrument panel's there.
But then again, it's a museum plane.
War-time photos, at least the kind where you could see the cockpit area clearly, seem to be scarce.
I found a couple, but they aren't that helpful.
A larger one, better post as a link.
Here's a few more shots of museum planes:
Minsi III
One from inside the cockpit.
Close-up from the outside
Not the best possible angles, but here's a picture from the actual manual.
Btw, check out the whole gallery here: http://www.cybermodeler.com/aircraft/f6f/f6f_pit.shtml Great stuff.
Finally, I found this (apparently) war-time cockpit photo.
No gunsight fitted though.
alpha_tango
Joined: September 07, 2005
KitMaker: 5,609 posts
AeroScale: 5,231 posts
Posted: Saturday, September 27, 2008 - 02:50 AM UTC
Hi Eetu
wow .. you put quite some time in this!! Thank you!
If I may toss in my two ct ?!
IMO the gun sight is pretty much in the same place as on the original pictures. The mount is surely simplified, but I do not see how the "three stick mount" from the museum a/c could be done in plastic .. I am o.k. with what Eduard did.
The armour glass is a different deal, but I also hardly see a simple way to do in in IM. Eduard could have done the front panel of the canopy separate and mould the Armour glass to it. So you could paint the frame around the Armour panel. But you would have to glue two clear pieces together. The plastic has to be of a certain thickness to work in an IM tool .. so from my point of view there is no way to do a separate armour glass without cheating on the dimensions or producing other "errors". But you have surely a different approach as with the wheels so again if you have another opinion post it ... I have the greatest respect of that, and sometimes I agree that my statement was wrong but I do not want to argue about the "devils beard".
I am looking forward how you will improve your model in this area!!
all the best
Steffen
wow .. you put quite some time in this!! Thank you!
If I may toss in my two ct ?!
IMO the gun sight is pretty much in the same place as on the original pictures. The mount is surely simplified, but I do not see how the "three stick mount" from the museum a/c could be done in plastic .. I am o.k. with what Eduard did.
The armour glass is a different deal, but I also hardly see a simple way to do in in IM. Eduard could have done the front panel of the canopy separate and mould the Armour glass to it. So you could paint the frame around the Armour panel. But you would have to glue two clear pieces together. The plastic has to be of a certain thickness to work in an IM tool .. so from my point of view there is no way to do a separate armour glass without cheating on the dimensions or producing other "errors". But you have surely a different approach as with the wheels
so again if you have another opinion post it ... I have the greatest respect of that, and sometimes I agree that my statement was wrong but I do not want to argue about the "devils beard". I am looking forward how you will improve your model in this area!!
all the best
Steffen
Emeritus
Joined: March 30, 2004
KitMaker: 2,845 posts
AeroScale: 1,564 posts
Posted: Saturday, September 27, 2008 - 03:49 AM UTC
What wifferent approach with the wheels? I just ordered a bunch of wheels from UItracast today. 
And why argue about the devil's beard when we can pull it?
You're 100% correct on the gunsight mount, replicating that mount in a single part would be all but impossible, but IMHO, they could have made it stick out of the instrument panel some more. Now there's a cutout in the coaming, which wasn't there on the real thing.
I wouldn't probably have a problem with this, but with this ealier type featuring the glass panel, there's less room for it in an already cramped area.
Why they should have moulded the armored glass to the windscreen? It's a completely separate part mounted on the instrument panel coaming. Both the position of the gunsight (mounted behind the coaming), the coaming itself, and the glass are clearly visible here.
You're right, the glass panel looks tricky to pull off. I'll have to look into it if I even want to bother with one, but it could be an interesting challenge.
With the metal rim of it being quite wide, the thickness of the actual clear part wouldn't matter that much as long as it's clear enough to fool the eye. (looking from the side, the panel appears thicker than it is)
But what do you think, is the armored glass attached to the windscreen after all?
http://uscockpits.com/Early%20Fighters/F6F-3%20Hellcat2.JPG
Is it really fixed to the windscreen with strips of sheet metal on the sides, or am I just seeing things?
alpha_tango
Joined: September 07, 2005
KitMaker: 5,609 posts
AeroScale: 5,231 posts
Posted: Saturday, September 27, 2008 - 04:23 AM UTC
Hi Eetu
here we go again .. I know we both like to discuss things to the slightest nuance .. that's why I commented above not to argue about .... sigh .. as you like it
I think the position of the gun sight is o.k. compared to the photos you kindly provided. In my opinion the restauration piece looks "fishy" I might be totally wrong and I do apologize in that case but I think they just left off the glare shield .. I browsed my copy of Kageros Monography and there seem to be several types .. some as large as the whole windshield (=front fixed part of the canopy). One type is very similar to the Eduard appearance.
My approach was to think as a plastic manufacturer. How would/could I do it:
1. The plexigass part is maybe 5mm thick in 1:1 that would be approx 0.1 mm in 1/48 .. you cannot injection mold that. It would even be very hard to do that as Vacu, because it is much too instable.
2. The model part is about 1 mm thick which would be 5cm armoured glass in real life.
ergo it is not possible to do this as a two part thing.
But to get the effect you could do a one part center panel of the windscreen which has the armoured glass attached to the windshield front. You could just paint the ridge that forms the armour interior colour and you would have a similar effect as in real life.
hope I could make my point clear
all the best
Steffen
here we go again .. I know we both like to discuss things to the slightest nuance .. that's why I commented above not to argue about .... sigh .. as you like it
Quoted Text
You're 100% correct on the gunsight mount, replicating that mount in a single part would be all but impossible, but IMHO, they could have made it stick out of the instrument panel some more. Now there's a cutout in the coaming, which wasn't there on the real thing.
I wouldn't probably have a problem with this, but with this ealier type featuring the glass panel, there's less room for it in an already cramped area.
I think the position of the gun sight is o.k. compared to the photos you kindly provided. In my opinion the restauration piece looks "fishy" I might be totally wrong and I do apologize in that case but I think they just left off the glare shield .. I browsed my copy of Kageros Monography and there seem to be several types .. some as large as the whole windshield (=front fixed part of the canopy). One type is very similar to the Eduard appearance.
Quoted Text
Why they should have moulded the armored glass to the windscreen?
{...}
But what do you think, is the armored glass attached to the windscreen after all??
My approach was to think as a plastic manufacturer. How would/could I do it:
1. The plexigass part is maybe 5mm thick in 1:1 that would be approx 0.1 mm in 1/48 .. you cannot injection mold that. It would even be very hard to do that as Vacu, because it is much too instable.
2. The model part is about 1 mm thick which would be 5cm armoured glass in real life.
ergo it is not possible to do this as a two part thing.
But to get the effect you could do a one part center panel of the windscreen which has the armoured glass attached to the windshield front. You could just paint the ridge that forms the armour interior colour and you would have a similar effect as in real life.
hope I could make my point clear
all the best
Steffen
Emeritus
Joined: March 30, 2004
KitMaker: 2,845 posts
AeroScale: 1,564 posts
Posted: Saturday, September 27, 2008 - 05:31 AM UTC
Got your point.
But on the other hand, what details are "in-scale" on model kits we build anyway? My guess is that relatively few.
I feel the main idea is to convey the idea of the original in the parts. In other words, if it doesn't look out of place or out of scale, it's ok.
You mean the museum example might be missing a part from the instrument panel coaming? Perfectly possible, a restoration is always a restoration, accuracy can swing wildly from piece to piece. (Take the Finnish Bf-109s repainted in the 70s as an example. Mottles and all, hand-brushed with those "accurate" and "very durable" latex paints of the day... )
Not trying to argue here. I'm not an expert on Hellcats.
What I've found out is just that the earlier series had a separate armored glass, which was integrated to the windscreen in later variants. Personally, I find the research aspect and comparing opinions and views an interesting part of the hobby.

But on the other hand, what details are "in-scale" on model kits we build anyway? My guess is that relatively few.
I feel the main idea is to convey the idea of the original in the parts. In other words, if it doesn't look out of place or out of scale, it's ok.
You mean the museum example might be missing a part from the instrument panel coaming? Perfectly possible, a restoration is always a restoration, accuracy can swing wildly from piece to piece. (Take the Finnish Bf-109s repainted in the 70s as an example. Mottles and all, hand-brushed with those "accurate" and "very durable" latex paints of the day...
)Not trying to argue here. I'm not an expert on Hellcats.
What I've found out is just that the earlier series had a separate armored glass, which was integrated to the windscreen in later variants. Personally, I find the research aspect and comparing opinions and views an interesting part of the hobby.
alpha_tango
Joined: September 07, 2005
KitMaker: 5,609 posts
AeroScale: 5,231 posts
Posted: Saturday, September 27, 2008 - 06:01 AM UTC
Hi Again
Well, I think I got what you are saying, but as written above I do not think that is doable in a plausible way. If we had a flat surface we would be fine with two acetate sheets but the canopy is cruved. i think including a 2nd part for the armour would just look horrible and you had a bulletproof cockpit front
and here we are at a point where we cannot exchange arguments any more because we both believe in something (there are no further facts we can deliver). We both agree that there is an amoured glass behind the wind shield. You say Eduard should have done it and I say they could not do that in a convincing way because the IM process has limits (as explained above). ... and we could argue days and nights without getting one step further..... as I predicted some posts above,
all the best
Steffen
Emeritus
Joined: March 30, 2004
KitMaker: 2,845 posts
AeroScale: 1,564 posts
Posted: Saturday, September 27, 2008 - 06:13 AM UTC
Well, there's nothing wrong with different opinions, right?
If people would always agree on everything, the world would stop progressing.
If people would always agree on everything, the world would stop progressing.
alpha_tango
Joined: September 07, 2005
KitMaker: 5,609 posts
AeroScale: 5,231 posts
Posted: Saturday, September 27, 2008 - 06:29 AM UTC
Hi Eetu
no I I find different opinions intersting. But we are not talking about philosophy where everything can be discussed without end. If I see this right, none of us has a solution. We are both neither wrong or right .. we cannot prove our positions so it just would be foolish to discuss this further.
As I posted above, I am curious what your home made work around for this problem is. maybe this will inspire another approach ... else we will just go in circles. e.g. you could cut out the windows from the wind shield and replace it with acetate to get some room for your armour .. or you could sand down the inside. For the moment I cannot come up with a solution that seems worthwhile .. this very model will definitely not have an additional armour.
cheers
Steffen
Emeritus
Joined: March 30, 2004
KitMaker: 2,845 posts
AeroScale: 1,564 posts
Posted: Sunday, September 28, 2008 - 07:29 AM UTC
Looks like somebody alread did it, make the armored glass from the extra windscreen: Boyakasha
alpha_tango
Joined: September 07, 2005
KitMaker: 5,609 posts
AeroScale: 5,231 posts
Posted: Sunday, September 28, 2008 - 07:50 AM UTC
Nice, but it is too large .. the real thing has almost the same angle as the windshield.
But it is better than nothing so ... go for it!!!
cheers
Steffen
But it is better than nothing so ... go for it!!!
cheers
Steffen
Emeritus
Joined: March 30, 2004
KitMaker: 2,845 posts
AeroScale: 1,564 posts
Posted: Sunday, September 28, 2008 - 08:30 AM UTC
I think that looks quite good as well. Sure, the plate thickness is out of scale, but doesn't matter since the rim of the original makes it look thick too when viewed from the side. And as long as the clear stynere is clear enough as not to give away the actual thickness of it, it's fine for me.
The size shouldn't be an issue, I can always make it smaller, but cutting and sanding indeed needs care and patience. (better not scratch it... ) Looks like the curvature on the bottom of the windscreen matches the instrument panel coaming quite nicely (now assuming it isn't modified, which isn't specifically mentioned in the article).
I think I'll at least try it when the time comes.
Ps. I wonder when aftermarket companies come up with a vac-form plate with a PE rim. If Murphy's law works as it has before, it's likely to happen just after I finish building my kit...
The size shouldn't be an issue, I can always make it smaller, but cutting and sanding indeed needs care and patience. (better not scratch it...
) Looks like the curvature on the bottom of the windscreen matches the instrument panel coaming quite nicely (now assuming it isn't modified, which isn't specifically mentioned in the article).I think I'll at least try it when the time comes.
Ps. I wonder when aftermarket companies come up with a vac-form plate with a PE rim. If Murphy's law works as it has before, it's likely to happen just after I finish building my kit...
alpha_tango
Joined: September 07, 2005
KitMaker: 5,609 posts
AeroScale: 5,231 posts
Posted: Monday, December 15, 2008 - 09:21 AM UTC
Hi All
so I finally managed to make an article for my website. Please forgive me that i do not link all the pix here if you are interested just have a look: Alex Vracius F6F-3 (text is German, so you can polish up your language skills for your next 109 project )
Well, here is at least one pic
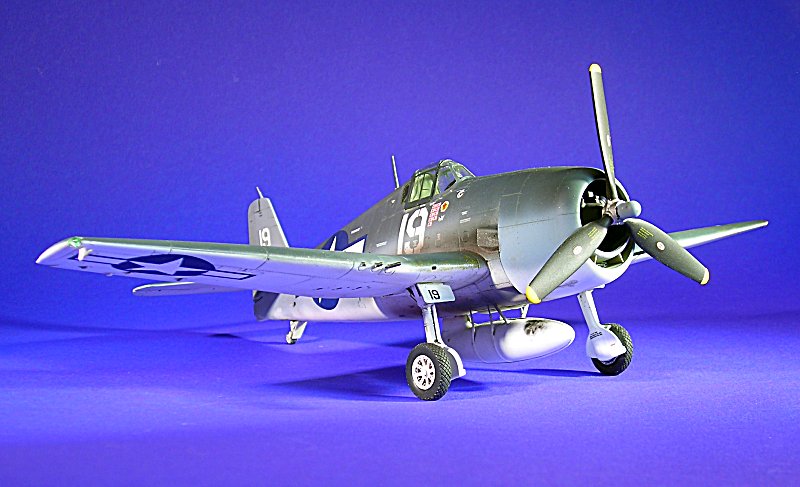
all the best
Steffen
so I finally managed to make an article for my website. Please forgive me that i do not link all the pix here if you are interested just have a look: Alex Vracius F6F-3 (text is German, so you can polish up your language skills for your next 109 project
)Well, here is at least one pic
all the best
Steffen
Emeritus
Joined: March 30, 2004
KitMaker: 2,845 posts
AeroScale: 1,564 posts
Posted: Tuesday, December 16, 2008 - 04:33 AM UTC
Great to see it finished. Looks really nice.
alpha_tango
Joined: September 07, 2005
KitMaker: 5,609 posts
AeroScale: 5,231 posts
Posted: Tuesday, December 16, 2008 - 05:07 AM UTC
Hi Eetu
many thanks!
I have mentioned the things we have discussed in my article even if I did not tackle them .. I only filled the landing light under the wing.
cheers
Steffen
many thanks!
I have mentioned the things we have discussed in my article even if I did not tackle them .. I only filled the landing light under the wing.
cheers
Steffen
 |

WEB HOSTING BY


Copyright ©2021 AeroScale and Kitmaker Network, a subsidiary of Silver Star Enterprises
All Rights Reserved. Please read our Conditions of Use and Privacy Policy.
All Rights Reserved. Please read our Conditions of Use and Privacy Policy.