1/32 Roden GB 2008 Fok. F. I - Brad
Queensland, Australia
Joined: August 30, 2006
KitMaker: 285 posts
AeroScale: 281 posts
Posted: Saturday, March 01, 2008 - 08:04 PM UTC
Some of you may recall that not so long ago I built a Roden 1/32 Albatros D.III in the markings of Werner Voss for friend of mine - see
Click here.The ALbatros was one of three 1/32 Voss-related kits that I agreed to build for said friend, the other two being the Roden Fokker F.1 and Pfalz D.III. Well I decided after completing my latest project that I would get off by backside and get stuck into the F.1. As per the Albatros, I intend to make this an online build (if y'all don't mind) - I will be building this kit with the assistance of the PART photoetched set for this kit.
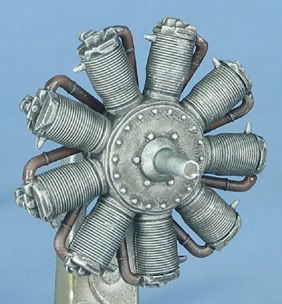
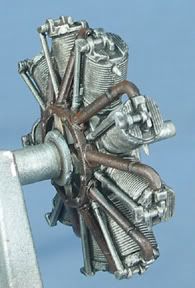
So far I have tackled the engine, which took me an afternoon to complete. My research tells me that Voss' triplane was fitted with a 110hp LeRhone at the time of his famous final flight. After digging though a couple of references, the kit engine looks pretty well spot on to represent the LeRhone (I am guessing that the Oberursel must have been a pretty close copy) - this was a good thing as it meant I did not have to do any modifications to the kit engine. The engine looks very nice out of the box and I did not feel that I had to make any modifications other than to omit the cylindrical looking part that Roden will have you fit to the back of the engine (part 8E). I found that if I fitted this part, that the cowling would not fit over the engine and flush with the firewall. Anyway, here are some pics.

I have also painted the wood parts of the cockpit as well as the propeller - as per most of the Roden 1/32 kits, the prop has some large sink holes, but these were easily dealt with. Next, onto the cockpit, where I intend to enhance the kit details with the PART set.
All feedback welcomed!

BC
Tennessee, United States
Joined: April 28, 2006
KitMaker: 286 posts
AeroScale: 45 posts
Posted: Sunday, March 02, 2008 - 01:28 AM UTC
Good start Brad i really enjoy seeing your work .
Victoria, Australia
Joined: November 26, 2006
KitMaker: 608 posts
AeroScale: 602 posts
Posted: Sunday, March 02, 2008 - 09:21 AM UTC
Cool!
Another source of reference for my Roden 1/32 Group Build build.
I will be very interested to see how you do this one Brad... Especially on the exterior...
Cheers,
Hugh
Indiana, United States
Joined: May 14, 2007
KitMaker: 3,117 posts
AeroScale: 2,270 posts
Posted: Sunday, March 02, 2008 - 10:56 AM UTC
It is a very good kit. I can't wait to see what kind of magic you do to it.
"Treat 'em Rough", Current Builds--Wingnut Rumpler
I am frequently seen with blood shot eyes from staying up past my nap time to get the right colour scheme on my latest WWI model?
Queensland, Australia
Joined: August 30, 2006
KitMaker: 285 posts
AeroScale: 281 posts
Posted: Sunday, July 13, 2008 - 01:30 AM UTC
Ok folks, it's been a while between drinks on this one, mainly due to other projects....
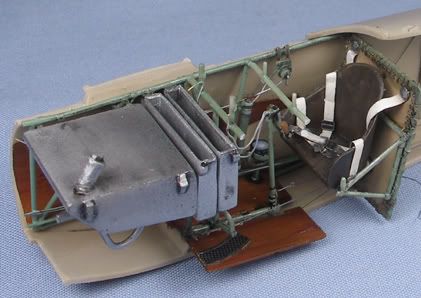
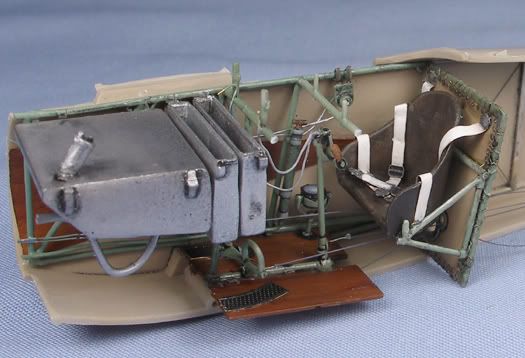
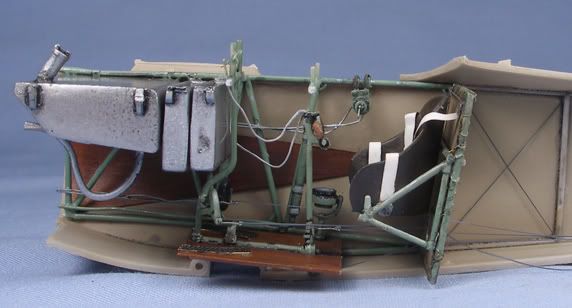
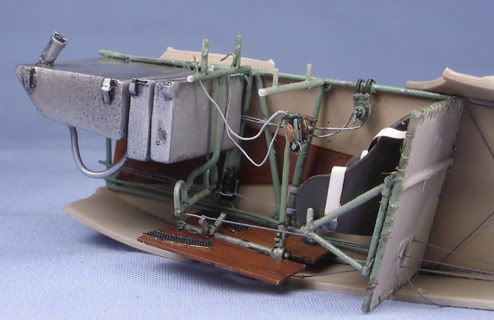
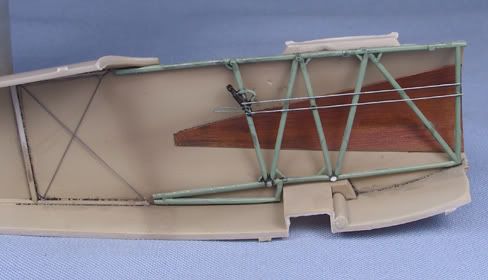
I am on a bit of a deadline to finish this one as I found out last week that I will be moving out of town in two months time (isn't life in the military fun!). As such, I have put in a bit of effort over the last few days and I have now just about finished the cockpit with the assistance of the PART photo-etched fret. I also added some other details, namely the V-shaped wooden fuselage formers from plastic sheet, and wiring from fuse wire and solder. The rest of the bits are from the PART set, which was actually a little vauge in placement of certain items (I am reasonably sure I have the seat belt attachments wrong - you always find references once its all glued together!!)... other than that, it all went together quite well (in contrast with the Roden 1/32 Albatros D.III, which was a real challenge to get the cockpit in)... Anyways, the pics:
Next, it's on to major assembly...
As always, all feedback and criticisms welcome!
Östergötland, Sweden
Joined: April 04, 2006
KitMaker: 1,058 posts
AeroScale: 1,004 posts
Posted: Sunday, July 13, 2008 - 07:10 AM UTC
Good as always, you´r the best Brad. Just like it
Thanks for sharing, and let us see the rest.
Cheers
Larsa Q
Colorado, United States
Joined: January 25, 2004
KitMaker: 11,669 posts
AeroScale: 11,011 posts
Posted: Sunday, July 13, 2008 - 09:01 AM UTC
Quoted Text
Some of you may recall that not so long ago I built a Roden 1/32 Albatros D.III in the markings of Werner Voss for friend of mine - see Click here.. . .BC
See here at Aeroscale :
Aeroscale Thread. ". . .The most important thing is to know why you build and then get the most that you can out of building." via D.D.
Indiana, United States
Joined: May 14, 2007
KitMaker: 3,117 posts
AeroScale: 2,270 posts
Posted: Sunday, July 13, 2008 - 09:05 AM UTC
Good luck on your move. I hope it wont be to disruptive.
"Treat 'em Rough", Current Builds--Wingnut Rumpler
I am frequently seen with blood shot eyes from staying up past my nap time to get the right colour scheme on my latest WWI model?
Colorado, United States
Joined: January 25, 2004
KitMaker: 11,669 posts
AeroScale: 11,011 posts
Posted: Sunday, July 13, 2008 - 03:17 PM UTC
Hey Brad, Here is a bit of feed back. sorry. The starter magneto assembly should be on the pilot's left shoulder. And there should be another brace of stay wiring from the rear bulkhead / screen supports to the framing where you have the fuel tank pressure hand pump. Also this item was angled so that when you pumped it you were pushing forward not up and down.
". . .The most important thing is to know why you build and then get the most that you can out of building." via D.D.
Queensland, Australia
Joined: August 30, 2006
KitMaker: 285 posts
AeroScale: 281 posts
Posted: Monday, July 14, 2008 - 12:14 AM UTC
Thanks for the feedback Stephen - the items you mentioned were placed where the Roden and PART instructions told me to place them (that'll teach me for following instructions...mumble mumble). I wonder why PART would put the starting magnito at the pilot's right foot if it was supposed to be at his left shoulder??? Odd. Oh well.
Thanks for the tip on the bracing, I picked this up myself after I posted the pics and this has since been corrected
It's just a pity that I have to rush this build as I cannot dedicate the time to research that I usually do

BC
Colorado, United States
Joined: January 25, 2004
KitMaker: 11,669 posts
AeroScale: 11,011 posts
Posted: Monday, July 14, 2008 - 06:48 AM UTC
Here is the real kicker. The starting magneto is the object they tell you to put at the pilot's right shoulder. (should be on the pilot's left shoulder.) The "Bosch" starting magneto they include (that they tell you to put at the pilot's right foot) is bogus. It was designed for inline motors. As to why they included it is anybody's guess.
". . .The most important thing is to know why you build and then get the most that you can out of building." via D.D.
Merlin
 Senior Editor
#017
United Kingdom
Joined: June 11, 2003
KitMaker: 17,582 posts
AeroScale: 12,795 posts
Posted: Monday, July 14, 2008 - 09:54 AM UTC
Hi Brad
First off - gorgeous work! As usual with your builds, I'm awestruck - the depth of shading you achieve is an inspiration. Let's make sure this one comes in as a Feature when you're done...

Secondly - ahh... the magneto! Stephen has pre-empted the question I was about to ask for the Eduard Dr.I build. They show it mounted on the floor by the pilot's left foot and I was equally confused by that. I trawled through my German cockpit interior references and could never find it associated with a rotary engine. No wonder, in the light of Stephen's comment above.
All the best
Rowan

BEWARE OF THE FEW...
As I grow older, I regret to say that a detestable habit of thinking seems to be getting a hold of me. - H. Rider Haggard
Colorado, United States
Joined: January 25, 2004
KitMaker: 11,669 posts
AeroScale: 11,011 posts
Posted: Monday, July 14, 2008 - 03:35 PM UTC
Its truely amazing to me they both (Part & Eduard) got it wrong in different locations.
". . .The most important thing is to know why you build and then get the most that you can out of building." via D.D.
Indiana, United States
Joined: May 14, 2007
KitMaker: 3,117 posts
AeroScale: 2,270 posts
Posted: Thursday, July 17, 2008 - 10:31 AM UTC
I just checked my book "An Illustrated Anatomy of the World Fighters" It does not even show a starter magneto. Do you have any good pics of what it looks like and its location for future reference?
"Treat 'em Rough", Current Builds--Wingnut Rumpler
I am frequently seen with blood shot eyes from staying up past my nap time to get the right colour scheme on my latest WWI model?
Queensland, Australia
Joined: August 30, 2006
KitMaker: 285 posts
AeroScale: 281 posts
Posted: Monday, July 21, 2008 - 12:37 AM UTC
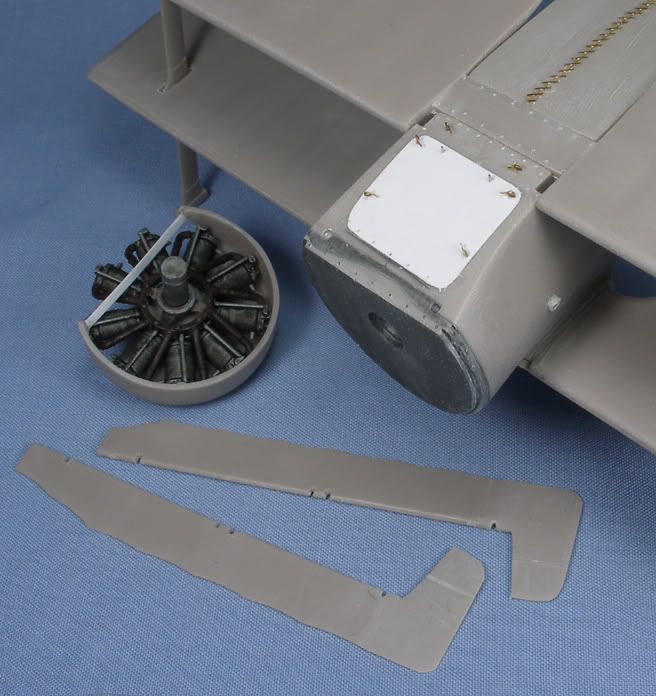
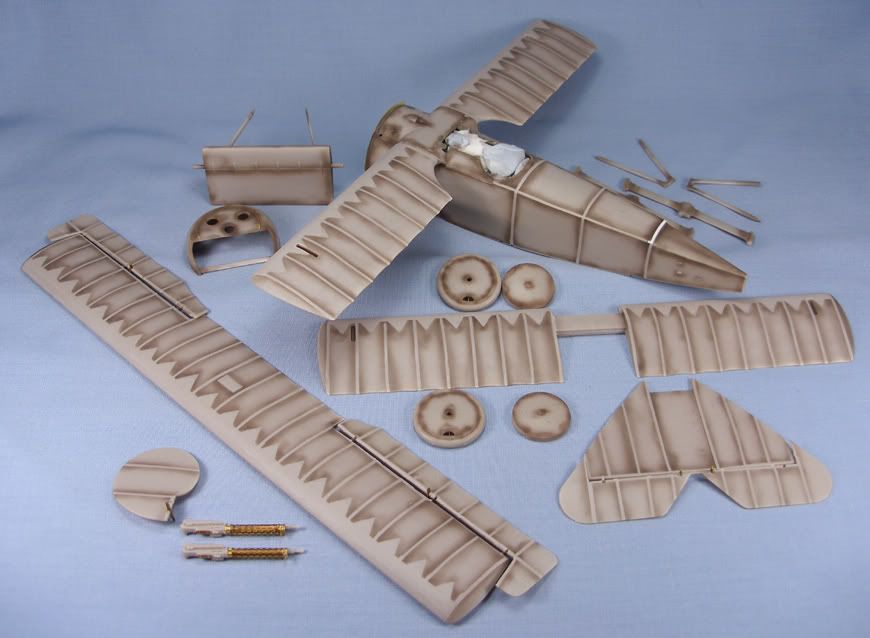
Ok folks, the fuselage is now together as are the flying surfaces. I have now moved to enhancing the nose area. I have added the bottom lip to the cowling seen on the F.I from styrene. Interestingly, both Roden and PART missed the prominent under-nose panel. I added mine from sheet plastic, with wire for the hinge, and etched metal pieces from the spares box to represent the myriad of clips seen on this panel. I have also extended the ailerons to be the larger versions seen on the F.I and early production models.

Getting closer to putting some paint on her...
BC
Indiana, United States
Joined: May 14, 2007
KitMaker: 3,117 posts
AeroScale: 2,270 posts
Posted: Monday, July 21, 2008 - 12:50 PM UTC
"Treat 'em Rough", Current Builds--Wingnut Rumpler
I am frequently seen with blood shot eyes from staying up past my nap time to get the right colour scheme on my latest WWI model?
Queensland, Australia
Joined: August 30, 2006
KitMaker: 285 posts
AeroScale: 281 posts
Posted: Sunday, July 27, 2008 - 02:14 AM UTC
Preshading is done.
BC
New York, United States
Joined: December 15, 2006
KitMaker: 365 posts
AeroScale: 344 posts
Posted: Sunday, July 27, 2008 - 06:03 AM UTC
Brad,
The interior is looking awesome. Your finishing techniques are outstanding so I'm just gonna sit back and watch this baby bloom. Can't wait to see some more.
Dwayne
Indiana, United States
Joined: May 14, 2007
KitMaker: 3,117 posts
AeroScale: 2,270 posts
Posted: Sunday, July 27, 2008 - 10:42 AM UTC
I think you are goimg to be very happy with this build.
As a side note, if you hit the return in between the pictures, the thread won't turn out extra-wide. Easier to see if you dont have to scroll left and right all the time. But really... no big deal. Just a quirk of the software.
"Treat 'em Rough", Current Builds--Wingnut Rumpler
I am frequently seen with blood shot eyes from staying up past my nap time to get the right colour scheme on my latest WWI model?
Colorado, United States
Joined: January 25, 2004
KitMaker: 11,669 posts
AeroScale: 11,011 posts
Posted: Sunday, July 27, 2008 - 01:18 PM UTC
Quoted Text
I just checked my book "An Illustrated Anatomy of the World Fighters" It does not even show a starter magneto. Do you have any good pics of what it looks like and its location for future reference?
Absolutely! I will dig out my images later to night (after midight here) and see if I can post one for you. Its 6:17pm here now.
". . .The most important thing is to know why you build and then get the most that you can out of building." via D.D.
Queensland, Australia
Joined: August 30, 2006
KitMaker: 285 posts
AeroScale: 281 posts
Posted: Friday, August 15, 2008 - 04:15 PM UTC
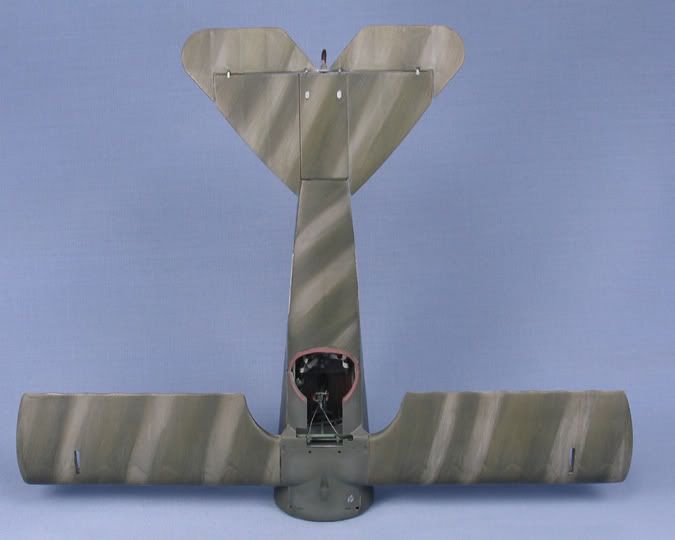
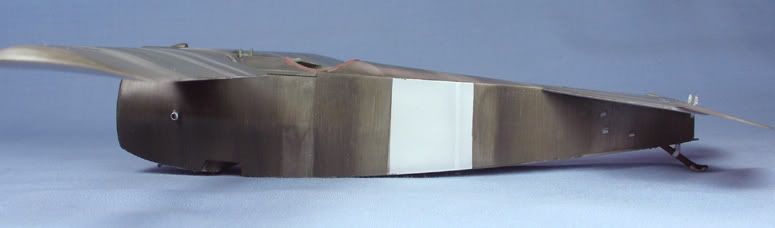
I have now had a crack at the Fokker streaked finish. I tried a mix of black and yellow ochre oil paints streaked over light blue. Not sure if it is accurate (will anyone ever be sure?). For some reason the photos show each component as a different colour (but they are all the same...)

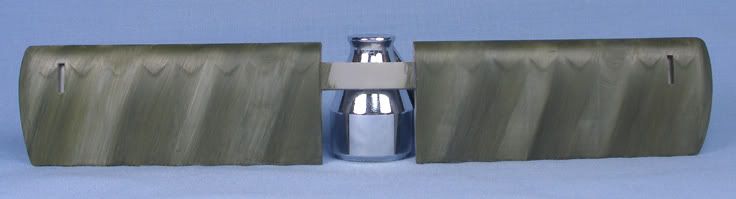
I also painted the face onto the cowling - knowing roden's decals, I did not think they would sit over the curves very well.

Next is on to major assembly - I think I will keep the weathering light to emphasise the nice lines of the aircraft.
Let me know what you think.
BC
Colorado, United States
Joined: January 25, 2004
KitMaker: 11,669 posts
AeroScale: 11,011 posts
Posted: Friday, August 15, 2008 - 04:22 PM UTC
Hey Brad its looking good! One small comment the pilot's right side aileron is a later type it should match the left at the scalloped trailing edge for an F.I.
". . .The most important thing is to know why you build and then get the most that you can out of building." via D.D.
Queensland, Australia
Joined: August 30, 2006
KitMaker: 285 posts
AeroScale: 281 posts
Posted: Friday, August 15, 2008 - 05:25 PM UTC
Thanks Stephen - I missed that one :-) a few quick swipes with some sandpaper and a light touch up have now fixed that!
BC
Victoria, Australia
Joined: November 26, 2006
KitMaker: 608 posts
AeroScale: 602 posts
Posted: Friday, August 15, 2008 - 08:44 PM UTC
Hi Brad,
Looking good. I too was toying with the idea of masking and spraying the cowel. I'm glad someone else tried it for me

Cheers,
Hugh
Tennessee, United States
Joined: April 28, 2006
KitMaker: 286 posts
AeroScale: 45 posts
Posted: Friday, August 15, 2008 - 11:52 PM UTC
The plane is looking real good Brad but i have a question about the streaking. Was the Fokker olive green color streaked over the light blue or over the doped linen i thought the belief was that it was over the linen? Was there a standard ?


