World War II: Germany
Aircraft of Germany in WWII.
Hosted by Rowan Baylis
1/32 Focke Wulf Fw190D-9
Holdfast
Staff MemberPresident
IPMS-UK KITMAKER BRANCH
#056
_VISITCOMMUNITY
England - South West, United Kingdom
Joined: September 30, 2002
KitMaker: 8,581 posts
AeroScale: 4,913 posts
Posted: Monday, March 24, 2008 - 07:47 AM UTC
Thanks Steve,

Quoted Text

This one is well open to debate, and gives the chance for a bit of freedom to do what you want. I am not a total rivet counter, I just want my models to look good, and by being able to freestyle it a bit with some colours makes it more enjoyable to me.


Yep, agreed, having found that 65 and 04 give a good "Sky" I'm sort of convinced, and it makes sense. 65 was still used on bombers but no longer on fighters, so there may have been excess about. 04 was an ident colour which wasn't used very much at the time. Sky worked for the RAF and, if used on the sides of fuselages, in combination with other camo, would help to camouflage the aircraft on the ground, because of it's green hue, but still give a degree of air camouflage because of the blue dirivative. If you see what I mean?

Thanks Eetu,

Quoted Text

I remember reading an article about this RLM84 thing as well, and it was speculated that perhaps it wasn't a separate color, but late-war RLM76. Due to material shortages, the amount of color pigments had to be cut down, resulting in the zinc chromate (or whatever it was, can't remember. Yellowish stuff anyway) included for corrosion prevention showing more prominently.


Yes, this is possibly a more plausable explanation, but begs the question was it the only colour to suffer from lack of pigment, if true? If bombers were still using RLM 65 why didn't fighters switch back to that colour, or why not mix one of the upper surface greys with white? You could go on and on, but nobody really knows, but again, I have my answer

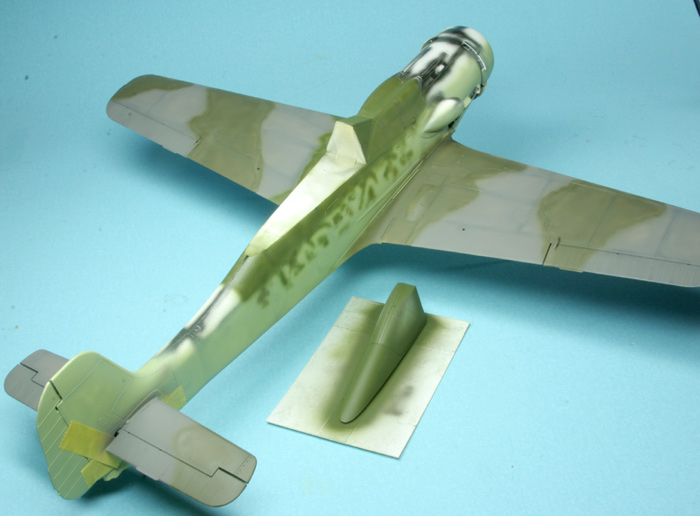
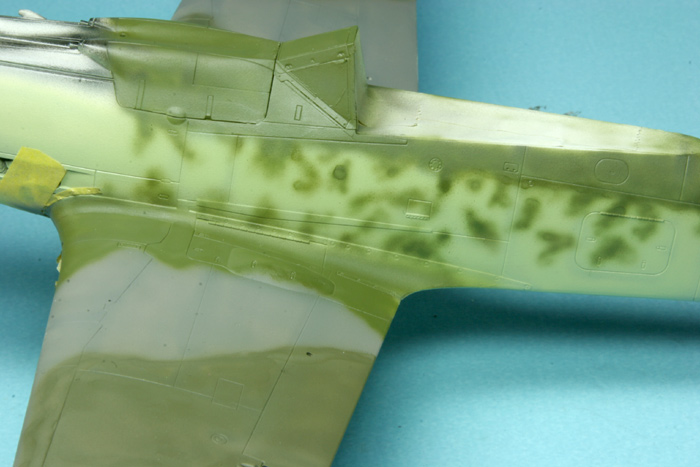
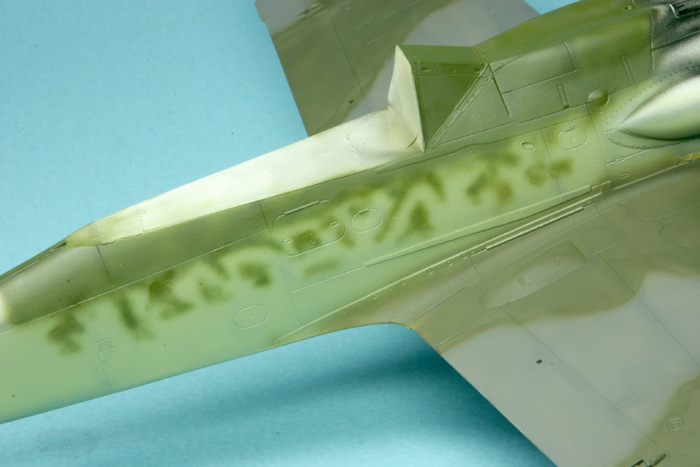
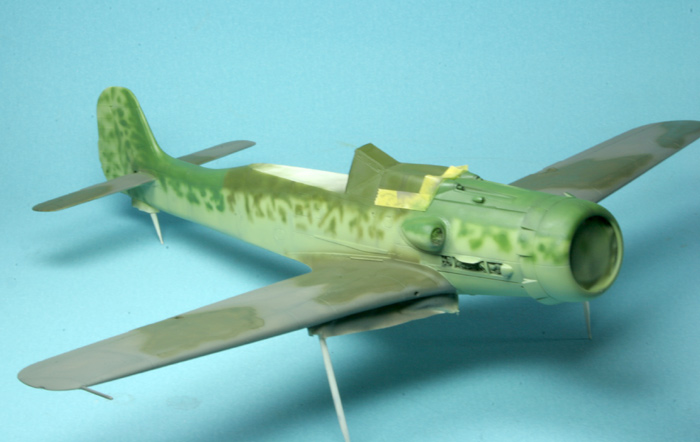
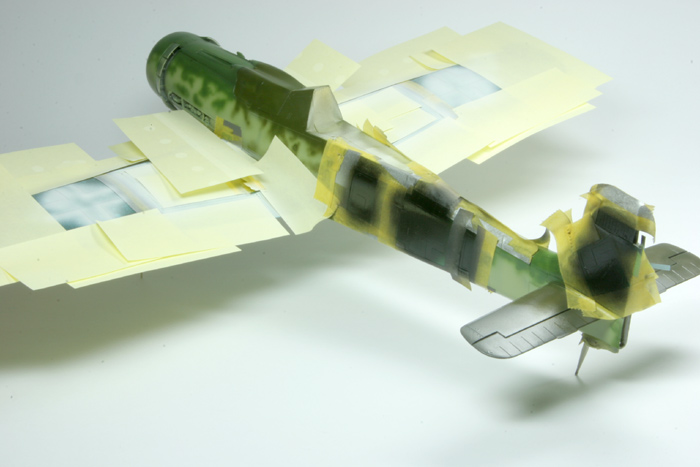
So here are the results of my colour mixing Just like my tests, 2 parts RLM 65 (Hellblau) to 1 part RLM 04 (Gelb). I did add a little white but it isn't noticeable. I was slightly wrong, in that it isn't possible to match RAF Sky, bang on, although it is very close but a little greener. The beauty is that it doesn't look contrived and, because it is mixed from standard colours, it is therefore believable. I'm very pleased with it and the next stage is to try the same thing with Colourcoats as this was mixed using Xtracolor.


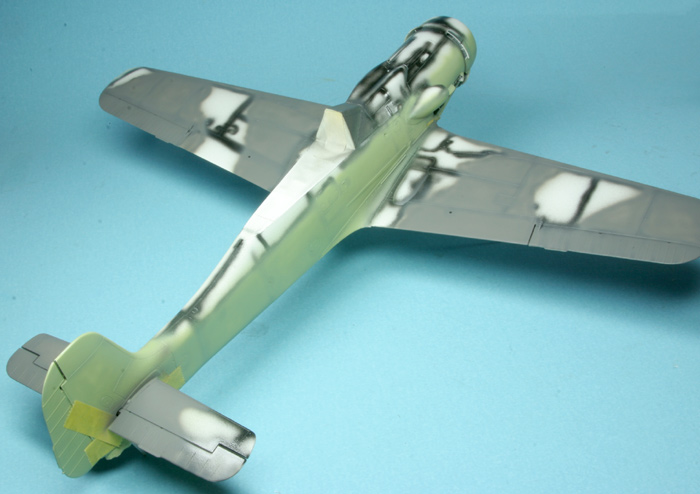
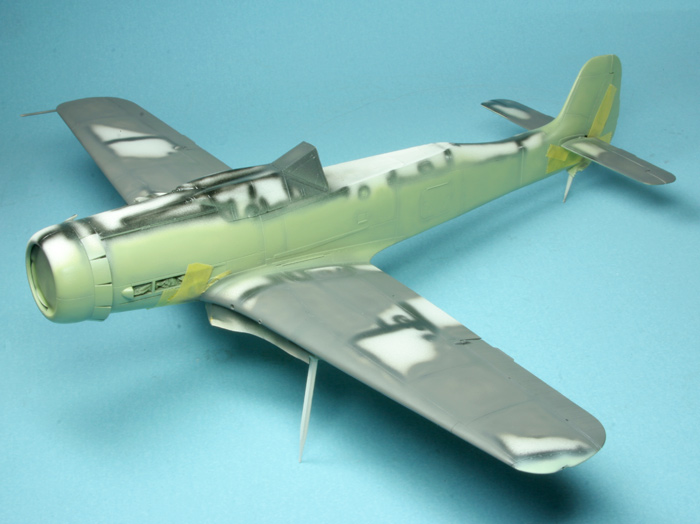
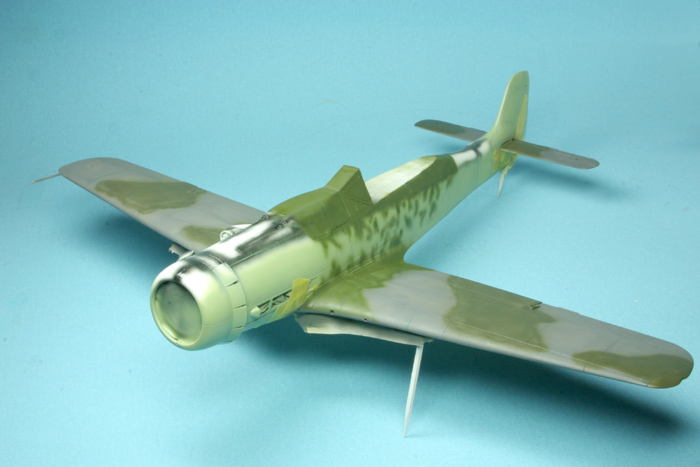
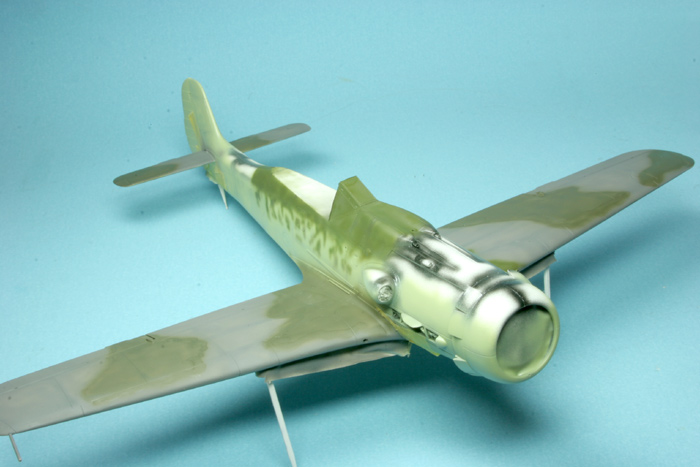
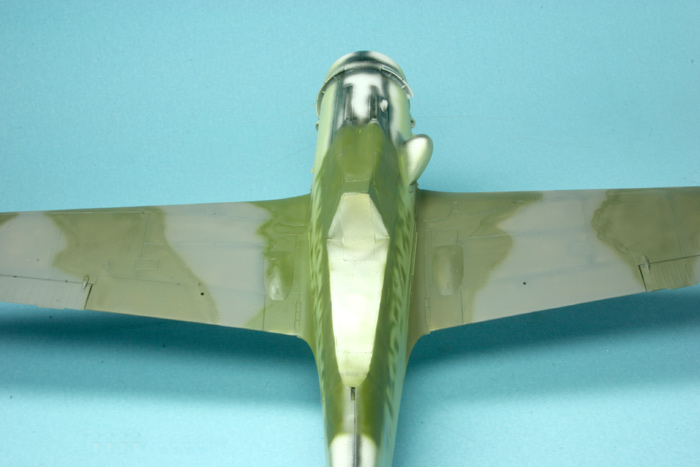
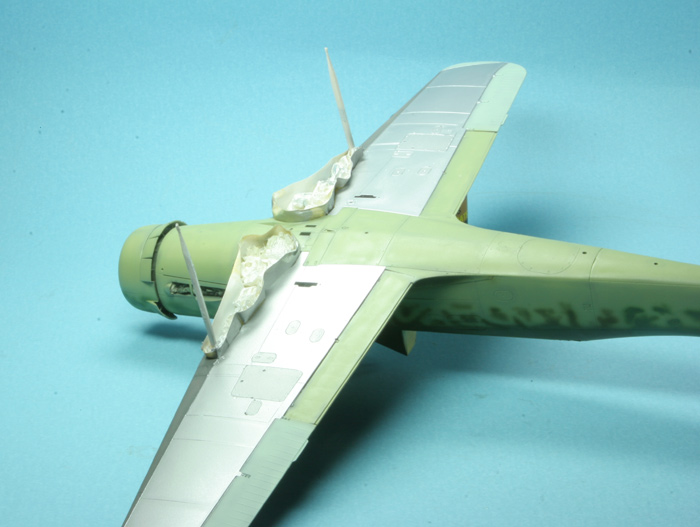
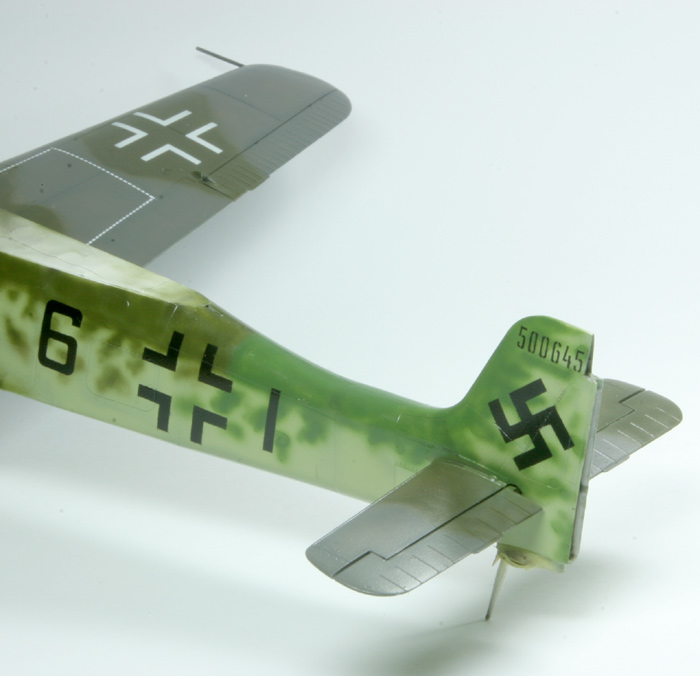
Only the fuselage and tail planes received the "RLM84" mix the wings will be natural metal with RLM 75 leading edges. That is apart from the flaps, RLM 84 and the ailerons and wing tips, RLM 76, as are the drop tank pylon and drop tank.


Mal
Holdfast
Staff MemberPresident
IPMS-UK KITMAKER BRANCH
#056
_VISITCOMMUNITY
England - South West, United Kingdom
Joined: September 30, 2002
KitMaker: 8,581 posts
AeroScale: 4,913 posts
Posted: Friday, March 28, 2008 - 08:15 AM UTC
I have sprayed the RLM 75 on the upper wings and it wraps around the leading edge and includes the undercarriage doors. So that the pre-shading works for the other colour (RLM 83) on the upper wing I have left areas unpainted. These areas are smaller than that which the RLM 83 will occupy so that there is a bit of an overlap between colours. I hope that you can see how the white primer works to lighten the centre of the panels. To achieve this the paint is first of all sprayed to deliniate the boundry of the colour. Next the different panels within the "borders" are filled in, working form the outside in, letting the primer lighten the colour towards the centre. Care is taken not to paint out the black pre-shading but it can be "cut back" a little where necessary. When all areas are completed to this stage the paint nozzle on the airbrush is opened a little further and all areas are blended in. The idea being that the black pre-shading and part of the white primer are only partially covered, allowing them both to show through, subtley. The effect needs to be slightly overdone to allow for the weatherering which will help to tone it down a little.


A couple more pics.


I hope to finish the painting of the wings and make a start on the fuselage tomorrow, stay tuned

Mal
betheyn
Staff MemberSenior Editor
AEROSCALE
#019
_VISITCOMMUNITY
England - South East, United Kingdom
Joined: October 14, 2004
KitMaker: 4,560 posts
AeroScale: 2,225 posts
Posted: Friday, March 28, 2008 - 09:03 AM UTC
That is really coming on nicely Mal. Looking forward to seeing the full camo on it.
Andy
Holdfast
Staff MemberPresident
IPMS-UK KITMAKER BRANCH
#056
_VISITCOMMUNITY
England - South West, United Kingdom
Joined: September 30, 2002
KitMaker: 8,581 posts
AeroScale: 4,913 posts
Posted: Saturday, March 29, 2008 - 09:52 AM UTC
Thanks Andy, yes I like this scheme, there is a lot going on and I'm looking forward to seeing the finished item myself

Upper wings completed with RLM 83 Dunklegrun and RLM 81 Braunviolet applied to the area around the cockpit and the canopy, plus the first bit of mottling (which may be revised).
The same painting technique was applied as for the other areas.


Mal
Wolfpack
_VISITCOMMUNITY
England - North, United Kingdom
Joined: April 10, 2005
KitMaker: 78 posts
AeroScale: 43 posts
Posted: Saturday, March 29, 2008 - 08:15 PM UTC
Naughty boy. Cease this pre -shading at once.

IAN
Holdfast
Staff MemberPresident
IPMS-UK KITMAKER BRANCH
#056
_VISITCOMMUNITY
England - South West, United Kingdom
Joined: September 30, 2002
KitMaker: 8,581 posts
AeroScale: 4,913 posts
Posted: Saturday, March 29, 2008 - 11:11 PM UTC
Ian, all you ever mention is pre-shading. I get it, you don't like it but I, on the other hand, think that, when it's done correctly, it adds to the overal look of the paint scheme by taking away the boring nature of a straight coat of paint. It is a technique that requires careful use of the airbrush and therefore shouldn't be dismissed out of hand. My favourite part of building models is the painting, so I am constantly looking to improve and master new methods and techniques.

Mal
AIRGUNNER
_VISITCOMMUNITY
England - South East, United Kingdom
Joined: September 27, 2006
KitMaker: 246 posts
AeroScale: 234 posts
Posted: Sunday, March 30, 2008 - 01:58 AM UTC
Hi Mal,

Looking exceptionally good, I like the mottling especially. Are you going to do the mottle two or three colours as I have read in various places it could be either. A quick other question if I may. I have heard you mention using Isopropyl alcohol on occasion. Where do you buy it as every pharmacy I have visited doesnt stock it. Must think I am going to drink or something.

Best regards

Steve

BTW. I love the pre-shading. I am trying to master it myself, as it makes even some of my ham-fisted efforts look better. Keep up the good work.
TedMamere
_VISITCOMMUNITY
Moselle, France
Joined: May 15, 2005
KitMaker: 5,653 posts
AeroScale: 4,347 posts
Posted: Sunday, March 30, 2008 - 05:06 AM UTC
Hi Mal!

Looks very good so far. I like your pre-shading very much as it adds more life to the model.

Jean-Luc
Merlin
Staff MemberSenior Editor
AEROSCALE
#017
_VISITCOMMUNITY
United Kingdom
Joined: June 11, 2003
KitMaker: 17,582 posts
AeroScale: 12,795 posts
Posted: Sunday, March 30, 2008 - 05:24 AM UTC
Hi Mal

Looking good! I don't if was the case with the particular machine you're depicting, but if you want to break up the underside colour a bit further, you could apply slightly different paint mixes to the engine cowls and tail unit, which were delivered fully-camouflaged from the subcontractors and often not repainted to match the rest of the airframe. The lower cowls are frequently described as "pale whitish blue" RLM 76 variation.

All the best

Rowan
Holdfast
Staff MemberPresident
IPMS-UK KITMAKER BRANCH
#056
_VISITCOMMUNITY
England - South West, United Kingdom
Joined: September 30, 2002
KitMaker: 8,581 posts
AeroScale: 4,913 posts
Posted: Sunday, March 30, 2008 - 06:55 AM UTC
Steve.

Quoted Text

BTW. I love the pre-shading. I am trying to master it myself, as it makes even some of my ham-fisted efforts look better. Keep up the good work.


I am still trying to master pre-shading but I'm almost there, infact I'm quite happy with the way this turned out, but there is still room for improvement

Quoted Text

Looking exceptionally good, I like the mottling especially. Are you going to do the mottle two or three colours as I have read in various places it could be either.


This will be answered with this update, see below

Quoted Text

I have heard you mention using Isopropyl alcohol on occasion. Where do you buy it


Yes I always wash my models using Isopropyl alcohol before painting. I used to get at the chemist but I now get it from work for about 1/2 price. do you go to any shows in the UK?

Jean-Luc.

Quoted Text

Looks very good so far. I like your pre-shading very much as it adds more life to the model.


Yes I find models painted with straight colour to be pretty mundane, very well painted in most cases, but all much of a muchness, which anyone can do I too like the "life" added to models which are treated to well done paint techniques

Rowan.

Quoted Text

The lower cowls are frequently described as "pale whitish blue" RLM 76 variation.


I knew about thew subcaontracter thing but I hadn't heard about a "pale whitish blue" shade. I'm basically going with the kit instructions but using what I do know. For example the under fuselage hatch for access to the rear fuel tank, is dipicted as NMF in the instructions, but late war hatches were made of wood. I was thinking about painting it in primer but I don't know what colour that would be, so I just painted it the underside colour. Also the RLM 75 extends further back in the instructions, to about the centre of the wing. rapping around the leading edge with 75 makes sense, but I reckon that it would stop at the first panel line, which is what I have done. I also painted the centre cover in the underside colour, NMF, in the instructions, but I have painted the drop tank and carrier RLM 76

OK, now to the update, I have finished the upper camo with RLM 82 Licht grun. I do like this colour. Again using the same pre-shading method as before.


I still have to paint the NMF section on the lower wing, for which I will use Allclad II but the real fun can now begin as I will be painting on all the markings, and yes, Jean-Luc, I think that I have cracked the cutting of the "no walk" dotted lines.

Mal
TedMamere
_VISITCOMMUNITY
Moselle, France
Joined: May 15, 2005
KitMaker: 5,653 posts
AeroScale: 4,347 posts
Posted: Sunday, March 30, 2008 - 07:07 AM UTC

Quoted Text

and yes, Jean-Luc, I think that I have cracked the cutting of the "no walk" dotted lines.


I can't wait to see how you did!
Wolfpack
_VISITCOMMUNITY
England - North, United Kingdom
Joined: April 10, 2005
KitMaker: 78 posts
AeroScale: 43 posts
Posted: Sunday, March 30, 2008 - 10:20 AM UTC

Quoted Text

Ian, all you ever mention is pre-shading. I get it, you don't like it but I, on the other hand, think that, when it's done correctly, it adds to the overal look of the paint scheme by taking away the boring nature of a straight coat of paint.


Mal, your models are so good, it's all I can get picky with. Think about it. Paint weathers from the outside in, pre-shaing makes it look the opposite way round. How about trying post-shading, giving the paint a worn, natural look?

Just a thought.


Quoted Text

I think that I have cracked the cutting of the "no walk" dotted lines.


This I gotta see. Hope it turns out well, there's gonna be some sales if it does.

IAN
Holdfast
Staff MemberPresident
IPMS-UK KITMAKER BRANCH
#056
_VISITCOMMUNITY
England - South West, United Kingdom
Joined: September 30, 2002
KitMaker: 8,581 posts
AeroScale: 4,913 posts
Posted: Monday, March 31, 2008 - 07:33 AM UTC
Jean-Luc

Quoted Text

I can't wait to see how you did!


Well at the moment I have only done a short trial cut and I don't know what the actual size of the dashes was but measuring the ones on the decal sheet (not easy) they are about 1mm long by about 0.5mm wide with a 0.5mm gap, which is what my test was. I only cut about 6 and at first thought that it was a no go, because all the little sections had been pushed out. Then I realised that it didn't matter, the small 1x0.5mm rectangles aren't required, just the holes that they leave. I am, at the moment, drawing up the markings for the model and I will draw the dotted lines last. I had thought to draw up just straight lines and turn and overlap where required, but I have decided that it would be better simply to draw the dotted lines to the correct shape for the wing. My only worry is what cutting so many very small shapes might do to my cutter but nothing ventured nothing gained

I won't be able to do any more painting on this, apart from maybe the defence bands, until after the Cosford show, which is this Sunday. That is assuming that I can get the part I need for my badger airbrush, so that I can spray the Allclad II.

Mal
Holdfast
Staff MemberPresident
IPMS-UK KITMAKER BRANCH
#056
_VISITCOMMUNITY
England - South West, United Kingdom
Joined: September 30, 2002
KitMaker: 8,581 posts
AeroScale: 4,913 posts
Posted: Friday, April 04, 2008 - 09:03 AM UTC
Well I lied on 2 counts in my last post
The first was that I wouldn't be doing any more painting until after the Cosford show, but I have painted the NMF on the underside of the wings. I used 2 shades of Allclad II, white aluminium and aluminium.


The other lie was that I would be attempting to cut the wing walkway masks last, I did them first I will have to put them on the model to know if they are accurate enough, but they look pretty good


Mal
f1matt
_VISITCOMMUNITY
Manitoba, Canada
Joined: August 13, 2006
KitMaker: 1,021 posts
AeroScale: 184 posts
Posted: Friday, April 04, 2008 - 09:06 PM UTC
Morning Mal. Just found this thread and I'm glad I did. I love the look of the D-9. Yours especially. I have a question about the NMF since I will have to tackle that soon. Did you spray the Alclad right over the base coat of flat white and pre-shading or did you spray the underside with a gloss black as per Alclad's instructions?

-Matt
TedMamere
_VISITCOMMUNITY
Moselle, France
Joined: May 15, 2005
KitMaker: 5,653 posts
AeroScale: 4,347 posts
Posted: Friday, April 04, 2008 - 11:40 PM UTC


One small step for Mal, one giant leap for modeling!
Holdfast
Staff MemberPresident
IPMS-UK KITMAKER BRANCH
#056
_VISITCOMMUNITY
England - South West, United Kingdom
Joined: September 30, 2002
KitMaker: 8,581 posts
AeroScale: 4,913 posts
Posted: Saturday, April 05, 2008 - 08:53 AM UTC
Hi Mathew,

Quoted Text

Did you spray the Alclad right over the base coat of flat white and pre-shading or did you spray the underside with a gloss black as per Alclad's instructions?


I sprayed straight onto the primer and pre-shading, it is a misconception that Allclad has to be sprayed over black. It is only when you are using the crome or highly polished Aluminium that you need an undercoat of black. What I didn't take into consideration is that Allclad is "hot" and I should not have sprayed over the enamal pre-shading, but I got away with it

I will, hopefully be applying the markings this week Jean-Luc, so we'll see how good the walkways are (I just know that they will be good )

Mal
Yeti123
_VISITCOMMUNITY
Michigan, United States
Joined: February 11, 2008
KitMaker: 311 posts
AeroScale: 278 posts
Posted: Saturday, April 05, 2008 - 03:31 PM UTC
Mal:

Looking great. My personal take is that the preshading is looking wonderful and adds alot to the sense of depth. I can't wait to see how the walkway masks turn out.
Holdfast
Staff MemberPresident
IPMS-UK KITMAKER BRANCH
#056
_VISITCOMMUNITY
England - South West, United Kingdom
Joined: September 30, 2002
KitMaker: 8,581 posts
AeroScale: 4,913 posts
Posted: Monday, April 07, 2008 - 09:42 AM UTC
Thanks Taylor

I haven't done anymore to this as I wanted to take it to the model show at RAF Cosford museum. I have started adding a Klear coat this evening and will finish the second coat tomorrow evening. Then the markings and decals will be applied

Mal
FalkeEins
_VISITCOMMUNITY
England - South East, United Kingdom
Joined: March 07, 2005
KitMaker: 868 posts
AeroScale: 690 posts
Posted: Wednesday, April 09, 2008 - 10:50 PM UTC

Quoted Text

Also the RLM 75 extends further back in the instructions, to about the centre of the wing. rapping around the leading edge with 75 makes sense, but I reckon that it would stop at the first panel line, which is what I have done.


..great work Mal ..but FWIW I reckon the instructions are correct. You've already mentioned the gear doors should be finished in 75. This is the best example of that type of scheme. We reproduced this pic of 'blue 12' of II./JG 6 in a Dora article I did for SAM a while back....you can clearly see in the original article pic - which we reproduced from a huge 20Mb scan -that the colour demarcation extends back underneath to the mid-wing section. Bit more difficult to detect on this much smaller & darker scan but its there...
the article pic also shows well the colour difference between the fuselage 'green-blue' and the rudder in standard 76 on this machine

flitzer
_VISITCOMMUNITY
England - North West, United Kingdom
Joined: November 13, 2003
KitMaker: 2,240 posts
AeroScale: 743 posts
Posted: Thursday, April 10, 2008 - 01:02 AM UTC
Hi Mal
Looking great.
Love the mottling. Airbrush or very thin brush applied?
Sounds a good candidate for a future 'Mal's How to do Mottling' feature.

On the 'pale whitish blue' shade. I've seen a few refs to this with most guessing it was probably RLM 76 that turned out lighter due to late war supply problems with ingredients hence variation in shade from the original 'official' colour, different and or substitute thinners and varying climatic conditions, if and when, applied in the field.

Eagerly waiting the next thrilling installment.

Cheers
Peter
Holdfast
Staff MemberPresident
IPMS-UK KITMAKER BRANCH
#056
_VISITCOMMUNITY
England - South West, United Kingdom
Joined: September 30, 2002
KitMaker: 8,581 posts
AeroScale: 4,913 posts
Posted: Thursday, April 10, 2008 - 08:01 AM UTC
Neil, Thanks for the info, do you remember which issue the article apheared in? I will always bow to greater knowledge and it isn't too late to extend the RLM 75 back to mid span.

Peter, Airbrushed mottle, but I don't think that a feature is on the cards, it would have to be a video (I haven't forgotten the Ta 183)

I have checked the wing walk markings and they are slightly undersize, so I will be altering them to fit. The model has recieved a couple of coats of clear and I will be applying the markings this week end.

Mal
FalkeEins
_VISITCOMMUNITY
England - South East, United Kingdom
Joined: March 07, 2005
KitMaker: 868 posts
AeroScale: 690 posts
Posted: Thursday, April 10, 2008 - 08:21 AM UTC

Quoted Text

Neil, Thanks for the info, do you remember which issue the article appeared in?


Vol 27 No. 12 Feb 2006 issue
Holdfast
Staff MemberPresident
IPMS-UK KITMAKER BRANCH
#056
_VISITCOMMUNITY
England - South West, United Kingdom
Joined: September 30, 2002
KitMaker: 8,581 posts
AeroScale: 4,913 posts
Posted: Sunday, April 13, 2008 - 07:28 AM UTC
Thanks again Neil, I have extended the RLM 75 back to the centre of the wing I'm glad that I found out before the markings went on

I have been having some difficulty getting the wing walk markings to fit correctly and I have realised that they have to be absolutely bang on, if I cut them as a complete set. I have abandoned that I dea and hve been working out how I can do single lines of dashes that can be joined at whatever angle is required at will. I think that I have cracked it so keep watching I had hoped to get the markings on this week end but the problem with the walk ways has held me up.

Mal
Holdfast
Staff MemberPresident
IPMS-UK KITMAKER BRANCH
#056
_VISITCOMMUNITY
England - South West, United Kingdom
Joined: September 30, 2002
KitMaker: 8,581 posts
AeroScale: 4,913 posts
Posted: Monday, April 21, 2008 - 10:07 AM UTC
The model has had the main markings sprayed on, I'm particularly pleased with the wing walk markings and the serial number on the fin
I tried many times to produce an exceptable mask for the wing walk markings but just couldn't get the angle right, it was very close but not close enough. In the end I produced individual lines of dashes and these worked well and were easy to use. They still require a little "tweeking" but I have a good idea how the final masks will work.


Mal