_GOTOBOTTOM
World War II: Germany
Aircraft of Germany in WWII.
Hosted by Rowan Baylis
1/32 Focke Wulf Fw190D-9
Holdfast
Staff MemberPresident
IPMS-UK KITMAKER BRANCH
#056
_VISITCOMMUNITY
England - South West, United Kingdom
Joined: September 30, 2002
KitMaker: 8,581 posts
AeroScale: 4,913 posts
Posted: Tuesday, March 11, 2008 - 08:00 AM UTC
This is the Revell boxing of the Hasegawa 1/32 scale Fw 190D-9, with the MDC Cockpit set. I have posted pics of this before but it was so long ago that I thought that I would start again from here

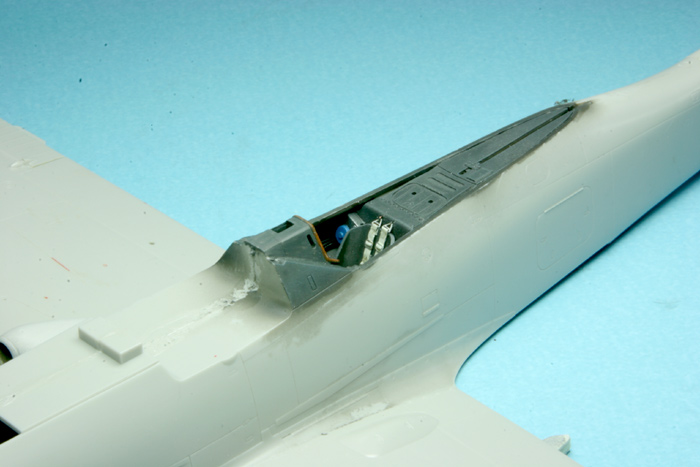
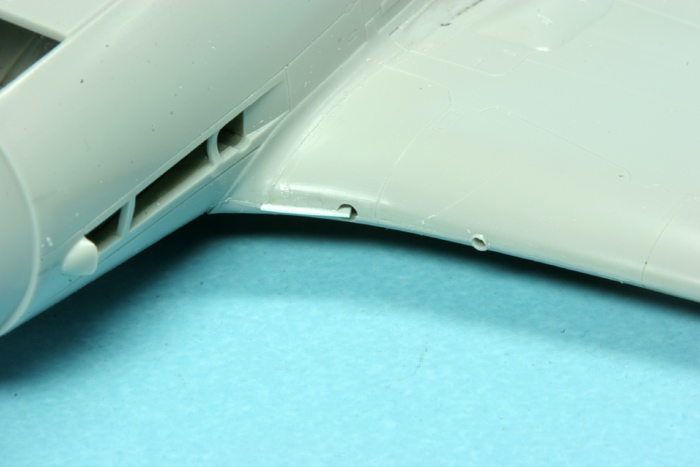
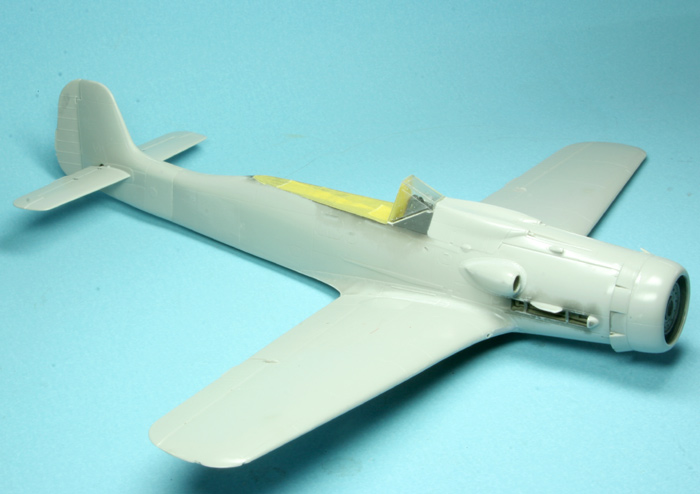
I had got stuck at fitting the coming from the MDC cockpit detail set because the gun sight protrudes through it and therefor it had to be alighned correctly. Having cut off the original I realised that I had cut away too much, so the rebuilding began. Off course this became the hurdle that I had to get over to continue the build, which I managed to do this last week end. I have also finished the cockpit interior which I am about to insert into the fuselage.

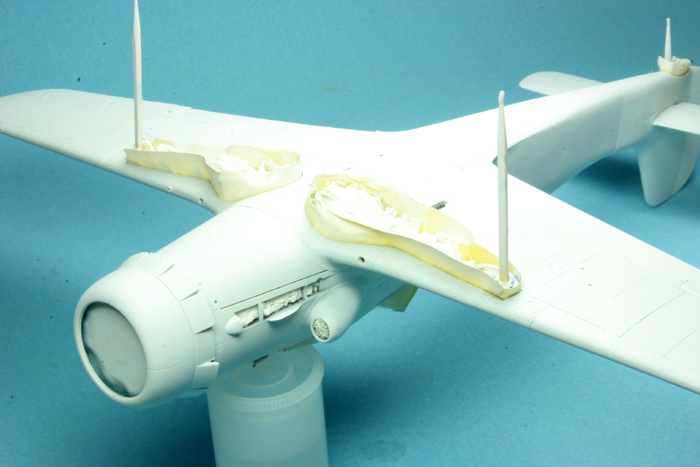
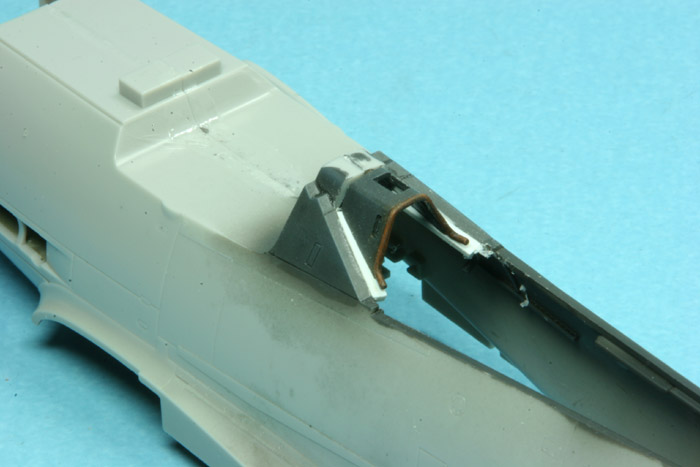
This shows the amount of the cock up.


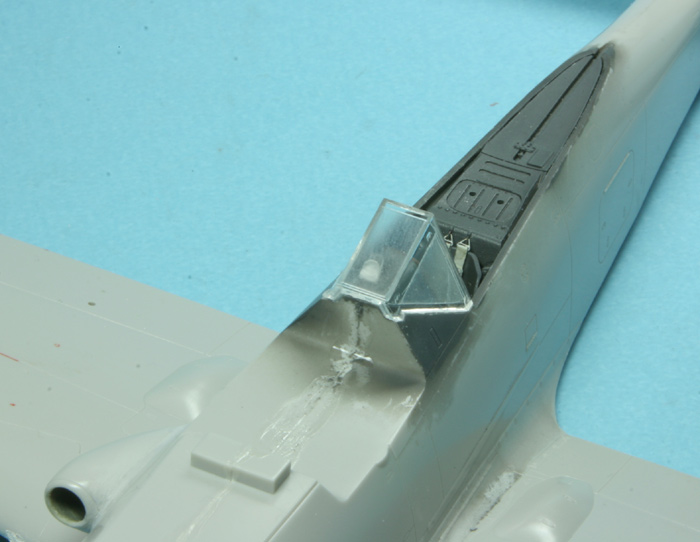
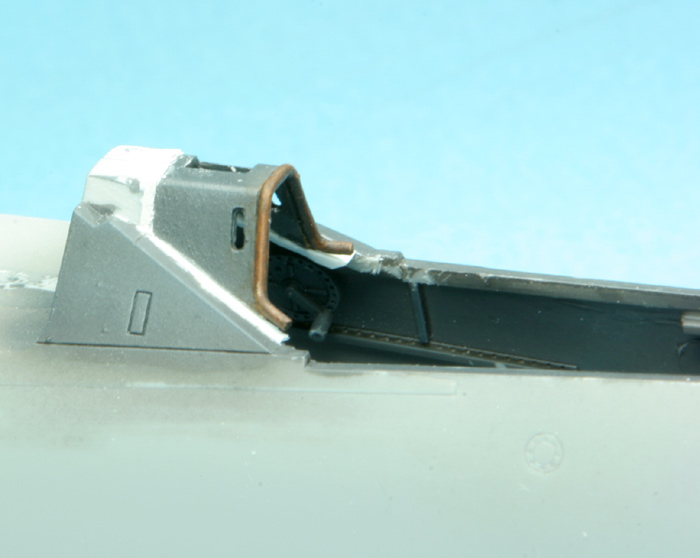
This shows the coming fitted and filler applied.


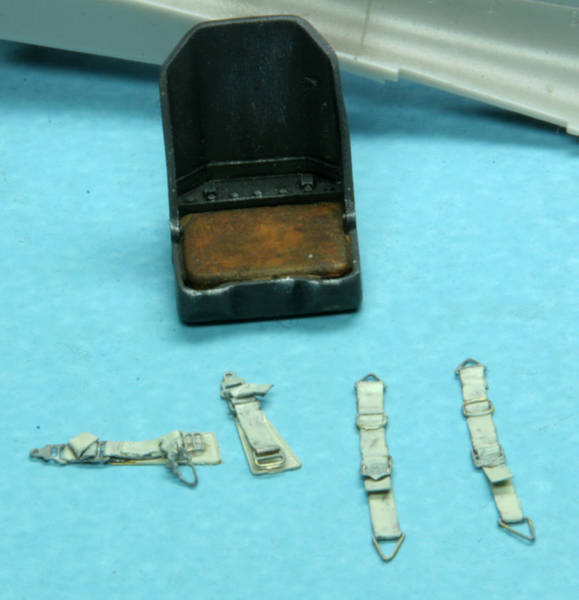
I made the seat belts out of Port bottle foil (From my Senior Drill Course) and etched buckles. The etched buckles came with the MDC set, which also contains a set of etched belts. I much prefer to use the etched buckles as the belts look far more realistic.


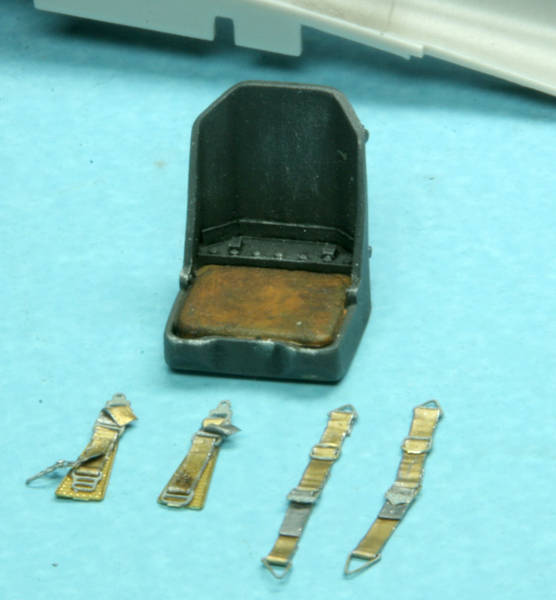
The belts painted. Humbrol "Authentic" HU10 (FS36622)


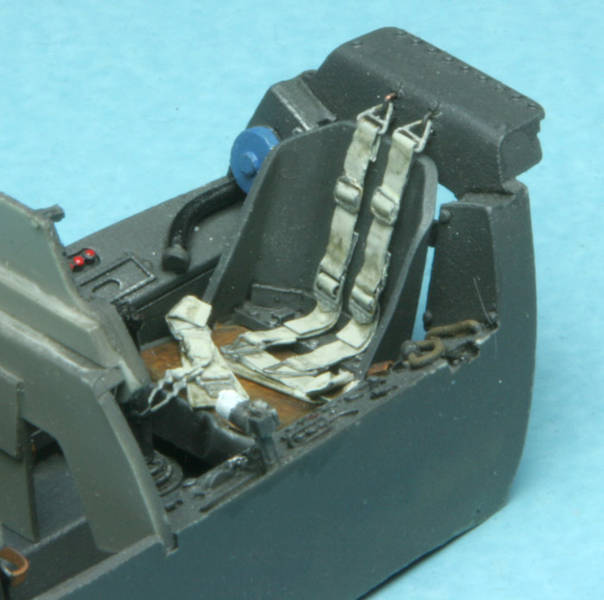
The belts weathered and fitted into the cockpit tub, the shoulder straps are realistically attached to the rear bulkhead.


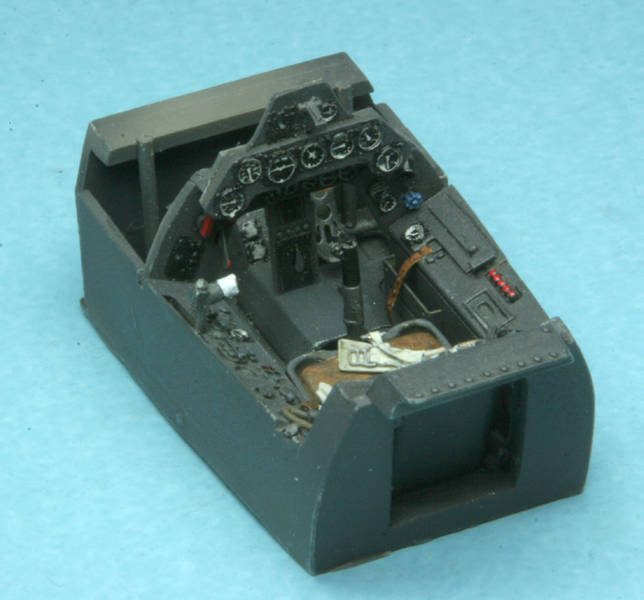
Another view of the tub, showing the instrument panel. The dials are decals, again part of the cockpit set.


Mal
Holdfast
Staff MemberPresident
IPMS-UK KITMAKER BRANCH
#056
_VISITCOMMUNITY
England - South West, United Kingdom
Joined: September 30, 2002
KitMaker: 8,581 posts
AeroScale: 4,913 posts
Posted: Thursday, March 13, 2008 - 06:48 AM UTC
Coming is sorted, just needs a little dry brushing and the cockpit is in along with the rear decking.


I have also glued on the upper wings. Gluing the upper wings, on their own first, ensures the best possible wing root join. Any seams will be at the leading edge and will be much easier to deal with.


More soon.

Mal
lampie
#029
_VISITCOMMUNITY
England - East Midlands, United Kingdom
Joined: December 23, 2005
KitMaker: 6,249 posts
AeroScale: 3,270 posts
Posted: Thursday, March 13, 2008 - 08:47 AM UTC
Blimey Mal,,this is a speed build!
Do you always glue to the top section of the wing first?
Nige
TedMamere
_VISITCOMMUNITY
Moselle, France
Joined: May 15, 2005
KitMaker: 5,653 posts
AeroScale: 4,347 posts
Posted: Thursday, March 13, 2008 - 09:45 AM UTC
Hi Mal!

Great start! Those seatbelts indeed look very realistic... Let me guess, you won't use the kit's decals on that one...

I can't wait to see more! Especially how you will tackle the walkway lines.

Jean-Luc
SGTJKJ
#041
_VISITCOMMUNITY
Kobenhavn, Denmark
Joined: July 20, 2006
KitMaker: 10,069 posts
AeroScale: 3,788 posts
Posted: Thursday, March 13, 2008 - 07:44 PM UTC
Looking good, Mal.

To add to Jean-Luc's question - what camouflage and markings are you going to use?

Looking forward to see more
Holdfast
Staff MemberPresident
IPMS-UK KITMAKER BRANCH
#056
_VISITCOMMUNITY
England - South West, United Kingdom
Joined: September 30, 2002
KitMaker: 8,581 posts
AeroScale: 4,913 posts
Posted: Friday, March 14, 2008 - 09:31 AM UTC
Nige, I wouldn't call it a speed build, it's been on the go for quite some time. It is part of my "Poles-Apart" effort for the Club them for Telford. Recently I have been adding the top wing first, it does make quite a difference, giving the best possible wing root join.

Jean-Luc, Yes I do like to use etched buckles and foil for belts as they always look much more realistic than full etch. I cut masks to the correct width of the belts which made getting them even quite easy. I think that the trick when using etched buckles is to have the belt material as wide as possible, so it will just go through the buckles, otherwise they look false.

Quite right no marking decals will be hurt in the building of this model. I'll also be very interested in how I tackle the walkway markings

Jesper, I am going to do one of the kit schemes, black 6 of III./JG Richthofen, May 1945. It's nice and complicated with lots of different colours plus mottling

Mal
Holdfast
Staff MemberPresident
IPMS-UK KITMAKER BRANCH
#056
_VISITCOMMUNITY
England - South West, United Kingdom
Joined: September 30, 2002
KitMaker: 8,581 posts
AeroScale: 4,913 posts
Posted: Friday, March 14, 2008 - 10:08 PM UTC
Lower wing and tail plane are attached.


A couple of views of the underside showing the rear of the engine instalation in the gear bay. I have also boxed in the cartridge ejection chutes for the wing root cannon.


This shot shows the amount of gap that requires filling at the root leading edge. It isn't much but enough to require a thin piece of plasticard, rather than just asome filler. This discrepancy would have been on the upper surface wing root joint, if I hadn't glued the upper wings on first.


I hope to have the gun sight in and the canopy masked and in position, plus the cover over the central wheel bay, later today. I am also considering which of the cowl flaps to use, open or closed.

Mal
Merlin
Staff MemberSenior Editor
AEROSCALE
#017
_VISITCOMMUNITY
United Kingdom
Joined: June 11, 2003
KitMaker: 17,582 posts
AeroScale: 12,795 posts
Posted: Friday, March 14, 2008 - 10:26 PM UTC
Hi Mal

It's looking good - so, no surprise there! Going back a stage or two, did you take any pics of the MDC set in its raw state? - it'd be a good one to add to the Reviews section.

All the best

Rowan
Holdfast
Staff MemberPresident
IPMS-UK KITMAKER BRANCH
#056
_VISITCOMMUNITY
England - South West, United Kingdom
Joined: September 30, 2002
KitMaker: 8,581 posts
AeroScale: 4,913 posts
Posted: Saturday, March 15, 2008 - 10:30 PM UTC
Thanks Rowan I don't think that I did but I can get some pics at Cosford I think. MDC are there and Bob and I are on speaking terms so I'm sure that he won't mind me taking a couple of pics. He might even drop in on the site to have a look

Mal
Merlin
Staff MemberSenior Editor
AEROSCALE
#017
_VISITCOMMUNITY
United Kingdom
Joined: June 11, 2003
KitMaker: 17,582 posts
AeroScale: 12,795 posts
Posted: Saturday, March 15, 2008 - 10:43 PM UTC

Quoted Text

Thanks Rowan I don't think that I did but I can get some pics at Cosford I think. MDC are there and Bob and I are on speaking terms so I'm sure that he won't mind me taking a couple of pics. He might even drop in on the site to have a look

Mal


Hi Mal

You can tell him I bought an MDC Typhoon as my birthday present to myself. I should have the Review ready soon and plan on doing a long-term on-line build after I've blitzed my workshop to put in new tables and make more space.

All the best

Rowan
Holdfast
Staff MemberPresident
IPMS-UK KITMAKER BRANCH
#056
_VISITCOMMUNITY
England - South West, United Kingdom
Joined: September 30, 2002
KitMaker: 8,581 posts
AeroScale: 4,913 posts
Posted: Sunday, March 16, 2008 - 01:48 AM UTC
Now I am jealous, I've been wanting one of those for ages Yep I'll mention it and Andy's got an Ar 234 and I'm bloody jealous of that too

I have cut away the plasticard inserted into the slight gap at the wing root and add a little filler. I also filled out and inserted a piece of styrene tup into the 2 wing root cannon openings. These are in the process of being reamed out. This process gices a very neat round hole and also fills in any discrepency at the join. The gun camera opening will get similar treatment but, as you can see, there is a lip around the opening so this will be done after the final sanding of the wing leading edge.


The gun sight was added and I used the kit sight glasses as I think that they will be better than the acatate which is recommended. The canopy was washed in Isopropynol and dipped in Klear and has been masked with Parafilm-M, really easy in this scale.


The underside fairing has been added, this took a little trimming to get it to fit, especially at the pointy ends, nearest to the coming. It is now an almost perfect fit I also decided to use the open radiator flaps so painted the forward recess RLM 02 and drilled a series of holes which line up with the cowl flaps, these will take lengths of wire which will represent the operating links.


I was hoping to get some paint on this this week end but but a few masking projects are in the way

Mal
Holdfast
Staff MemberPresident
IPMS-UK KITMAKER BRANCH
#056
_VISITCOMMUNITY
England - South West, United Kingdom
Joined: September 30, 2002
KitMaker: 8,581 posts
AeroScale: 4,913 posts
Posted: Wednesday, March 19, 2008 - 11:54 PM UTC
Front end pieces all on, cowling gun barrels drilled out as is the fresh air scoop


The wing root cannon openings have been reamed out to take new stainless steel barrels. The gun camera opening has been sorted and requires just a little more reaming to get the required thinning to the lens cover.


This shows the new stainless steel barrel, outer sections, in place. The cannon barrels themselves will be added, using the same material, at the end of the build.


This shows the radiator flap actuators.


An overall shot, the rudder has been re-atached, slightly offset to Starboard, and the cockpit has been maske, ready for painting. I have started to clean the plastic ready for paint and I ned to remove any of the overspray from when the cockpit and undercarriage bays were painted. This is because the primer that I use (Halfords white plastic primer) will "eat" the overspray causing it to lift and crinckle and not look good. The pito tube will be added before painting starts.


Mal
Grifter
_VISITCOMMUNITY
North Carolina, United States
Joined: November 17, 2002
KitMaker: 608 posts
AeroScale: 55 posts
Posted: Thursday, March 20, 2008 - 12:24 AM UTC
Looking great Mal!
Your technique for the gun and camera openings in the wing is very interesting, and looks very effective.
Holdfast
Staff MemberPresident
IPMS-UK KITMAKER BRANCH
#056
_VISITCOMMUNITY
England - South West, United Kingdom
Joined: September 30, 2002
KitMaker: 8,581 posts
AeroScale: 4,913 posts
Posted: Friday, March 21, 2008 - 06:44 AM UTC
Thanks Greg, the plastic tube in the wing root is an easy and effective way of ensuring that these areas are circular, as they should be and, for the gun camera, an easy way of achieving a circular portion clear of the leading edge, as the original was in 2 parts, one on each half of the wing, and was impossible to clean up.

More pics tomorrow, the model is in the spray booth having had it's primer coat applied.

Mal
Yeti123
_VISITCOMMUNITY
Michigan, United States
Joined: February 11, 2008
KitMaker: 311 posts
AeroScale: 278 posts
Posted: Friday, March 21, 2008 - 03:36 PM UTC
Mal:
This is one of my favorite aircraft and the build is looking great. What did you use to paint the radiator? It looks very realistic
Holdfast
Staff MemberPresident
IPMS-UK KITMAKER BRANCH
#056
_VISITCOMMUNITY
England - South West, United Kingdom
Joined: September 30, 2002
KitMaker: 8,581 posts
AeroScale: 4,913 posts
Posted: Saturday, March 22, 2008 - 12:09 AM UTC
Hi Taylor, I first painted the radiator "burnt iron" then painted over that with a thinned mix of "gun metal", the burt iron underneath gives the thinned gun metal a more metalic sheen. I then, lightly, dry brushed with aluminium.

More pics later, I have just brought the model out of the spray booth after it's primer coat.

Mal
betheyn
Staff MemberSenior Editor
AEROSCALE
#019
_VISITCOMMUNITY
England - South East, United Kingdom
Joined: October 14, 2004
KitMaker: 4,560 posts
AeroScale: 2,225 posts
Posted: Saturday, March 22, 2008 - 08:50 AM UTC
Really enjoying watching this come together Mal. I like the subtle details you have added to the basic kit.
Any chance this making it debut at Cosford then ?

Quoted Text

and Andy's git an Ar 234


We have resorted to name calling now then .
Andy
Holdfast
Staff MemberPresident
IPMS-UK KITMAKER BRANCH
#056
_VISITCOMMUNITY
England - South West, United Kingdom
Joined: September 30, 2002
KitMaker: 8,581 posts
AeroScale: 4,913 posts
Posted: Saturday, March 22, 2008 - 09:43 AM UTC
Yep if your gonna get MDC stuff and build it and show it on here then I'm gonna start calling you names

Quoted Text

and Andy's git an Ar 234


Of course this should have read, "and Andy, the git, has an Ar 234"
I actually edited the post before I read your reply, but I might re-edit it to what I have written above

It won't be finished for Cosford, but I could take it anyway, as WIP along witht he masks for it I'm stuke with the RLM 84 colour for wich I could use sky but I want it to be a different hue to "RAF Sky" I could have sworn that I had a tin of Xtracolour RLM 84, but no. I have tried mixing verious RLM colours to try and reproduce RLM 84, because I believe it was actually a mix to save paint during the latter months of the war, but no joy. I thought that Flitzer had described the mix but I can't find it Anyway I will pick some up at Cosford, hopefully, unless anyone knows the mix?

Mal
CaptainA
_VISITCOMMUNITY
Indiana, United States
Joined: May 14, 2007
KitMaker: 3,117 posts
AeroScale: 2,270 posts
Posted: Saturday, March 22, 2008 - 09:45 AM UTC
It is amazing how much a novice builder like myself can pick up from these forums. The wing technique is very simple and effective. I am sure this will be seen a lot here in the future. The rest of the build is pretty good also. Thumbs up.
Holdfast
Staff MemberPresident
IPMS-UK KITMAKER BRANCH
#056
_VISITCOMMUNITY
England - South West, United Kingdom
Joined: September 30, 2002
KitMaker: 8,581 posts
AeroScale: 4,913 posts
Posted: Saturday, March 22, 2008 - 10:38 AM UTC
Thanks Carl, the reason for posting the pics is so that someone may find a useful technique, and it's the same reason why I look in on all build threads, you just never know what you might pic up

This will probably be the last update until after the Cosford show (6th April) as I need some paint and Hannants wont deliver unless you buy a kit. The other answer is to find out what RLM colours when mixed together give RLM 84. RLM 84 isn't an official designation and it is believed to be a mix of standard RLM colours (I believe).

I masked off all the openings, using Tamiya tape as "greedy boards" and to give a clean edge, then gently packed in kitchen towel which had been soaked in water then rung out. The turbo intake had a small piece of sponge inserted. The wind screen was protected from the primer otherwise you get a nice white (or whatever primer colour) edging. The model was then sprayed with Halfords plastic primer straight out of the rattle can.


When the primer is dry I give it a rub down, whether it appears to require it or not, with 0000 wire wool. This evens up the surface and smooths it out if the primer goes on grainy (if too cold). Using wire wool protects raised detail from being inadvertantly removed.


Then it's back into the spray booth for the pre-shading. I use gloss black. The cockpit canopy and the propeller blades were also painted at this time.


I have also been experimenting with what to use for the antenna wire and how to make the spring and insulators for it as well. As we all know the antenna wire in late Focke Wulfs wasn't tensioned when the canopy was open and hung down on one side of the fuselage. I think that I have the answer, more when I get to it, at the end. I have made a spring though, and this was inserted at the tail. It is about in scale, but again, more when I come to the finishing

Mal
Holdfast
Staff MemberPresident
IPMS-UK KITMAKER BRANCH
#056
_VISITCOMMUNITY
England - South West, United Kingdom
Joined: September 30, 2002
KitMaker: 8,581 posts
AeroScale: 4,913 posts
Posted: Saturday, March 22, 2008 - 11:59 PM UTC
I had another go at mixing "RLM84" and bingo bloody obvious when you know. Approx 2 parts RLM 65 (light blue) to 1 part RLM 04 (yellow) I said it was obvious, give SKY. I have actually got SKY bang on, close enough so that it could be used on RAF aircraft and you would know that it was mixed and better than Humbrol I will add a touch more RLM 65 I think, as I don't want it to look exactly like SKY. In the future I will just mix the shade so that no 2 models have exactly the same shade, which is how it would have been.

Off skipping to the spray booth (I will mix a batch spray and let it dry before comitting to the model though).

Mal
AIRGUNNER
_VISITCOMMUNITY
England - South East, United Kingdom
Joined: September 27, 2006
KitMaker: 246 posts
AeroScale: 234 posts
Posted: Sunday, March 23, 2008 - 01:43 PM UTC
Hi Mal,

Re: Your post a couple back about Hannnats not posting paint without a kit, I get mine from Military Precision who also advertise on Aeroscale, Lee will post without kits and they are cheaper. Postage is really fast too, usually next working day.

I've just ordered a load for my Dornier 17 for Twin Spinners, plus a few other goodies.

But, I bet you knew this anyway

Steve
Holdfast
Staff MemberPresident
IPMS-UK KITMAKER BRANCH
#056
_VISITCOMMUNITY
England - South West, United Kingdom
Joined: September 30, 2002
KitMaker: 8,581 posts
AeroScale: 4,913 posts
Posted: Sunday, March 23, 2008 - 10:13 PM UTC
Hi Steve and thanks for that no I didn't know and it's very nice to know

I actually use White Ensign Colourcoats but they don't do the RLM 84 shade. This is not a problem as, from what I have read 84 is very close to RAF Sky anyway and I could use that. However I believe that Hannants do RLM 84 in their Xtracolor range. I was convinced that I had a tin, but no. My recolection of seeing it and comparing the lid colour with sky is that they are one and the same, but I wasn't 100% and therefore I was going to use it. I really did prefer to find a mix that would give me the colour, because that would be so much more authintic. RLM 65 and RLM 04 give me what I wanted and I think that I will add a little white. I tried with RLM 76 and 04 but that doesn't work, so I reckon that, assuming it was a mixed shade, then I have it I will also be able to very it as and when I choose

I'm just about to go and spray my new colour, I'll post the results as soon as I can, but I have a birthday celebration to fit in

Mal
AIRGUNNER
_VISITCOMMUNITY
England - South East, United Kingdom
Joined: September 27, 2006
KitMaker: 246 posts
AeroScale: 234 posts
Posted: Monday, March 24, 2008 - 03:15 AM UTC
Hi Mal,

First things first, plenty of these for the Birthday !

I hear what you say about the "mythical" RLM84, I don't know who to believe, many 'experts' say it never existed, some say it did but was never official, others that it was used as a mix from existing colours when there was nothing else available. This one is well open to debate, and gives the chance for a bit of freedom to do what you want. I am not a total rivet counter, I just want my models to look good, and by being able to freestyle it a bit with some colours makes it more enjoyable to me.

As always your build is looking excellent, I now think I have the hang of Halfords white primer, but boy, is it tempremental! I have just primed my P-51B with it and it was a sod!!

Can't wait for more pics of your build.

Regards

Steve
Emeritus
_VISITCOMMUNITY
Uusimaa, Finland
Joined: March 30, 2004
KitMaker: 2,845 posts
AeroScale: 1,564 posts
Posted: Monday, March 24, 2008 - 03:44 AM UTC

Quoted Text

I hear what you say about the "mythical" RLM84, I don't know who to believe, many 'experts' say it never existed, some say it did but was never official, others that it was used as a mix from existing colours when there was nothing else available. This one is well open to debate, and gives the chance for a bit of freedom to do what you want.


I remember reading an article about this RLM84 thing as well, and it was speculated that perhaps it wasn't a separate color, but late-war RLM76. Due to material shortages, the amount of color pigments had to be cut down, resulting in the zinc chromate (or whatever it was, can't remember. Yellowish stuff anyway) included for corrosion prevention showing more prominently.

Awesome looking Focke-wulf so far, btw! Very nice work.
 _GOTOTOP