1:32 Roden GB 2008 Fokker Dr.I
Mendoza, Argentina
Joined: June 14, 2006
KitMaker: 222 posts
AeroScale: 219 posts
Posted: Sunday, October 26, 2008 - 08:30 PM UTC
Please accept my apologies for not posting updates for a long time, I'm dealing with some problems that are taking most of my time and energy. Anyway I found some time to advance a little with the Fokker build. Here are some pictures (I reduced the quality because I'm running out of space in my gallery)
Scratchbuilt map case:
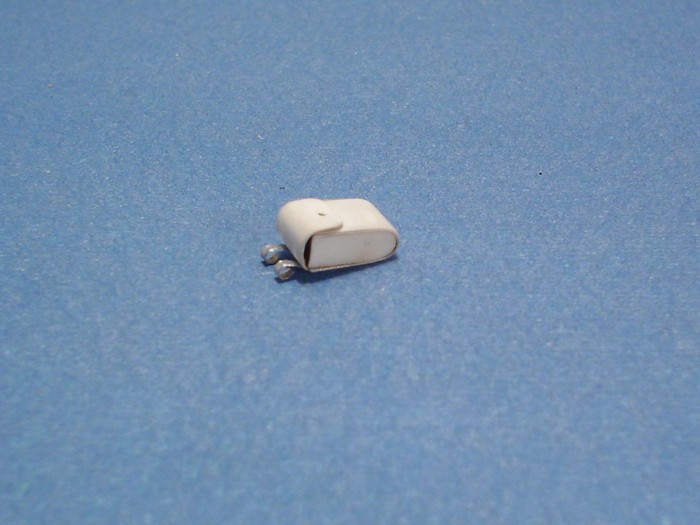
I found that the fuselage plywood sections provided by Part etched set were too small I made new ones in plasticard, then I painted them.

Build in progress, please be patient ....
I have always imagined that Paradise will be a kind of library.
Siempre imagine que el paraíso sería algún tipo de biblioteca.
Jorge Luis Borges
Victoria, Australia
Joined: November 26, 2006
KitMaker: 608 posts
AeroScale: 602 posts
Posted: Sunday, October 26, 2008 - 09:55 PM UTC
Hey Kalt,
Great to see you back on board and great to see your updates.
Hope sincerely that all is going well for you and your family.
Cheers,
Hugh
North Carolina, United States
Joined: June 19, 2007
KitMaker: 604 posts
AeroScale: 600 posts
Posted: Monday, October 27, 2008 - 02:01 AM UTC
Welcome back to the build! Your attention to details is fantastic!!
RAGIII
Mendoza, Argentina
Joined: June 14, 2006
KitMaker: 222 posts
AeroScale: 219 posts
Posted: Tuesday, October 28, 2008 - 12:45 AM UTC
Thanks guys!
Now I'm working with the seat, perhaps tonight I will upload some pictures.
Cheers,

Claudio
I have always imagined that Paradise will be a kind of library.
Siempre imagine que el paraíso sería algún tipo de biblioteca.
Jorge Luis Borges
Alberta, Canada
Joined: January 19, 2008
KitMaker: 6,743 posts
AeroScale: 6,151 posts
Posted: Tuesday, October 28, 2008 - 01:10 AM UTC
Glad to see back Claudio . The map case looks awesome and the fine details added .

Mendoza, Argentina
Joined: June 14, 2006
KitMaker: 222 posts
AeroScale: 219 posts
Posted: Sunday, November 09, 2008 - 07:44 PM UTC
Thanks Terri,
The build progressed since I took these pictures, the cockpit is almost ready now.
More pictures to follow...

I have always imagined that Paradise will be a kind of library.
Siempre imagine que el paraíso sería algún tipo de biblioteca.
Jorge Luis Borges
Alberta, Canada
Joined: January 19, 2008
KitMaker: 6,743 posts
AeroScale: 6,151 posts
Posted: Sunday, November 09, 2008 - 09:28 PM UTC
Awesome progress so far Kalt ! I really like the lacing on the rear bulkhead not to mention your wood effect .
I think if you and Hugh joined together the both of you would turn out one incredible DR.1 in 1/1 scale !
What make is your new camera ? I'm still learning how to use my with all the features on it . I do find this to be harder to learn how to use the building a kit .
North Carolina, United States
Joined: June 17, 2006
KitMaker: 478 posts
AeroScale: 391 posts
Posted: Sunday, November 09, 2008 - 11:32 PM UTC
I like.....
I like
Regards
Steve
1/350 USS San Francisco on Slipways
1/350 HMS Warspite in Research Mode
1/32 P-39D stalled
Mendoza, Argentina
Joined: June 14, 2006
KitMaker: 222 posts
AeroScale: 219 posts
Posted: Monday, November 10, 2008 - 05:27 AM UTC
Quoted Text
What make is your new camera ? I'm still learning how to use my with all the features on it . I do find this to be harder to learn how to use the building a kit .
My new camera is a Lumix (Panasonic) FZ-28K with a macro lens, a big improvement over my old, but reliable, Sony P-41. Anyway, I think that the secret lies in the illumination and not in the camera. I use two 500w halogen spotlights for general illumination and a smaller and moveable one (250w) to eliminate or reduce the shadows.
If you are interested I can post an image of my "photo desk".
Cheers,
Claudio
I have always imagined that Paradise will be a kind of library.
Siempre imagine que el paraíso sería algún tipo de biblioteca.
Jorge Luis Borges
Colorado, United States
Joined: January 25, 2004
KitMaker: 11,669 posts
AeroScale: 11,011 posts
Posted: Monday, November 10, 2008 - 06:35 AM UTC
Excellent Claudio! You might consider altering the cushion to represent the parachute pack? What scheme will you go with.
". . .The most important thing is to know why you build and then get the most that you can out of building." via D.D.
North Carolina, United States
Joined: June 19, 2007
KitMaker: 604 posts
AeroScale: 600 posts
Posted: Monday, November 10, 2008 - 09:34 AM UTC
These builds just keep getting better, as I have said before! The wood side panels are striking! I love the subtle grain, really nice effect!! Of course the panel on the bottom and the stitching on the fabric panel behind the seat are also top notch!
RAGIII
Mendoza, Argentina
Joined: June 14, 2006
KitMaker: 222 posts
AeroScale: 219 posts
Posted: Monday, November 10, 2008 - 10:06 AM UTC
Steve, RAGIII, Terri and Stephen; thanks for the nice words!
Quoted Text
You might consider altering the cushion to represent the parachute pack? What scheme will you go with.
Parachute pack? I didn't know that Dr.1 were equipped with parachutes, all the pictures I saw show an ordinary leather cushion, like the one I depicted. I saw that you included the parachute pack in your D.VI and I though that it was an equipment common to late war machines, perhaps I have been looking at pictures representing early production Dr.Is?.
I'm planning to depict the Kirschstein-Udet's 586/17.
Cheers,
Claudio
I have always imagined that Paradise will be a kind of library.
Siempre imagine que el paraíso sería algún tipo de biblioteca.
Jorge Luis Borges
New York, United States
Joined: December 15, 2006
KitMaker: 365 posts
AeroScale: 344 posts
Posted: Tuesday, November 11, 2008 - 05:40 AM UTC
Kalt,
Outstanding work. One of the many artisans of this website. I can't wait to see more progress shots.
Regards, Dwayne
Mendoza, Argentina
Joined: June 14, 2006
KitMaker: 222 posts
AeroScale: 219 posts
Posted: Wednesday, November 19, 2008 - 07:50 PM UTC
Thanks Dwayne!
Small update today:
I made a new seat frame with 0.7mm bronze rods. The frame supplied by Roden was thick and oversimplified.
I repainted the reinforcement in the center of the rear bulkhead because I found that it was made of leather instead of metal.

The finished seat with the seatbelts attached (including the scratchbuilt locking pin). I'm going to add the shoulderbelts once the seat will be glued to the rear bulkhead.
About the color of the belts, upon examining all of my F.I/Dr.I photos, their belts are definitely a darker color than tan. I chose khaki-green because I saw this color used by the German army in some of their web gear.
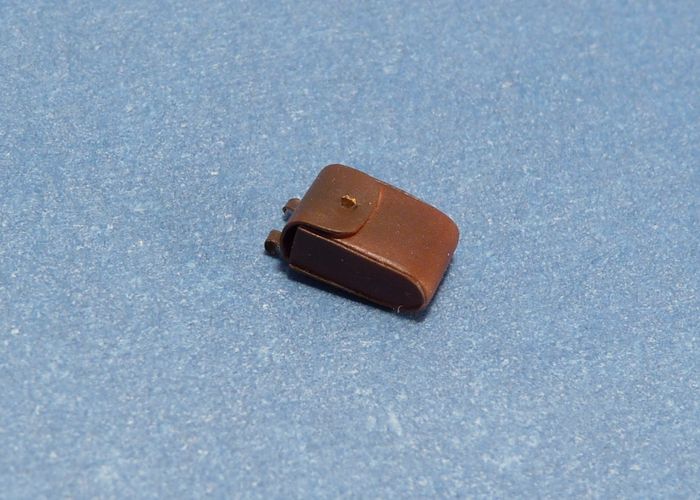
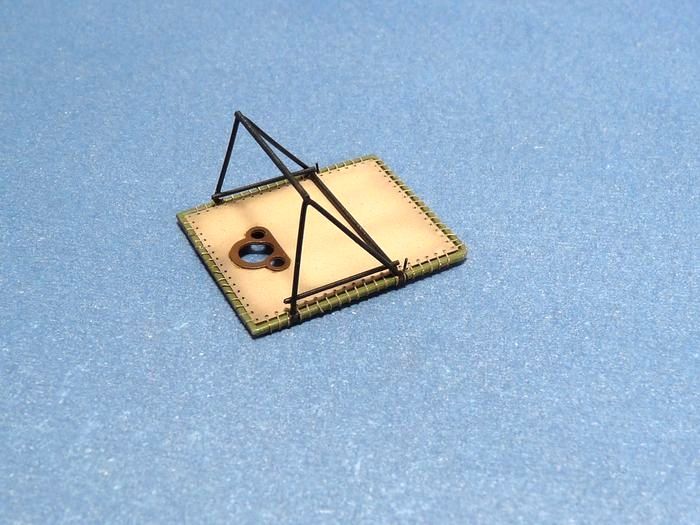
Map case ready to install
Accidentally, I deleted most of the latest pictures...I will take new ones today

I have always imagined that Paradise will be a kind of library.
Siempre imagine que el paraíso sería algún tipo de biblioteca.
Jorge Luis Borges
Victoria, Australia
Joined: November 26, 2006
KitMaker: 608 posts
AeroScale: 602 posts
Posted: Wednesday, November 19, 2008 - 11:04 PM UTC
Wow!
This has been worth the wait!
It's making the rest of us look positively amatuer (sic).
Cheers,
Hugh
Colorado, United States
Joined: January 25, 2004
KitMaker: 11,669 posts
AeroScale: 11,011 posts
Posted: Thursday, November 20, 2008 - 08:12 AM UTC
Wow! Claudio your sub assemblies are very impressive!
". . .The most important thing is to know why you build and then get the most that you can out of building." via D.D.
Tennessee, United States
Joined: April 28, 2006
KitMaker: 286 posts
AeroScale: 45 posts
Posted: Thursday, November 20, 2008 - 09:09 AM UTC
Indiana, United States
Joined: May 14, 2007
KitMaker: 3,117 posts
AeroScale: 2,270 posts
Posted: Thursday, November 20, 2008 - 10:40 AM UTC
This is a great build. The sub-assemblies you have shown us are so well executed and realistic. Great job.
The PE people would have us attach the seatbelts to the tubular frame work supporting the seat. You have attached them under the cushion. I am curious about that.
"Treat 'em Rough", Current Builds--Wingnut Rumpler
I am frequently seen with blood shot eyes from staying up past my nap time to get the right colour scheme on my latest WWI model?
Mendoza, Argentina
Joined: June 14, 2006
KitMaker: 222 posts
AeroScale: 219 posts
Posted: Friday, November 21, 2008 - 01:34 AM UTC
Thanks a lot guys!
Carl: I attached the seatbelts to the seat instead of the tubular frame based on the information of this thread at the Aerodrome Forum:
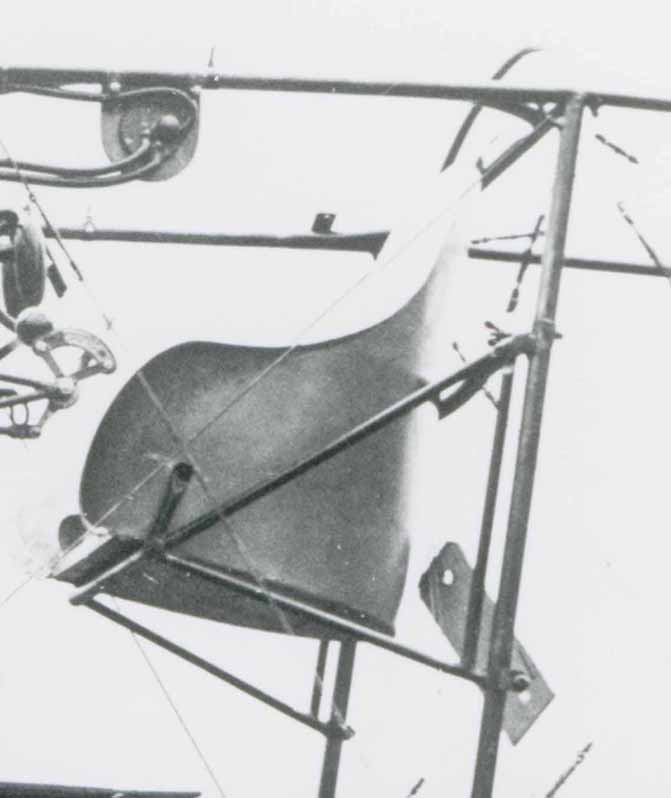
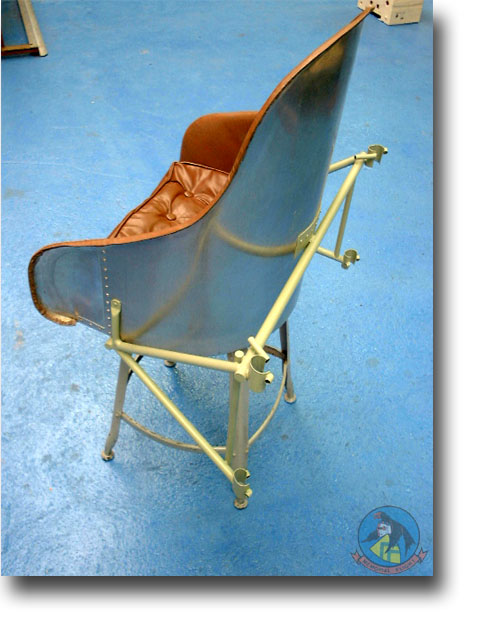
http://www.theaerodrome.com/forum/replica-aircraft/30991-fokker-seat-harness.htmlAlso, check these photos of the, as far I know, only surviving original Fokker Dr.1 seat from MvR 425/17:
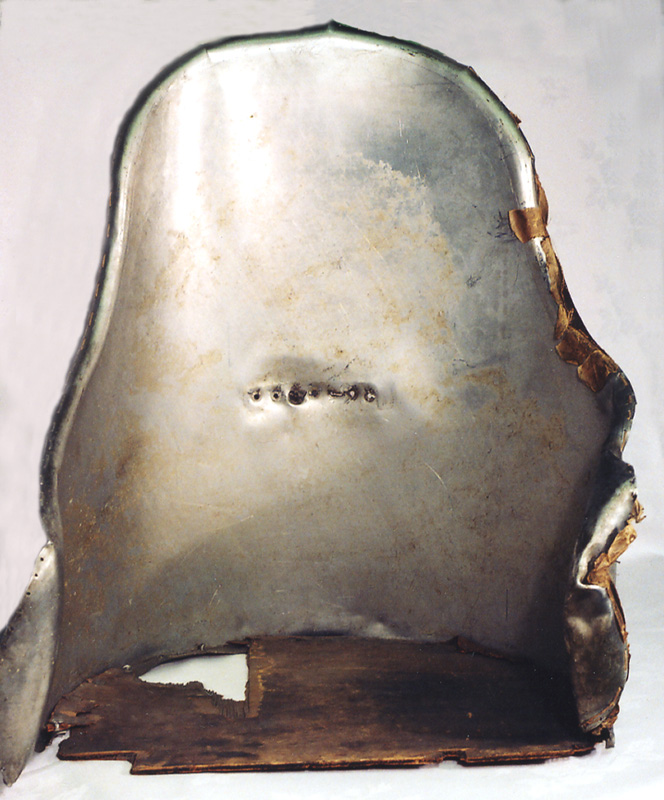
No signs of the "slot" to pass the seatbelts.
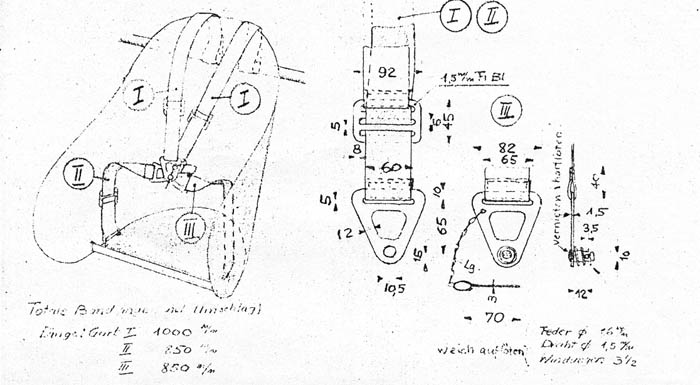
Here is a drawing of the manual of the Dutch Fokker D.VII showing the attachment method of the seat-shoulder belts.
I have always imagined that Paradise will be a kind of library.
Siempre imagine que el paraíso sería algún tipo de biblioteca.
Jorge Luis Borges
Indiana, United States
Joined: May 14, 2007
KitMaker: 3,117 posts
AeroScale: 2,270 posts
Posted: Friday, November 21, 2008 - 08:58 AM UTC
Thanks. That thread and your drawings have given me much to contemplate before my next build.
"Treat 'em Rough", Current Builds--Wingnut Rumpler
I am frequently seen with blood shot eyes from staying up past my nap time to get the right colour scheme on my latest WWI model?
North Carolina, United States
Joined: June 19, 2007
KitMaker: 604 posts
AeroScale: 600 posts
Posted: Friday, November 21, 2008 - 11:27 AM UTC
Carl,
Can't say much that hasn't been said already! The attention to detail on the sub assemblies is fantastic!! Looking forward to more!
RAGIII
Östergötland, Sweden
Joined: April 04, 2006
KitMaker: 1,058 posts
AeroScale: 1,004 posts
Posted: Saturday, November 22, 2008 - 11:26 PM UTC
Quoted Text
Carl,
Can't say much that hasn't been said already! The attention to detail on the sub assemblies is fantastic!! Looking forward to more!
RAGIII
Awesome. just love the seat and the leather paint is just spot on.
Looking forward, yes me too
Larsa Q
Alberta, Canada
Joined: January 19, 2008
KitMaker: 6,743 posts
AeroScale: 6,151 posts
Posted: Sunday, November 23, 2008 - 02:58 AM UTC
Very lovely job done on the seat and map case . Can you share on how you did the painting of these items ? It's something on which I have to improve on and any tips would be must helpful .
Mendoza, Argentina
Joined: June 14, 2006
KitMaker: 222 posts
AeroScale: 219 posts
Posted: Monday, November 24, 2008 - 02:23 AM UTC
Thanks for the nice words, I'm glad you liked them!
Terri: I applied different mixes of red, yellow and black to represent the different shades of leather. I recommend you to have pictures of leather covered furniture to get the correct color.
I hope this helps
About the build, I'm having some problems with the etched ammo and spent cartridge boxes, I had to rebuild part of the interior, not a mayor setback but I lost a couple of days of work.
I have always imagined that Paradise will be a kind of library.
Siempre imagine que el paraíso sería algún tipo de biblioteca.
Jorge Luis Borges
Colorado, United States
Joined: January 25, 2004
KitMaker: 11,669 posts
AeroScale: 11,011 posts
Posted: Monday, November 24, 2008 - 08:06 AM UTC
Excellent Claudio! Model on!
". . .The most important thing is to know why you build and then get the most that you can out of building." via D.D.


