_GOTOBOTTOM
Early Aviation
Discuss World War I and the early years of aviation thru 1934.
1:32 Roden GB 2008 Fokker Dr.I
Kalt
_VISITCOMMUNITY
Mendoza, Argentina
Joined: June 14, 2006
KitMaker: 222 posts
AeroScale: 219 posts
Posted: Friday, April 25, 2008 - 06:41 PM UTC


Hello everybody !

After a couple of problems I am joining the Roden 1/32 Group Build.
What can I say about the Fokker Dr.I that hasn´t been said before? … Not much. So, I’m going to concentrate on the version I chose to build. One of the rules of the GB states that we have to use the kit’s decals. That means that I have to pick one of the following versions:

- Fokker Dr.I, 213/17, Jasta 2, Ltn. Friedrich Kempf, March 1918. "Kennscht mi noch?"
- Fokker Dr.I, 477/17, JG, Rttm. Manfred von Richthofen, March 1918.
- Fokker Dr.I, 450/17, Jasta 7, Ltn. Joseph Carl Peter Jacobs, Summer 1918.
- Fokker Dr.I, 586/17 , Jasta 4, Ltn. Ernst Udet, June 1918 (Previously flown by Ltn. Hans Kirschstein, Jasta 6).

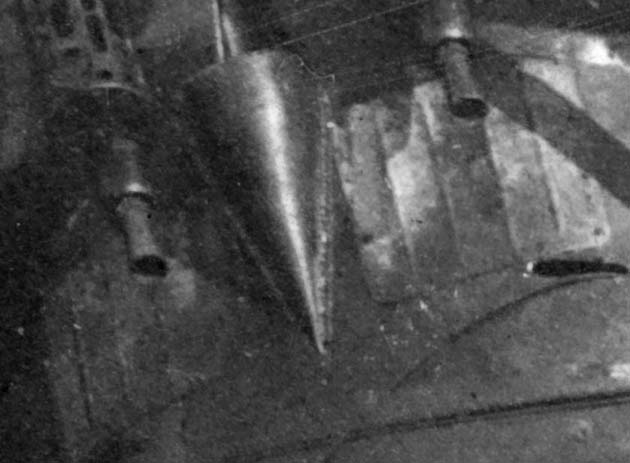
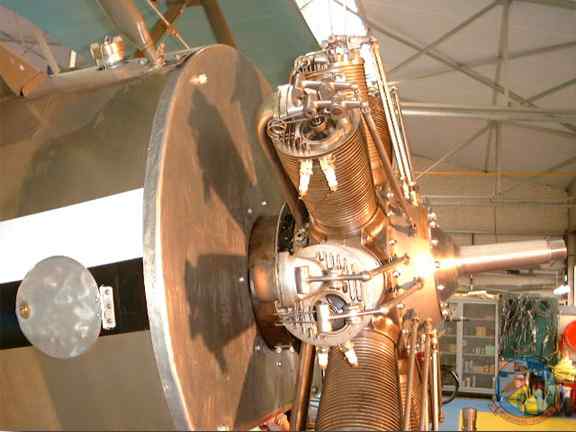
At the beginning I wanted to build the Jacobs Dr.I but this machine was most probably equipped with a captured Clerget engine and its corresponding propeller, both of them not provided by Roden. I couldn’t find a good 1/32 Clerget engine and since I’m really delayed with this build scratchbuild one was out of question. So, I decided to build Udet’s (or Kirschstein’s) plane mainly because I have more pictures of it and I can use the kit's engine and propeller.
This project will be a double challenge for me because it will be my first attempt to represent the Fokker streaked camouflage and my first 1/32 WWI model.


RAGIII
_VISITCOMMUNITY
North Carolina, United States
Joined: June 19, 2007
KitMaker: 604 posts
AeroScale: 600 posts
Posted: Sunday, April 27, 2008 - 03:33 PM UTC
Glad to see your entry into the build! ! Looking forward to the updates,
RAGIII
JackFlash
_VISITCOMMUNITY
Colorado, United States
Joined: January 25, 2004
KitMaker: 11,669 posts
AeroScale: 11,011 posts
Posted: Sunday, April 27, 2008 - 05:29 PM UTC
Go Kalt go!
Kalt
_VISITCOMMUNITY
Mendoza, Argentina
Joined: June 14, 2006
KitMaker: 222 posts
AeroScale: 219 posts
Posted: Sunday, April 27, 2008 - 07:31 PM UTC
Thanks for the support guys!

Since I’m still waiting for the Part etched set (32028) I ordered; I decided to start the kit in those sections that doesn’t need etched parts. Although the surface detail is pretty good, with crisp detail on the smaller parts some kit’s parts need to be corrected. Obviously, Rodent used Ian Stair’s plans from the Albatros Productions Fokker Dr.1 Special as a main reference. The problem with these plans is they include some errors that Rodent, in turn, incorporated to the kit. These are the errors I found:

Axle wing: This item on the triplane was not detachable consequently the six molded “fittings” must be sanded off. The only Dr.I fittings on the axle wing were two jack pads used for changing the wheels or tires and located under the bottom outer ends. I will have to add these.


Tailplane: This part has a pronounced step in the central area of both upper and lower surfaces not present in the real plane; this gap was responsible of another step between the tailplane and the fuselage. I’m going to use a piece of plastic card to fill the gap and replace the control wire openings with etched parts from the Part set 48087.


Fuselage front decking: The opening for the fuel filler is provided but I will have to drill the oil aperture on the starboard side and add the machine gun blast protection plates. I also think that the cover of the fuel gauge is too small and too pointed.


Inspection Window: This is a small window on the top wing, made of a clear product called Cellon, which allowed you to see the wing inspection date and ZAK stamp that was printed on top the wing's internal spar. ZAK are the initials of the Zentral Abnahme Kommission (Central Acceptance Commission) responsible to provide the acceptance inspection of aircraft, engines and other items during the manufacture process.
On the kit, I think that this inspection window is located in the wrong position; it should be closer to the leading edge of the wing.


Engine cowling: Apart of the rough finish (I will have to polish it) the cowling doesn’t show the characteristic riveted faceplate. Fortunately, Part etched set provides the rivets but that means that I will have to wait to receive the etched set to correct the cowling.


I found a couple of sink marks on the machine guns and the propeller but these will be easily fixed. . There are, also two ejector pin marks inside the fuselage in the worst position but they will be easily sanded off too.


Next entry: pictures of the corrected parts.

Cheers,

Claudio
Kalt
_VISITCOMMUNITY
Mendoza, Argentina
Joined: June 14, 2006
KitMaker: 222 posts
AeroScale: 219 posts
Posted: Thursday, May 08, 2008 - 09:11 PM UTC
Here is my update:

I'm still working on the front decking but I finished the wing axle (I sanded off the fittings and I added the jack pads).


I filled the tailplane's gap, by doing this I solved the problem of the tailplane-fuselage step. Also, I added the etched reinforcements for the control wire openings. The red paint actually is a primer used in real cars. I use this primer because can be sprayed easily with an airbrush.
Thanks to the information and drawings (made using original parts as reference) provided by the "Aerodrome" forum member Gary Sewall I discovered some shape problems with the elevator and rudder. I modified them to match the drawings.


I changed the position of the inspection window


While I was waiting for the Part etched set I managed to build the wings. I found some injection problems on the trailing edge of the upper half of the middle wing, the scalloping there was quite vague. I used the lower half of the wing as a pattern and cyanocrilate to reconstruct the missing scalloping.


More to come!
MerlinV
_VISITCOMMUNITY
Victoria, Australia
Joined: November 26, 2006
KitMaker: 608 posts
AeroScale: 602 posts
Posted: Friday, May 09, 2008 - 01:16 AM UTC
Hey Kalt,
Welcome to the group build at last. And major Kudos to you for going out and buying your own kit.
So you had the same issue with the Upper wing Trailing edge as I did? Or at least similar.
I am unsure as to whether the discussion on the Aerodrome gives us a complete and definitive impression of how to tackle my F1's tail planes, but I, like you, am watching closely.

Cheers,

Hugh
JackFlash
_VISITCOMMUNITY
Colorado, United States
Joined: January 25, 2004
KitMaker: 11,669 posts
AeroScale: 11,011 posts
Posted: Saturday, May 10, 2008 - 03:51 PM UTC
Since I am working on the Fokker D.VI I too am watch this build closely.
Kalt
_VISITCOMMUNITY
Mendoza, Argentina
Joined: June 14, 2006
KitMaker: 222 posts
AeroScale: 219 posts
Posted: Saturday, May 10, 2008 - 08:14 PM UTC
Thanks Hugh, and yes we are fighting with the same problems (but in a different wing). I built a couple of Roden's Fokker D.VII with the same trailing edge issue.

About the Dr.1, a couple of days ago I received the Part etched set so I will start to build the cockpit in the following days.
Kalt
_VISITCOMMUNITY
Mendoza, Argentina
Joined: June 14, 2006
KitMaker: 222 posts
AeroScale: 219 posts
Posted: Thursday, May 15, 2008 - 07:54 PM UTC
Small update:

I finished front deck. I changed the position of the oil and fuel filler holes. I built a new fuel gauge cover and I added the machine gun blast protection plates.
Now, I'm working in the fuel gauge.


Also, I made a resin copy of the fuel filler cap to use it as the oil filler cap an then, I drilled the necessary "second hole" for it in the oil-fuel tank.

MerlinV
_VISITCOMMUNITY
Victoria, Australia
Joined: November 26, 2006
KitMaker: 608 posts
AeroScale: 602 posts
Posted: Thursday, May 15, 2008 - 11:55 PM UTC
Lookin' Good Kalt!

Cheers,

Hugh
Kalt
_VISITCOMMUNITY
Mendoza, Argentina
Joined: June 14, 2006
KitMaker: 222 posts
AeroScale: 219 posts
Posted: Friday, May 16, 2008 - 12:06 PM UTC
Thanks Hugh. If you are interested I have the Corel Draw files of the gun blast protection plates and the lower panel but I don't know if they were similar on the F.I. Stephen the same for you and your Fokker D.VI project.

Cheers,

Claudio
RAGIII
_VISITCOMMUNITY
North Carolina, United States
Joined: June 19, 2007
KitMaker: 604 posts
AeroScale: 600 posts
Posted: Friday, May 16, 2008 - 03:55 PM UTC
In one word, WOW,
RAGIII
MerlinV
_VISITCOMMUNITY
Victoria, Australia
Joined: November 26, 2006
KitMaker: 608 posts
AeroScale: 602 posts
Posted: Friday, May 16, 2008 - 11:27 PM UTC
Thanks Kalt,
I'd appreciate that.
Can anybody say for certain whether they are relevant to the F1?

Cheers,

Hugh
Kalt
_VISITCOMMUNITY
Mendoza, Argentina
Joined: June 14, 2006
KitMaker: 222 posts
AeroScale: 219 posts
Posted: Saturday, May 17, 2008 - 05:49 AM UTC
Thanks RAGIII !

Hugh: Send me your E-mail address, I will send you the Corel Archives.

Last night I managed to finish the cowling. I attached the rivet detail provided by Part (I bought the Part etched set mostly for this etched rivet detail).
The original cowling was made with two metal parts I tried to replicate this by filling the outer section of the etched rivet leaving the characteristic Dr.1 "step" in the inner section. I had to be very careful sanding the red putty because I didn't want to eliminate the extremely delicate etched rivets.

I added thin plastic stripes to represent the separation of the two metal sections.

Then I reshaped and thinned the lower section of the cowling. To the right of the picture is cowling before the correction and to left is the corrected and thinned lower section.


Also, I found a problem with the kit's firewall. The original piece doesn't have the step. So, I sanded it to replicate the original flat surface.


mgtaylor
_VISITCOMMUNITY
Florida, United States
Joined: July 20, 2006
KitMaker: 59 posts
AeroScale: 56 posts
Posted: Sunday, May 18, 2008 - 09:09 AM UTC
Awesome Build by the way. Very Correct Detailing and Documenting and fixes for the ommsions of this kit.
Extremely instructive.

My Personal Graditude for the Reference Photo !! I have searched such a photo out for a couple of years. Not so obvious at first however THAT IS a an example of a Captured / Camel Clerget Engine on a Factory Camo Schemed Production Fokker DrI. !!

Jacobs ALL Black Dr I used one but I wanted documentation for a Factory Streaked Scheme DrI with one. It was known captured Clergets where sometimes substituted for Obersals in the feild I wasnt able to find any pictures. Some claimed they were sought after by German Aviators and considered a superior engine to their LeRhone/Obersual. Rotories wore out quickly in the field requireing major overhaul often with heavy use I understand due to un-even cooling ? Replacements were hard to come by and often captured engines were put back to Good use against the enemy !

Even IF this a replica build and the retsorers were only able to get their hands a Clerget it is a very Great Example !!!

I had been wanting to use one (Clerget) from another kit and use it a FOk Dr.I Build !!! BUT NOW I ahve the Photo to back me up !

Yours Mike
Kalt
_VISITCOMMUNITY
Mendoza, Argentina
Joined: June 14, 2006
KitMaker: 222 posts
AeroScale: 219 posts
Posted: Monday, May 19, 2008 - 02:59 AM UTC
Thanks Michael, I'm glad you found my Dr.1 build useful and informative, that was one of my main objectives when I started it.
About the Clerget equipped Dr.1, I have a Dragon's Fokker Dr.1 waiting to receive the markings of Jacobs 450/17.
I think that the Memorial Flight Fokker Dr.1 is the most accurate replica. You can find more pictures of it here:

http://storage.mfa.free.fr/FokkerDRIuk.html

Cheers,

Claudio
MerlinV
_VISITCOMMUNITY
Victoria, Australia
Joined: November 26, 2006
KitMaker: 608 posts
AeroScale: 602 posts
Posted: Monday, May 19, 2008 - 11:31 AM UTC
Great Link there Kalt!
I have saved some of the shots of the interior. Looks like I fluked the right colour for the Framing. I used RLM Grey (A pale grey with a tinge of green). I reckon it will be great after the fuselage is closed up.

Cheers

Hugh
Kalt
_VISITCOMMUNITY
Mendoza, Argentina
Joined: June 14, 2006
KitMaker: 222 posts
AeroScale: 219 posts
Posted: Monday, May 19, 2008 - 06:06 PM UTC
Hugh, The RLM 02 is close to the color used by Fokker for the interior metal parts but I think that it should be "greener".

Cheers,

Claudio
JackFlash
_VISITCOMMUNITY
Colorado, United States
Joined: January 25, 2004
KitMaker: 11,669 posts
AeroScale: 11,011 posts
Posted: Saturday, May 24, 2008 - 02:25 PM UTC
Greetings Claudio;
In reference to the green; Remember that the Knowlton held Fokker D.VII is an Albatros (Johannistahl) built item not the parent company Schwerin. The green IMO should be as you say "greener." Though your monitor might see it different than mine I suggest taking a Medium green and lightening it with a touch of light grey. See my strip down Roden / Part of Poland 1/48 scale build.
Kalt
_VISITCOMMUNITY
Mendoza, Argentina
Joined: June 14, 2006
KitMaker: 222 posts
AeroScale: 219 posts
Posted: Monday, May 26, 2008 - 07:56 PM UTC
You are right Stephen and thanks for the advice.

Cheers,

Claudio
Repainted
_VISITCOMMUNITY
Östergötland, Sweden
Joined: April 04, 2006
KitMaker: 1,058 posts
AeroScale: 1,004 posts
Posted: Wednesday, June 11, 2008 - 05:05 AM UTC
Hi Kalt
I really like the job you put into this build. Great attention to details. Keep it up..
Larsa
JackFlash
_VISITCOMMUNITY
Colorado, United States
Joined: January 25, 2004
KitMaker: 11,669 posts
AeroScale: 11,011 posts
Posted: Thursday, August 21, 2008 - 08:07 AM UTC
Greetings KALT. How goes the build?
Kalt
_VISITCOMMUNITY
Mendoza, Argentina
Joined: June 14, 2006
KitMaker: 222 posts
AeroScale: 219 posts
Posted: Friday, August 22, 2008 - 08:17 PM UTC
Hello Stephen, sadly I've been very busy lately. I didn't touch a kit in two months!!!
I promise that this weekend I am going to resume the Dr.I build.

Cheers,

Claudio
MerlinV
_VISITCOMMUNITY
Victoria, Australia
Joined: November 26, 2006
KitMaker: 608 posts
AeroScale: 602 posts
Posted: Wednesday, October 01, 2008 - 11:22 AM UTC
Hey Kalt,

How's it going? I have been looking for some updates on your Dr.I.

I reckon I have a couple of weeks work left in the F.I.

Cheers,

Hugh
JackFlash
_VISITCOMMUNITY
Colorado, United States
Joined: January 25, 2004
KitMaker: 11,669 posts
AeroScale: 11,011 posts
Posted: Saturday, October 25, 2008 - 09:23 AM UTC
Our good man Kalt has been dealing with some things and the build will continue as he can get back to it.
 _GOTOTOP