

This is no speedbuild kit. I just started up this build my self and for the moment Im working on the engine. Roden have tried to give us modellers location pins and corresponding holes. This is good and an evolutionary step. Sad to say this but those location pins does not fit so there is to dry fit everything twice before gluing parts together.
For me I'm glad that Im not entered this kit in the GB with in a tough that this would be my fourth build. The kit is just too good to get it rushed over in a harry.
Larsa Q
Early Aviation
Discuss World War I and the early years of aviation thru 1934.
Discuss World War I and the early years of aviation thru 1934.
Hosted by Jim Starkweather
1:32 Roden GB 2008 Spad VII

Repainted

Joined: April 04, 2006
KitMaker: 1,058 posts
AeroScale: 1,004 posts
Posted: Tuesday, January 27, 2009 - 10:01 PM UTC

JackFlash

Joined: January 25, 2004
KitMaker: 11,669 posts
AeroScale: 11,011 posts
Posted: Thursday, January 29, 2009 - 05:24 PM UTC
Very well. The Roden 1/32 Group Build final extension is . . .drum roll please. . .February 28, 2009. BUT we can accept no further builds. After that - the axe must fall ya'll.

RAGIII
Joined: June 19, 2007
KitMaker: 604 posts
AeroScale: 600 posts
Posted: Saturday, January 31, 2009 - 02:34 AM UTC
Quoted Text
Very well. The Roden 1/32 Group Build final extension is . . .drum roll please. . .February 28, 2009. BUT we can accept no further builds. After that - the axe must fall ya'll.
Thanks for the extension! I will endeaver to work more quickly but as Larsa says, this isn't a speed building candidate.
RAGIII
Repainted
Joined: April 04, 2006
KitMaker: 1,058 posts
AeroScale: 1,004 posts
Posted: Saturday, January 31, 2009 - 06:53 AM UTC
Now I have a friend in North Carolina to 
When DH-2 and SS DIII hits the LHS I just wonder what Stephen will calling
Evolution???

Larsa Q
When DH-2 and SS DIII hits the LHS I just wonder what Stephen will calling
Evolution???
Larsa Q
JackFlash
Joined: January 25, 2004
KitMaker: 11,669 posts
AeroScale: 11,011 posts
Posted: Saturday, January 31, 2009 - 07:09 PM UTC
Oh my now I have another decision to make . . . 
Repainted
Joined: April 04, 2006
KitMaker: 1,058 posts
AeroScale: 1,004 posts
Posted: Monday, February 09, 2009 - 06:15 AM UTC
Stephen
How about
"Never ending story"
Larsa Q
How about
"Never ending story"
Larsa Q
RAGIII
Joined: June 19, 2007
KitMaker: 604 posts
AeroScale: 600 posts
Posted: Saturday, February 14, 2009 - 12:23 PM UTC
Ok, I know I have been promissing pictures for a while! That being said I thought I would do some prep work before posting, probably tomorrow night! I mantioned earlier my misfortune while attempting to un-assemble the firewall from the engine supports. I don't know if this caused my subsequent fit problems or not so if Larsa will chime in it will be appreciated. the interior details, fuselage halves etc. assemble easily. All seems to line up fairly well. The upper cowl pieces on the other hand left a large gap in the front near the cowling, at least 1/8th of an inch. I tried everything I could and nothing I could do with alignment made a difference. I ended up dremeling-grinding away the engine parts that interfered with the fit. All is again well, but the result is ugly in photos. I had NO Intention of leaving the engine covers off, and nothing will be visible once all is assembled so no harm no foul. I should make it clear that I left off the parts that Roden says are not necessary if closing the cowls.
Again I am interested in knowing if this is my fault or an inherent problem with the kit. For about the 4th time I WILL post pictures, just don't expect to see a finely detailed engine assembly as it isn't there!
That is all for now,
RAGIII
Again I am interested in knowing if this is my fault or an inherent problem with the kit. For about the 4th time I WILL post pictures, just don't expect to see a finely detailed engine assembly as it isn't there!
That is all for now,
RAGIII

guitarlute101
Joined: December 18, 2006
KitMaker: 1,121 posts
AeroScale: 1,063 posts
Posted: Saturday, February 14, 2009 - 01:34 PM UTC
Rick,
I'll be happy to see anything you've got put together so far. I'd like to see some of the sub-assemblies or the detail on the wings. No worries about the difficulties you've had. Everyone here knows you're an excellent modeller and can fix any problems you run into. I much rather see someone fix a problem than just put the parts together from the instructions anyhow. Thanks for being willing to share your build. I look forward to learning a thing or two from you.
Mark

Kalt

Joined: June 14, 2006
KitMaker: 222 posts
AeroScale: 219 posts

Posted: Saturday, February 14, 2009 - 08:49 PM UTC
Don't worry Rick, take your time, this is the secret for a good build.
I always prefer to see an good model than an "Weekend" model but you kmow me, I suffer from a bad case of AMS....
I always prefer to see an good model than an "Weekend" model but you kmow me, I suffer from a bad case of AMS....
JackFlash
Joined: January 25, 2004
KitMaker: 11,669 posts
AeroScale: 11,011 posts
Posted: Saturday, February 21, 2009 - 05:37 AM UTC
Quoted Text
Don't worry Rick, take your time, this is the secret for a good build.
I always prefer to see an good model than an "Weekend" model but you kmow me, I suffer from a bad case of AMS....
Most of the good ones do.

thegirl

Joined: January 19, 2008
KitMaker: 6,743 posts
AeroScale: 6,151 posts
Posted: Sunday, February 22, 2009 - 10:42 AM UTC
I concur on that , your builds just leave me speechless !

CaptainA
Joined: May 14, 2007
KitMaker: 3,117 posts
AeroScale: 2,270 posts
Posted: Wednesday, February 25, 2009 - 01:12 PM UTC
Rick, I don't mind the wait to see your wonderful builds. With family, and work, builds often take some time. Most people can't dedicate 4-6 hours a day, like I do. If you are under to much pressure to perform, the hobby stops being fun. After coming home from work, and taking care of familial obligations, the last thing most people want to do is work on something else.
Enjoy your build.
Enjoy your build.

RAGIII
Joined: June 19, 2007
KitMaker: 604 posts
AeroScale: 600 posts
Posted: Saturday, February 28, 2009 - 03:22 PM UTC
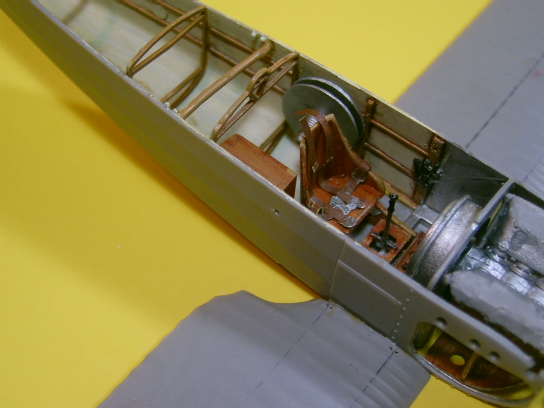
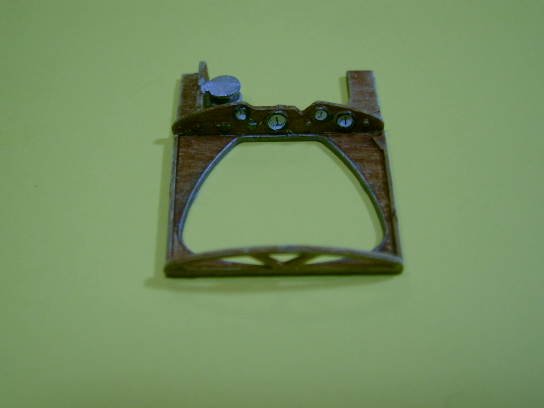
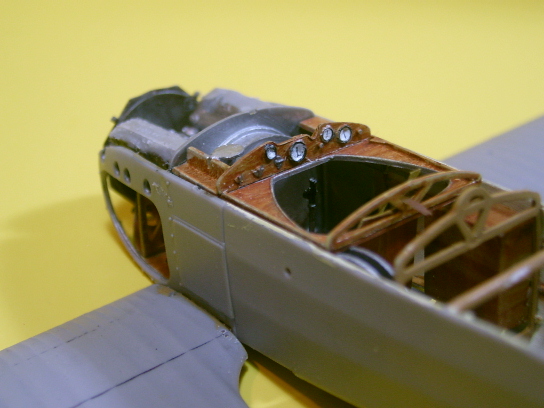
Well, here on the Very Last Day of the group build are the pictures. The first are overviews of the assembled fuselage engine assemblies. The last are the instrument panel and the upper fuselage and forward decking just sitting in place. More discussion to follow this posting.


More to come
RAGIII
More to come
RAGIII
RAGIII
Joined: June 19, 2007
KitMaker: 604 posts
AeroScale: 600 posts
Posted: Saturday, February 28, 2009 - 03:36 PM UTC
Quoted Text
Well, here on the Very Last Day of the group build are the pictures. The first are overviews of the assembled fuselage engine assemblies. The last are the instrument panel and the upper fuselage and forward decking just sitting in place. More discussion to follow this posting.
More to come
RAGIII
Some details will be added later, such as the internal bracing wires. Yes I should have done them earlier

The seat belts are paper with some generic PE buckles. I figured a little strech of the rules would work as I am obviously not going to make the deadline. In spite of how the engine looks I really like this kit. I think a more careful beginning( read as TAKE YOUR TIME) and a lot of thinning of the cowl panels and I might not have had to grind the Engine. Larsa will be able to prove this theory soon! The wood is done as usual with artist oils over polyscale.
You should note that I have added two plastic rods to the fuselage assembly. These were added to stretch the sides apart as I felt the overlap from the decking was too much to sand off. Probably more to come as I get the part numbers etc. straght in my mind. By the way I didn't worry too much about the interior detail aft of the cockpit. Test fitting has shown nothing will be visible, and I don't model for GOD!
RAGIII
RAGIII
Joined: June 19, 2007
KitMaker: 604 posts
AeroScale: 600 posts
Posted: Saturday, February 28, 2009 - 03:40 PM UTC


Panels and decking just set in place. Now the fit will be excellent once glued.
RAGIII
Repainted
Joined: April 04, 2006
KitMaker: 1,058 posts
AeroScale: 1,004 posts
Posted: Sunday, March 01, 2009 - 12:43 AM UTC
Hi RAGIII
You have come along way with build. Hopefully you can build this one with the cowls closed, or you have to recreate some off that the grinder took away. I like your woodworks so far and the linen colour is nice on the inside.
Just wonder if its possible to scratch an ammo belt for the drums, will that be seen when completed? Did you use Eduards French belts? The looking nice, would like if you could get any close pics off them.
This build looks promising indeed, and I know you can lift this one to the gem level as usual.
My build, I not near any pics for the moment, but they come, I promise. For the moment I'm working on Special Hobbys Nieuport Bebe
Larsa Q
guitarlute101
Joined: December 18, 2006
KitMaker: 1,121 posts
AeroScale: 1,063 posts
Posted: Sunday, March 01, 2009 - 12:59 AM UTC
Rick,
It's coming along nicely. Do the bottom wings keep good shape once attached to the fuselage?
Mark
RAGIII
Joined: June 19, 2007
KitMaker: 604 posts
AeroScale: 600 posts
Posted: Sunday, March 01, 2009 - 01:31 AM UTC
Quoted Text
Hi RAGIII
You have come along way with build. Hopefully you can build this one with the cowls closed, or you have to recreate some off that the grinder took away. I like your woodworks so far and the linen colour is nice on the inside.
Just wonder if its possible to scratch an ammo belt for the drums, will that be seen when completed? Did you use Eduards French belts? The looking nice, would like if you could get any close pics off them.
This build looks promising indeed, and I know you can lift this one to the gem level as usual.
My build, I not near any pics for the moment, but they come, I promise. For the moment I'm working on Special Hobbys Nieuport Bebe
Larsa Q
Thanks Larsa! Yes the cowl will be closed up! My plan from the start anyway. Nothing can be seen of the ground away engine parts once the cowl ring and upper panels are in place, I have checked. AS for the Ammo belt, I have an old pe fret from my scrap box that will be used for the spent shell belt on the left side. There is a small tray that this runs through moving towards the take up reel. This will be seen when everything is closed up! As for the loaded belt, no it will not be seen!
RAGIII
PS: I am hoping that Stephen will forgive my small pe transgression as the GB IS officially over.
RAGIII
Joined: June 19, 2007
KitMaker: 604 posts
AeroScale: 600 posts
Posted: Sunday, March 01, 2009 - 01:34 AM UTC
Quoted Text
Rick,
It's coming along nicely. Do the bottom wings keep good shape once attached to the fuselage?
Mark
There is absolutely no trouble fitting the lower wing. No bends at all. Thanks for the encouragement,
RAGIII
CaptainA
Joined: May 14, 2007
KitMaker: 3,117 posts
AeroScale: 2,270 posts
Posted: Sunday, March 01, 2009 - 08:39 AM UTC
Glad to see you are back into the build. It looks like it is going together well.
RAGIII
Joined: June 19, 2007
KitMaker: 604 posts
AeroScale: 600 posts
Posted: Monday, March 02, 2009 - 11:26 AM UTC
Quoted Text
Glad to see you are back into the build. It looks like it is going together well.
Thanks Carl,
I am overcoming my problems with the build." I shall Endeavor to Persevere"
RAGIII
RAGIII
Joined: June 19, 2007
KitMaker: 604 posts
AeroScale: 600 posts
Posted: Monday, March 02, 2009 - 12:31 PM UTC
I have begun the work of closing up the cowl panels. No problems have been encountered beyond my grinding away the engine that interfered, apparently my own fault! A little filler and sanding was used for the rear fuselage decking. I won't promise pictures for a few days as my work schedule is terrible!
RAGIII
RAGIII
JackFlash
Joined: January 25, 2004
KitMaker: 11,669 posts
AeroScale: 11,011 posts
Posted: Monday, March 02, 2009 - 03:17 PM UTC
Excellent Rick!
Kalt
Joined: June 14, 2006
KitMaker: 222 posts
AeroScale: 219 posts
Posted: Tuesday, March 03, 2009 - 01:46 AM UTC
Looking good, Rick !!
Cheers,
Claudio
Cheers,
Claudio
RAGIII
Joined: June 19, 2007
KitMaker: 604 posts
AeroScale: 600 posts
Posted: Thursday, March 05, 2009 - 11:54 AM UTC
Quoted Text
Looking good, Rick !!
Cheers,
Claudio
Thanks for the comment Claudio, and Stephen.
RAGIII
 |

WEB HOSTING BY


Copyright ©2021 AeroScale and Kitmaker Network, a subsidiary of Silver Star Enterprises
All Rights Reserved. Please read our Conditions of Use and Privacy Policy.
All Rights Reserved. Please read our Conditions of Use and Privacy Policy.