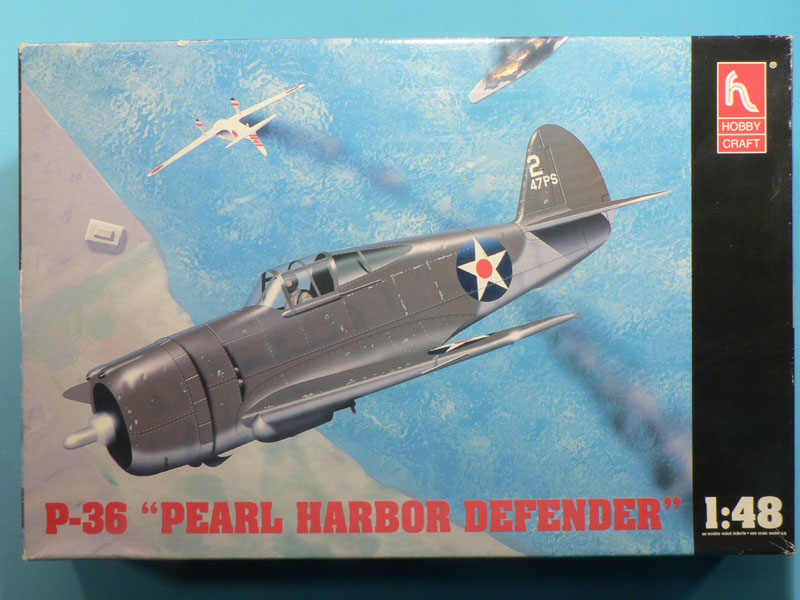
Week-end build: P-36 Pearl Harbor
Moselle, France
Joined: May 15, 2005
KitMaker: 5,653 posts
AeroScale: 4,347 posts
Posted: Friday, December 05, 2008 - 10:21 PM UTC
Hi all,
This will be my entry for the
Pearl Harbor Campaign which ends on Sunday 7th. This means the kit will have to be built in two days...

I'll try to do regular updates during the week-end.
Jean-Luc

Better think one hour and build five minutes...
Than think five minutes and build an hour!
Scotland, United Kingdom
Joined: February 07, 2008
KitMaker: 1,699 posts
AeroScale: 1,384 posts
Posted: Friday, December 05, 2008 - 11:35 PM UTC
good luck jean luc chocks awa'
Moselle, France
Joined: May 15, 2005
KitMaker: 5,653 posts
AeroScale: 4,347 posts
Posted: Saturday, December 06, 2008 - 02:38 AM UTC
Hi Jaypee!
Yes, let's take off...
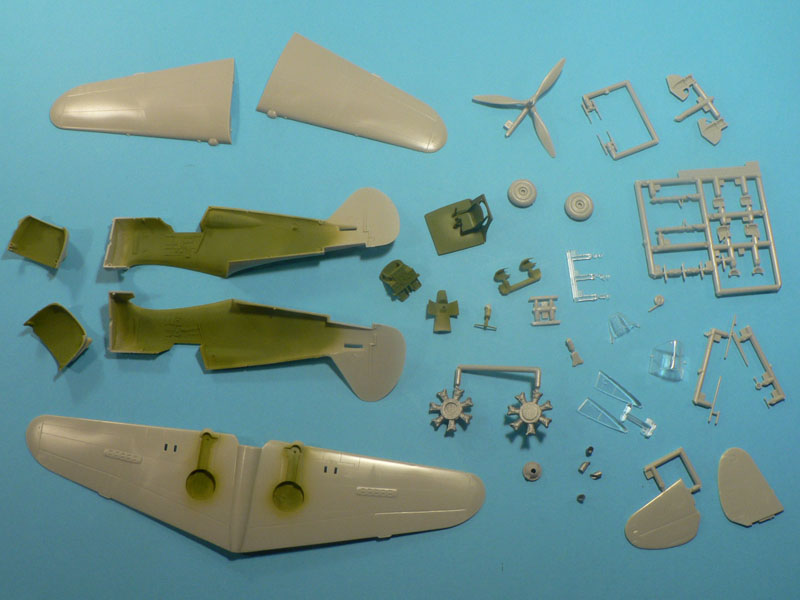
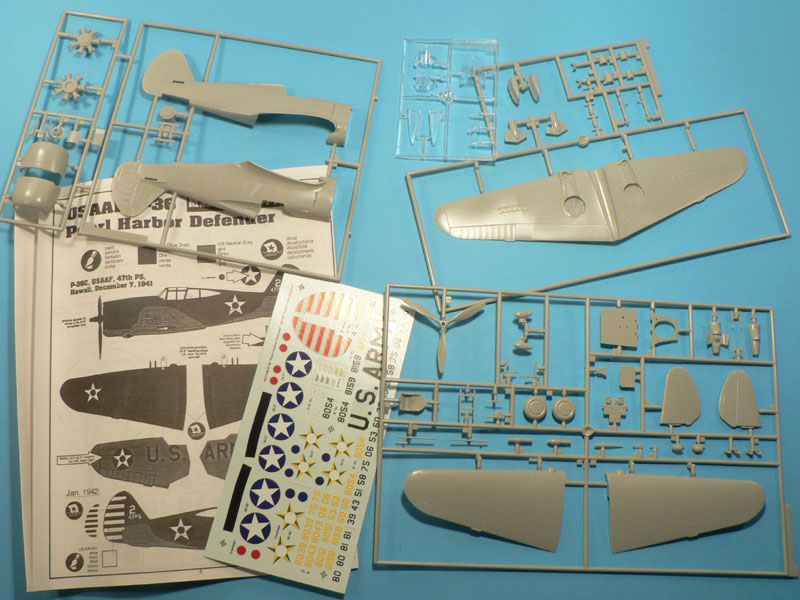
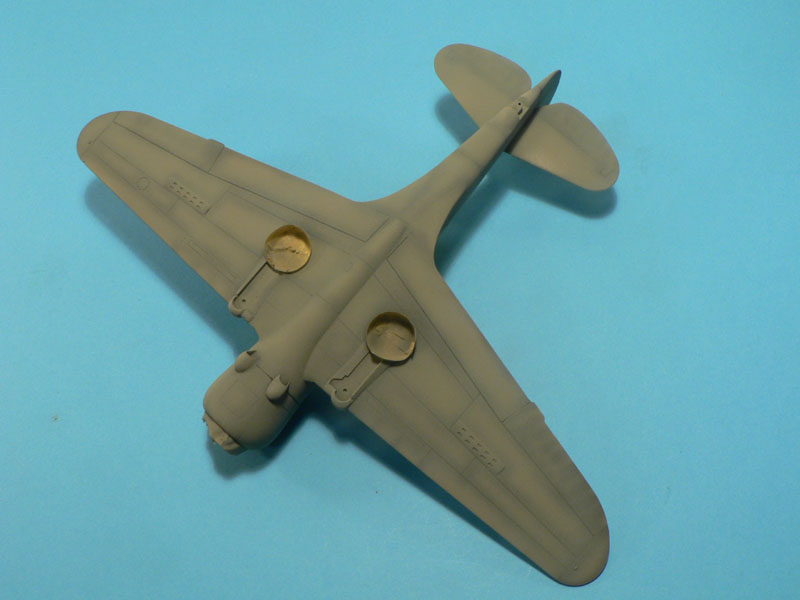
Not much done. I glued some pieces together, eliminated the optional parts and sprayed some basic colors...
Jean-Luc
Better think one hour and build five minutes...
Than think five minutes and build an hour!
Washington, United States
Joined: August 16, 2004
KitMaker: 603 posts
AeroScale: 565 posts
Posted: Saturday, December 06, 2008 - 03:17 AM UTC
jean luc,
i look forward to seeing what you do with this one. i know that kit can be built quick. with your talent it should look great.
joe
Veterans,
Thank You For Your Sacrifices,
Never To Be Forgotten
[img]http://i.imgur.com/1kRjMlc.jpg[/img]
New York, United States
Joined: April 04, 2006
KitMaker: 279 posts
AeroScale: 194 posts
Posted: Saturday, December 06, 2008 - 03:59 AM UTC
Jean Luc
Good luck. I have this bird on my bench right now and its anything but a weekend build..lol
Be careful of the wing fit as it looks like its going on nicely, only to have the finish product crooked. Its almost as if the fuselage leans to port on the wings. I wish I had pics to help illustrate, but my camera is currently not working. Please let em know if you have the same problem or if only my kit was warped.
Justen Hanna
IPMSUSA #45680
Proprietor, Section 8 Hobbies
"The distance between genius and insanity is measured only by success."
JPTRR
 Managing Editor
#051
Tennessee, United States
Joined: December 21, 2002
KitMaker: 7,772 posts
AeroScale: 3,175 posts
Posted: Saturday, December 06, 2008 - 05:36 AM UTC
Hi Jean-Luc,
Cob the throttle, stick aft, hair on fire and veins in your teeth! You go, man! You can do it!


BTW, I sent you a PM.
If they demand your loyalty, give them integrity; if they demand integrity, give them your loyalty.--Col John Boyd, USAF
Any plan where you lose your hat is a bad plan.
Moselle, France
Joined: May 15, 2005
KitMaker: 5,653 posts
AeroScale: 4,347 posts
Posted: Saturday, December 06, 2008 - 11:31 AM UTC
Hi all,
Thanks for the support guys... I will need it!
The cockpit area is done. Most of the work did go into the seatbelts. The red arrow points to what is supposed to be an oxygen bottle!

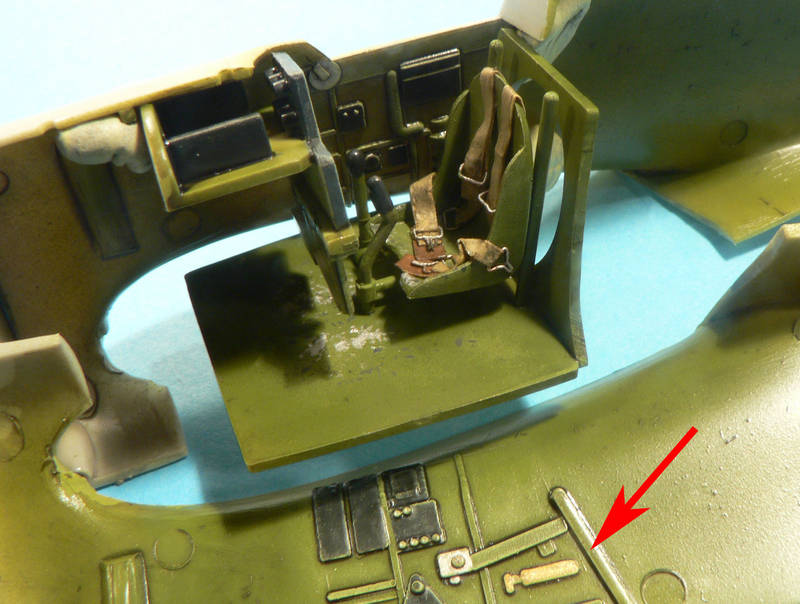
On the picture, the instrument panel and rudder pedals are fitted into position as per instructions. I think I will put the part further backward because the poor pilot would have no room for his legs...
Jean-Luc
P.S. Fred, PM received. Thanks!
Better think one hour and build five minutes...
Than think five minutes and build an hour!
Moselle, France
Joined: May 15, 2005
KitMaker: 5,653 posts
AeroScale: 4,347 posts
Posted: Saturday, December 06, 2008 - 12:38 PM UTC
Hi all,
Last update before I go to bed...
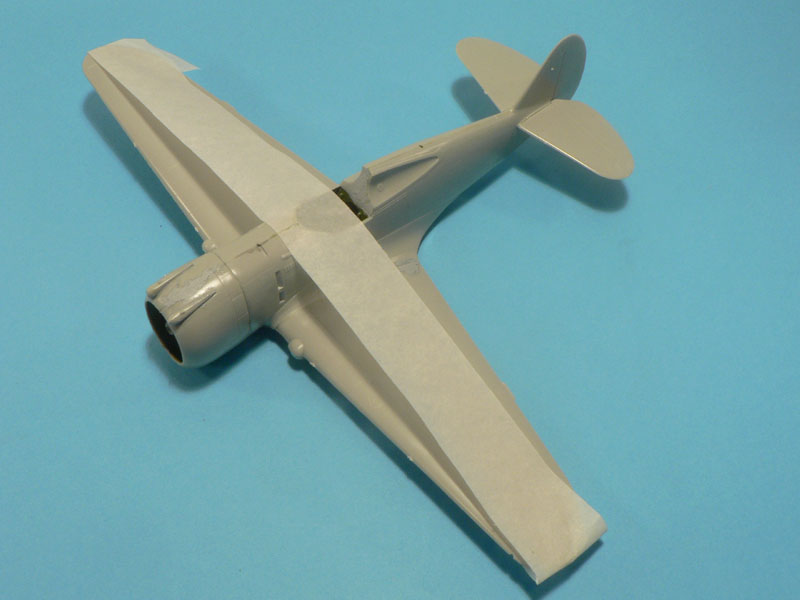
It looks like a plane now!

The fit isn't too bad. Justen, it seems I didn't encountered the same problem as you. I had to apply filler on the underside though. More pictures tomorrow...
Jean-Luc
Better think one hour and build five minutes...
Than think five minutes and build an hour!
JPTRR
Managing Editor #051
Tennessee, United States
Joined: December 21, 2002
KitMaker: 7,772 posts
AeroScale: 3,175 posts
Posted: Saturday, December 06, 2008 - 01:32 PM UTC
I'll have to send in pics of my H.C. RAF Mohawk--if I can find out which moving box it is in.

I have a P/E cockpit within. IIRC, the fuselage is joined, but I do not recall if the wings are on. Siderius, do you recall?
My zillionth 'next model' may be my Armée de l'Air Hawk 75.

If they demand your loyalty, give them integrity; if they demand integrity, give them your loyalty.--Col John Boyd, USAF
Any plan where you lose your hat is a bad plan.
Moselle, France
Joined: May 15, 2005
KitMaker: 5,653 posts
AeroScale: 4,347 posts
Posted: Saturday, December 06, 2008 - 11:45 PM UTC
Hi all,
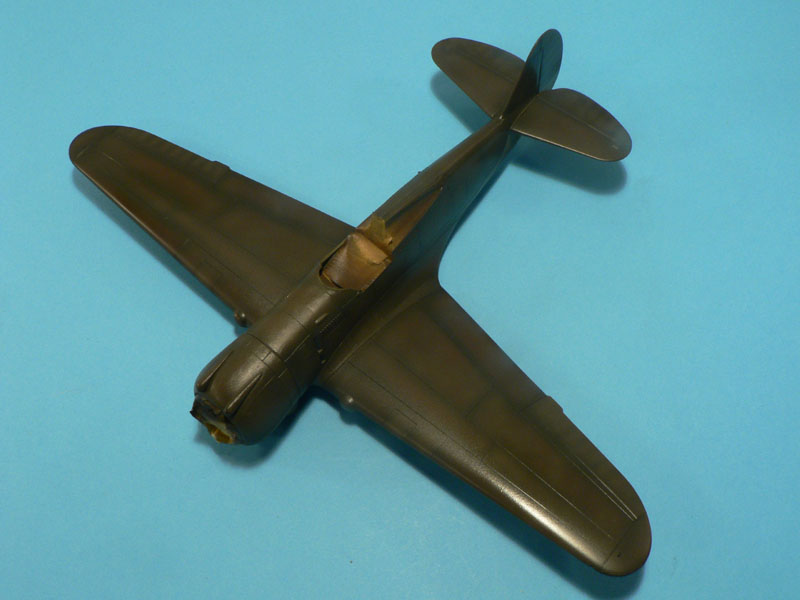
After some filling and sanding...
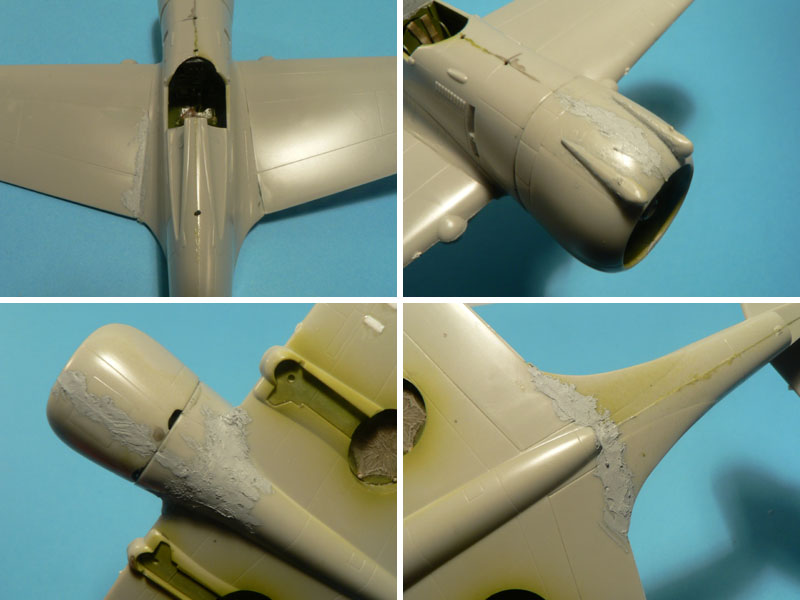
I'm ready to do the painting...
I'm not sure I'm going to make it before midnight...
Jean-Luc
Better think one hour and build five minutes...
Than think five minutes and build an hour!
Moselle, France
Joined: May 15, 2005
KitMaker: 5,653 posts
AeroScale: 4,347 posts
Posted: Sunday, December 07, 2008 - 05:00 AM UTC
Hi all,
The camouflage is done...
I already sprayed a coat of future...
Next step is applying the decals. Ii hope they will work well...
Jean-Luc
Better think one hour and build five minutes...
Than think five minutes and build an hour!
Germany
Joined: September 07, 2005
KitMaker: 5,609 posts
AeroScale: 5,231 posts
Posted: Sunday, December 07, 2008 - 05:09 AM UTC
You are a mad man , my friend!
looks good and if you refer to Hawaiian time you still have plenty of that
cheers
Steffen
DULCE ET DECORUM EST PRO HOBBY MORI
Idaho, United States
Joined: May 16, 2003
KitMaker: 895 posts
AeroScale: 457 posts
Posted: Sunday, December 07, 2008 - 05:57 AM UTC
Hello Jean Luc,
Great choice of kit for the build. If anyone can complete a model in two days it's you!
One thing I ran into with the same kit (built for "Fighters Under the Midnight Sun") the engine seemed to far back from the cowl opening and when test fitting I placed the prop shaft in and prop did rest on the cowling opening.
I do not know if the problem was with how I assembled the kit or if it was a manufacturer problem. I cut and shaped a disk the size of the engine mount and extended the engine further toward the cowl opening to "Fix" the problem.
I look forward to seeing it completed.
Sincerely,
Brian
There is only two kinds of fires. Those that use less than 500 gallons of water too extinguish and those that use WAY MORE!
Moselle, France
Joined: May 15, 2005
KitMaker: 5,653 posts
AeroScale: 4,347 posts
Posted: Sunday, December 07, 2008 - 07:18 AM UTC
Hi Steffen and Brian,
Quoted Text
looks good and if you refer to Hawaiian time you still have plenty of that
Isn't it the contrary?

Quoted Text
I do not know if the problem was with how I assembled the kit or if it was a manufacturer problem. I cut and shaped a disk the size of the engine mount and extended the engine further toward the cowl opening to "Fix" the problem
Yes, I have the same problem on my model. The engine is too far back...

The decals are on the model. They worked fine...
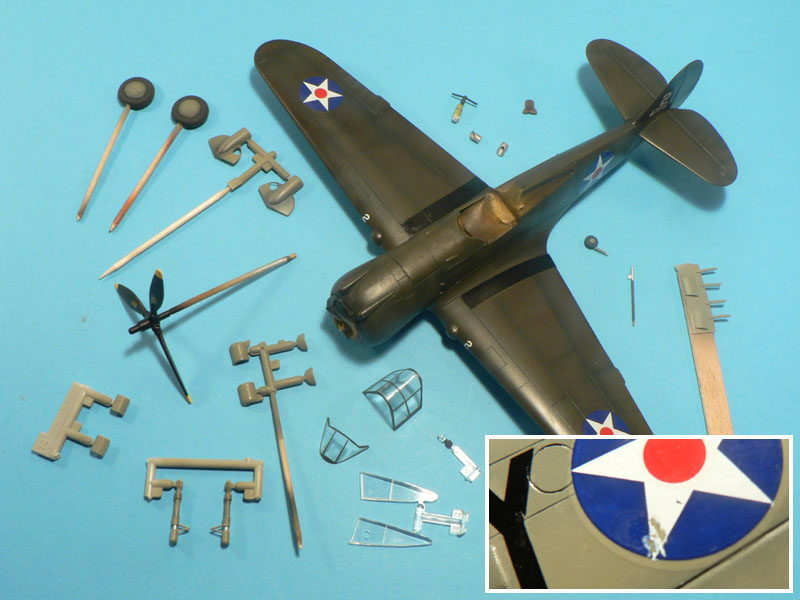
However, I must have used too much setting solution (Mr.Mark Softer). I touched one decal on the underside and it was as if I wiped away some fresh paint!
I will wait at least one night to let the decals dry before doing the weathering. This means I won't finish the model today but only tomorrow...
Jean-Luc
Better think one hour and build five minutes...
Than think five minutes and build an hour!
Germany
Joined: September 07, 2005
KitMaker: 5,609 posts
AeroScale: 5,231 posts
Posted: Sunday, December 07, 2008 - 07:52 AM UTC
hI Jean-Luc
Hawaii is UTC -10h .. French Time is UTC +1 (IIRC) .. soo if you finish by 11 AM tomorrow (local) you are safe (of course my damaged brain can fool me) .. .guess you will get an extension if not
cheers
Steffen
DULCE ET DECORUM EST PRO HOBBY MORI
Michigan, United States
Joined: February 11, 2008
KitMaker: 311 posts
AeroScale: 278 posts
Posted: Sunday, December 07, 2008 - 05:07 PM UTC
Jean-Luc:
I am amazed how fast you have gotten this far. I takes me months to finish even a simple kit. It looks great
Taylor
Current Builds:
FW 190 D (Butcher Bird)
P61A (Night Stalkers)
P47D (CaveTonitrum)
Sea Fury ( Airedale Navy)
S-199 for finish the job again on Armorama
Merlin
Senior Editor #017
United Kingdom
Joined: June 11, 2003
KitMaker: 17,582 posts
AeroScale: 12,795 posts
Posted: Sunday, December 07, 2008 - 10:20 PM UTC
Hi Jean-Luc
Great stuff as usual! Even without Aeroscale, I'd never get so much done in a weekend - after shopping, housework and all the rest of it, it feels like time to turn round and go back to work again!

I wouldn't weather the P-36 too much - remember that although this was 1941, it was effectively a "pre-war" aircraft and probably still kept parade-ground fresh for inspection.
After Pearl Harbour, it would be a very different matter in the scramble to mobilize...
All the best
Rowan
BEWARE OF THE FEW...
As I grow older, I regret to say that a detestable habit of thinking seems to be getting a hold of me. - H. Rider Haggard
Moselle, France
Joined: May 15, 2005
KitMaker: 5,653 posts
AeroScale: 4,347 posts
Posted: Sunday, December 07, 2008 - 10:23 PM UTC
Hi all,
Thanks for the kind words and the support...

Rowan, I'm afraid it's too late for the weathering. I've added some to hide the flaws of the build!


Well, it wasn't quite a week-end build but almost...
Jean-Luc
Better think one hour and build five minutes...
Than think five minutes and build an hour!
Western Australia, Australia
Joined: June 05, 2007
KitMaker: 2,166 posts
AeroScale: 105 posts
Posted: Sunday, December 07, 2008 - 10:40 PM UTC
Still looks fantastic mate, and gee was that quick!
Is it 100% finished?
Chas
Like Military History? Check out the History Club forum here on the Kitmaker Net.
Merlin
Senior Editor #017
United Kingdom
Joined: June 11, 2003
KitMaker: 17,582 posts
AeroScale: 12,795 posts
Posted: Sunday, December 07, 2008 - 10:47 PM UTC
Hi again Jean-Luc
"... flaws of the build"! It looks like one that any of us would be proud of!
All the best
Rowan
BEWARE OF THE FEW...
As I grow older, I regret to say that a detestable habit of thinking seems to be getting a hold of me. - H. Rider Haggard
Bern, Switzerland
Joined: April 17, 2008
KitMaker: 264 posts
AeroScale: 88 posts
Posted: Monday, December 08, 2008 - 01:24 AM UTC
Fantastic!
It would have took me about a month to finish this up half as good as your plane!
Keep it going

Moselle, France
Joined: May 15, 2005
KitMaker: 5,653 posts
AeroScale: 4,347 posts
Posted: Monday, December 08, 2008 - 03:19 AM UTC
Hi all
Well, there are no parts left in the box if this is what you mean...
More seriously, I may have forgot a couple of things. If it's the case, don't hesitate to tell me.
Jean-Luc
Better think one hour and build five minutes...
Than think five minutes and build an hour!
JPTRR
Managing Editor #051
Tennessee, United States
Joined: December 21, 2002
KitMaker: 7,772 posts
AeroScale: 3,175 posts
Posted: Monday, December 08, 2008 - 04:43 PM UTC
Jean-Luc,
Great job as usual!
Did the instruction's history state whether this was the plane (one of them) flown by Lt Harry W. Brown?
IIRC, Brown flew multiple missions. I recall he never had ammo in his .50 cal. He related that on one flight, after shooting up a Kate or a Val, his gun jammed or ran out of ammo. A Japanese plane came after him and he climbed vertical into a cloud. He remarked of subsequently stalling out..."Want to know who invented the Lomcevak? Try stalling a P-36 in a cloud!"
If they demand your loyalty, give them integrity; if they demand integrity, give them your loyalty.--Col John Boyd, USAF
Any plan where you lose your hat is a bad plan.
Moselle, France
Joined: May 15, 2005
KitMaker: 5,653 posts
AeroScale: 4,347 posts
Posted: Tuesday, December 09, 2008 - 07:17 AM UTC
Hi Fred,
Quoted Text
Did the instruction's history state whether this was the plane (one of them) flown by Lt Harry W. Brown?
No, but a Squadron book has a profile of the same aircraft and it is indeed the one of Lt Harry W. Brown. I've read in a french publication that he, and some of his comrades, have been chased by a japanese aircraft during 10 mn... Brown was driving a car! Remember the scene in the "Pearl Harbor" movie?
In the article, Brown himself confirmed that many P-36s only had one .30 cal. gun available at that time. The .50 cal ammo were destined to the P-40s only! Still he managed to shot down two japanese aircraft!

Jean-Luc
Better think one hour and build five minutes...
Than think five minutes and build an hour!
Indiana, United States
Joined: May 14, 2007
KitMaker: 3,117 posts
AeroScale: 2,270 posts
Posted: Wednesday, December 10, 2008 - 11:03 AM UTC
Great build.
I have a friend who had two brothers at Pearl. During the attack, an armorer refused to release weapons and ammo without written authorization. The brothers mannages to obtain said weapons and ammo after rendering the armorer unconscious. Just a little side story.
"Treat 'em Rough", Current Builds--Wingnut Rumpler
I am frequently seen with blood shot eyes from staying up past my nap time to get the right colour scheme on my latest WWI model?