the Etrich Taube strip down
Wien, Austria
Joined: October 19, 2007
KitMaker: 77 posts
AeroScale: 72 posts
Posted: Monday, January 26, 2009 - 07:00 AM UTC
As recomended I will start a new thread with this item
The topic is building a factory diaroma of the Fischamend Aircraft Factory producing an Etrich Taube. In the center there will be a strip down bird in 1/48 scale.
I don`t know why but this time I had the intention to build this model mainly out of plastic.
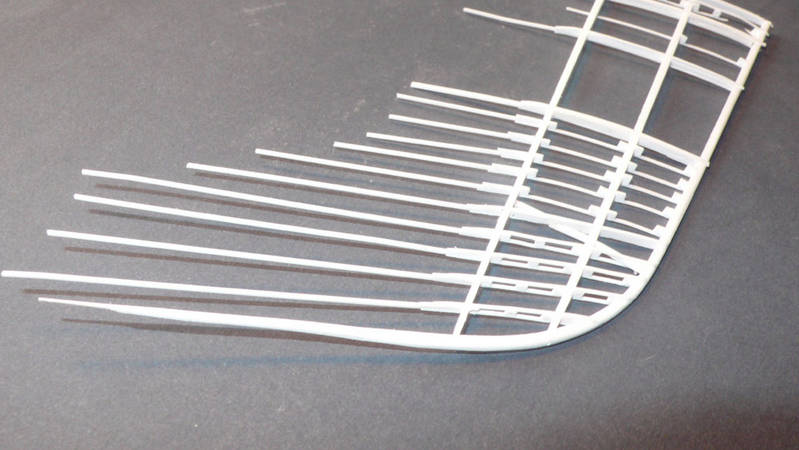
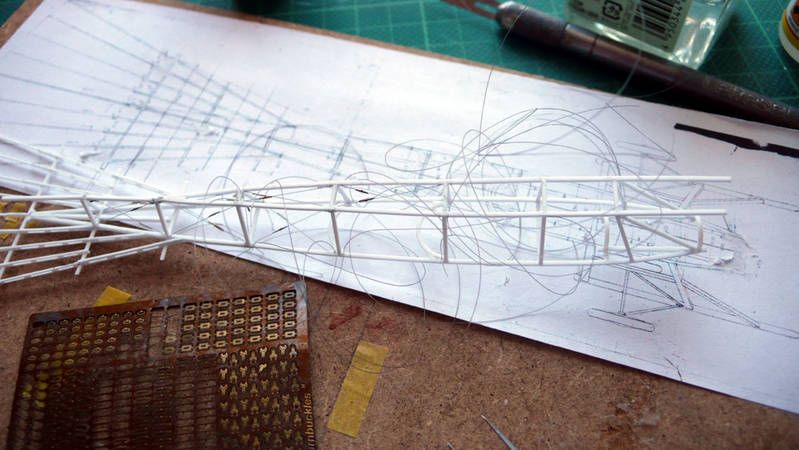
Here are the first steps of building the right wing


next update will follow soon
Colorado, United States
Joined: January 25, 2004
KitMaker: 11,669 posts
AeroScale: 11,011 posts
Posted: Monday, January 26, 2009 - 07:25 AM UTC
Most impressive Peter. Are you going to master this and offer it as a kit?
". . .The most important thing is to know why you build and then get the most that you can out of building." via D.D.
Wien, Austria
Joined: October 19, 2007
KitMaker: 77 posts
AeroScale: 72 posts
Posted: Monday, January 26, 2009 - 09:16 AM UTC
Hi Stephen
Not as a strip down... maybe as fotoetch.
But 3 different types of Taubes are already in progress to become kits in 1/48 scale
Wien, Austria
Joined: October 19, 2007
KitMaker: 77 posts
AeroScale: 72 posts
Posted: Monday, January 26, 2009 - 09:33 AM UTC
Here are the next few steps. This was not the result of a few days as you can imagine. I took me some weeks to get this far.
The difficulty is to keep this thin material in the required shape. It always wraps. Sometimes i wish to have 8 arms with tweezer fingers, but unfortunately I have to struggel with my hands as they are.... with much to thick clumsy fingers.
This piece is almost built like the original except that plastic is used instead of wood, what a shame.

West Virginia, United States
Joined: December 18, 2006
KitMaker: 1,121 posts
AeroScale: 1,063 posts
Posted: Monday, January 26, 2009 - 09:38 AM UTC
Excellent work, Peter. This is very inspiring.
Mark
Alberta, Canada
Joined: January 19, 2008
KitMaker: 6,743 posts
AeroScale: 6,151 posts
Posted: Monday, January 26, 2009 - 11:42 AM UTC
Very nice indeed , awesome work !
Wien, Austria
Joined: October 19, 2007
KitMaker: 77 posts
AeroScale: 72 posts
Posted: Thursday, January 29, 2009 - 11:43 AM UTC
rigging-madnes???
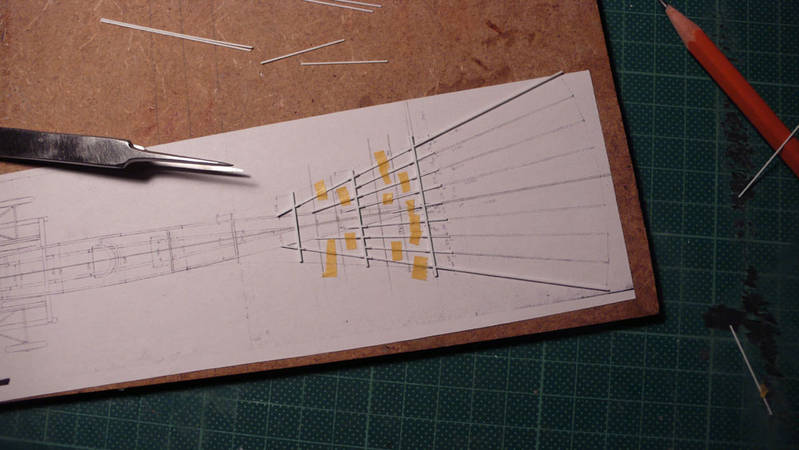
this what needs all my concentration for the last few days. The internal wire bracing. Drilling all the holes with a 0,2mm drill and then how to find the matching end of wire.
It takes hours and hours.
Colorado, United States
Joined: January 25, 2004
KitMaker: 11,669 posts
AeroScale: 11,011 posts
Posted: Thursday, January 29, 2009 - 05:12 PM UTC
And people think I do details. Peter, you are one of the finest modelers I have ever had the pleasure to watch. Model On!
". . .The most important thing is to know why you build and then get the most that you can out of building." via D.D.
Wien, Austria
Joined: October 19, 2007
KitMaker: 77 posts
AeroScale: 72 posts
Posted: Friday, January 30, 2009 - 09:50 AM UTC
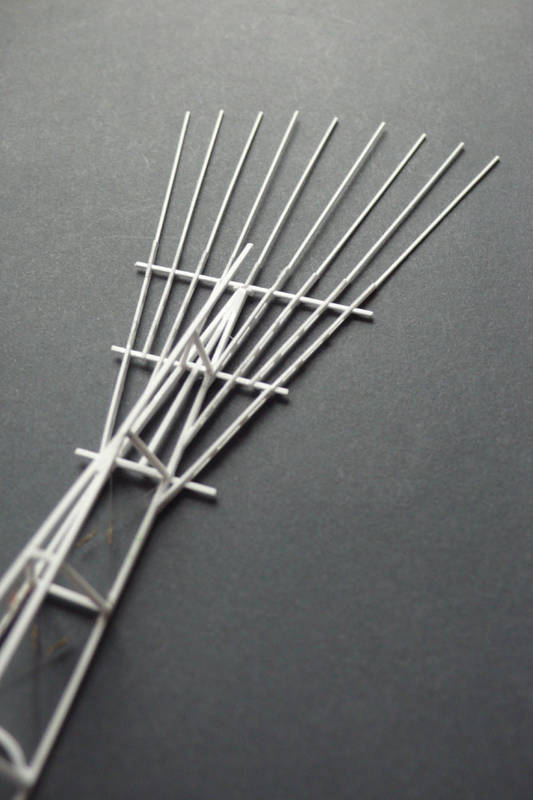
Scratch modelling is always 2 steps ahead an one back, especially for me. Dry and testfits are often required...... and finally not always but very often the parts don`t fit.There lives a ghost in the models. Here you see the right wing almost finished it only needs sanding and the trailing edge wire.
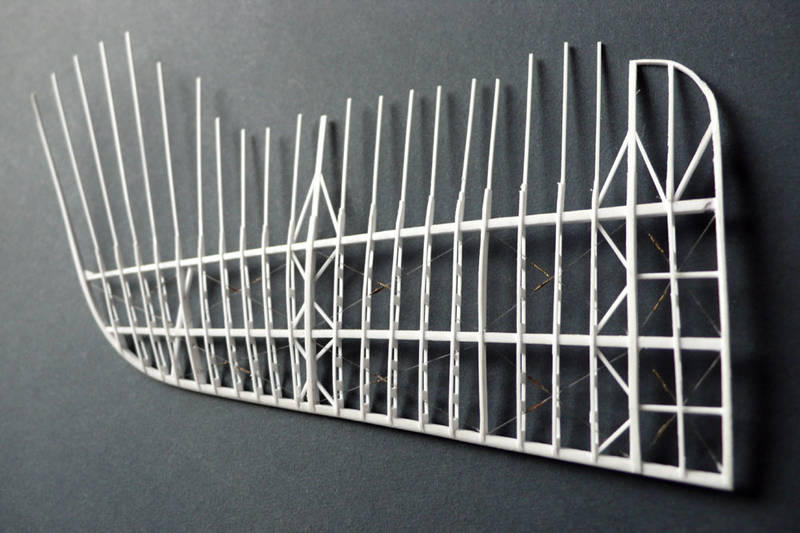
The test fit of the fuselage with the wing shows good results in this case.

Victoria, Australia
Joined: November 26, 2006
KitMaker: 608 posts
AeroScale: 602 posts
Posted: Friday, January 30, 2009 - 10:36 AM UTC
Peter,
this is truly amazing and inspirational stuff!
It is obvious what you are using for the main structural components... What are you using for rigging and turnbuckles?
Cheers,
Hugh
Alberta, Canada
Joined: January 19, 2008
KitMaker: 6,743 posts
AeroScale: 6,151 posts
Posted: Friday, January 30, 2009 - 02:32 PM UTC
WOW , very nicely done indeed ! Looking forward to more ...........
Wien, Austria
Joined: October 19, 2007
KitMaker: 77 posts
AeroScale: 72 posts
Posted: Saturday, January 31, 2009 - 09:55 PM UTC
Thank you all for your encouraging comments. I truly hope you will find some ideas in this thread.
Maybe you have some suggestions for doing parts different or easier.
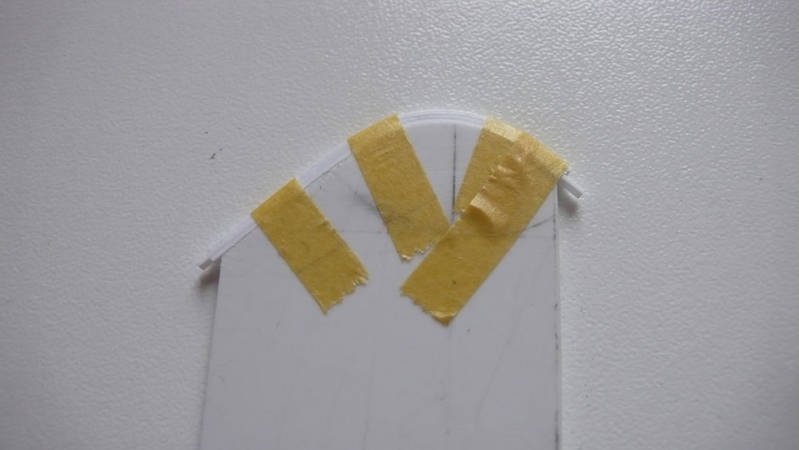
This series of pics shows how I made the tailskid. Its the same method as laminating wood. 3 pieces of evergreen strips are glued together over a former. After drying this thin piece keeeps it round shape. Some smaller parts added after sanding and its done. Oh, to be honest all this steps are not to difficult but time consuming.
I was asked what materials I use:
1. there is plastic from sheets and Evergreen strips in all dimensions.
2. for parts more strength is neede I usually take brass. It is easy to handle and to solder.
3. for rigging I usually take nylon thread or fishing wire. this material is available in all requiered thicknesses and so far I had the best results with that materials. But anyway rigging is always a thrill.
4. for turnbuckles used on the internal bracing I took the Part fotoetchings in 1/72 scale. I know there are other methods, but in this case I am happy with them.

Wien, Austria
Joined: October 19, 2007
KitMaker: 77 posts
AeroScale: 72 posts
Posted: Monday, February 02, 2009 - 11:04 AM UTC
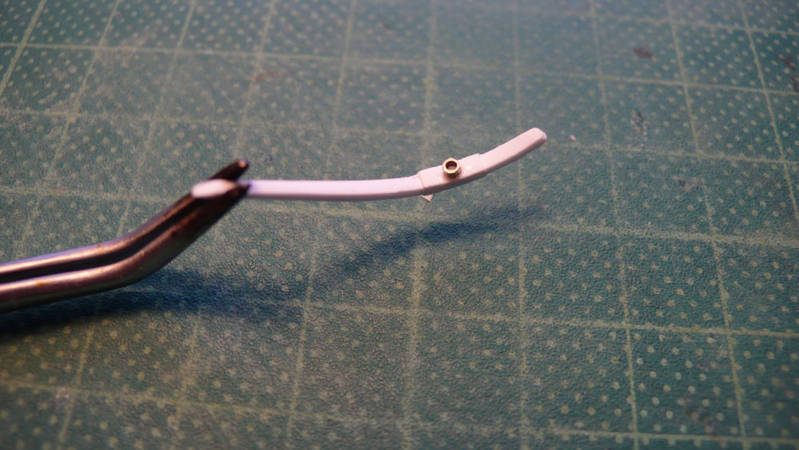
I spent my weekend with some very difficile parts. The "Taube" had split rudders-one upper and one lower. In the original they have been made of welded steel tubes.
Plastic as material seems to weak for me so I decieded to make them similar to the origin out of soldered brass and steel wire.
On the pics this parts seem huge but in fact I didn´t know where to put the tweezers. The thicker brass rod is 0,4 mm the steel wire 2,5mm and the rigging 0,1 cooper wire. I hope you like this little ones as I do.

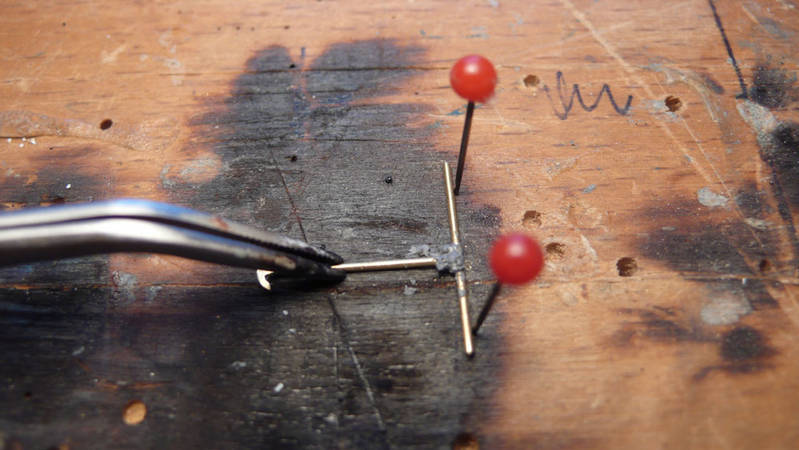
prepared for soldering
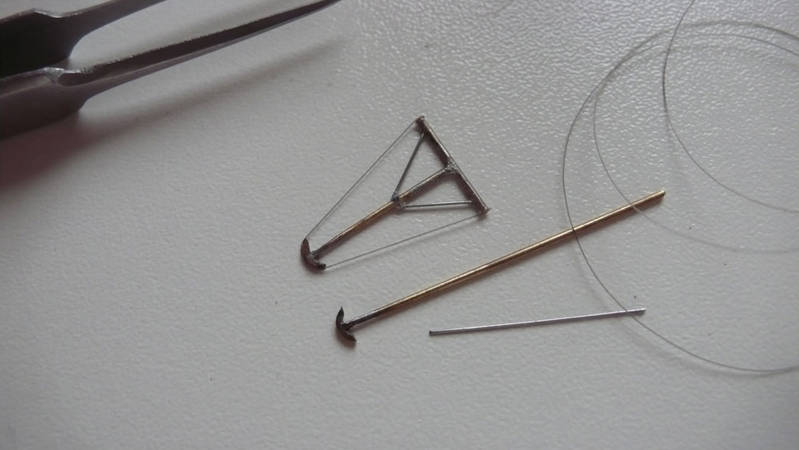
one finshed- one in parts

and both finshed

West Virginia, United States
Joined: December 18, 2006
KitMaker: 1,121 posts
AeroScale: 1,063 posts
Posted: Monday, February 02, 2009 - 12:51 PM UTC
Wow!!! Incredible work. Those are extremely impressive. Can't wait to see more.
Mark
Colorado, United States
Joined: January 25, 2004
KitMaker: 11,669 posts
AeroScale: 11,011 posts
Posted: Monday, February 02, 2009 - 01:35 PM UTC
Beautiful. Simply beautiful!
". . .The most important thing is to know why you build and then get the most that you can out of building." via D.D.
Alberta, Canada
Joined: January 19, 2008
KitMaker: 6,743 posts
AeroScale: 6,151 posts
Posted: Tuesday, February 03, 2009 - 02:52 PM UTC
I like it ! I like it a lot ! Will have to add this to the list of projects future . Can't wait to see more ........................
Wien, Austria
Joined: October 19, 2007
KitMaker: 77 posts
AeroScale: 72 posts
Posted: Wednesday, February 04, 2009 - 07:54 PM UTC
Thank you Terri, Stephen and Mark for your kind comments! They help a lot going on!
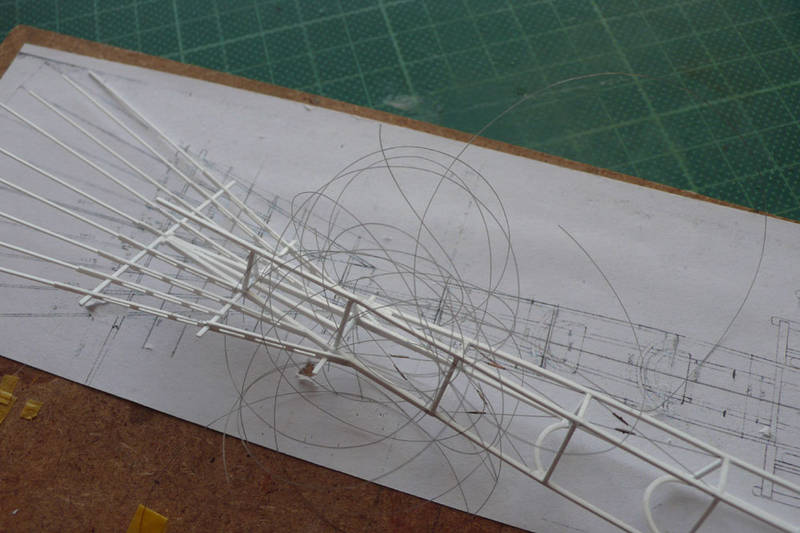
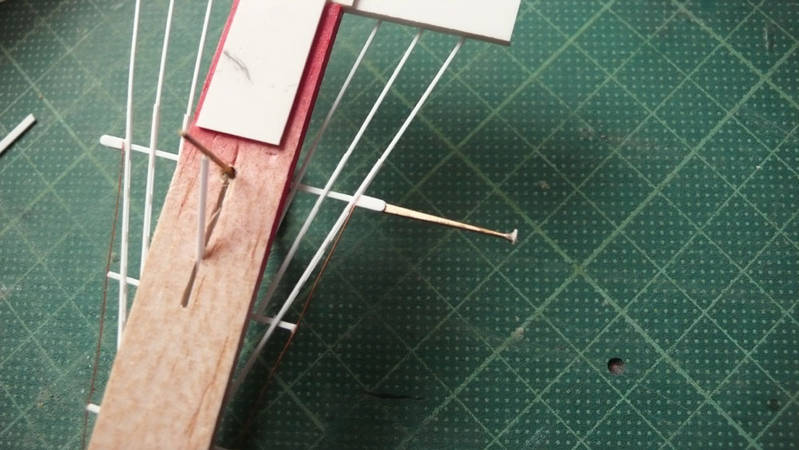
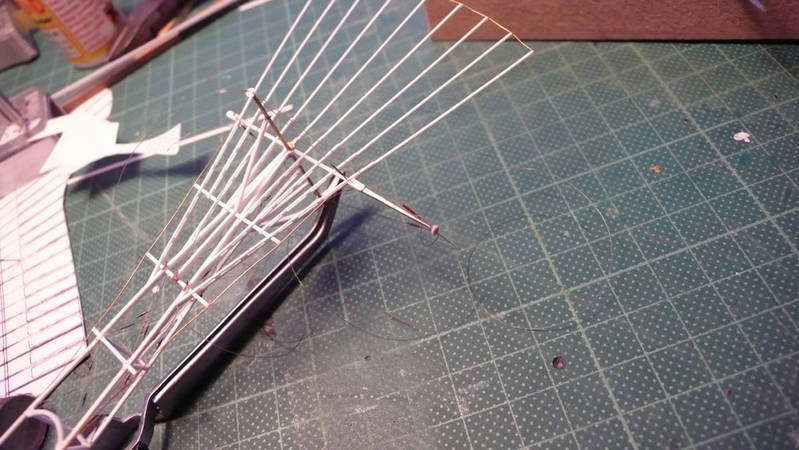
Now the time consuming cross bracing of the fuselage is finished. I never did a model before with such an intense rigging.
The most difficult part was avoid wraping while tightening the wire. But finally it is done
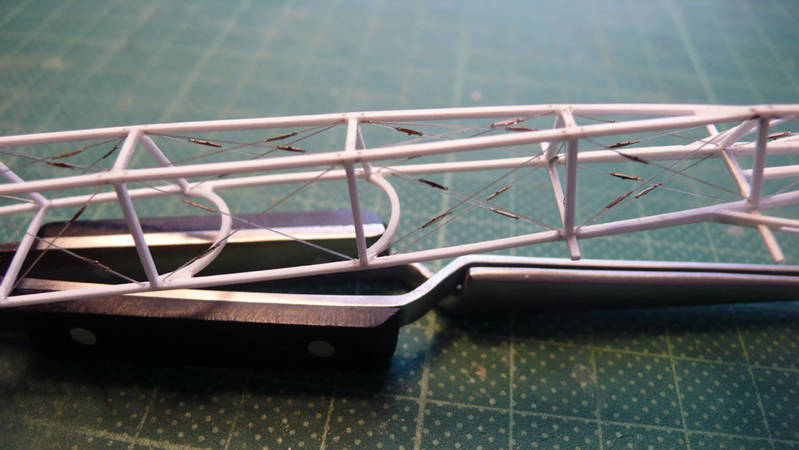
For size information, the frame work is made with 0,75/0,75 mm evergreen
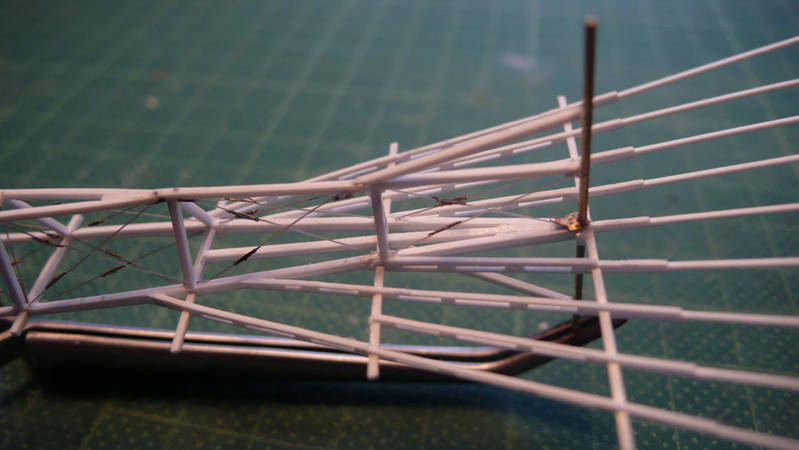
The ribs of the tailplane consist of following material: lower cord 0,25/05, distance block and tail spar 0,5/05 and the upper cord is again 0,25/0,25mm.
Alberta, Canada
Joined: January 19, 2008
KitMaker: 6,743 posts
AeroScale: 6,151 posts
Posted: Thursday, February 05, 2009 - 02:08 AM UTC
Awesome Peter ! Shaping up very nicely . What did you use for your turnbuckles ?
Mendoza, Argentina
Joined: June 14, 2006
KitMaker: 222 posts
AeroScale: 219 posts
Posted: Thursday, February 05, 2009 - 07:06 PM UTC
Amazing work Peter !!!

I can't wait to see it finished
I have always imagined that Paradise will be a kind of library.
Siempre imagine que el paraíso sería algún tipo de biblioteca.
Jorge Luis Borges
Wien, Austria
Joined: October 19, 2007
KitMaker: 77 posts
AeroScale: 72 posts
Posted: Friday, February 06, 2009 - 09:20 AM UTC
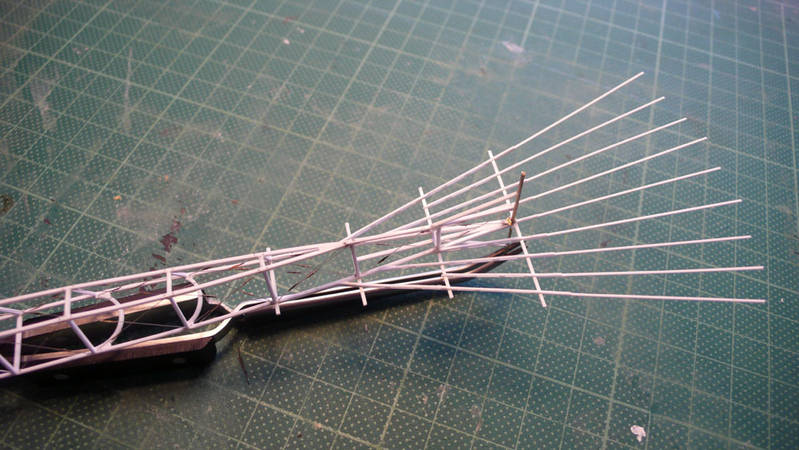
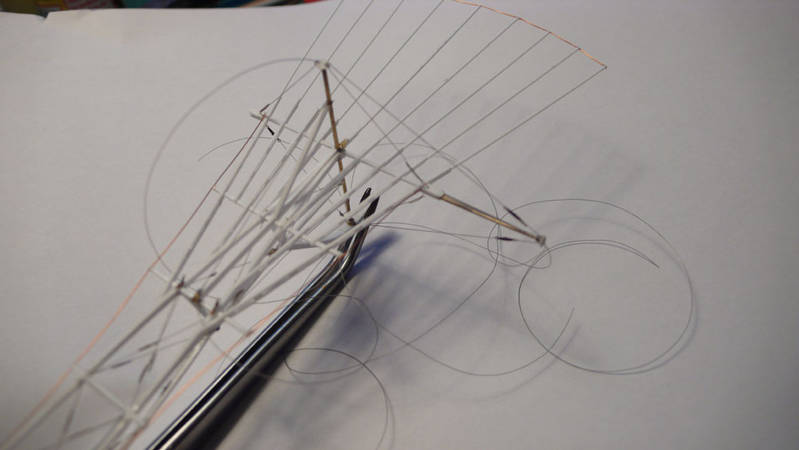
I have built a Taube much earlier in my modelling career. But I never built a model neither ship nor plane with such an intens rigging as this skull of a Taube.
One of the most difficult parts is rigging the tailplane and I am sweating blood and tears. The thin plastic wraps in every unwanted direction.
Wien, Austria
Joined: October 19, 2007
KitMaker: 77 posts
AeroScale: 72 posts
Posted: Friday, February 06, 2009 - 09:31 AM UTC
Just for refrehsing my memories here is a pic of this erly built of mine The A/H military Type Series A.II (Fd) 72.12.
this model was made long before the release of the Copper State Taube and was a havy conversion of the Flashback kit.

It is not as perfect as it could be but I still love it.
West Virginia, United States
Joined: December 18, 2006
KitMaker: 1,121 posts
AeroScale: 1,063 posts
Posted: Friday, February 06, 2009 - 01:21 PM UTC
Looking great, Peter. Keep those pictures coming. This is an excellent learning experience for all of us. Thanks for sharing your remarkable talents.
Mark
Rigas, Latvia
Joined: July 04, 2007
KitMaker: 268 posts
AeroScale: 245 posts
Posted: Friday, February 06, 2009 - 09:40 PM UTC
This is really amazing and inspiring!

Colorado, United States
Joined: January 25, 2004
KitMaker: 11,669 posts
AeroScale: 11,011 posts
Posted: Saturday, February 07, 2009 - 04:37 AM UTC
". . .The most important thing is to know why you build and then get the most that you can out of building." via D.D.

#001
California, United States
Joined: February 09, 2002
KitMaker: 1,726 posts
AeroScale: 89 posts
Posted: Saturday, February 07, 2009 - 07:44 AM UTC
Remarkable craftsmanship. Probably be relatively easy for you to build this 1:1 after doing it with such detail in this scale

Cheers,
Charles


