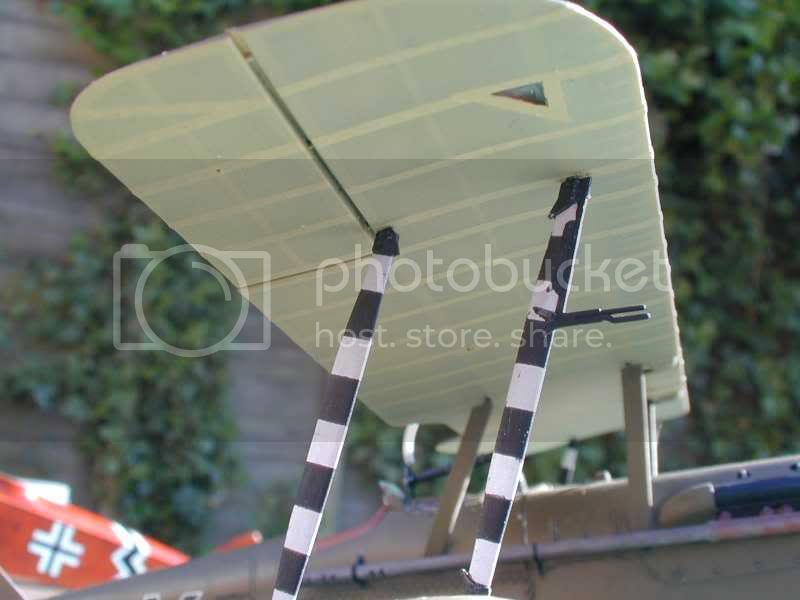
Well Keith my friend , finally some pic's with paint on the parts ! Very impressive . The pre-shading on the lower wings turned out great , excellent job done on that . top part on the wing are you going to do post shading ? Great heads up on the decals fit problems . You could have over coated the Roden decals with gloss lacquer and they would fall a part .
Nice twink on the guns brings new life to them ! Looking forward to seeing more of this project come together ....................................
Cheers
Early Aviation
Discuss World War I and the early years of aviation thru 1934.
Hosted by Jim Starkweather
WNW GB 2009 - 10 SE5a Keith
thegirl
Alberta, Canada
Joined: January 19, 2008
KitMaker: 6,743 posts
AeroScale: 6,151 posts
Joined: January 19, 2008
KitMaker: 6,743 posts
AeroScale: 6,151 posts
Posted: Tuesday, May 12, 2009 - 04:56 AM UTC
Kalt
Mendoza, Argentina
Joined: June 14, 2006
KitMaker: 222 posts
AeroScale: 219 posts
Joined: June 14, 2006
KitMaker: 222 posts
AeroScale: 219 posts
Posted: Tuesday, May 12, 2009 - 05:50 AM UTC
Impressive, especially the preshading !
and what a pity about the decals, they really look too big. Apparently we are not having luck with the decals of our 1/32 WWI kits. After all, Wingnuts kits were made by humans ......
Cheers,
Claudio
and what a pity about the decals, they really look too big. Apparently we are not having luck with the decals of our 1/32 WWI kits. After all, Wingnuts kits were made by humans ......
Cheers,
Claudio
JackFlash
Colorado, United States
Joined: January 25, 2004
KitMaker: 11,669 posts
AeroScale: 11,011 posts
Joined: January 25, 2004
KitMaker: 11,669 posts
AeroScale: 11,011 posts
Posted: Tuesday, May 12, 2009 - 06:47 AM UTC
Excellent preshading. Is the kit meeting your expectations?
Kornbeef
England - South East, United Kingdom
Joined: November 06, 2005
KitMaker: 1,667 posts
AeroScale: 1,551 posts
Joined: November 06, 2005
KitMaker: 1,667 posts
AeroScale: 1,551 posts
Posted: Tuesday, May 12, 2009 - 07:18 AM UTC
Quoted Text
Excellent preshading. Is the kit meeting your expectations?
Stephen,
Yes in all aspects apart from the decalling...I have the opposite problem with the LVG, I would be interested to see if anyone else notices the same.
But kitwise the build is beautiful, any problems I have had have been of my making. Tolerances are very tight... a coat of paint really does stop things fitting it is that tight...
Detail is good, simplified in places of course but realistically if not building to show it looks more than good enough, peering into the gloom of the cockpit. a lot of detail in the cockpit could be improved of course if it was wished to do so. Honestly the level of detail on the outside would detract the eye from peering in. Strangely the magneto starter is omitted even though attention is drawn to it in a pic in the booklet.
the Only part that I think is poor is part a34 the panel beneath the engine. all references I have found show a different arrangement of slots, 4 pairs of even slots in rows, where the kit has 4 width wide slots similar to the SE5 but of varying size and position and its cast oddly it may well be right though.
there are a few areas where detail could be improved, I canimagine a new resin rad grill with finer detail as Mastercastr brought out for the Roden Viper SE5a maybe resin guns ...not that there is anything much wrong the kit ones that a little time and patience and brass tube cant sort out.
As I stated the decalling is the big bugbear for me.....I hadnt realised till the wings were done as I left the fuselage till last....cutting the individual elements apart to cut down on any silvering I set the K's in place and only when it came to the roundels did it dawn on me.
A shame but one I will have to live with.... the wings were sealed before I knew.
guitarlute101
West Virginia, United States
Joined: December 18, 2006
KitMaker: 1,121 posts
AeroScale: 1,063 posts
Joined: December 18, 2006
KitMaker: 1,121 posts
AeroScale: 1,063 posts
Posted: Tuesday, May 12, 2009 - 08:17 AM UTC
Keith,
Great work on the preshade. Great work overall. I stil have this one on the side. I'm glad you pointed out the decal issue.
I really, really like the loose fabric look. I don't belive it's been done on any other production model, has it?
Mark
DAK66
Tennessee, United States
Joined: April 28, 2006
KitMaker: 286 posts
AeroScale: 45 posts
Joined: April 28, 2006
KitMaker: 286 posts
AeroScale: 45 posts
Posted: Tuesday, May 12, 2009 - 09:52 AM UTC
Great build Kornbeef the wing technique is is awesome
Kalt
Mendoza, Argentina
Joined: June 14, 2006
KitMaker: 222 posts
AeroScale: 219 posts
Joined: June 14, 2006
KitMaker: 222 posts
AeroScale: 219 posts
Posted: Tuesday, May 12, 2009 - 10:17 AM UTC
Which color do you used to replicate the PC10?
Kornbeef
England - South East, United Kingdom
Joined: November 06, 2005
KitMaker: 1,667 posts
AeroScale: 1,551 posts
Joined: November 06, 2005
KitMaker: 1,667 posts
AeroScale: 1,551 posts
Posted: Tuesday, May 12, 2009 - 12:07 PM UTC
Claudio,
its Humbrol no 155....I intend to overspray a little pale chocolate brown as part of the blending/fading on the fabric sections only.
thank you Doug, much appreciated
Mark, I cant ever recall seeing the fabric done like this elsewhere.. but where ese would you get 2 sets of fuselages to give you the choice?
K
thegirl
Alberta, Canada
Joined: January 19, 2008
KitMaker: 6,743 posts
AeroScale: 6,151 posts
Joined: January 19, 2008
KitMaker: 6,743 posts
AeroScale: 6,151 posts
Posted: Thursday, May 14, 2009 - 07:58 PM UTC
Well keith , we are trying very hard on waiting for the next set of pic's to come our way .......
Ooooh , look another minute has gone by already , hey another ....... Looking forward to seeing how the feathering of the coco brown turns out . Different method of how I seen other modellers tackle this shade . So this should be interesting .........
Kornbeef
England - South East, United Kingdom
Joined: November 06, 2005
KitMaker: 1,667 posts
AeroScale: 1,551 posts
Joined: November 06, 2005
KitMaker: 1,667 posts
AeroScale: 1,551 posts
Posted: Friday, May 15, 2009 - 12:56 AM UTC
Terri, Life is a tad busy atm..havent got much further as the light in my den is poor...and SHMBO took umbridge at me spraying in the kitchen...seems decalling is okay though for her...must be a dust thing but the weekends coming and some light. I have the squadron markings and struts to do still but it's shaping up.whet time I have is shared between this and the LVG
K
K
thegirl
Alberta, Canada
Joined: January 19, 2008
KitMaker: 6,743 posts
AeroScale: 6,151 posts
Joined: January 19, 2008
KitMaker: 6,743 posts
AeroScale: 6,151 posts
Posted: Friday, May 15, 2009 - 05:46 AM UTC
So you were caught braking the house rules !!!!! No trouble at Keith , life gets busy for us all at times ..... Looking forward to the pic's when you have the time !
MerlinV
Victoria, Australia
Joined: November 26, 2006
KitMaker: 608 posts
AeroScale: 602 posts
Joined: November 26, 2006
KitMaker: 608 posts
AeroScale: 602 posts
Posted: Friday, May 15, 2009 - 05:16 PM UTC
Hey Keith,
My other half hates it when I spray too. It's the smell I think. We of course are impervious to these odours, but wives seem to have much more sensitive Olfactory systems than we do.
Looking great by the way. I particularly like your comparisons withe the Roden kit.
Cheers,
Hugh
My other half hates it when I spray too. It's the smell I think. We of course are impervious to these odours, but wives seem to have much more sensitive Olfactory systems than we do.
Looking great by the way. I particularly like your comparisons withe the Roden kit.
Cheers,
Hugh
JimMrr
Ontario, Canada
Joined: January 03, 2007
KitMaker: 1,505 posts
AeroScale: 595 posts
Joined: January 03, 2007
KitMaker: 1,505 posts
AeroScale: 595 posts
Posted: Sunday, May 17, 2009 - 01:28 AM UTC
I recieved my kit yesterday ..and I see that the insturment panel is a wee bit lifeless. How did you approach this, Kieth? I am considering countersinking each insturment slightly,then using Mike Grant insturment decals or some such.
Someone suggested to me to use Eduard insturment bezels ....anyone have any ideas?
BTW Kieth, I agree that your Roden comaprison is very useful
Someone suggested to me to use Eduard insturment bezels ....anyone have any ideas?
BTW Kieth, I agree that your Roden comaprison is very useful
Kornbeef
England - South East, United Kingdom
Joined: November 06, 2005
KitMaker: 1,667 posts
AeroScale: 1,551 posts
Joined: November 06, 2005
KitMaker: 1,667 posts
AeroScale: 1,551 posts
Posted: Sunday, May 17, 2009 - 05:49 AM UTC
Jim,
I have to admit I went with Wingnuts portrayal of this part, working out that once finished it is pretty tucked away, and if you go to town detailing there where do you stop? A 90% scratched interior? It is of course a matter of personal preference it looks good enough if you are not intent on showing and building for pleasure otherwise you may as well scratch or adapt from PofP etch a new cockpit floor area, a lot is simplified, easily corrected, a good balance in my opinion.
If you do decide to rehash it though I think the kit decals would look okay but theres no compass decal oddly.
I may yet order another when the next batch of lovelies come out with the intent of really reworking the insides. There again a DVII and Dva will keep me happy tinkering for a long long time
thegirl
Alberta, Canada
Joined: January 19, 2008
KitMaker: 6,743 posts
AeroScale: 6,151 posts
Joined: January 19, 2008
KitMaker: 6,743 posts
AeroScale: 6,151 posts
Posted: Friday, May 22, 2009 - 11:08 AM UTC
Kornbeef ,are you still missing in action here or have you been ground for doing said work in the kitchen ?
I'm almost tempted to jump the pond , knock on your door and seeing if you can come out and play !
Kornbeef
England - South East, United Kingdom
Joined: November 06, 2005
KitMaker: 1,667 posts
AeroScale: 1,551 posts
Joined: November 06, 2005
KitMaker: 1,667 posts
AeroScale: 1,551 posts
Posted: Friday, May 22, 2009 - 09:50 PM UTC
Quoted Text
Kornbeef ,are you still missing in action here or have you been ground for doing said work in the kitchen ?
I'm almost tempted to jump the pond , knock on your door and seeing if you can come out and play !
LOL... beena busy week and what I've done kitwise I'm not so happy with, truied pastels and it looked good till I fixed them, but hoping to *get some in* this weekend and post pics.
Kornbeef
England - South East, United Kingdom
Joined: November 06, 2005
KitMaker: 1,667 posts
AeroScale: 1,551 posts
Joined: November 06, 2005
KitMaker: 1,667 posts
AeroScale: 1,551 posts
Posted: Saturday, May 30, 2009 - 11:07 PM UTC
hit and conquered *I hope* a major snag. Wondered why the small cowlings were buggers to fit...I found out when I tried to fit the exhausts. The motor was out of line, looking at it after I found out it was clear to see. I had to prize the cowlings and rad grill away and break the engine free once more. This time however I removed the cylinders and glued them to the exhausts and intend fitting them as assemblies....hopes it works, if it does pics will follow...gulps
Kornbeef
England - South East, United Kingdom
Joined: November 06, 2005
KitMaker: 1,667 posts
AeroScale: 1,551 posts
Joined: November 06, 2005
KitMaker: 1,667 posts
AeroScale: 1,551 posts
Posted: Sunday, May 31, 2009 - 06:31 AM UTC
Okay things went not too bad so heres my progress so far, some of the parts are not fixed simply held there by WNW tolerances and design...including the top wing and struts, the cabanes are already fixed securely to the fuselage.
I still havent sorted out my query with the lower engine cover, still some small details to add but am more pleased now than I ws a while back, the kit is excellently engineered, so much so my hamfistedness and overeager ways causes problems The mud....looked good as I did it but on reflection needs some work to weather and blend it in as the plane gets closer to a point where I consider it finishing.....RIGGING to consider so so soon GULP
Keith
I still havent sorted out my query with the lower engine cover, still some small details to add but am more pleased now than I ws a while back, the kit is excellently engineered, so much so my hamfistedness and overeager ways causes problems The mud....looked good as I did it but on reflection needs some work to weather and blend it in as the plane gets closer to a point where I consider it finishing.....RIGGING to consider so so soon GULP
Keith
JackFlash
Colorado, United States
Joined: January 25, 2004
KitMaker: 11,669 posts
AeroScale: 11,011 posts
Joined: January 25, 2004
KitMaker: 11,669 posts
AeroScale: 11,011 posts
Posted: Sunday, May 31, 2009 - 09:35 AM UTC
Check out Hatter50's build of the Roden kit. He has an interesting image of an open pan on a Hisso if memory serves.
67foxtrot
United States
Joined: February 13, 2008
KitMaker: 36 posts
AeroScale: 35 posts
Joined: February 13, 2008
KitMaker: 36 posts
AeroScale: 35 posts
Posted: Sunday, May 31, 2009 - 10:23 AM UTC
Keith,
In addition to the photo mentioned by Stephen, there are two other old black and white photos showing the lower engine cover in the closed position from a 3/4 front view. There aren't too awful many B&W to wade through!
Dave
In addition to the photo mentioned by Stephen, there are two other old black and white photos showing the lower engine cover in the closed position from a 3/4 front view. There aren't too awful many B&W to wade through!
Dave
Kornbeef
England - South East, United Kingdom
Joined: November 06, 2005
KitMaker: 1,667 posts
AeroScale: 1,551 posts
Joined: November 06, 2005
KitMaker: 1,667 posts
AeroScale: 1,551 posts
Posted: Sunday, May 31, 2009 - 01:50 PM UTC
thanks guys, I'll trawl through in the morning when my eyes are fresh
thegirl
Alberta, Canada
Joined: January 19, 2008
KitMaker: 6,743 posts
AeroScale: 6,151 posts
Joined: January 19, 2008
KitMaker: 6,743 posts
AeroScale: 6,151 posts
Posted: Sunday, May 31, 2009 - 02:44 PM UTC
Very nice build so far Keith . The wrinkled fabric turned out excellent when some paint was applied . looking forward to the rigging now .
Stephen is correct Steve ( Hatter50) was building Rodens 32 scale kit for the group build which is a must see ! Cowl covers where made from beer cans !!! His lower pan cover was in the drop postion . You will have to go back to the beginning of the year for the post , but well worth on having a look .
Kornbeef
England - South East, United Kingdom
Joined: November 06, 2005
KitMaker: 1,667 posts
AeroScale: 1,551 posts
Joined: November 06, 2005
KitMaker: 1,667 posts
AeroScale: 1,551 posts
Posted: Sunday, May 31, 2009 - 08:31 PM UTC
will do Terri
I agree, in bare plastic the wrinkles looked a little too much, but I think WNW got it just about spot on.....
DAK66
Tennessee, United States
Joined: April 28, 2006
KitMaker: 286 posts
AeroScale: 45 posts
Joined: April 28, 2006
KitMaker: 286 posts
AeroScale: 45 posts
Posted: Monday, June 01, 2009 - 12:28 AM UTC
Nice Job Keith
thegirl
Alberta, Canada
Joined: January 19, 2008
KitMaker: 6,743 posts
AeroScale: 6,151 posts
Joined: January 19, 2008
KitMaker: 6,743 posts
AeroScale: 6,151 posts
Posted: Wednesday, June 10, 2009 - 03:26 AM UTC
I'm sorry to report that Keith ( Kronbeef ) as gone Missing in Action . Last heard from on May 31 , an eyewitness leading to the disappearance has to say ................He was like a mad man ! running down the street screaming , pulling his hair yelling .......the wires are flat hehehehe , the wires are flat hehehehe . I tell you that's the only words which came out of his month ......so I said the hell with this ,, scaring the bejesus out of me . So back in the flat I went paying no more mind to it and the was the last I saw of him .......poor bugger .........
If any of you know the where abouts please call our hot line at 1 - 856 - 534-5668