

World War II
Discuss WWII and the era directly before and after the war from 1935-1949.
Discuss WWII and the era directly before and after the war from 1935-1949.
Hosted by Rowan Baylis
Focke-Wulf Fw 190A-4 "Turbo" Hasegawa 1/48

erwin_rommel

Joined: July 20, 2009
KitMaker: 105 posts
AeroScale: 76 posts

Posted: Wednesday, July 22, 2009 - 06:08 AM UTC
well, nice method. What about me I use a gloss paint instead spraying that stuff
TuomasH

Joined: September 10, 2008
KitMaker: 470 posts
AeroScale: 279 posts
Posted: Wednesday, July 22, 2009 - 06:27 AM UTC
Quoted Text
What about me I use a gloss paint instead spraying that stuff
Well, the Klear/future/Johnson (what ever you call it) is basicly gloss varnish, but it is cheaper.

alpha_tango

Joined: September 07, 2005
KitMaker: 5,609 posts
AeroScale: 5,231 posts
Posted: Wednesday, July 22, 2009 - 06:41 AM UTC
As Tuomas wrote and if I apply Future on Future it dissolves the layer below so you can melt the decal with the surface and the carrier film "disappears"

erwin_rommel
Joined: July 20, 2009
KitMaker: 105 posts
AeroScale: 76 posts
Posted: Wednesday, July 22, 2009 - 06:47 AM UTC
Quoted Text
As Tuomas wrote and if I apply Future on Future it dissolves the layer below so you can melt the decal with the surface and the carrier film "disappears"
I believe it is enough only one layer of future to make decals edges dissappeared?

PanosT

Joined: March 18, 2009
KitMaker: 36 posts
AeroScale: 22 posts
Posted: Wednesday, July 22, 2009 - 07:04 AM UTC
Hi Steffen!
Oops... I meant Hasegawa's intake! Sorry... I'm going to correct it immediately!
BTW looks more than great! Keep up the good work!
Panos

Quoted Text
As you can see Hasegawa provided the wrong intakes .... hope I get that darn things re-shaped
Oops... I meant Hasegawa's intake! Sorry... I'm going to correct it immediately!
BTW looks more than great! Keep up the good work!
Panos
alpha_tango
Joined: September 07, 2005
KitMaker: 5,609 posts
AeroScale: 5,231 posts
Posted: Wednesday, July 22, 2009 - 07:21 AM UTC
Hi again
@Aleksey: one layer below the decal and one on top .. as written above to embed the decal and also to protect it from the further weathering steps. In the past I had some wash accumulating at the borders of the carrier film and also some problems with different behavior of the wash on the paint and the decals.
This way I have an even surface for washes and so on. Once you have developed your way of doing things it is best to stick to it (more or less .... that does not mean that you cannot learn something new! I learn with every new model what all can go wrong )
)
@ Panos: ahh, now I see. There are two photos of the machine in Rodeikes Fw 190 "bible" which were pretty obviously different ... I must confess, that it does not look right now either, but at least it is wrong another way and surly unique
all the best
Steffen
@Aleksey: one layer below the decal and one on top .. as written above to embed the decal and also to protect it from the further weathering steps. In the past I had some wash accumulating at the borders of the carrier film and also some problems with different behavior of the wash on the paint and the decals.
This way I have an even surface for washes and so on. Once you have developed your way of doing things it is best to stick to it (more or less .... that does not mean that you cannot learn something new! I learn with every new model what all can go wrong
)@ Panos: ahh, now I see. There are two photos of the machine in Rodeikes Fw 190 "bible" which were pretty obviously different ... I must confess, that it does not look right now either, but at least it is wrong another way and surly unique
all the best
Steffen
alpha_tango
Joined: September 07, 2005
KitMaker: 5,609 posts
AeroScale: 5,231 posts
Posted: Thursday, July 23, 2009 - 12:06 AM UTC
Hi All
it is pretty bad weather today, which is very good weather for applying decals .. so here we go. The kit decals are yellow-ivory coloured (instead of white) and misprinted ... typical Hasegawa. So I used some from the Eduard Fw 190 A-5 and some from an Eagle Strike set I had (the rooster head is very nice and the "<<" too). Furthermore some crosses from my "spares box" .. I put on the larger decals first so that I can see some progress

when the decals are dry I will add the stencils from the kit as they look pretty nice
all the best
Steffen
it is pretty bad weather today, which is very good weather for applying decals .. so here we go. The kit decals are yellow-ivory coloured (instead of white) and misprinted ... typical Hasegawa. So I used some from the Eduard Fw 190 A-5 and some from an Eagle Strike set I had (the rooster head is very nice and the "<<" too). Furthermore some crosses from my "spares box" .. I put on the larger decals first so that I can see some progress
when the decals are dry I will add the stencils from the kit as they look pretty nice
all the best
Steffen

_H_Dori

Joined: November 09, 2006
KitMaker: 295 posts
AeroScale: 276 posts

Posted: Thursday, July 23, 2009 - 03:28 AM UTC
Looks great as always Steffen.
I will start my 190 for the Butcher Bird campaign soooooonnnn!! Hope it looks as good as this one.
Cheers
Howard
I will start my 190 for the Butcher Bird campaign soooooonnnn!! Hope it looks as good as this one.
Cheers
Howard
alpha_tango
Joined: September 07, 2005
KitMaker: 5,609 posts
AeroScale: 5,231 posts
Posted: Thursday, July 23, 2009 - 05:01 AM UTC
Many thanks Howard!
You better start very very soon, it is only running 8 days. Luckily I already have an entry so i do not need to finish this one for the campaign .. but I maybe make it anyway.
I fear for the stripes campaign .. but "Fw 190" is another sure ribbon in my small collection so I can balance all the unfinished campaigns
all the best
Steffen
NickZour

Joined: May 01, 2008
KitMaker: 1,437 posts
AeroScale: 1,241 posts
Posted: Thursday, July 23, 2009 - 06:03 AM UTC
Great model Steffen 
and very fast
Cheers Nick
and very fast
Cheers Nick
erwin_rommel
Joined: July 20, 2009
KitMaker: 105 posts
AeroScale: 76 posts
Posted: Thursday, July 23, 2009 - 06:48 AM UTC
Well, the decals lokks grreat!
Future is working! Byu the way, do you cover it with brush?
Future is working! Byu the way, do you cover it with brush?
alpha_tango
Joined: September 07, 2005
KitMaker: 5,609 posts
AeroScale: 5,231 posts
Posted: Thursday, July 23, 2009 - 07:01 AM UTC
Many thanks Nick and Aleksey!!
I airbrush the model with Future (Klear) as a base coat for the decals, but when I apply the decals I use a brush. This time I also used Daco. BTW the decals are not yet sealed with Klear! ... they will look better when sealed with a wash and a flatcoat plus some pigments
The tailband did not work out as I would have liked, but it is as it is .. the model is sub-standard anyway (supercharger intakes).
thanks for looking!
all the best
Steffen
erwin_rommel
Joined: July 20, 2009
KitMaker: 105 posts
AeroScale: 76 posts
Posted: Thursday, July 23, 2009 - 07:15 AM UTC
do you wash an airbrush immideately after spraying future? I`ve heard it dries up rapidly in it.... 
alpha_tango
Joined: September 07, 2005
KitMaker: 5,609 posts
AeroScale: 5,231 posts
Posted: Thursday, July 23, 2009 - 07:30 AM UTC
Hi Aleksey
it is just as normal paint. It does not dry that fast and I clean my airbrush anyway after I am done (read: I do not let it dry over night) ... and even if I did. It is pretty easy to remove with Aztek or Vallejo airbrush clean .. not to mention harder stuff like acetone.
all the best
Steffen
it is just as normal paint. It does not dry that fast and I clean my airbrush anyway after I am done (read: I do not let it dry over night) ... and even if I did. It is pretty easy to remove with Aztek or Vallejo airbrush clean .. not to mention harder stuff like acetone.
all the best
Steffen
_H_Dori
Joined: November 09, 2006
KitMaker: 295 posts
AeroScale: 276 posts
Posted: Thursday, July 23, 2009 - 08:51 PM UTC
Quoted Text
Many thanks Howard!
You better start very very soon, it is only running 8 days. Luckily I already have an entry so i do not need to finish this one for the campaign .. but I maybe make it anyway.
I fear for the stripes campaign .. but "Fw 190" is another sure ribbon in my small collection so I can balance all the unfinished campaigns
all the best
Steffen
EEK!! For some reason I thought this was a year campaign!!
In that case I'll get started tomorrow. Thank goodness I choose an easy one!
Thanks Steffen
Howard
alpha_tango
Joined: September 07, 2005
KitMaker: 5,609 posts
AeroScale: 5,231 posts
Posted: Friday, July 24, 2009 - 04:12 AM UTC
Not much of an update today.
I just put on the final stencils and gave the whole thing a nice coat of Klear.
Actually I am lookig for my next interrims project. I fiddle a lot with my Tempest, but i just cannot get rid of that darn seam. I crafted on a replacement tail and i puttied and sanded it at least 20 times (this is no exaggeration it rather is more ...) and I tried much stuff: Sqn white putty, Tamiya putty, CA glue, Mr surfacer and every time I have finished sanding and polishing plus a layer of primer .. the darn seam is back there .. i guess I do something wrong here (see P-40 problem) but I just do not know what else to do.
So I will probably pick another one from the stack .. might be the F4U-5N or I start the Beaufighter, so I will have an entry for Night Stalkers.
Well, here is a pic, but as I wrote above not much progress to see. You can see the curved fuselage band .. but as written some posts above: the build is ruined anyway, will be faaar back in the display shelf.

all the best
Steffen
I just put on the final stencils and gave the whole thing a nice coat of Klear.
Actually I am lookig for my next interrims project. I fiddle a lot with my Tempest, but i just cannot get rid of that darn seam. I crafted on a replacement tail and i puttied and sanded it at least 20 times (this is no exaggeration it rather is more ...) and I tried much stuff: Sqn white putty, Tamiya putty, CA glue, Mr surfacer and every time I have finished sanding and polishing plus a layer of primer .. the darn seam is back there .. i guess I do something wrong here (see P-40 problem) but I just do not know what else to do.
So I will probably pick another one from the stack .. might be the F4U-5N or I start the Beaufighter, so I will have an entry for Night Stalkers.
Well, here is a pic, but as I wrote above not much progress to see. You can see the curved fuselage band .. but as written some posts above: the build is ruined anyway, will be faaar back in the display shelf.
all the best
Steffen
alpha_tango
Joined: September 07, 2005
KitMaker: 5,609 posts
AeroScale: 5,231 posts
Posted: Saturday, July 25, 2009 - 04:04 AM UTC
Another small update.
i pretty much concentrated on the undercarriage: break lines, scissors, wheels and covers. The wheels are from TD. I do not like their "flat tyre" style pretty much, but these were the only early wheels I had in the stack, so Egon had flat tyres that day ... might have been a bad day for the crew chief

Still a lot more bits and pieces to add.
all the best
Steffen
i pretty much concentrated on the undercarriage: break lines, scissors, wheels and covers. The wheels are from TD. I do not like their "flat tyre" style pretty much, but these were the only early wheels I had in the stack, so Egon had flat tyres that day ... might have been a bad day for the crew chief
Still a lot more bits and pieces to add.
all the best
Steffen

FalkeEins

Joined: March 07, 2005
KitMaker: 868 posts
AeroScale: 690 posts
Posted: Saturday, July 25, 2009 - 04:26 AM UTC
..Nice work Steffen ..I look away for a week and you've gone and nearly finished a kit ! Now that has created a stir on this corner of the board..
.. managed to get nowhere with my campaign build !
alpha_tango
Joined: September 07, 2005
KitMaker: 5,609 posts
AeroScale: 5,231 posts
Posted: Saturday, July 25, 2009 - 04:44 AM UTC
Hi Neil
many thanks mate!! The pit was already done for quite a while and the fuselage closed .. so it is not much of an achievement to get as far as I did.
As written above I am not very happy with the super charger intake (lhs, in flying direction ... you can see it in the pic posted today) but I had no idea how to improve it "the easy way" so I just have to live with it. Also some minor faults ... so all in all pretty lousy build, but I want to finish it anyway...
all the best
Steffen
Mecenas
Joined: December 23, 2007
KitMaker: 1,596 posts
AeroScale: 1,275 posts
KitMaker: 1,596 posts
AeroScale: 1,275 posts

Posted: Saturday, July 25, 2009 - 05:44 AM UTC
What can I say? You got nice cock...on the hood. I'm watching your build with great attention Steffen, a lot of good work.
Don't worry about the intake, nobody exept your noticed that something is wrong there...
Don't worry about the intake, nobody exept your noticed that something is wrong there...
alpha_tango
Joined: September 07, 2005
KitMaker: 5,609 posts
AeroScale: 5,231 posts
Posted: Saturday, July 25, 2009 - 11:45 PM UTC
Many thanks Michal!
Well, I do know about it and I do worry ... it is like my "love" for building cockpits ...
O.k., here we go again. I added a few more bits yesterday. The barrels are just drilled out plastic parts. I also added a dk. grey oil wash this morning and a black pin wash on the rudder and elevators. This has to dry now so the flat coat won't be done today (or maybe late this evening). Time to grab something from the stack....

all the best
Steffen
Quoted Text
Don't worry about the intake, nobody exept your noticed that something is wrong there...
Well, I do know about it and I do worry ... it is like my "love" for building cockpits ...
O.k., here we go again. I added a few more bits yesterday. The barrels are just drilled out plastic parts. I also added a dk. grey oil wash this morning and a black pin wash on the rudder and elevators. This has to dry now so the flat coat won't be done today (or maybe late this evening). Time to grab something from the stack....
all the best
Steffen
erwin_rommel
Joined: July 20, 2009
KitMaker: 105 posts
AeroScale: 76 posts
Posted: Sunday, July 26, 2009 - 01:00 AM UTC
nice Anton
alpha_tango
Joined: September 07, 2005
KitMaker: 5,609 posts
AeroScale: 5,231 posts
Posted: Monday, July 27, 2009 - 02:24 AM UTC
So all things have to come to an end ...
I added all the final small parts. Almost forgot the inside wheel covers but now I call it finished.


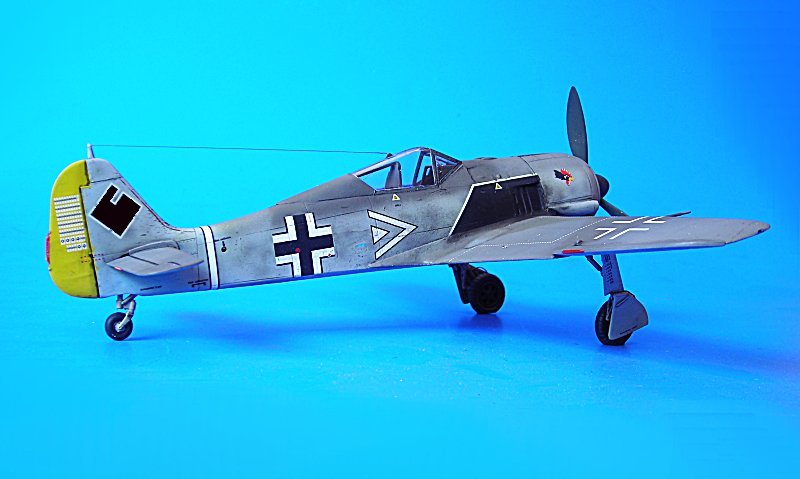


as always all comments welcome, but please do not mention that darn supercharger intake.
all the best
Steffen
I added all the final small parts. Almost forgot the inside wheel covers
but now I call it finished.as always all comments welcome, but please do not mention that darn supercharger intake.
all the best
Steffen
erwin_rommel
Joined: July 20, 2009
KitMaker: 105 posts
AeroScale: 76 posts
Posted: Monday, July 27, 2009 - 02:34 AM UTC
Looks very nice&accurate! Take my gratulations 
but what about me I`d add some paint chips, exaust stains and a little of soot around MG and canons
what project will be next Steffen, a spitfire?
cheers
but what about me I`d add some paint chips, exaust stains and a little of soot around MG and canons
what project will be next Steffen, a spitfire?
cheers
alpha_tango
Joined: September 07, 2005
KitMaker: 5,609 posts
AeroScale: 5,231 posts
Posted: Monday, July 27, 2009 - 02:54 AM UTC
Many thanks Aleksey.
As for your suggestions:
1. I am not a big fan of dirt on the chute ejectors. I have discussd that pretty long with Eetu in one of the threads and thus I added a little bit. i normally would do nothing.
2. No paint chips: this was a Kommandeurs bird. It was kept in top condition Furthermore it was the high speed/ high altitude plane so it most probably was polished (I do not like the glossy look on my models so I keep them flat) ... I may have added a bit too much dirt on the underside already, but it is a very "hard" to reach place for the ground crew and not easily seen by the camera also you have a mixture of oil from the engine and exhaust sooth here so it may stick better to the surface
3. there are exhaust stains in brown and black sooth pigments but i kept them subtle as in the pix I have none can be seen
all the best
Steffen
P.S. the next model is my Hasegawa F4U-5N for "Night Stalkers". i am already on it... see thread in Cold War forum
As for your suggestions:
1. I am not a big fan of dirt on the chute ejectors. I have discussd that pretty long with Eetu in one of the threads and thus I added a little bit. i normally would do nothing.
2. No paint chips: this was a Kommandeurs bird. It was kept in top condition Furthermore it was the high speed/ high altitude plane so it most probably was polished (I do not like the glossy look on my models so I keep them flat) ... I may have added a bit too much dirt on the underside already, but it is a very "hard" to reach place for the ground crew and not easily seen by the camera
also you have a mixture of oil from the engine and exhaust sooth here so it may stick better to the surface3. there are exhaust stains in brown and black sooth pigments but i kept them subtle as in the pix I have none can be seen
all the best
Steffen
P.S. the next model is my Hasegawa F4U-5N for "Night Stalkers". i am already on it... see thread in Cold War forum
 |

WEB HOSTING BY


Copyright ©2021 AeroScale and Kitmaker Network, a subsidiary of Silver Star Enterprises
All Rights Reserved. Please read our Conditions of Use and Privacy Policy.
All Rights Reserved. Please read our Conditions of Use and Privacy Policy.