Focke-Wulf Fw 190A-4 "Turbo" Hasegawa 1/48
Germany
Joined: September 07, 2005
KitMaker: 5,609 posts
AeroScale: 5,231 posts
Posted: Sunday, July 19, 2009 - 07:18 AM UTC
Rebyata
Aeroscale is lame these days ... you force me to start another thread just to start a thread ... it is kind of a fraud as i have these pix in the Würger thread already .. but I am at it again and I solved my latest problem with that kit (last pic is new) .. so here we go:
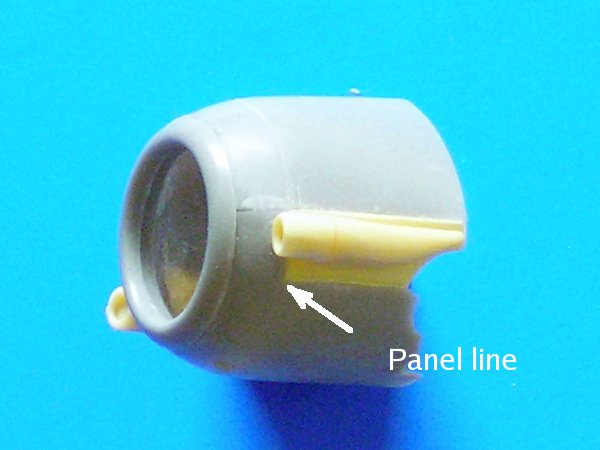
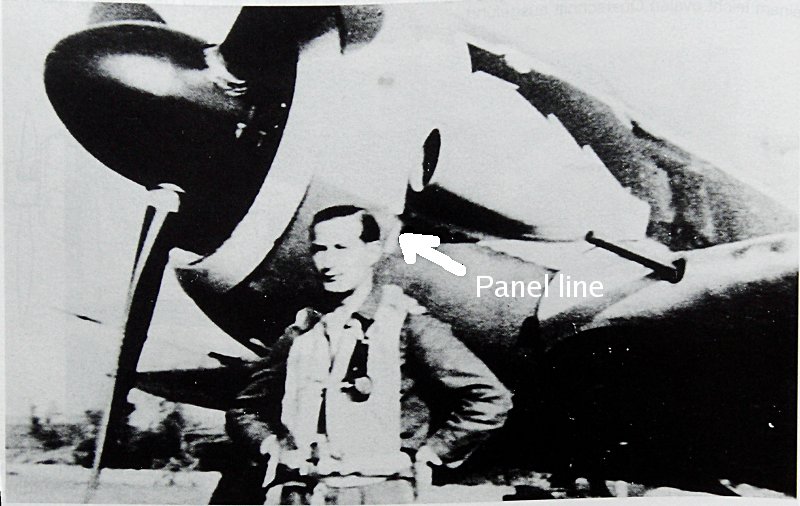
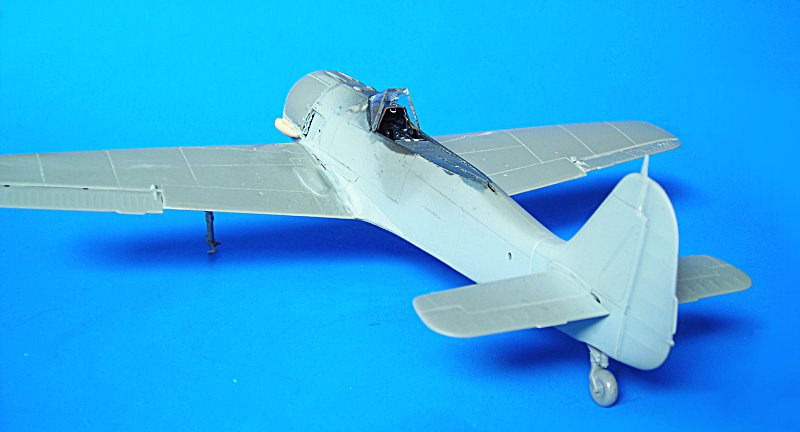
Hasegawas Fw 190 A-4 (Egon Mayer) with altitude intakes
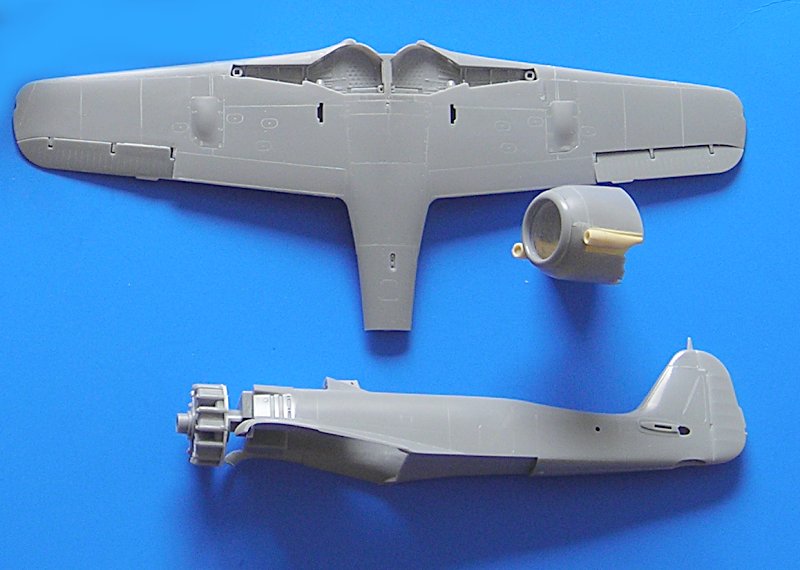
As you can see Hasegawa provided the wrong intakes .... hope I get that darn things re-shaped
I glued in the new Eduard part for the glare cover but somhow it just is tooooooo broad. I tried to fit the canopy above it. but I was not happy .. and sat it aside for some weeks (might be months now)

I removed the wind shield and cut the PE part in 3 and repositioned it. Looks better now and the canopy fits better too.. i also installe the u/c as I prefer my models to stand on their legs for painting/drying ....
more to come .. hopefully soon

all the best
Steffen
DULCE ET DECORUM EST PRO HOBBY MORI
Germany
Joined: September 07, 2005
KitMaker: 5,609 posts
AeroScale: 5,231 posts
Posted: Monday, July 20, 2009 - 02:08 AM UTC
Hi again
Well, I really feel the enthusiasm my project stirs among the crowd ...

Here is a small update. I cut a slot in the head rest mount and drilled a hole in the sliding hood . it is for the antenna wire. Written fast but including painting and decal it took me an hour or so. When it is all dry I will mount the head armour to the canopy, attach the wire and glue the canopy on the fuselage.
cheers
Steffen
DULCE ET DECORUM EST PRO HOBBY MORI
Joined: December 23, 2007
KitMaker: 1,596 posts
AeroScale: 1,275 posts
Posted: Monday, July 20, 2009 - 02:49 AM UTC
Do you want me to build my Spitfire in a high-atlitude version for a dog-fighting with your Focke-Wulf? Is this a kind of provocation, ha? ;P
Interesting project, I'm gonna stay and watch your hands...
Buenos Aires, Argentina
Joined: September 07, 2006
KitMaker: 918 posts
AeroScale: 688 posts
Posted: Monday, July 20, 2009 - 03:01 AM UTC
A very interest project that you´re begining Steffen
Germany
Joined: September 07, 2005
KitMaker: 5,609 posts
AeroScale: 5,231 posts
Posted: Monday, July 20, 2009 - 03:04 AM UTC
Thanks Michal
... now I know at least one Aeroscaler is looking what I do

.. just kidding, of course it is "just another Würger" and it is no fancy all hatches open build either.
As for the Spit ... do whatever
you want. as it is your fun that matters.. Though I must say that Duel Campaign in 2006 was really fun ... IIRC I had 3 or 4 "dog fights" then (completed!)
cheers
Steffen
P.S. o.k. make that 2 modelers watching

(I've just seen your post Daniel, thanks mate!)
DULCE ET DECORUM EST PRO HOBBY MORI
Turku ja Pori, Finland
Joined: September 10, 2008
KitMaker: 470 posts
AeroScale: 279 posts
Posted: Monday, July 20, 2009 - 03:44 AM UTC
Are those after market intakes or have you casted them by yourself?
I watch your pictures horrified, don't you ever break landing gear when keeping the plane stand on them? They look really fragile.
P.S Don't be sad, most of us just read and are too lazy to comment. Not builders fault.

Workbench;
Academy Curtiss Hawk H-75 FAF + Eduard PE
Roden Fokker D.VII "Bruno Loerzer" (Aces High II)
Italeri Messerschmitt Me 262 (The great checkerboard campaign)
Joined: December 23, 2007
KitMaker: 1,596 posts
AeroScale: 1,275 posts
Posted: Monday, July 20, 2009 - 03:50 AM UTC
Now you have 3 people watching your thread - little crowd...
Germany
Joined: September 07, 2005
KitMaker: 5,609 posts
AeroScale: 5,231 posts
Posted: Monday, July 20, 2009 - 04:00 AM UTC
Quoted Text
Are those after market intakes or have you casted them by yourself?
I watch your pictures horrified, don't you ever break landing gear when keeping the plane stand on them? They look really fragile.
P.S Don't be sad, most of us just read and are too lazy to comment. Not builders fault.
Hi Tuomas
thanks for watching
.. i know that quite a few people had a look at the thread and as there was not much new stuff there was also not much to comment on. I just want to stir the pot a bit so that we get a bit more action on Aeroscale. Of course it is this time of the year when most people prefer to "watch the rain falling", but some still model and those should post their projects to entertain the others
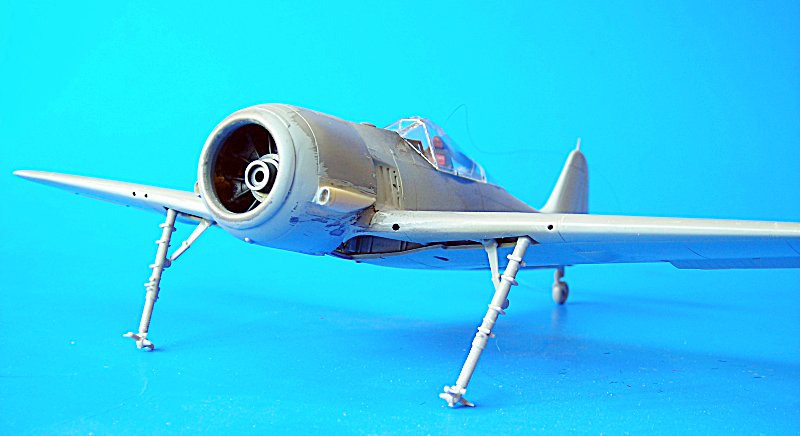
the intakes were part of the Hasegawa box:

but of the wrong style (see above). I altered the kit parts. Maybe i have to redo them again, but I will wait how it all looks with a layer of primer on.
As for breaking parts .. one of my favorite things ... really just broke a leg yesterday. but they most often break at the top where the leg goes into the wing and it is easy to drill a hole and glue in a wire (i got used to it" Still I prefer this over finger prints on the model ... just my stupid way of doing things . You know my favorite slogan ? ...
suum cuiquejust glued the canopy to the model .. it is still not broken and clear
.. should mask it ASAP
all the best
Steffen
Michal: Thanks for counting! After 3 it gets a bit fuzzy for me

DULCE ET DECORUM EST PRO HOBBY MORI
Germany
Joined: September 07, 2005
KitMaker: 5,609 posts
AeroScale: 5,231 posts
Posted: Monday, July 20, 2009 - 04:15 AM UTC
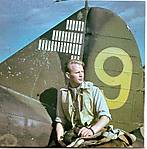
I just took a pic to illustrate the altered intakes .. well the angle was suboptimal ... another one next time
cheers
Steffen
DULCE ET DECORUM EST PRO HOBBY MORI
Brest, Belarus
Joined: July 20, 2009
KitMaker: 105 posts
AeroScale: 76 posts
Posted: Monday, July 20, 2009 - 10:41 AM UTC
well, it looks really nice
but why the antenna is so loosed?

Germany
Joined: September 07, 2005
KitMaker: 5,609 posts
AeroScale: 5,231 posts
Posted: Monday, July 20, 2009 - 07:59 PM UTC
Hi Aleksey
Thanks for your kind comment!
the back end of the antenna is still loose, because I am not sure if I will leave the canopy in closed position or if I will glue it in opened position. It is just glued on with Gators, so it is pretty easy to remove ...
all the best
Steffen
DULCE ET DECORUM EST PRO HOBBY MORI
Alberta, Canada
Joined: January 19, 2008
KitMaker: 6,743 posts
AeroScale: 6,151 posts
Posted: Tuesday, July 21, 2009 - 01:54 AM UTC
Off to a great start Steffen . Are you going for thr box markings or are they going to be different ?
Germany
Joined: September 07, 2005
KitMaker: 5,609 posts
AeroScale: 5,231 posts
Posted: Tuesday, July 21, 2009 - 01:59 AM UTC
Many thanks Terri!
I will used a markings option (Egon Mayer) from the box, but I will used different decals ... they are misprinted - esp. kill markings - and pretty yellow. Maybe I can use the specific markings from the Eduard A-5 (he had two birds parallel, the high altitude Fw 190 A-4 and the A-5) ...
cheers
Steffen
DULCE ET DECORUM EST PRO HOBBY MORI
Slovenia
Joined: March 30, 2009
KitMaker: 106 posts
AeroScale: 105 posts
Posted: Tuesday, July 21, 2009 - 03:32 AM UTC
NIce FW. You are really fast.
Germany
Joined: September 07, 2005
KitMaker: 5,609 posts
AeroScale: 5,231 posts
Posted: Tuesday, July 21, 2009 - 04:09 AM UTC
Well, to be honest: I am not.
As Rowan and a lot of other guys I have many started projects in the stack. e.g. I have about 10-20 "near Workbench projects" (which means they are in 2m distance of the bench and I still think about them from time to time or even glue a bit here and there) ... so it is easy to pull a started model from the stack and just proceed. All it needs is some motivation .. which is the hard part
cheers
Steffen
DULCE ET DECORUM EST PRO HOBBY MORI
Germany
Joined: September 07, 2005
KitMaker: 5,609 posts
AeroScale: 5,231 posts
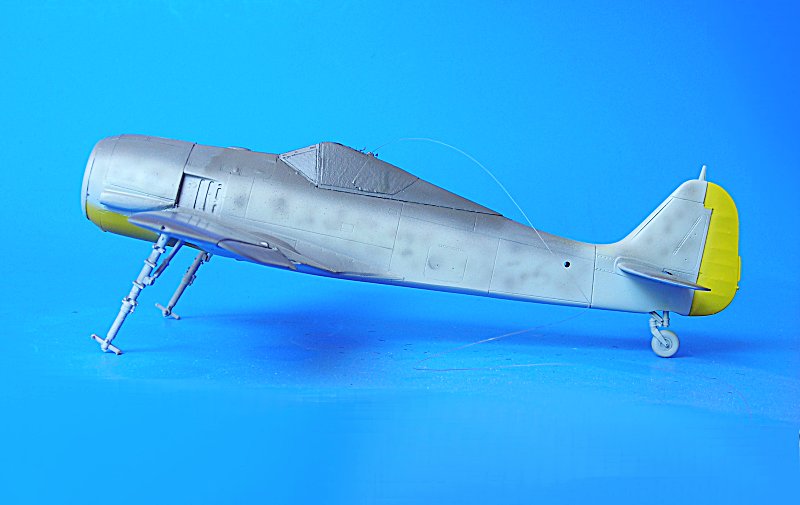
Posted: Tuesday, July 21, 2009 - 07:08 AM UTC
Hi
Today was the time for some colour. Not much to say about it .. I used vallejo end Gunze paints for the job. the intakes are not totally convincing, but I do not have the nerves to redo them, so they are like they are:
standard fighter scheme in 74/75/76 (BTW the colours do not come out very good in the pic. the 75 is a little more violet while the 74 is a bit more green than in the photograph)
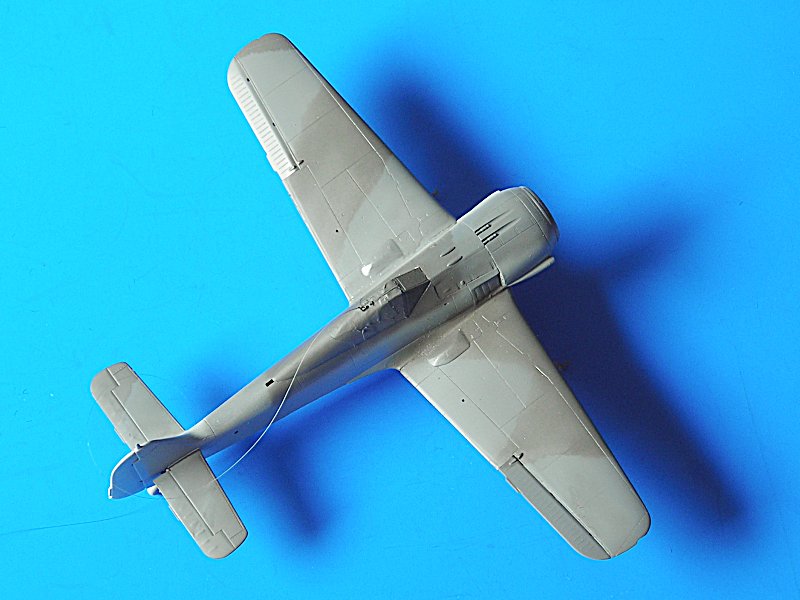
the mottling still has to be done .. petty hard task this time as it is very light and subtle
all the best
Steffen
DULCE ET DECORUM EST PRO HOBBY MORI
Brest, Belarus
Joined: July 20, 2009
KitMaker: 105 posts
AeroScale: 76 posts
Posted: Tuesday, July 21, 2009 - 08:16 AM UTC
very nice you know
do u usually apply filters on your models?
Germany
Joined: September 07, 2005
KitMaker: 5,609 posts
AeroScale: 5,231 posts
Posted: Tuesday, July 21, 2009 - 08:44 AM UTC
Hi Alexei
well, yes and no. The several gloss and flat layers alter the colours quite a bit. Then I use a wash (sometimes several) and pigments to finish the thing .. I have a few build threads here just have a look.
Burma Banshee Fw190F-8Bf 109 E-4just as an example ... you can also have a look at
my models on the IPMS Deutschland site, but of course these are in German ...
all the best
Steffen
DULCE ET DECORUM EST PRO HOBBY MORI
California, United States
Joined: March 18, 2009
KitMaker: 36 posts
AeroScale: 22 posts
Posted: Tuesday, July 21, 2009 - 09:32 PM UTC
Hi Steffen!

Great job as always! I really admire (except your builds) your knowledge. I wouldn't even notice the wrong intake! Can't wait to see the mottling.
Panos
Germany
Joined: September 07, 2005
KitMaker: 5,609 posts
AeroScale: 5,231 posts
Posted: Tuesday, July 21, 2009 - 10:55 PM UTC
Hello Panos
many thanks for your kind comment!
Sadly i do not understand this:
Quoted Text
I wouldn't even notice the wrong filter!
Alexei (Aleksey) just asked if i use filter which i understood he was asking for the modelling technique ....
OTOH we were talking about the colours. on his Fw 190 A-8 Eduard WE. He used pretty strong colours, which I mentioned in his thread (this can be an optical illusion as he used a flash light) .. in contrary I did not used a flash and in my picture the blue background together with slightly bad lighting absobes some of the colour that is actually there (a tad more red in the RLM75 and equally the 74 is a bit more green on my model)
all the best
Steffen
DULCE ET DECORUM EST PRO HOBBY MORI
Germany
Joined: September 07, 2005
KitMaker: 5,609 posts
AeroScale: 5,231 posts
Posted: Wednesday, July 22, 2009 - 02:04 AM UTC
Todays update picture:
I airbrushed the mottling and the yellow lower cowl and rudder. Maybe I can apply the first Klear layer this evening .. though it is better to let the Gunze dry very well before Future/Klear because it is possibl that both react ad leave a cracked surface ..
all the best
Steffen
DULCE ET DECORUM EST PRO HOBBY MORI
Brest, Belarus
Joined: July 20, 2009
KitMaker: 105 posts
AeroScale: 76 posts
Posted: Wednesday, July 22, 2009 - 03:10 AM UTC
Quoted Text
Maybe I can apply the first Klear layer this evening ..
Steffen
What layer are you talking about?

Germany
Joined: September 07, 2005
KitMaker: 5,609 posts
AeroScale: 5,231 posts
Posted: Wednesday, July 22, 2009 - 03:22 AM UTC
Hello Aleksey
Well, you did not read the other threads, did you ?
.. Klear is the GB equivalent to Future. it is an acrylic floor "wax" and a pretty good clear paint (among other uses) e.g. I have recently started to use it as decal medium too ...
all the best
Steffen
DULCE ET DECORUM EST PRO HOBBY MORI
Brest, Belarus
Joined: July 20, 2009
KitMaker: 105 posts
AeroScale: 76 posts
Posted: Wednesday, July 22, 2009 - 04:48 AM UTC
Quoted Text
Hello Aleksey
Well, you did not read the other threads, did you ? .. Klear is the GB equivalent to Future. it is an acrylic floor "wax" and a pretty good clear paint (among other uses) e.g. I have recently started to use it as decal medium too ...
all the best
Steffen
well, Future is esed to cover canopy,
you covered the model to apply a wash then?
Germany
Joined: September 07, 2005
KitMaker: 5,609 posts
AeroScale: 5,231 posts
Posted: Wednesday, July 22, 2009 - 04:52 AM UTC
Hi Aleksey
I just airbrushed the model.
It is just an inexpensive (in the US or GB) glossy acrylic "paint" .. i use it as base coat for the decals and then seal the decals for the wash. So the decals are embedded in Future/Klear
cheers
Steffen
DULCE ET DECORUM EST PRO HOBBY MORI