WNW GB 2009 -10 Junkers J.I Stephen
Colorado, United States
Joined: January 25, 2004
KitMaker: 11,669 posts
AeroScale: 11,011 posts
Posted: Saturday, May 08, 2010 - 05:43 PM UTC
Quoted Text
Nice progress so far Stephen , even though green isn't one of my favorite colours . This shade has a nice feel to it . Would this be moss green ?
As near as I can get it. Yes. My own mix of course.
". . .The most important thing is to know why you build and then get the most that you can out of building." via D.D.
Aarhus, Denmark
Joined: July 18, 2003
KitMaker: 3,377 posts
AeroScale: 115 posts
Posted: Saturday, May 08, 2010 - 09:51 PM UTC
Looks nice, I notice that its primed in metallic - are you going to use that doing chipping ? - I would imagine, that these crafts would soon show some heavy chipping ?
Cheers/jan
It´s happy days for modellers...
Colorado, United States
Joined: January 25, 2004
KitMaker: 11,669 posts
AeroScale: 11,011 posts
Posted: Sunday, May 09, 2010 - 12:48 AM UTC
Yes Jan, This is the method I have developed for all my kits. Metalizer laquer paint as a base. Seal it with clear laquer - dullcotes and then the enamel base coat. You can replicate chipping, oxidizing and wear quite reasonably. Linen covered surfaces are represented by the CDL primer coating and this of course helps me locate and remove all unwanted seams.
". . .The most important thing is to know why you build and then get the most that you can out of building." via D.D.
Västra Götaland, Sweden
Joined: February 19, 2010
KitMaker: 1,473 posts
AeroScale: 1,450 posts
Posted: Sunday, May 09, 2010 - 08:36 AM UTC
Hi Stephen
Great to see your progress and methods on this kit - looking really good so far. Hope to see some more posts on this one soon!
Best Regards
Mikael
_________________________________________________________
Just finished the Wingnut Wings Taube. On to the Junkers D.1
Colorado, United States
Joined: January 25, 2004
KitMaker: 11,669 posts
AeroScale: 11,011 posts
Posted: Thursday, August 12, 2010 - 09:12 AM UTC
Just finishing up some kit reviews and then back at this. Some progress images to be posted soon.
". . .The most important thing is to know why you build and then get the most that you can out of building." via D.D.
South Australia, Australia
Joined: August 14, 2007
KitMaker: 5,926 posts
AeroScale: 2,201 posts
Posted: Thursday, August 12, 2010 - 10:10 AM UTC
I think you will find that the wing problem Stephen had was due to nothing more than production tolerances. I had hassles with the fuselage floor that no one else seems to have had. Whereas my wings went together perfectly. You will find that it is only an enclosed space that will vary in size due to changes in air-pressure. In fact, the opposite would happen if the air pressure was the cause, the wing section would expand rather than contract. This is the phenomenon they use to make altimeters work, and airspeed indicators, machmeters, VSIs, IVSIs and many other pitpt-static instruments in aircraft. Did I mention I was originally an Instrument Fitter in the Air Force??

You may be right, I may be crazy.
South Australia, Australia
Joined: August 14, 2007
KitMaker: 5,926 posts
AeroScale: 2,201 posts
Posted: Thursday, August 12, 2010 - 10:13 AM UTC
Another quick one, why would you get much chipping on a surface where no one would need to walk? Nothing more than a Mark One eyeball would be used for inspection so where would all the chips come from? I for one would not like to get up on the wing of one os those parked kites as the angle would mean you slipped off everytime!!
You may be right, I may be crazy.
Colorado, United States
Joined: January 25, 2004
KitMaker: 11,669 posts
AeroScale: 11,011 posts
Posted: Thursday, August 12, 2010 - 10:36 AM UTC
Quoted Text
Another quick one, why would you get much chipping on a surface where no one would need to walk? Nothing more than a Mark One eyeball would be used for inspection so where would all the chips come from? I for one would not like to get up on the wing of one os those parked kites as the angle would mean you slipped off everytime!!
The wing would be inspected for buckling of the rivet attachments and stress damage and the top wing was strong enough to sustain the inspection. But the real problem with mild paint chipping comes from motor vibrations translated through the all metal structure during flight.
". . .The most important thing is to know why you build and then get the most that you can out of building." via D.D.
Aarhus, Denmark
Joined: July 18, 2003
KitMaker: 3,377 posts
AeroScale: 115 posts
Posted: Thursday, August 12, 2010 - 06:24 PM UTC
It would be very nice to see some progress on this big bird.
Cheers/Jan
It´s happy days for modellers...
Jalisco, Mexico
Joined: August 10, 2010
KitMaker: 182 posts
AeroScale: 179 posts
Posted: Friday, August 13, 2010 - 12:55 PM UTC
Nice big model. the wing construction in real plane must to be a hard work, for the early metal construction.
Cheers
Al
Agile as a demon and climbs like a monky
Colorado, United States
Joined: January 25, 2004
KitMaker: 11,669 posts
AeroScale: 11,011 posts
Posted: Sunday, October 03, 2010 - 08:11 PM UTC
Now to continue.

Note the stress break in the bulkhead. Tolerances are a bit tight.
". . .The most important thing is to know why you build and then get the most that you can out of building." via D.D.
Västra Götaland, Sweden
Joined: February 19, 2010
KitMaker: 1,473 posts
AeroScale: 1,450 posts
Posted: Sunday, October 03, 2010 - 09:36 PM UTC
Hi Stephen,
Nice progress with the interior hope to see some more from you soon!
Best Regards
Mikael
_________________________________________________________
Just finished the Wingnut Wings Taube. On to the Junkers D.1
England - South East, United Kingdom
Joined: November 06, 2005
KitMaker: 1,667 posts
AeroScale: 1,551 posts
Posted: Monday, October 04, 2010 - 12:10 AM UTC
I see the crack, WNW tolerances, I broke my original DVa seat rails trying to ease things into their tight locations.
Sometimes its better to dispose of the locating pegs/pins or whatever you want to call them and set things up by eye it they arent structural of course, easy to say in hindsight.
But it's good to see you fitting time in and working on this again Stephen, how you manage I'll never know, time management has always been an issue with me
Keith

Still can't cure the AMS even with sausage finger implants & olde eyes.
Colorado, United States
Joined: January 25, 2004
KitMaker: 11,669 posts
AeroScale: 11,011 posts
Posted: Tuesday, October 05, 2010 - 08:56 PM UTC
Please let me recommend that with this or any build you acquire flush cutting snips.
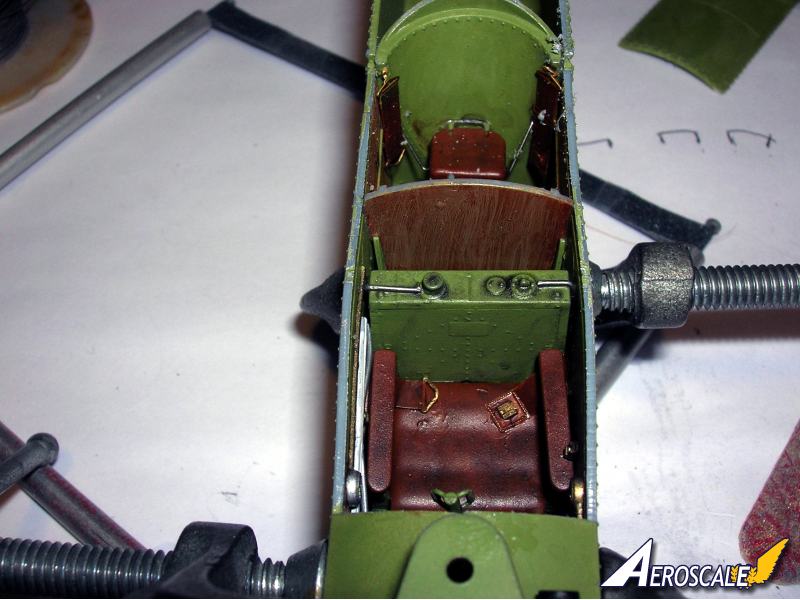
Here the seat is temporarily installed for a test fit. Still lots of plumbing to install.
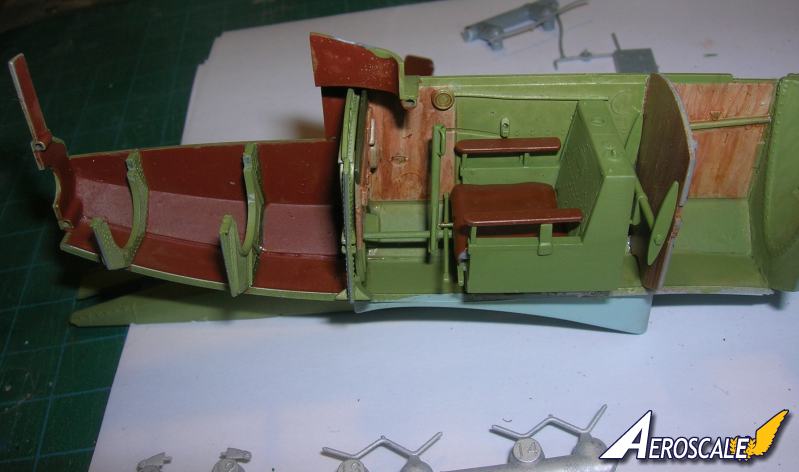
Now when it comes to the engine bearers the formers should be lined up correctly and to do this the fuselage should be temporarily united. With the tolerances of the kit parts you can do this with out tape or glue.

". . .The most important thing is to know why you build and then get the most that you can out of building." via D.D.
Alberta, Canada
Joined: January 19, 2008
KitMaker: 6,743 posts
AeroScale: 6,151 posts
Posted: Wednesday, October 06, 2010 - 04:43 AM UTC
She is coming along very well Stephen

Colorado, United States
Joined: January 25, 2004
KitMaker: 11,669 posts
AeroScale: 11,011 posts
Posted: Thursday, October 14, 2010 - 03:24 PM UTC
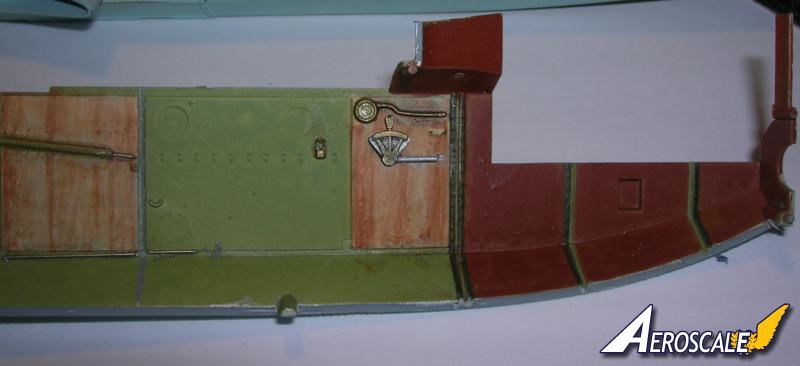
Greetings all images to post after midnight tonight. All cockpit parts inplace. NOTE! When it comes to the brass annealing it the best method. Apply candle / cig. lighter heat and bend into position then paint and glue inplace.
Some PE brass requires this at a minimum. But again speaking about WNW tolerances the pilot's seat belt straps must lay absolutely flat when glued in place on the outer sides of the seat. Otherwise you will fight closing up the fuselage.
". . .The most important thing is to know why you build and then get the most that you can out of building." via D.D.
Västra Götaland, Sweden
Joined: February 19, 2010
KitMaker: 1,473 posts
AeroScale: 1,450 posts
Posted: Thursday, October 14, 2010 - 07:34 PM UTC
Greetings Stephen burning a bit of midnight oil? Looking forward to the images
Anhealing and the seatbelt for the JI noted Thank You for the heads up!
Best Regards
Mikael
_________________________________________________________
Just finished the Wingnut Wings Taube. On to the Junkers D.1
Colorado, United States
Joined: January 25, 2004
KitMaker: 11,669 posts
AeroScale: 11,011 posts
Posted: Thursday, October 14, 2010 - 10:48 PM UTC
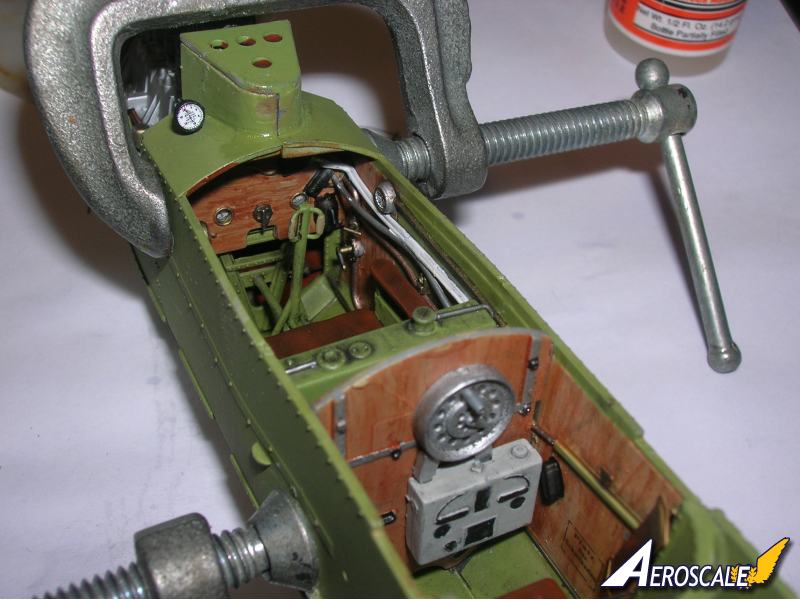
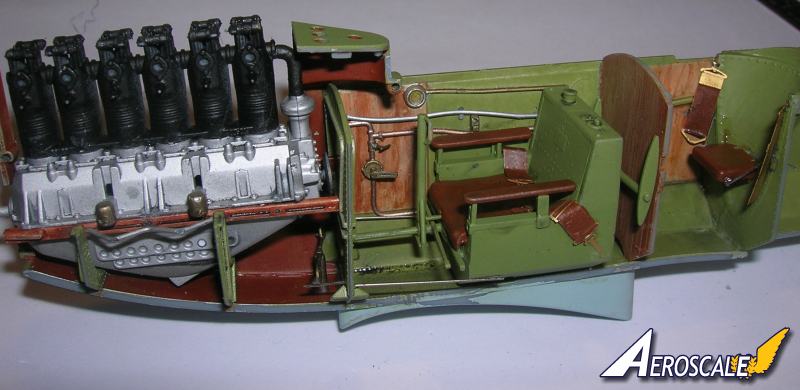
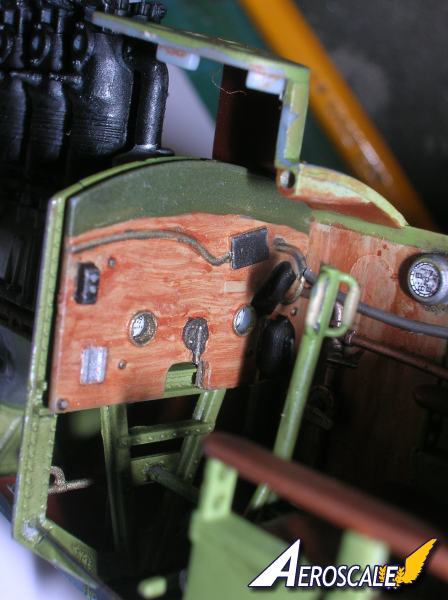
Here you go.
Firsty the instrument panel with a clear section glued behind it to represent the gauge face glass.

The pilot's left side with some bit of wire to represent cables and the throttle actuation rod.
Here are the pilot's right side shots showing the rudder and elevator cables.
". . .The most important thing is to know why you build and then get the most that you can out of building." via D.D.
Västra Götaland, Sweden
Joined: February 19, 2010
KitMaker: 1,473 posts
AeroScale: 1,450 posts
Posted: Friday, October 15, 2010 - 12:33 AM UTC
Great update Stephen your interior is looking real sharp!
Looking forward to the next update.
Best Regards
Mikael
_________________________________________________________
Just finished the Wingnut Wings Taube. On to the Junkers D.1
Arizona, United States
Joined: December 12, 2008
KitMaker: 1,423 posts
AeroScale: 1,319 posts
Posted: Friday, October 15, 2010 - 01:40 AM UTC

Looking good with good progress Stephen. Only 27 days until 11 November.
Best
Mark
We few, we happy few........
Colorado, United States
Joined: January 25, 2004
KitMaker: 11,669 posts
AeroScale: 11,011 posts
Posted: Friday, October 15, 2010 - 03:11 PM UTC
Next I'll finish the gauge faces and a couple of cockpit detail items. Then the engine details and a closing of the fuselage. I am looking at some hinge details for the cowling.
". . .The most important thing is to know why you build and then get the most that you can out of building." via D.D.
Colorado, United States
Joined: January 25, 2004
KitMaker: 11,669 posts
AeroScale: 11,011 posts
Posted: Sunday, October 17, 2010 - 01:14 PM UTC
Greetings all,
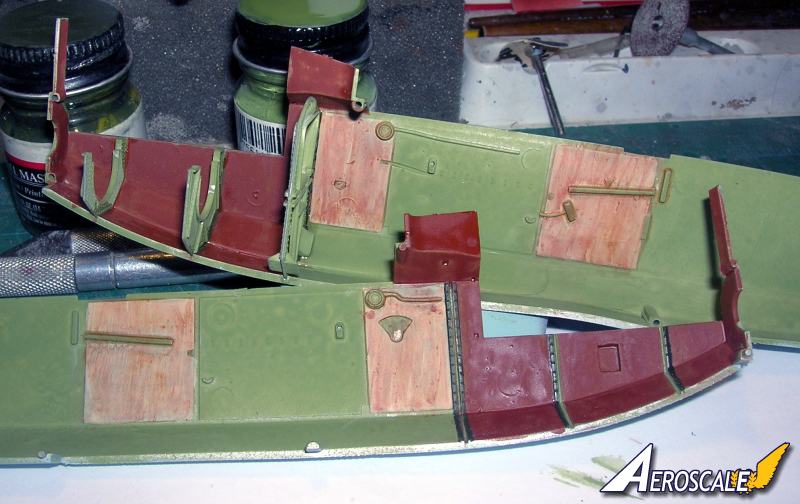
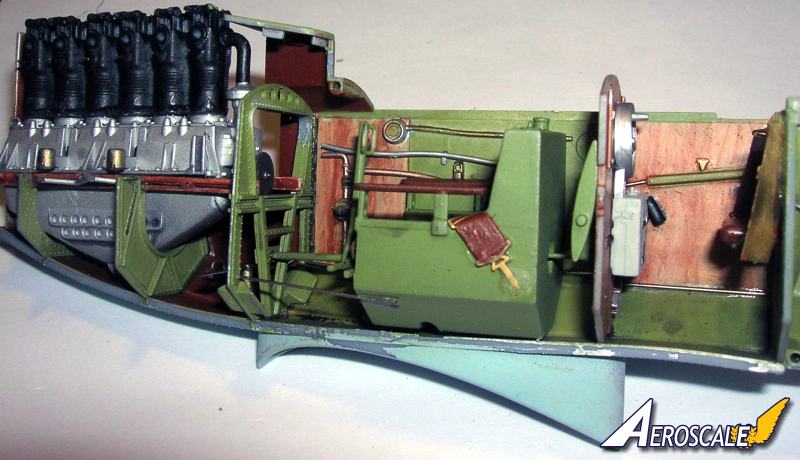
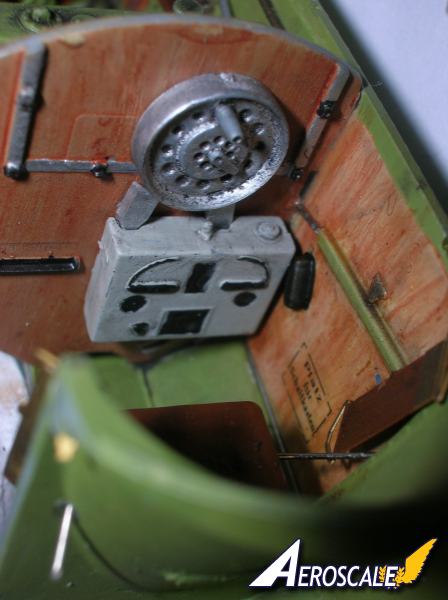
While in the area lets take a look at the wireless radio / transmitter - receiver. WNW provides 3 parts for this unit. The antenna reel, radio and a pluggin station (molded to the fuselage side wall.
The Company "telefunken" was the powerhouse in WWI that provided many radios "The very first Telefunken customers were the German Army and the Imperial Navy. Telefunken was proud to deliver the first two transmitters for the new coastal radio station, Norddeich Radio, in November 1905. In October 1906, the expansion of a much larger Nauen station was completed with a range of 300 km and HF output of 10 kW. Welcome to the power of Telefunken. "
When a dispute concerning patents arose between the two companies, Kaiser Wilhelm II decided that the two companies were to be joined, creating on 27 May 1903 the company Gesellschaft für drahtlose Telegraphie System Telefunken ("The Company for Wireless Telegraphy Ltd."), and the disputed patents and techniques were invested in it. The name "Transradio" dates back to 1918, when Transradio was founded as a subsidiary of Telefunken.
The type of transradio that WNW has provided appears to be a Siemans Halske.
". . .The most important thing is to know why you build and then get the most that you can out of building." via D.D.
Colorado, United States
Joined: January 25, 2004
KitMaker: 11,669 posts
AeroScale: 11,011 posts
Posted: Tuesday, October 19, 2010 - 11:09 AM UTC
Here is the propeller in its early progressions.

". . .The most important thing is to know why you build and then get the most that you can out of building." via D.D.
Colorado, United States
Joined: January 25, 2004
KitMaker: 11,669 posts
AeroScale: 11,011 posts
Posted: Tuesday, October 19, 2010 - 11:15 AM UTC
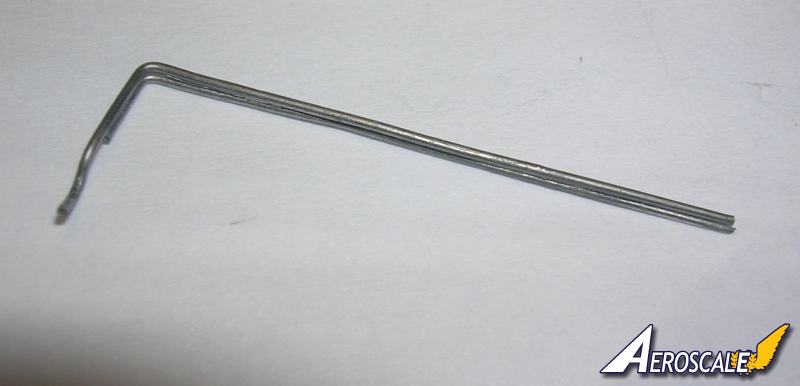
Small gauge solder comes in handy for representing additional electrical lines.
". . .The most important thing is to know why you build and then get the most that you can out of building." via D.D.
Colorado, United States
Joined: January 25, 2004
KitMaker: 11,669 posts
AeroScale: 11,011 posts
Posted: Tuesday, October 19, 2010 - 11:18 AM UTC
". . .The most important thing is to know why you build and then get the most that you can out of building." via D.D.